(Perl: Lesson 11)
{ Policy Part 4: Parsing /etc/passwd }
| Section 0. Background Information |
- What is /etc/passwd file?
- /etc/passwd file stores essential information, which is required during login i.e. user account information. /etc/passwd is a text file, that contains a list of the system's accounts, giving for each account some useful information like user ID, group ID, home directory, shell, etc. It should have general read permission as many utilities, like ls used it to map user IDs to user names, but write access only for the superuser (root).
- Username: It is used when user logs in. It should be between 1 and 32 characters in length.
- Password: An x character indicates that encrypted password is stored in /etc/shadow file.
- User ID (UID): Each user must be assigned a user ID (UID). UID 0 (zero) is reserved for root and UIDs 1-99 are reserved for other predefined accounts. Further UID 100-999 are reserved by system for administrative and system accounts/groups.
- Group ID (GID): The primary group ID (stored in /etc/group file)
- User ID Info: The comment field. It allow you to add extra information about the users such as user's full name, phone number etc. This field use by finger command.
- Home directory: The absolute path to the directory the user will be in when they log in. If this directory does not exists then users directory becomes /
- Command/shell: The absolute path of a command or shell (/bin/bash). Typically, this is a shell. Please note that it does not have to be a shell.
- Getting Perl
- For the purposes of these perl lesson, I will be using a perl package that comes standard on Backtrack, Ubuntu and most flavors of Linux and Unix.
- However, if you are using Windows, instead
of a Linux, Unix or MAC operating system, you still have options.
- Pre-Requisite
-
Lab
Notes
- In this lab we will do the following:
- We will download a basic perl program that parses out each element of the /etc/passwd file
- The program will provide extraction examples using split.
- In this lab we will do the following:
- Legal Disclaimer
- As a condition of your use of this Web site, you warrant to computersecuritystudent.com that you will not use this Web site for any purpose that is unlawful or that is prohibited by these terms, conditions, and notices.
- In accordance with UCC § 2-316, this product is provided with "no warranties, either express or implied." The information contained is provided "as-is", with "no guarantee of merchantability."
- In addition, this is a teaching website that does not condone malicious behavior of any kind.
- You are on notice, that continuing and/or using this lab outside your "own" test environment is considered malicious and is against the law.
- © 2013 No content replication of any kind is allowed without express written permission.
| Section 1: Login to BackTrack |
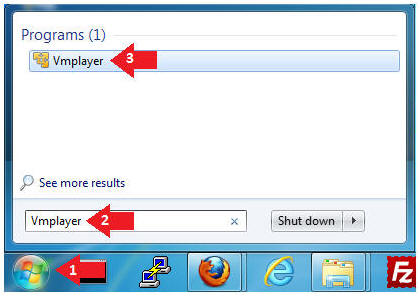
- Start Up VMWare Player
- Instructions:
- Click the Start Button
- Type Vmplayer in the search box
- Click on Vmplayer
-
- Instructions:
- Open a Virtual Machine
- Instructions:
- Click on Open a Virtual Machine
-

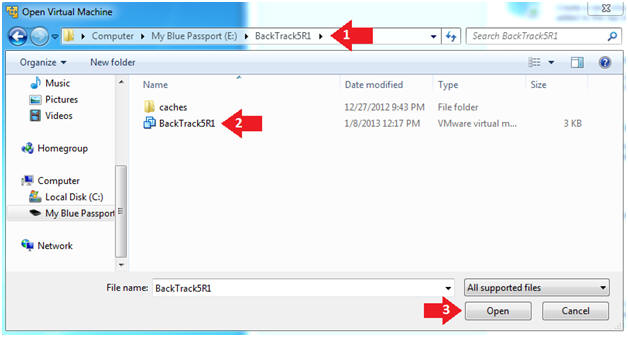
- Instructions:
- Open the BackTrack5R1 VM
- Instructions:
- Navigate to where the BackTrack5R1 VM is located
- Click on on the BackTrack5R1 VM
- Click on the Open Button
-
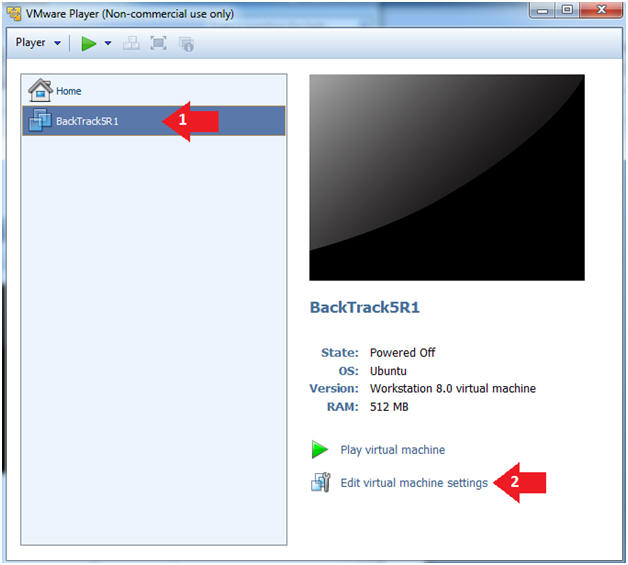
- Instructions:
- Edit the BackTrack5R1 VM
- Instructions:
- Select BackTrack5R1 VM
- Click Edit virtual machine settings
-
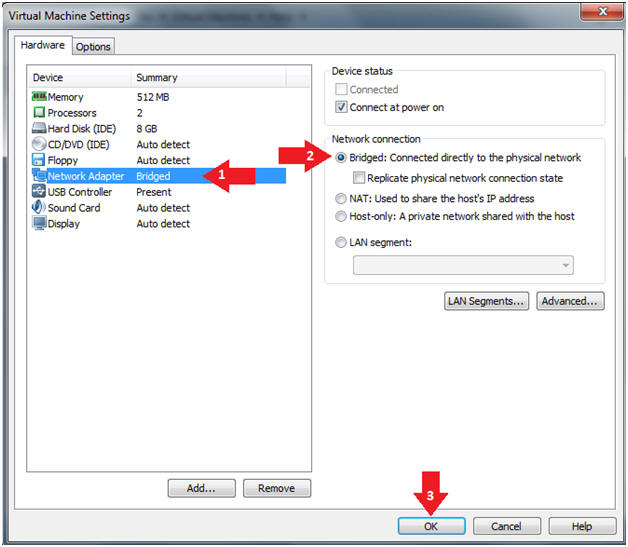
- Instructions:
- Edit Virtual Machine Settings
- Instructions:
- Click on Network Adapter
- Click on the Bridged Radio button
- Click on the OK Button
- Instructions:
- Play the BackTrack5R1 VM
- Instructions:
- Click on the BackTrack5R1 VM
- Click on Play virtual machine
-

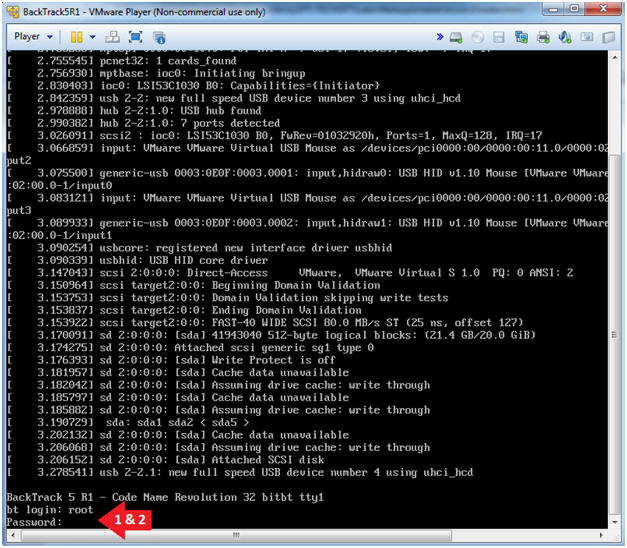
- Instructions:
- Login to BackTrack
- Instructions:
- Login: root
- Password: toor or <whatever you changed it to>.
-
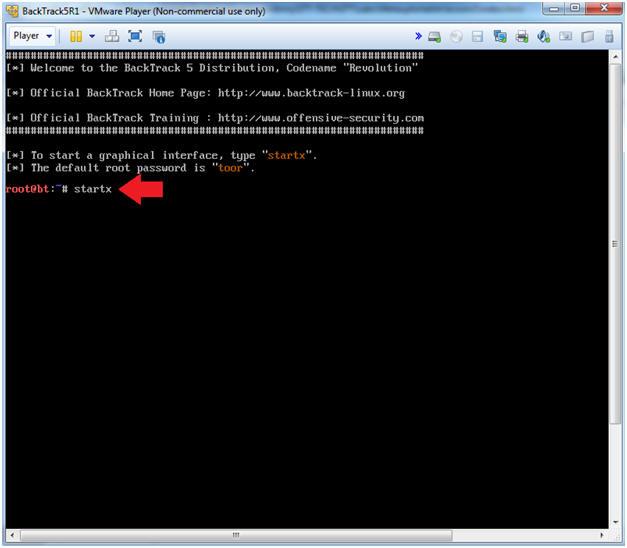
- Instructions:
- Bring up the GNOME
- Instructions:
- Type startx
-
- Instructions:
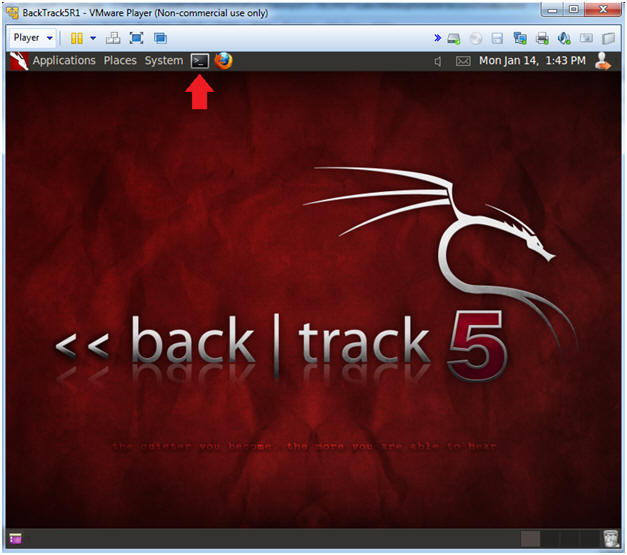
| Section 2: Bring up a console terminal |
- Start up a terminal window
- Instructions:
- Click on the Terminal Window
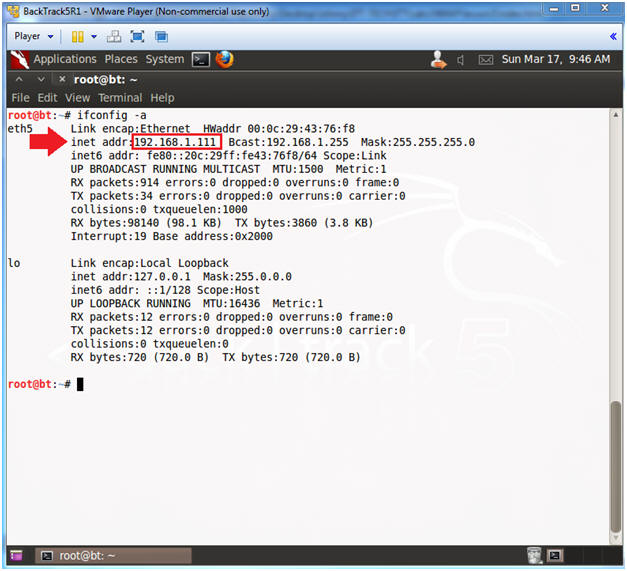
- Instructions:
- Obtain the IP Address
- Instructions:
- ifconfig -a
- Note(FYI):
- My IP address 192.168.1.111.
- In your case, it will probably be different.
-
- Instructions:
| Section 3: Download scan_passwd.pl |
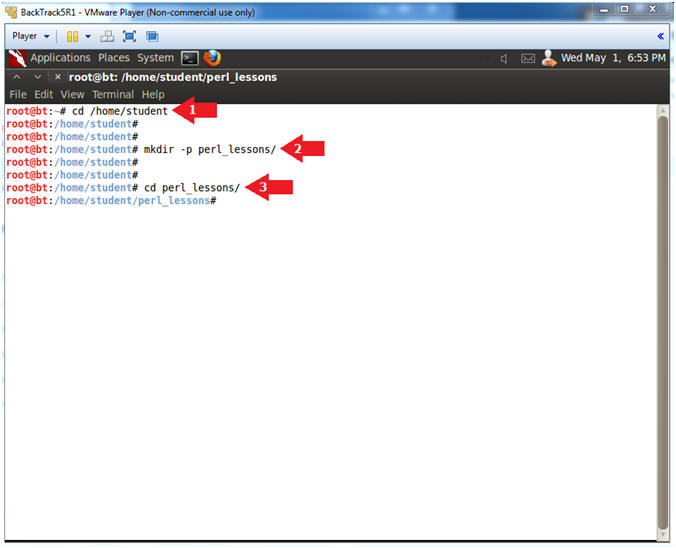
- Make a student directory
- Instructions:
- cd /home/student
- mkdir -p perl_lessons/
- cd perl_lessons/
- Instructions:
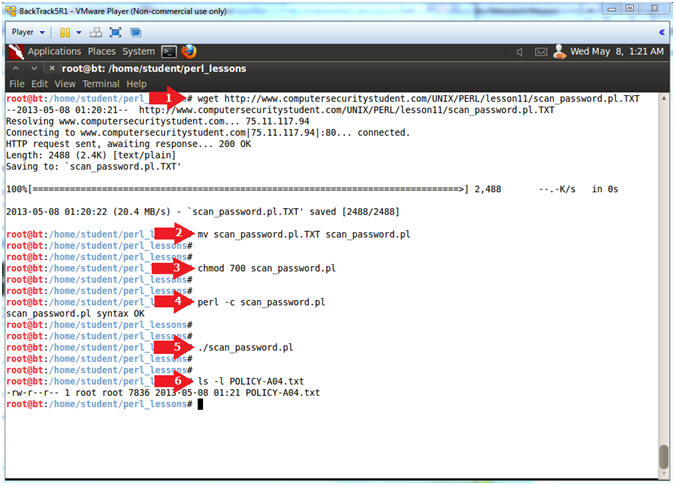
- Download scan_passwd.pl
- Instructions:
- wget http://www.computersecuritystudent.com/UNIX/PERL/lesson11/scan_password.pl.TXT
- mv scan_password.pl.TXT scan_password.pl
- chmod 700 scan_password.pl
- perl -c scan_password.pl
- ./scan_password.pl
- ls -l POLICY-A04.txt
- Instructions:
| Section 4: Analyze The Code |
- SheBang Directive
- Instructions:
- vi scan_password.pl
- :set nu
- Press the <Enter> key
- Note(FYI):
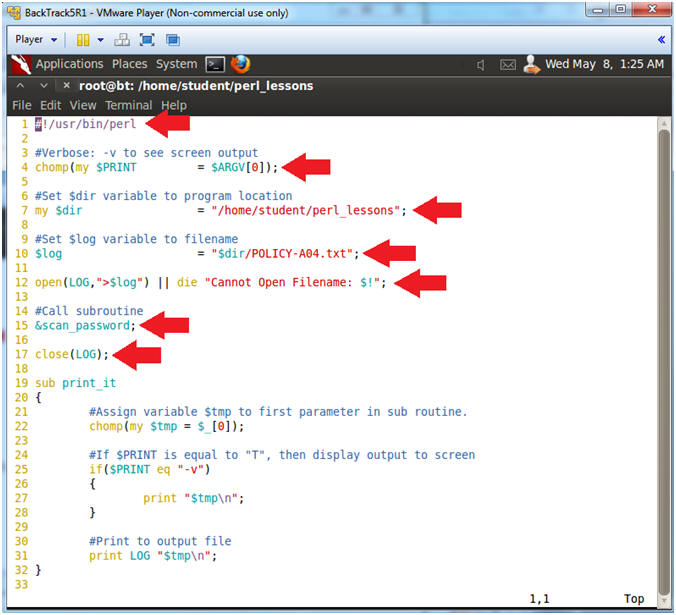
- Line 1: #!/usr/bin/perl
- #! - is called the SheBang Directive. SheBang is an interpreter directive that tells Linux to load the following program.
- /usr/bin/perl - is the Perl Interpreter. SheBang tells the program loader to run the Perl Interpreter.
- Line 4: chomp(my $PRINT = $ARGV[0]);
- $ARGV is a special perl array to receive command line arguments.
- $PRINT will be used to tell the program to output data to the screen.
- Line 7: my $dir = "/home/student/perl_lessons";
- Set the $dir variable to the directory location of the program.
- Line 10: $log = "$dir/POLICY-A04.txt";
- Set the $log variable to the output file name.
- Line 12: open(LOG,">$log") || die
"Cannot Open Filename: $!";
- Open the log file POLICY-A04.txt. LOG is the filehandle name. The greater than operator (>) mean to write to output.
- Line 15: &scan_password;
- Execute the subroutine scan_password.
- Line 17: close(LOG);
- Close the filehandle LOG, which is log file POLICY-A04.txt.
- Line 1: #!/usr/bin/perl
- Instructions:
- Explaining Lines 19 through 32
- Instructions:
- Arrow down to line 19
- Note(FYI):
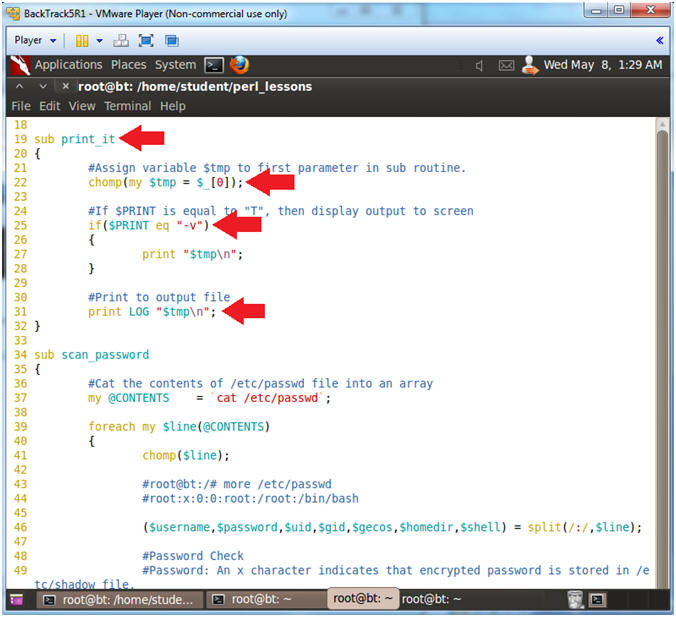
- Line 19 through 32: sub print_it
- This subroutine has two actions: (1) Print to Output (line 31), and (2) Print to Screen (Lines 25 to 28).
- Line 22: chomp(my $tmp = $_[0]);
- Assign variable $tmp to first parameter.
- Line 25 - 28: if($PRINT eq "-v")
- If $PRINT is equal to -v, then print output to screen.
- Line 31: print LOG "$tmp\n";
- Print output to the filehandle LOG, which means print to the output file POLICY-A04.txt.
- Line 19 through 32: sub print_it
- Instructions:
- Explaining Lines 34 through 37
- Instructions:
- Arrow down to line 34
- Note(FYI):
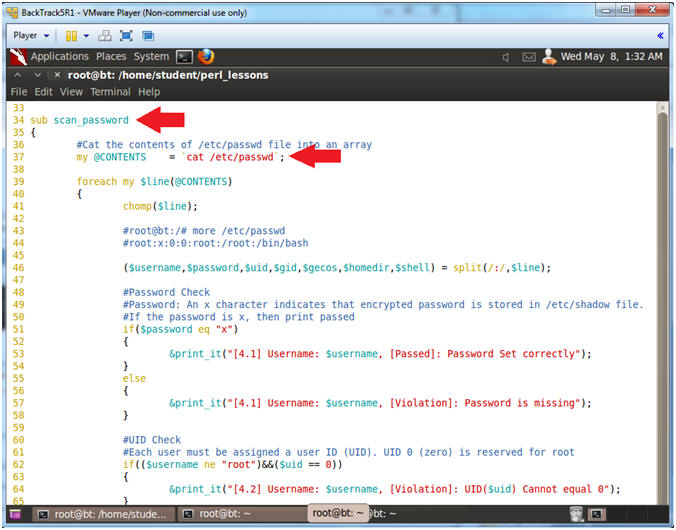
- Line 34: sub scan_password
- The scan_password subroutine scans the /etc/passwd file.
- Line 37: my @CONTENTS = `cat /etc/passwd`;
- This cats the contents of the /etc/passwd file into an array.
- Line 34: sub scan_password
- Instructions:
- Explaining Lines 39 through 46
- Instructions:
- Arrow down to line 39
- Note(FYI):
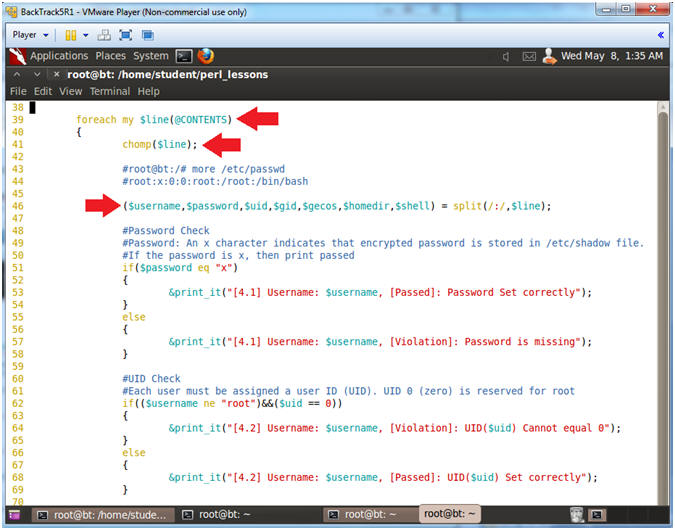
- Line 39: foreach my $line (@CONTENTS)
- This is a foreach loop. We will go through the array @CONTENTS line by line. Remember the @CONTENTS array contains the /etc/login.defs file.
- Line 41: chomp($line);
- Perl has a built in function called chomp that removes any end of line characters.
- Line 46:
($username,$password,$uid,$gid,$gecos,$homedir,$shell)
= split(/:/,$line);
- Perl's split is used to extract each element between the colon(:) delimiter from the /etc/passwd file.
- Line 39: foreach my $line (@CONTENTS)
- Instructions:
- Explaining Lines 51 through 58
- Instructions:
- Arrow down to line 51
- Note(FYI):
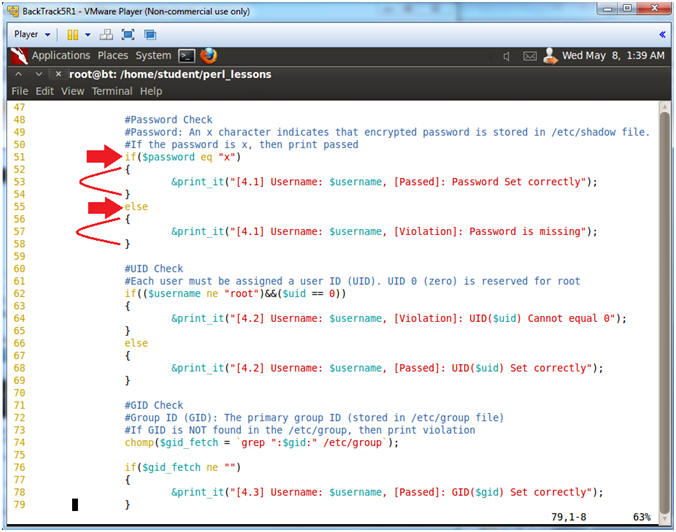
- #Password: An x character indicates that encrypted password is stored in /etc/shadow file. If the password is x, then print passed
- Line 51: if($password eq "x")
- If password is equal to "x", then Password Set Correctly.
- Line 55: else
- If password is not encrypted, then print a violation.
- Instructions:
- Explaining Lines 62 through 69
- Instructions:
- Arrow down to line 62
- Note(FYI):
- User ID (UID): Each user must be assigned a user ID (UID). UID 0 (zero) is reserved for root.
- Line 62-65: if(($username ne
"root")&&($uid == 0))
- If the user is not root and has a UID of 0, then print violation.
- Line 66-69: else
- All other circumstances, print UID Set correctly.

- Instructions:
- Explaining Lines 74 through 83
- Instructions:
- Arrow down to line 74
- Note(FYI):
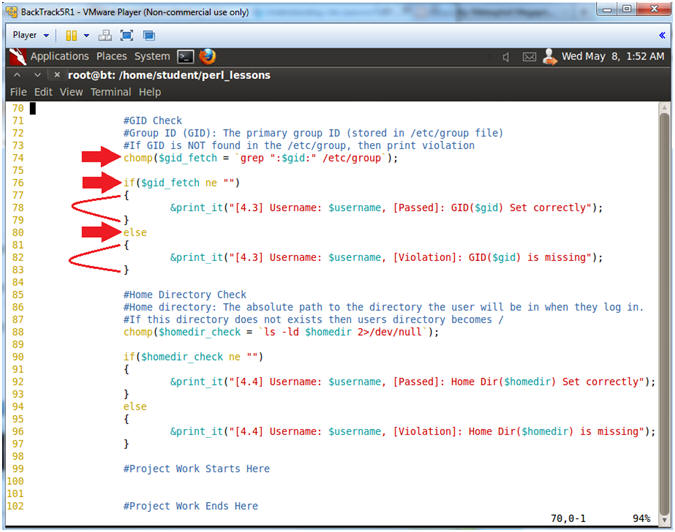
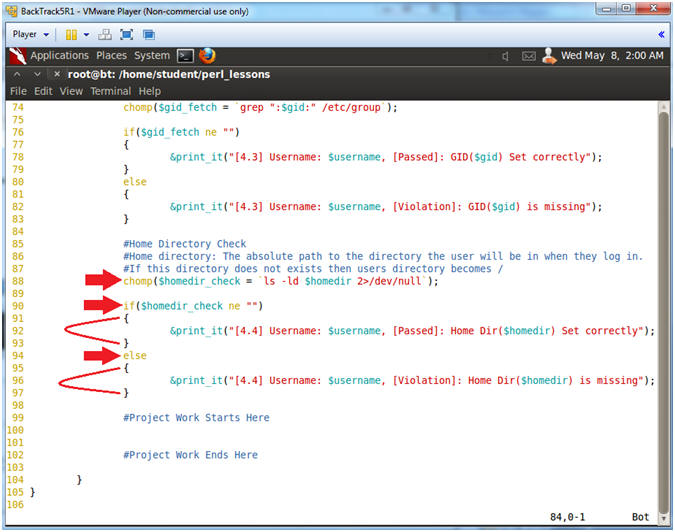
- #Group ID (GID): The primary group ID (stored in /etc/group file). If GID is NOT found in the /etc/group, then print violation
- chomp($gid_fetch = `grep ":$gid:"
/etc/group`);
- Foreach line search the /etc/group for file the username's GUI.
- Line 76-79: if($gid_fetch ne "")
- If the GID is found in the /etc/group file, then print the check passed.
- Line 80-83: else
- If the GID is NOT found in teh /etc/group file, the print violation.
- Instructions:
- Explaining Lines 88 through 97
- Instructions:
- Arrow down to line 88
- Note(FYI):
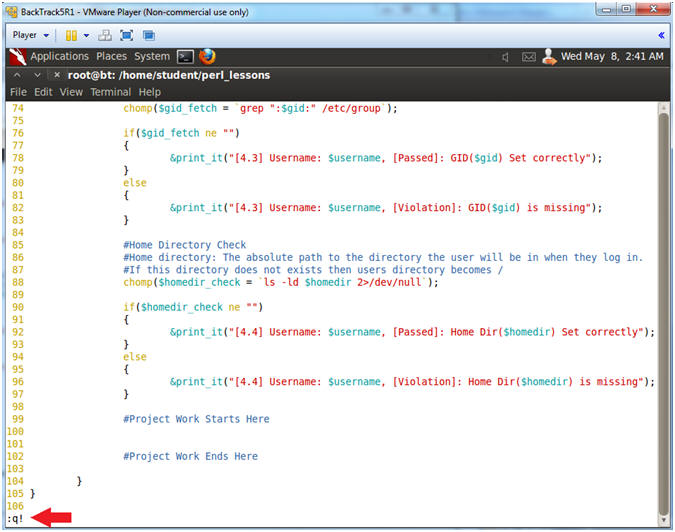
- #Home directory: The absolute path to the directory the user will be in when they log in. #If this directory does not exists then users directory becomes /
- Line 88: chomp($homedir_check = `ls -ld
$homedir 2>/dev/null`);
- Foreach line determine if the home directory actually exists.
- ls -ld $homedir = list the directory if it exists.
- 2>/dev/null = If directory does not exist, then shoot the output into a black hole (a.k.a., /dev/null).
- Line 90-93: if($homedir_check ne "")
- If the home directory exist, then print the home directory is set correctly.
- Line 94-97: else
- If the home directory does NOT exist, the print a violation.
- Instructions:
- Save and Quit
- Instructions:
- Press the <Esc> key
- :q!
- Press the <Enter> key
- Instructions:
| Section 5: Proof of Lab |
- Project
- Instructions:
- cp scan_password.pl scan_password.BKP
- Your project is to write nested if-clause that interrogate usernames without a home directory that does not have their shell set to nologin or false.
- vi scan_password.pl
- After the line that contains "#Project
Work Starts Here", place the below code.
-
#Shell Check
#Command/shell: The absolute path of a command or shell (/bin/bash). Typically, this is a shell.
#If no home directory, then shell should be set to false or nologin

if($homedir_check eq "")
{
	if($shell =~ m/nologin|false/i)
	{
		&print_it("[4.5] Username: $username, [Passed]: Shell($shell) Set correctly");
	}
	else
	{
		&print_it("[4.5] Username: $username, [Violation]: Shell($shell) Not Set Correctly");
	}
}
else
{
	&print_it("[4.5] Username: $username, [Passed]: Shell($shell) Set correctly");
}

#Project Work Ends Here
-
- Press <Esc>
- :wq!
- Instructions:
- Proof of Lab
- Instructions
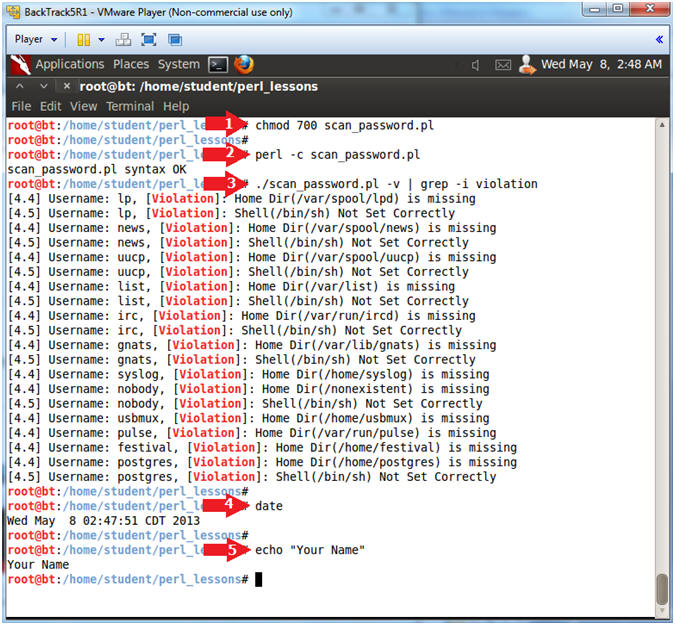
- chmod 700 scan_password.pl
- perl -c scan_password.pl
- ./scan_password.pl -v | grep -i violation
- date
- echo "Your Name"
- Put in your actual name in place of "Your Name"
- e.g., echo "John Gray"
-
Proof Of Lab
Instructions:
- Press the <Ctrl><Alt> keys simultaneously
- Press the <PrtScn> key
- Paste into a word document
- Upload to Moodle
- Instructions