(NMAP: Lesson 4)
{ Create an Inventory File with nmap }
| Section 0. Background Information |
- What is NMAP
- Nmap (Network Mapper) is a security scanner used to discover hosts and services on a computer network, thus creating a "map" of the network. To accomplish its goal, Nmap sends specially crafted packets to the target host and then analyzes the responses. Unlike many simple port scanners that just send packets at some predefined constant rate, Nmap accounts for the network conditions (latency fluctuations, network congestion, the target interference with the scan) during the run.
- Why Create an Inventory List?
- One of the first stages of a Risk Assessment is to know what devices are on your network. This lab will demonstrate how to create a very basic inventory list that can be later used to assess criticality and vulnerability.
- Pre-Requisite
-
Lab Notes
- In this lab we will do the following:
- We will conduct a NMAP network scan using operating system detection.
- We will use a perl program to parse the nmap results and create an inventory list.
- In this lab we will do the following:
- Legal Disclaimer
- As a condition of your use of this Web site, you warrant to computersecuritystudent.com that you will not use this Web site for any purpose that is unlawful or that is prohibited by these terms, conditions, and notices.
- In accordance with UCC § 2-316, this product is provided with "no warranties, either express or implied." The information contained is provided "as-is", with "no guarantee of merchantability."
- In addition, this is a teaching website that does not condone malicious behavior of any kind.
- Your are on notice, that continuing and/or using this lab outside your "own" test environment is considered malicious and is against the law.
- © 2013 No content replication of any kind is allowed without express written permission.
| Section 1: Login to BackTrack |
- Start Up VMWare Player
- Instructions:
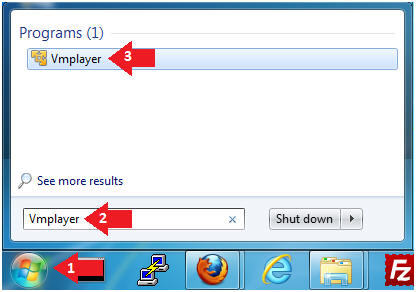
- Click the Start Button
- Type Vmplayer in the search box
- Click on Vmplayer
- Instructions:
- Open a Virtual Machine
- Instructions:
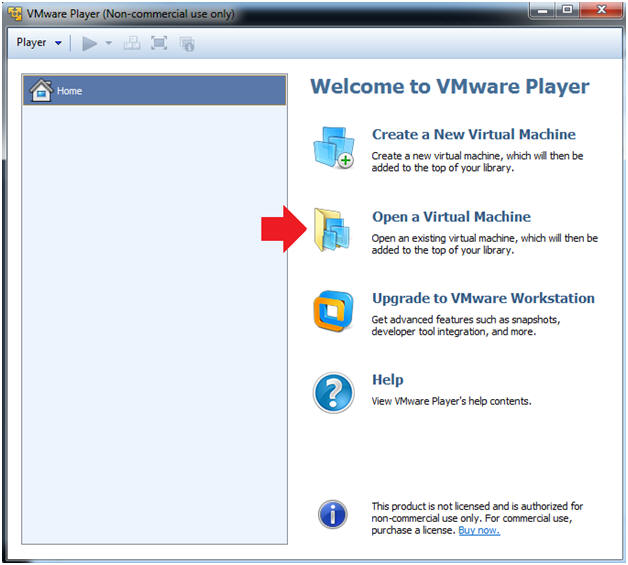
- Click on Open a Virtual Machine
- Instructions:
- Open the BackTrack5R1 VM
- Instructions:
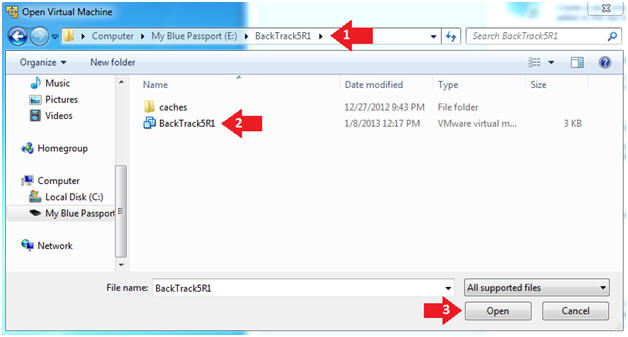
- Navigate to where the BackTrack5R1 VM is located
- Click on on the BackTrack5R1 VM
- Click on the Open Button
- Instructions:
- Edit the BackTrack5R1 VM
- Instructions:
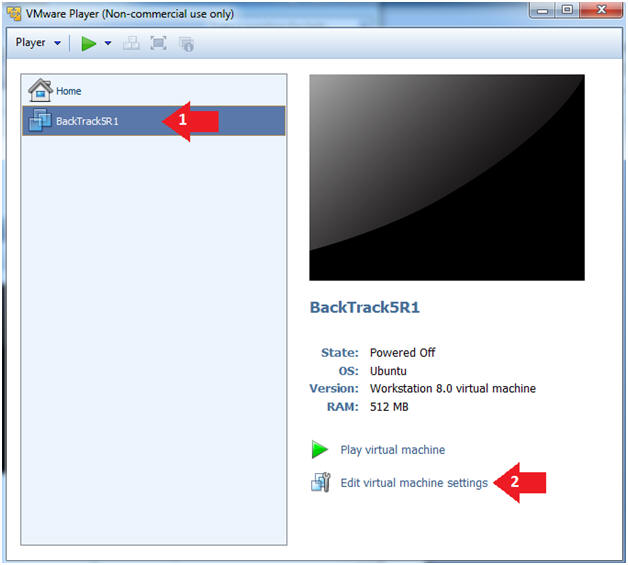
- Select BackTrack5R1 VM
- Click Edit virtual machine settings
- Instructions:
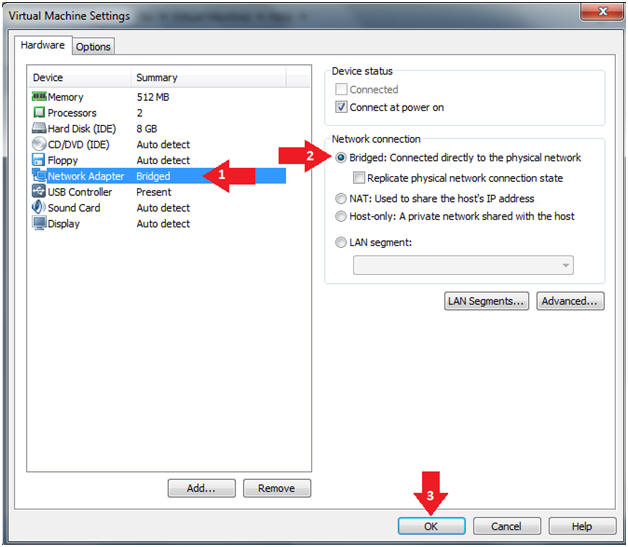
- Edit Virtual Machine Settings
- Instructions:
- Click on Network Adapter
- Click on the Bridged Radio button
- Click on the OK Button
- Instructions:
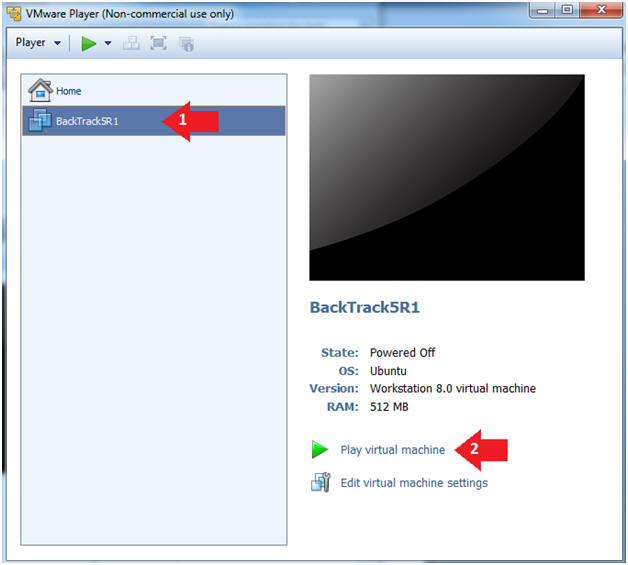
- Play the BackTrack5R1 VM
- Instructions:
- Click on the BackTrack5R1 VM
- Click on Play virtual machine
- Instructions:
| Section 2: Login to BackTrack |
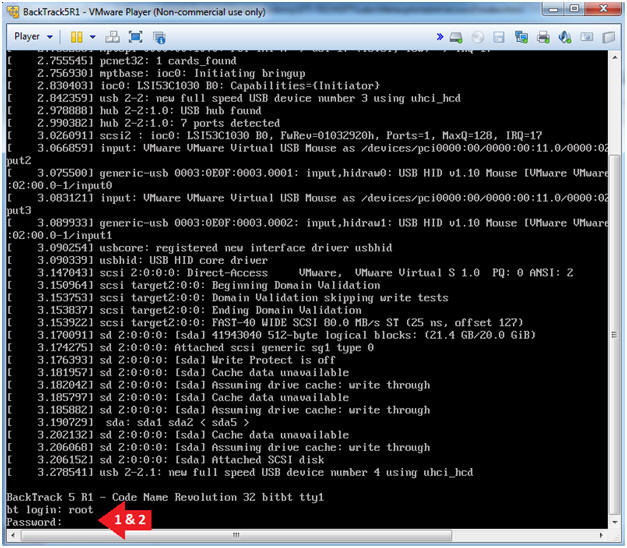
- Login to BackTrack
- Instructions:
- Login: root
- Password: toor or <whatever you changed it to>.
- Instructions:
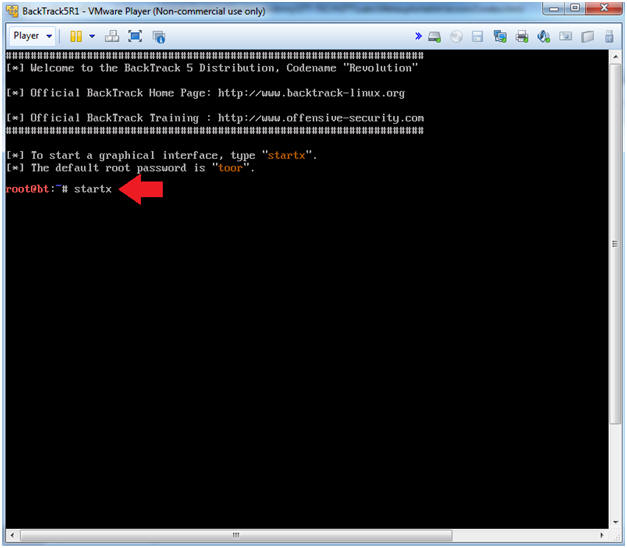
- Bring up the GNOME
- Instructions:
- Type startx
- Instructions:
| Section 3: Bring up a console terminal |
- Start up a terminal window
- Instructions:
- Click on the Terminal Window
- Instructions:
- Obtain the IP Address
- Instructions:
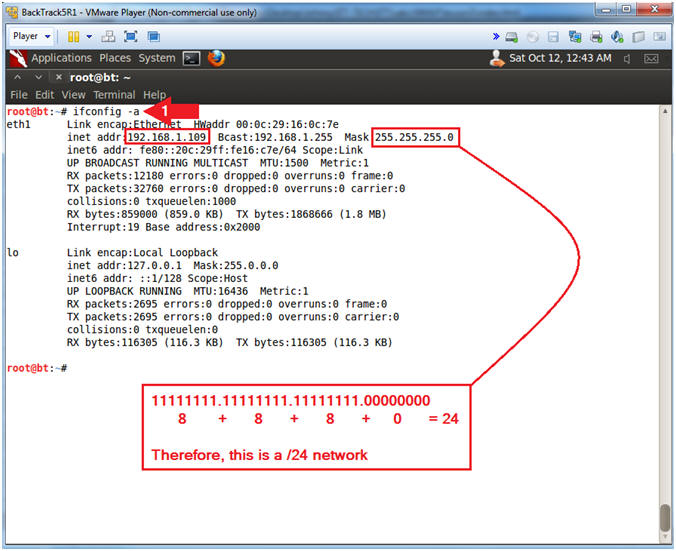
- ifconfig -a
- Note(FYI):
- My IP address 192.168.1.109.
- In your case, it will probably be different.
- Notice my mask is 255.255.255.0, which is a /24 network.
- Instructions:
| Section 4: Create NMAP Data File |
- Create NMAP Data File
- Instructions:
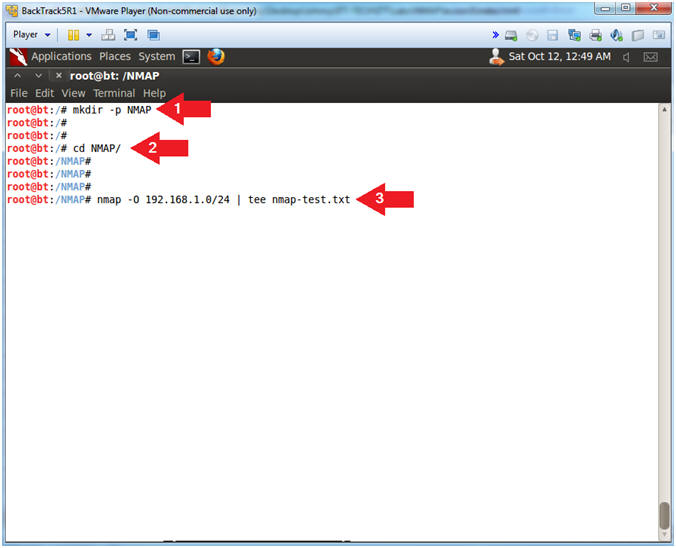
- mkdir -p NMAP
- cd NMAP/
- nmap -O
192.168.1.0/24
| tee nmap-test.txt
- Replace the first three octets 192.168.1 with the first three octets of your IP Address obtain in (Section 3, Step 2).
- Replace /24, with your network mask also obtain in (Section 3, Step 2).
- Note(FYI):
- Make Directory called NMAP.
- Change Directory to NMAP
- Scan the entire 192.168.1.0 network using operating system detection.
- Instructions:
- Verify NMAP Data File
- Instructions:
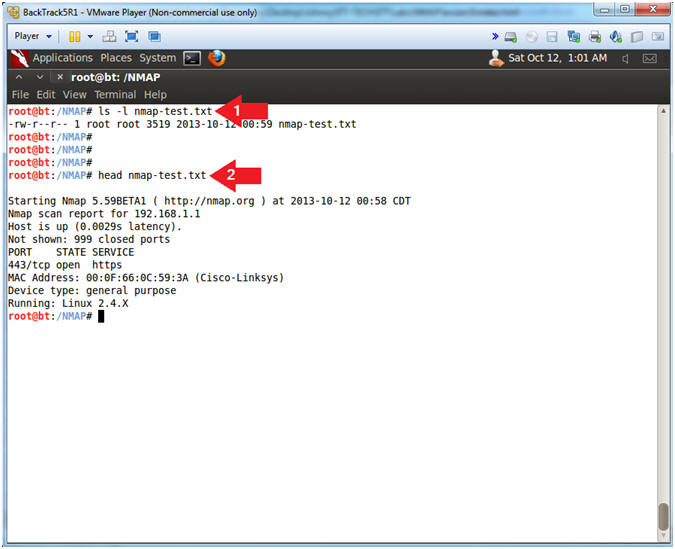
- ls -l nmap-test.txt
- head nmap-test.txt
- Note(FYI):
- Long List file nmap-test.txt
- Show the first 10 lines of nmap-test.txt
- Instructions:
| Section 5: Download the NMAP Parser |
- Download NMAP Parser
- Instructions:
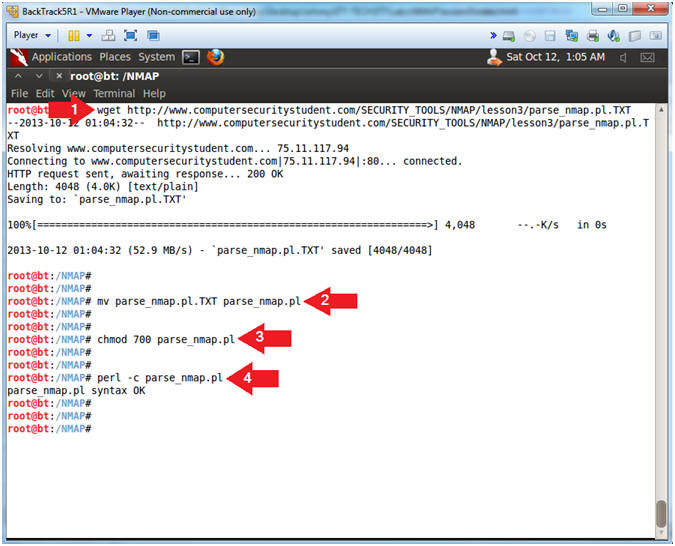
- wget http://www.computersecuritystudent.com/SECURITY_TOOLS/NMAP/lesson3/parse_nmap.pl.TXT
- mv parse_nmap.pl.TXT parse_nmap.pl
- chmod 700 parse_nmap.pl
- perl -c parse_nmap.pl
- Note(FYI):
- Wget is a free utility for non-interactive download of files from the Web
- Rename File from parse_nmap.pl.TXT to parse_nmap.pl
- Change the file permissions to where only the root user has read, write and execute permission.
- Check the syntax of the perl program
- Instructions:
| Section 5: Generate Inventory List using nmap_parser.pl |
- Generate Inventory List (Non-Verbose Mode)
- Instructions:
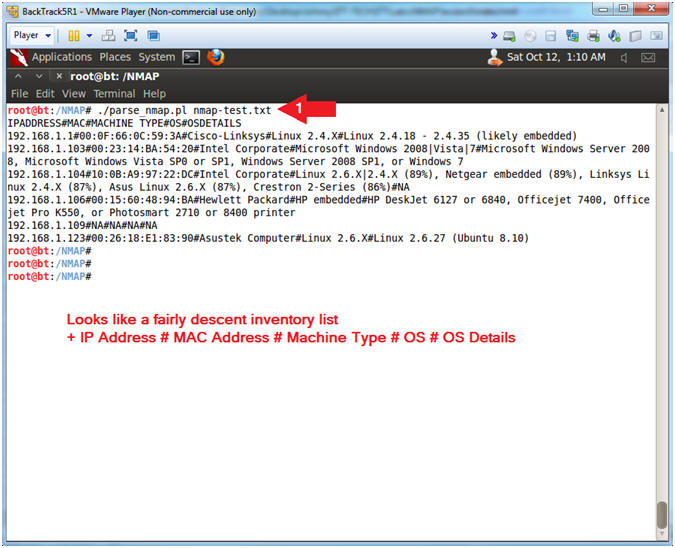
- ./parse_nmap.pl nmap-test.txt
- Note(FYI):
- Supply the perl program (parse_nmap.pl) with the nmap file (nmap-test.txt) you created.
- Instructions:
- Generate Inventory List (Verbose Mode)
- Instructions:
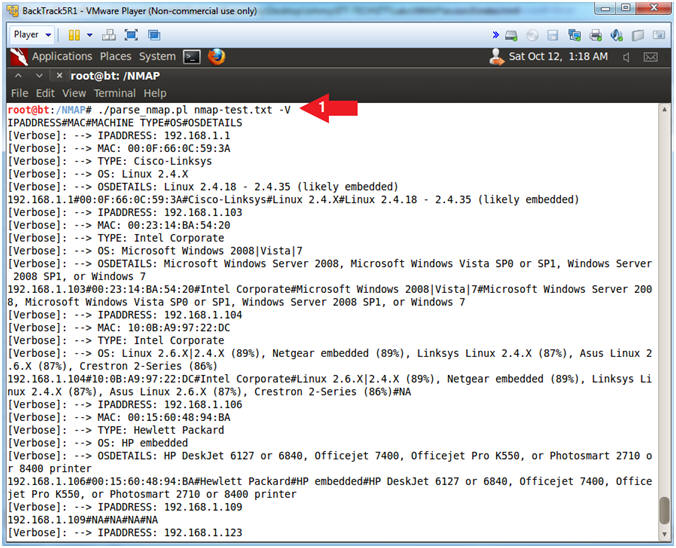
- ./parse_nmap.pl nmap-test.txt -V
- Note(FYI):
- Supply the perl program (parse_nmap.pl) with the nmap file (nmap-test.txt) you created and the verbose option (-V).
- Instructions:
- View Output File
- Instructions:
- ls -l nmap-output.txt
- more nmap-output.txt
- Notes(FYI):
- Long list the nmap-output.txt file.
- More is a filter for paging through text one screenful at a time.

- Instructions:
| Section 6: Proof of Lab |
- Proof of Lab
- Instructions
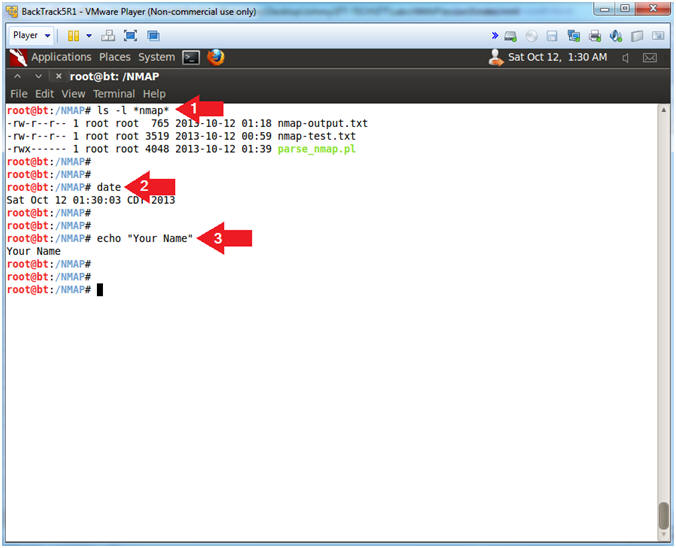
- ls -l *nmap*
- date
- echo "Your Name"
- Put in your actual name in place of "Your Name"
- e.g., echo "John Gray"
-
Proof Of Lab Instructions:
- Press the <Ctrl> and <Alt> keys
- Press the <PrtScn> key
- Paste into a word document
- Upload to Moodle
- Instructions