(Password Cracking: Lesson 2)
{ Using Kali, bkhive, samdump2, and John to crack the SAM Database }
| Section 0. Background Information |
- What is the SAM Database?
- The SAM database is the Security Accounts Manager database, used by Windows that manages user accounts and other things. It is implemented as a registry file that is locked for exclusive use while the OS is running.
- What is Kali?
- Kali Linux is an advanced Penetration Testing and Security Auditing Linux distribution.
- Kali is a complete re-build of BackTrack
Linux, adhering completely to Debian development standards, which
contains for the following features:
- More than 300 penetration testing tools
- Vast wireless device support
- Custom kernel patched for injection
- Secure development environment
- What is bkhive?
- bkhive dumps the syskey bootkey from Windows NT/2K/XP/Vista system hive.
- What is
samdump2?
- samdump2 dumps the Windows NT/2K/XP/Vista password hashes.
- What is John
the Ripper?
- John the Ripper is a free password cracking software tool. Initially developed for the Unix operating system, it now runs on fifteen different platforms (eleven of which are architecture-specific versions of Unix, DOS, Win32, BeOS, and OpenVMS). It is one of the most popular password testing and breaking programs as it combines a number of password crackers into one package, autodetects password hash types, and includes a customizable cracker. It can be run against various encrypted password formats including several crypt password hash types most commonly found on various Unix versions (based on DES, MD5, or Blowfish), Kerberos AFS, and Windows NT/2000/XP/2003 LM hash. Additional modules have extended its ability to include MD4-based password hashes and passwords stored in LDAP, MySQL, and others.
-
Lab Notes
- In this lab we will do the following:
- We will boot Windows into Kali.
- We will use Kali to mount the Windows Disk Partition that contains the SAM Database.
- We will use bkhive and samdump2 to extract password hashes for each user.
- We will use John the Ripper to crack the administrator password.
- In this lab we will do the following:
- Legal Disclaimer
- As a condition of your use of this Web site, you warrant to computersecuritystudent.com that you will not use this Web site for any purpose that is unlawful or that is prohibited by these terms, conditions, and notices.
- In accordance with UCC § 2-316, this product is provided with "no warranties, either express or implied." The information contained is provided "as-is", with "no guarantee of merchantability."
- In addition, this is a teaching website that does not condone malicious behavior of any kind.
- Your are on notice, that continuing and/or using this lab outside your "own" test environment is considered malicious and is against the law.
- © 2013 No content replication of any kind is allowed without express written permission.
| Section 1. Log into Damn Vulnerable WXP-SP2 |
- Start Up Damn Vulnerable WXP-SP2.
- Instructions:
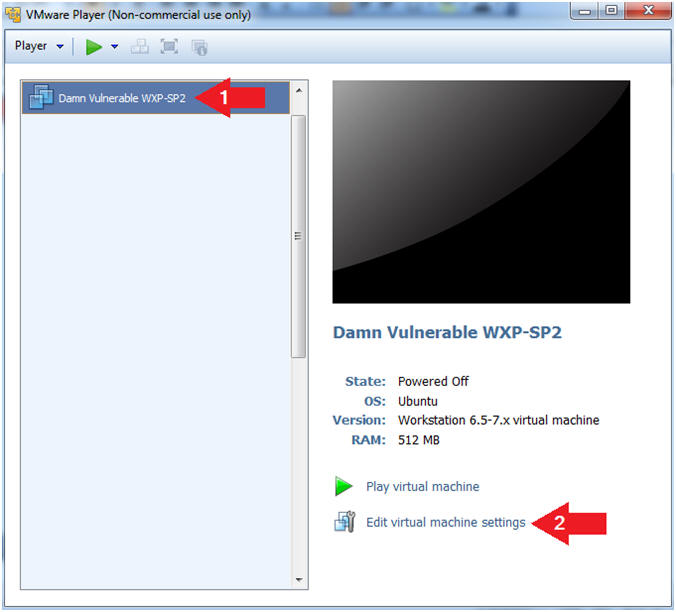
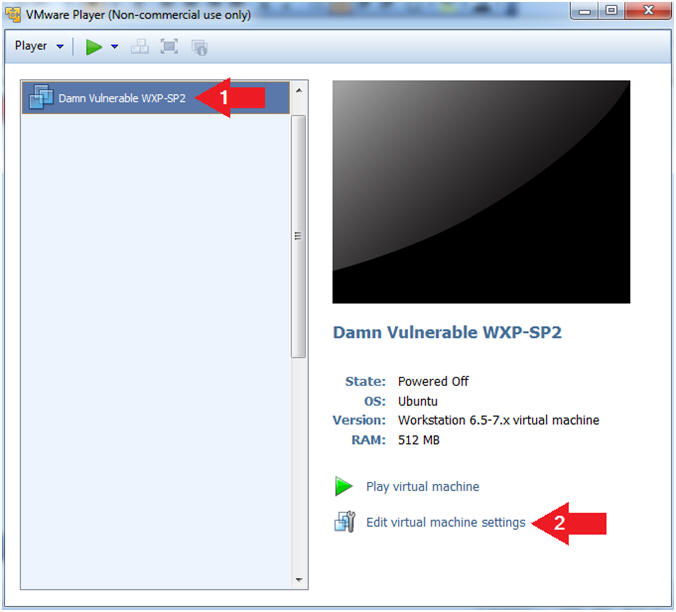
- Click on Damn Vulnerable WXP-SP2
- Click on Edit virtual machine Settings
- Note(FYI):
- For those of you not part of my class, this is a Windows XP machine running SP2.
- Instructions:
- Edit Virtual Machine Settings
- Instructions:
- Click on Network Adapter
- Click on the Bridged Radio button
- Click on the OK Button

- Instructions:
- Play Virtual Machine
- Instructions:
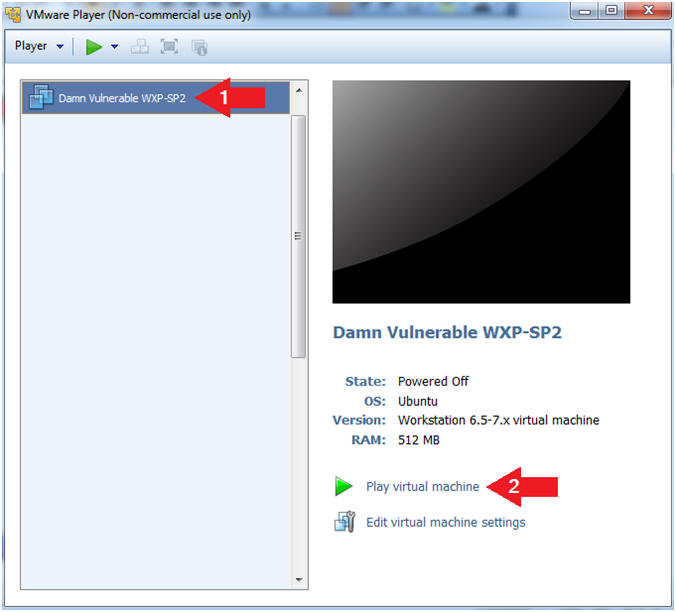
- Click on Damn Vulnerable WXP-SP2
- Click on Play virtual machine
- Instructions:
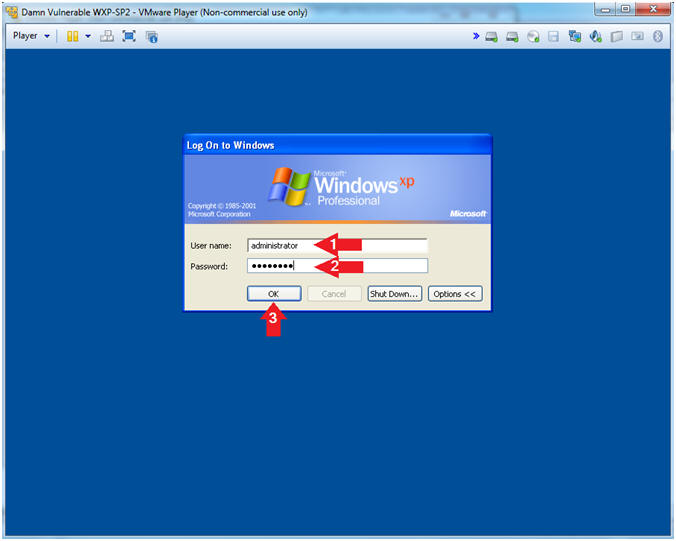
- Logging into Damn Vulnerable WXP-SP2.
- Instructions:
- Username: administrator
- Password: Use the Class Password or whatever you set it.
- Click the OK Button
- Instructions:
| Section 2. Change Administrator Password |
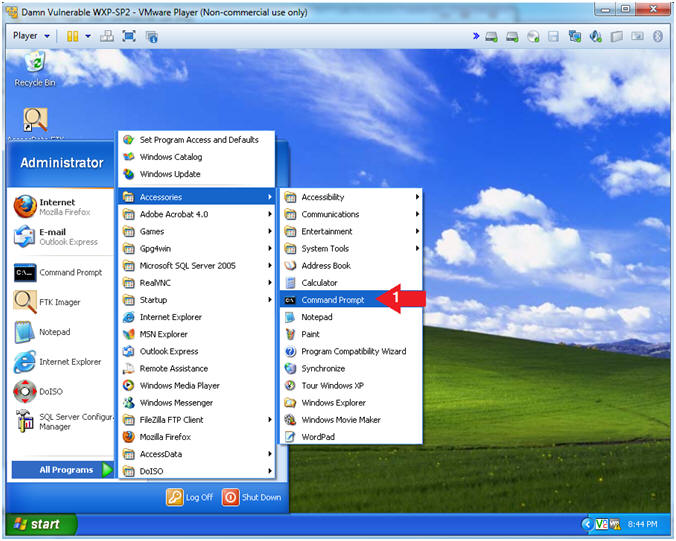
- Open a Command Prompt
- Instructions:
- Start --> All Programs --> Accessories --> Command Prompt
- Instructions:
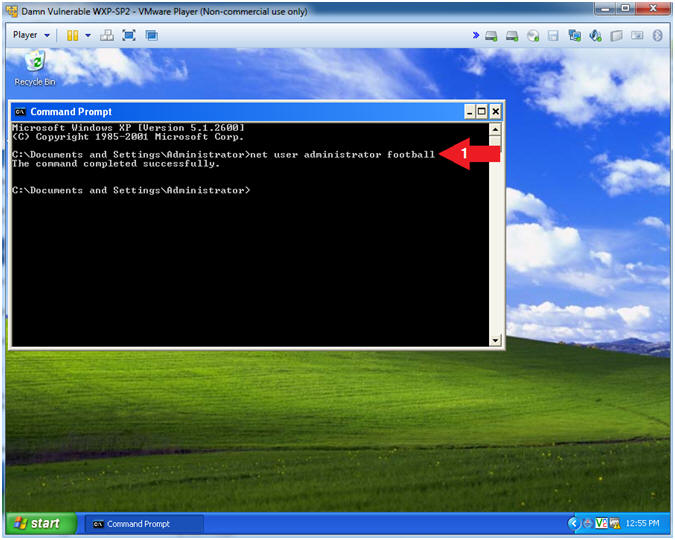
- Change the Administrator Password
- Instructions:
- net user administrator football
- Note(FYI):
- We are changing the password to something that is in the dictionary to show you how easily it can be cracked.
 .
.
- Instructions:
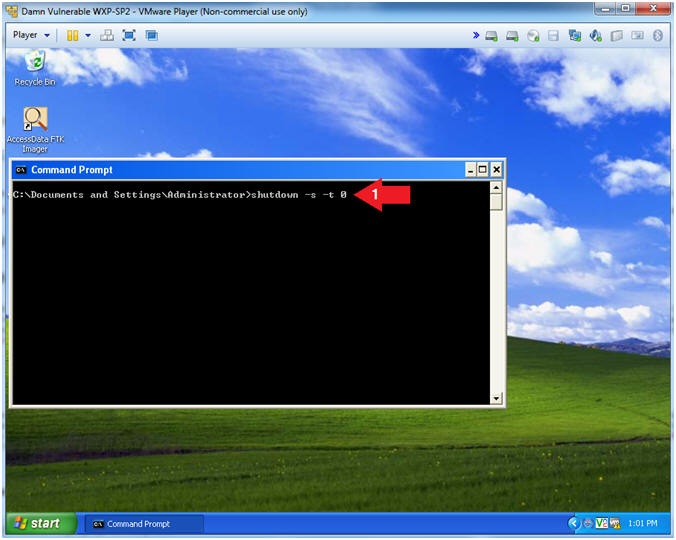
- Shutdown Windows Machine
- Instructions:
- shutdown -s -t 0
- Note(FYI):
- shutdown -s, shutdown the machine.
- -t 0, give the user a grace period of 0 seconds. The default is 30 seconds.
- Instructions:
| Section 3. Configure Windows to boot from Kali |
- Start Up Damn Vulnerable WXP-SP2.
- Instructions:
- Click on Damn Vulnerable WXP-SP2
- Click on Edit virtual machine Settings
- Note(FYI):
- For those of you not part of my class, this is a Windows XP machine running SP2.
- Instructions:
- Edit Virtual Machine Settings
- Instructions:
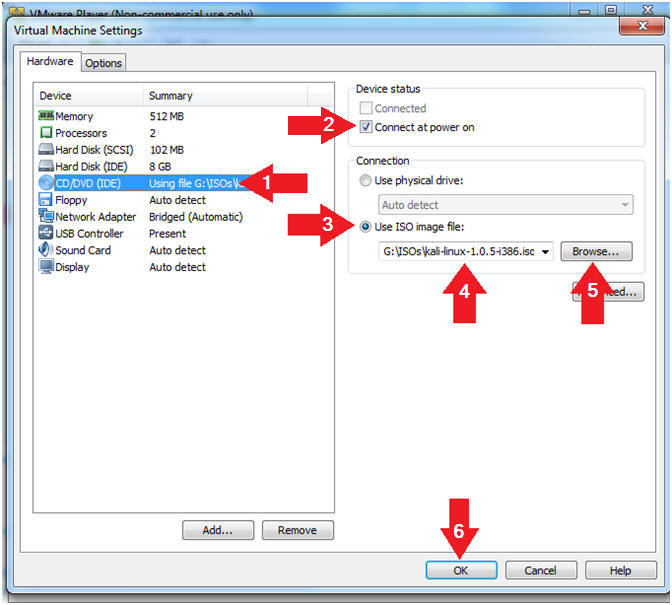
- Click on CD/DVD(IDE)
- Check the Connect at power on checkbox
- Click on the Use ISO Image File: radio button
- Click the Browse Button and Navigate to Kali.iso location
- Select the Kali.iso
- Click on the OK Button
- Instructions:
| Section 4. Power on Virtual Machine and Obtain Boot Menu |
- Play Virtual Machine
- Instructions:
- Click on Damn Vulnerable WXP-SP2
- Click on Play virtual machine

- Instructions:
- Obtain Boot Menu
- Instructions
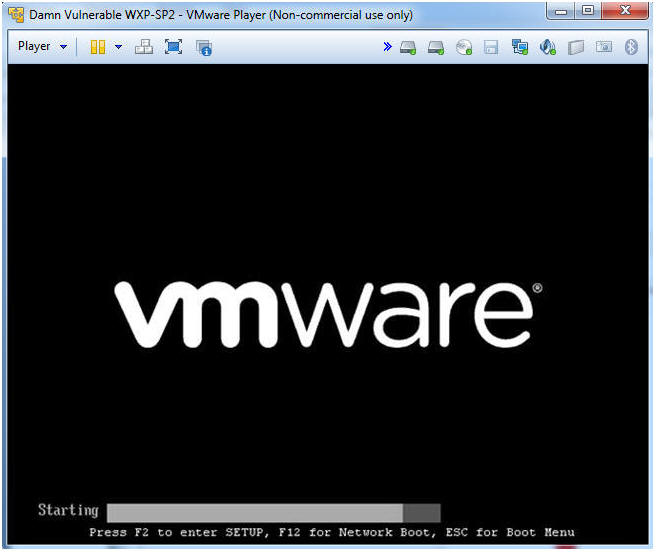
- Once you see the below vmware screen, (1) Left Click in the screen and (2) press the "<Esc>" key
- Note(FYI):
- This might take you a few times so be patient!!!
- Instructions
- Boot Menu Options
- Instructions:
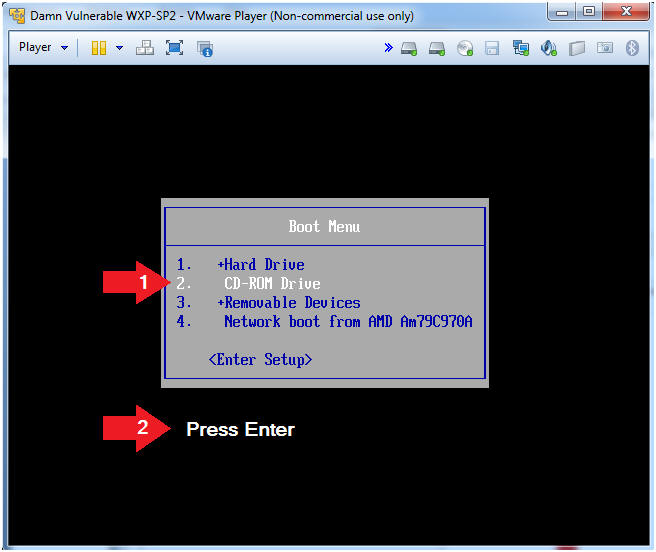
- Arrow Down to CD-ROM Drive
- Press <Enter>
- Instructions:
| Section 5. Mount Windows Disk Partition with Kali |
- Kali Linux Boot Menu
- Instructions:
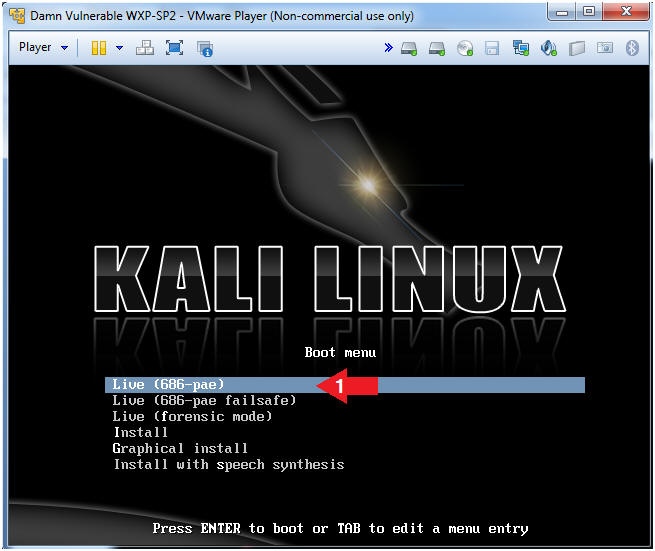
- Arrow Down to Live (686-pae)
- Press <Enter>
- Note(FYI):
- Note this will usually be the first selection.
- Instructions:
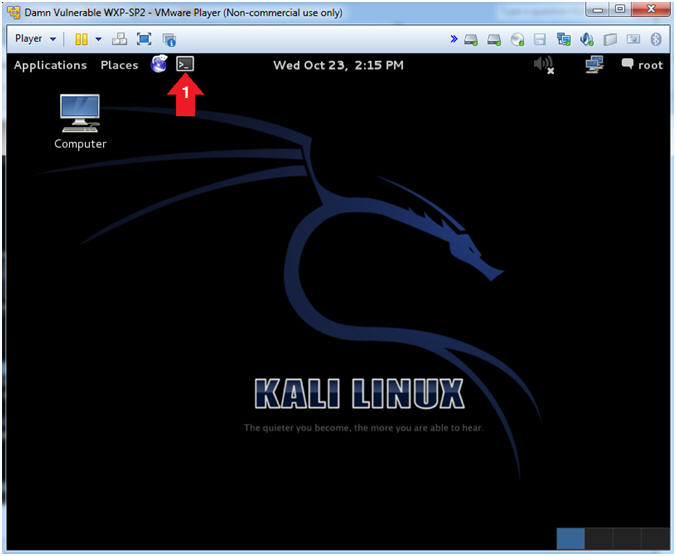
- Open a Terminal Window
- Instructions:
- Click on the Terminal Window Icon
- Instructions:
- View and Mount Windows Disk
- Instructions:
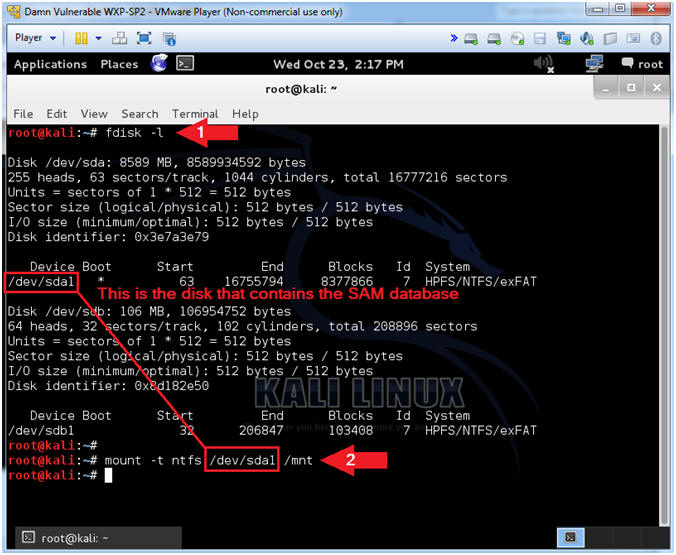
- fdisk -l
- Where "-l" is the lower case letter L.
- mount -t ntfs /dev/sda1 /mnt
- fdisk -l
- Note(FYI):
- The fdisk command will allow you to see the partition table for one or many disk(s)
- The mount command will mount a file system. Since this is a Windows file system, I am specifying the "-t ntfs" option.
- Instructions:
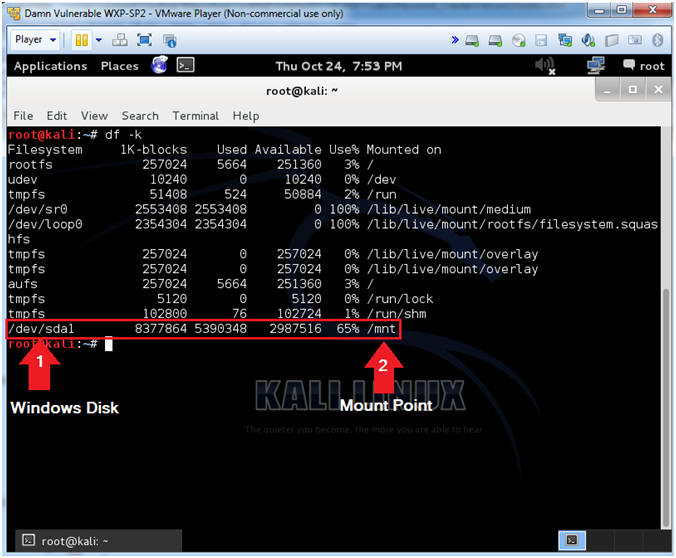
- View Mount Point
- Instructions:
- df -k
- Note(FYI):
- The df command reports on file system disk space usage.
- Arrow #1 is point to the Windows Disk.
- Arrow #2 is the /mnt point that the Windows Disk is not mounted on.
- Instructions:
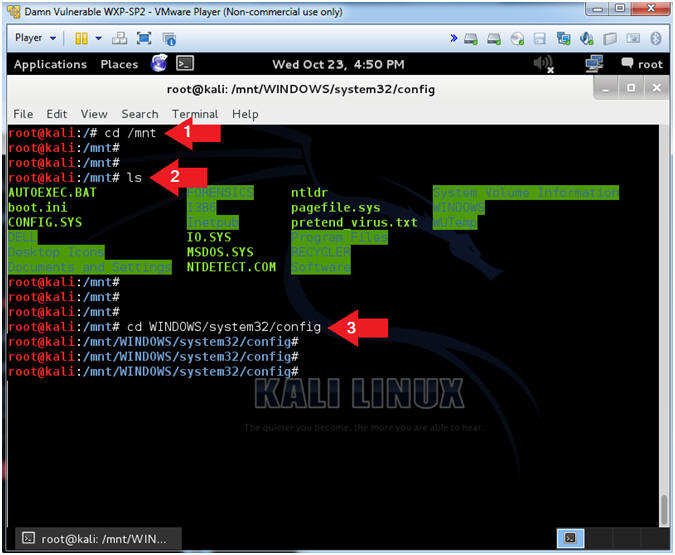
- View Windows Disk Contents
- Instructions:
- cd /mnt
- ls
- cd WINDOWS/system32/config
- Note(FYI):
- Since we mount the windows disk boot partition (/dev/sda1) on top of the /mnt directory, we have to cd into it to see its' contents.
- The ls command will list the directories contents.
- This is where the SAM database lives. The SAM database is where all the Windows passwords live.
- Instructions:
| Section 6. Using bkhive and samdump2 |
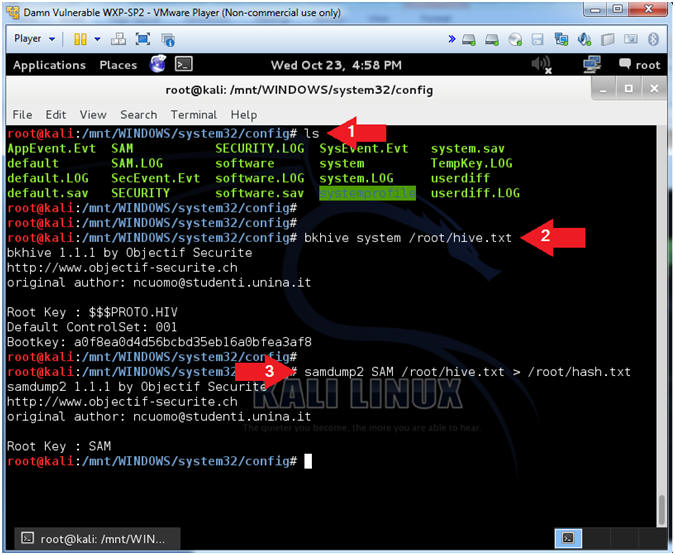
- Using bkhive and samdump2
- Instructions:
- ls
- bkhive system /root/hive.txt
- samdump2 SAM /root/hive.txt > /root/hash.txt
- Note(FYI):
- ls the contents of the /WINDOWS/system32/config directory.
- bkhive dumps the syskey bootkey from Windows NT/2k/XP/Vista system hive.
- samdump2 dumps the Windows NT/2k/XP/Vista password hashes.
- Instructions:
- View Hash Contents
- Instructions:
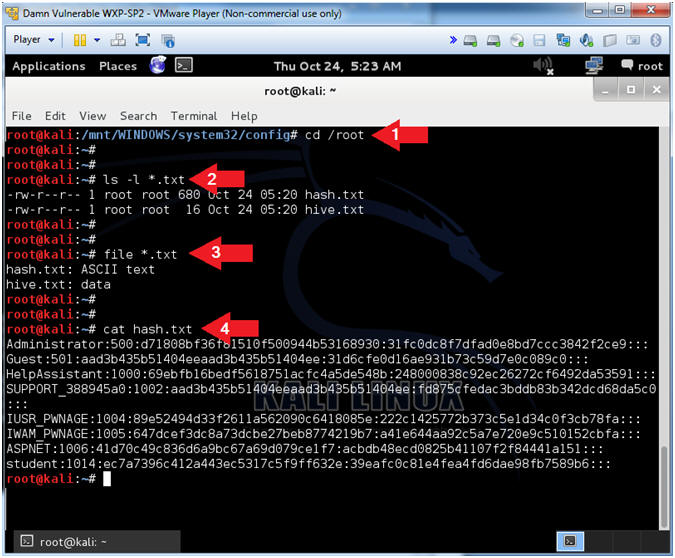
- cd /root
- ls -l *.txt
- file *.txt
- cat hash.txt
- Note(FYI):
- Change directory into /root, because that is where we put our hive and hash files.
- List out the files using a wildcard (*).
- Determine the file type of the hash and hive files, where the hash file is (ASCII) and the hive file is (Compressed Binary).
- View the contents of the hash file
- Instructions:
| Section 7. Using John the Ripper |
- Run John the Ripper
- Instructions:
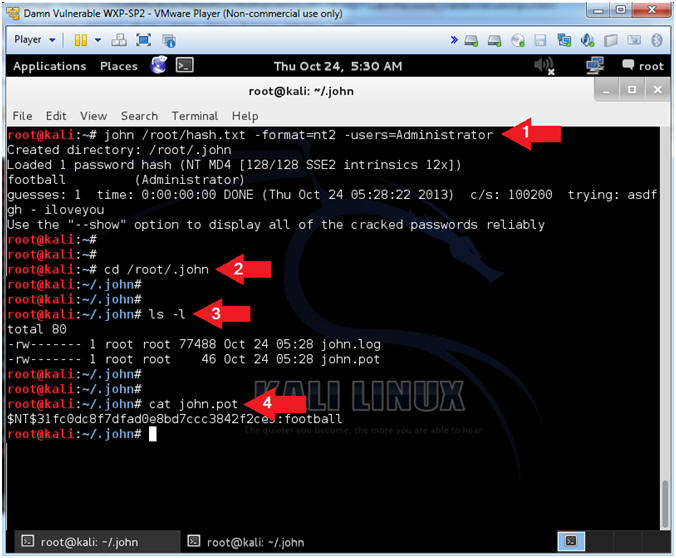
- john /root/hash.txt -format=nt2 -users=Administrator
- cd /root/.john
- ls -l
- cat john.pot
- Note(FYI):
- John is a password cracking tool.
- After john is ran, it stores the results in the .john directory under the current user's home directory. (e.g., /root/.john).
- Use "ls -l" to show the detail listing of the files.
- View the contents of the john.pot file which contains the cracked passwords.
- Instructions:
| Section 8. Proof of Lab |
-
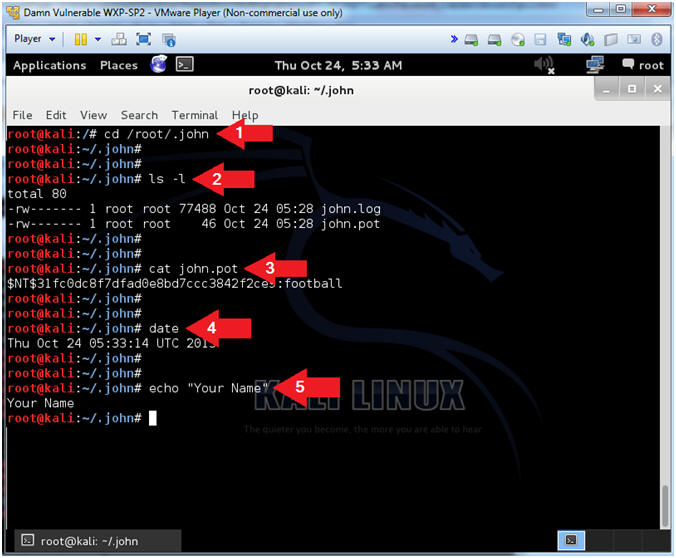
Proof of Lab
- Instructions:
- cd /root/.john
- ls -l
- cat john.pot
- date
- echo "Your Name"
- This should be your actual name.
- e.g., echo "John Gray"
- Proof of Lab
Instructions:
- Do a PrtScn
- Past into a word document
- Upload to Moodle.
- Instructions:
| Section 9. Post Installation Instructions |
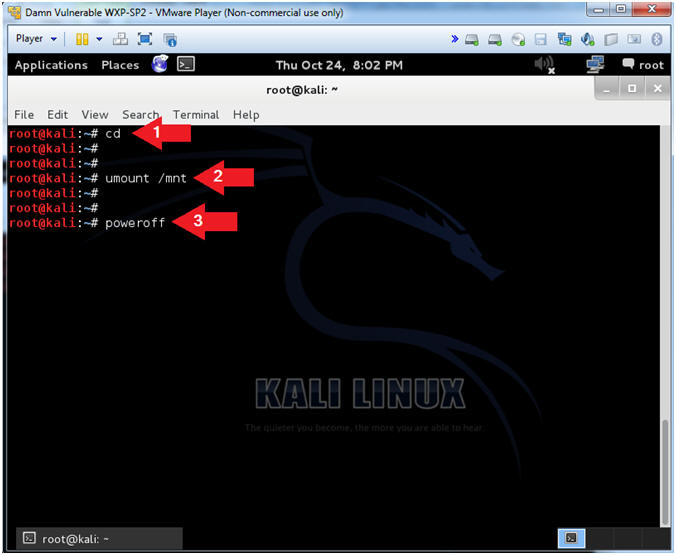
- Un-Mount and Poweroff the Virtual Machine
- Instructions:
- cd
- umount /mnt
- poweroff
- Instructions:
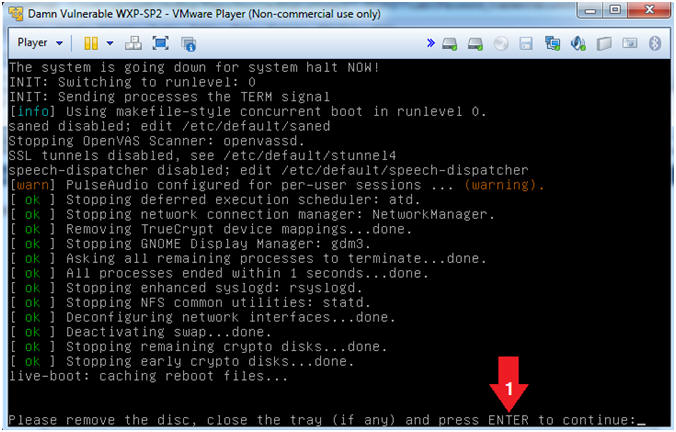
- Remove Disc Message
- Instructions:
- Press Enter
- Instructions:
- Edit Damn Vulnerable WXP-SP2.
- Instructions:
- Click on Damn Vulnerable WXP-SP2
- Click on Edit virtual machine Settings
- Note(FYI):
- For those of you not part of my class, this is a Windows XP machine running SP2.
- Instructions:
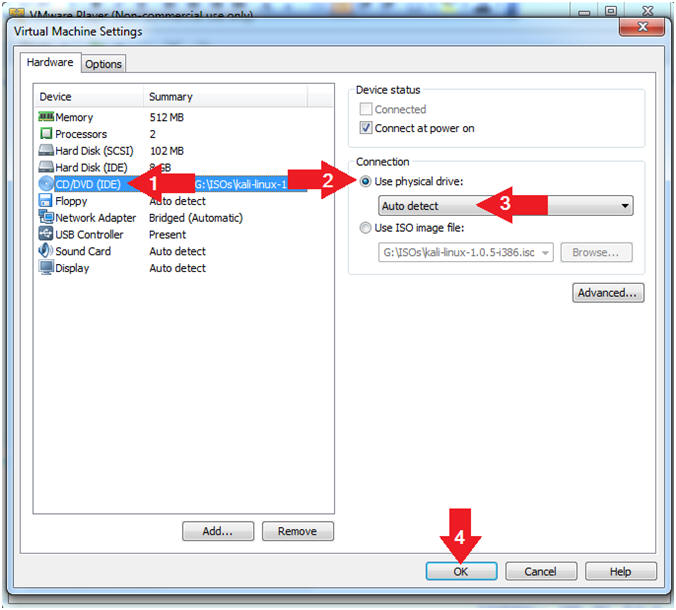
- Edit Virtual Machine Settings
- Instructions:
- Click on CD/DVD(IDE)
- Click on the Use physical drive: radio button
- Select Auto detect from the down drop menu
- Click on the OK Button
- Instructions:
