(Windows 7: Lesson 5)
{ Download and Run BitDefender Rescue CD (Antivirus Scan) }
| Section 0. Background Information |
- BitDefender Rescue CD
- BitDefender Rescue CD is freely provided by BitDefender. BitDefender provides a full suite of security tools. Using the BitDefender Rescue CD, you have the ability to do the following: (1) boot a windows operating system into a Xubuntu environment, (2) mount up the windows filesystem for access, and (3) scan the mounted windows file system for viruses.
-
Lab Notes
- In this lab we will do the following:
- Download the BitDefender iso
- Boot Windows 7 VM into the BitDefender Rescue Environment
- Using BitDefender Rescue CD
- Update BitDefender
- Run BitDefender Antivirus Scan
- In this lab we will do the following:
- Prerequisites
- Instructions:
- Legal Disclaimer
- As a condition of your use of this Web site, you warrant to computersecuritystudent.com that you will not use this Web site for any purpose that is unlawful or that is prohibited by these terms, conditions, and notices.
- In accordance with UCC § 2-316, this product is provided with "no warranties, either express or implied." The information contained is provided "as-is", with "no guarantee of merchantability."
- In addition, this is a teaching website that does not condone malicious behavior of any kind.
- Your are on notice, that continuing and/or using this lab outside your "own" test environment is considered malicious and is against the law.
- © 2012 No content replication of any kind is allowed without express written permission.
| Section 1. Download BitDefender |
- Open A Firefox Browser
- Notes:
- Login to the machine that has VM Player Installed.
- Instructions:
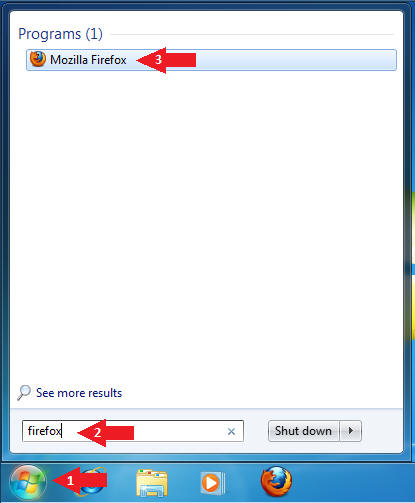
- Click on the Windows Start Button
- Type firefox in the search box
- Click on Mozilla Firefox
- Notes:
- Open A Firefox Browser
- Instructions:
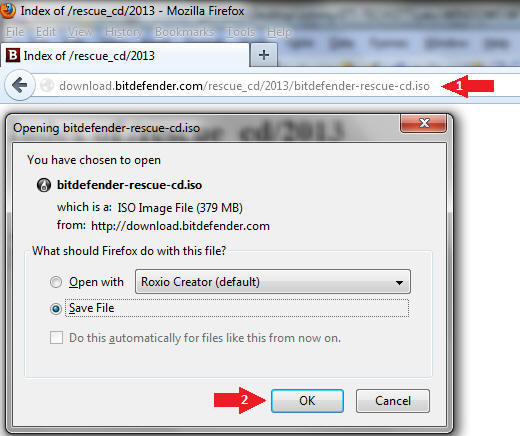
- Place the following address in the Firefox Browser
- Click OK to download
- Instructions:
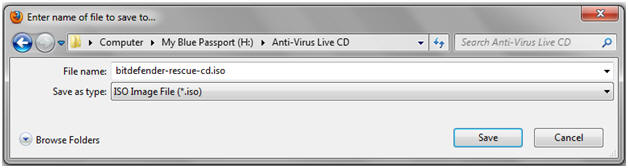
- Navigate and Save
- Instructions:
- Navigate to your external USB hard drive.
- Create a directory call Anti-Virus Live CD on your
- Click Save
- Instructions:
| Section 2. Start your Windows 7 VM |
- Edit Virtual Machine Settings
- Instructions:
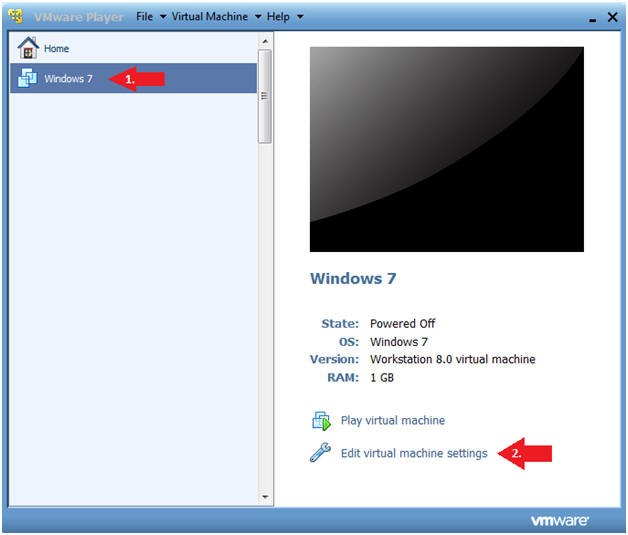
- Click on Windows 7
- Click on Edit virtual machine
- Instructions:
- Configure CD/DVD (IDE)
- Instructions
- Configure CD/DVD (IDE)
- Click the radio button "Use ISO image file:"
- Click the Browse button and Navigate to the location of the bitdefender-rescue-cd.iso
- Click the Okay button
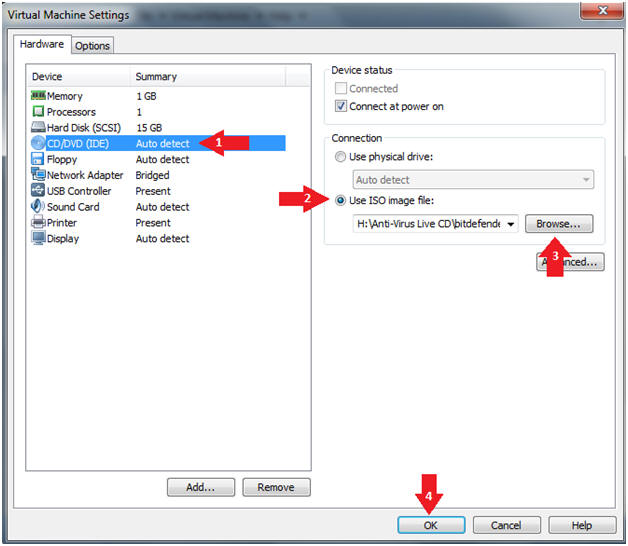
- Instructions
- Start Windows 7
- Instructions:
- Click on Windows 7
- Click on Play virtual machine
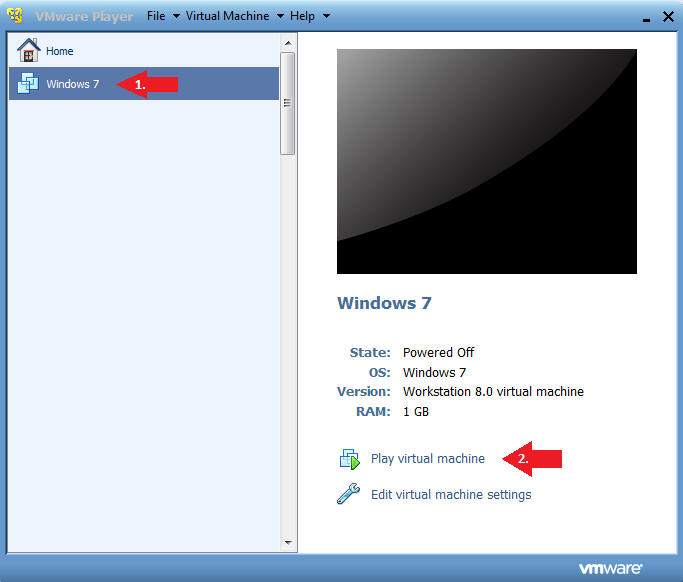
- Instructions:
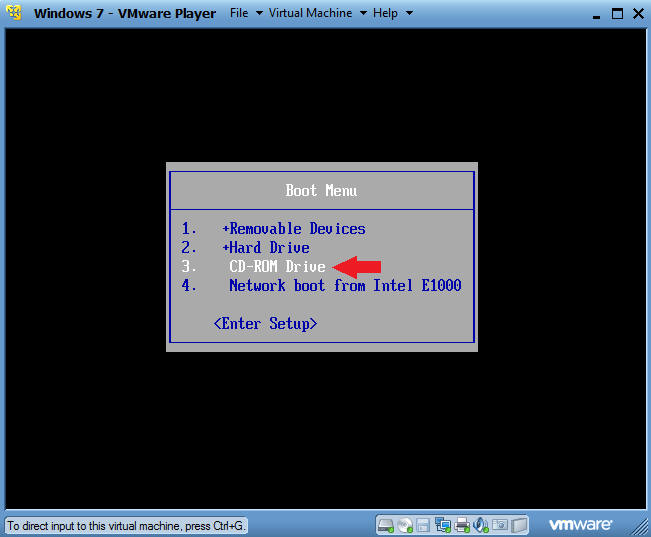
- Access the Boot Menu
- Instructions
- Once you see the below vmware screen, (1) Left Click in the screen and (2) press the <Esc> key.
- Instructions
- Boot from CD-ROM Drive
- Instructions
- Arrow Down to where CD-ROM Drive is highlighted
- Press <Enter>
- Instructions

| Section 3. Using Bitdefender Rescue CD |
- BitDefender Rescue Menu
- Instructions
- Select Language of Choice, English is default.
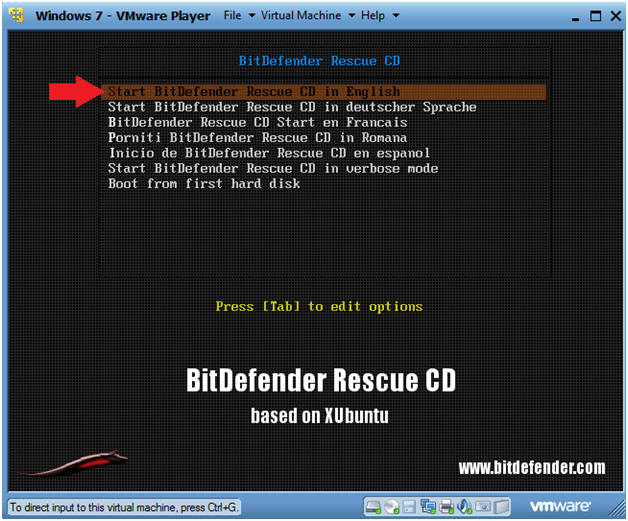
- Instructions
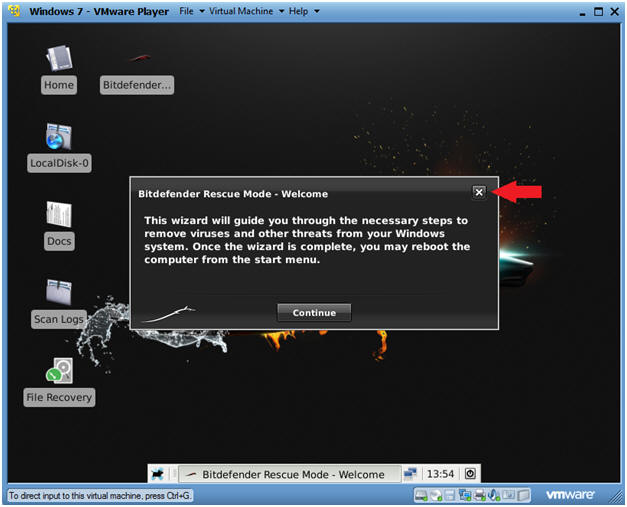
- BitDefender Rescue Mode - Welcome
- Instructions
- Do not click Continue.
- Click the X to close the BitDefender Application for now.
- Instructions
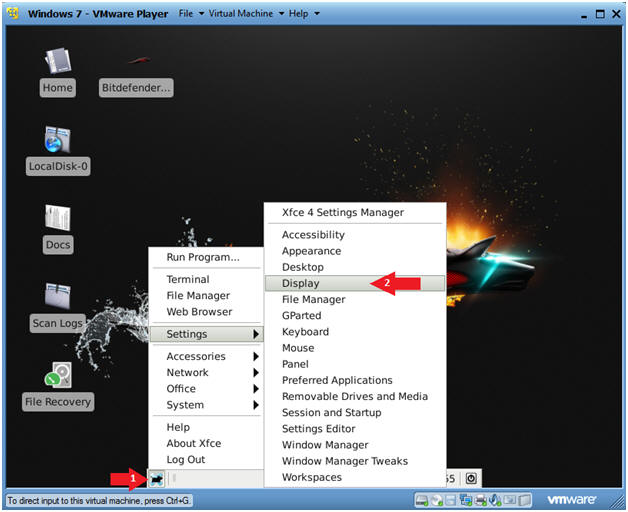
- Open BitDefender Display Settings
- Instructions
- Select the X from the GUI Panel
- Settings --> Display
- Instructions
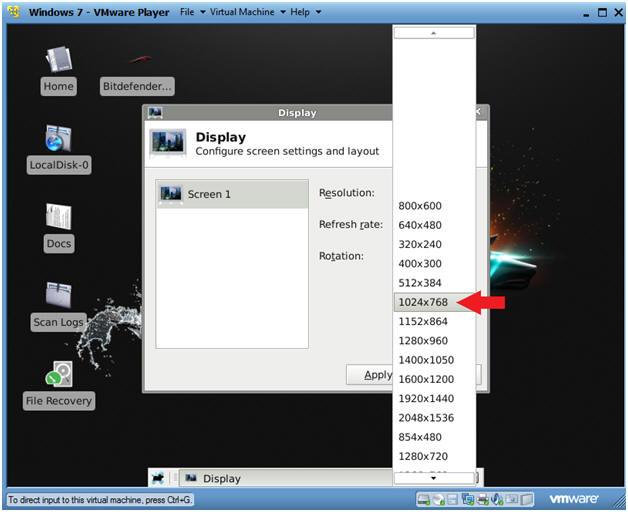
- Select Display
- Instructions
- Select 1024 x 768
- Instructions
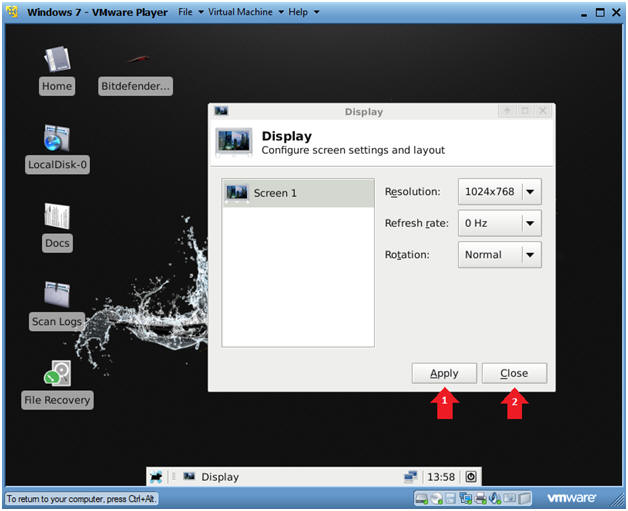
- Set Display
- Instructions
- Click Apply
- Click Close
- Instructions
- Start Bitdefender Scanner
- Instructions
- Click the X on the GUI
- System --> Bitdenfender Scanner
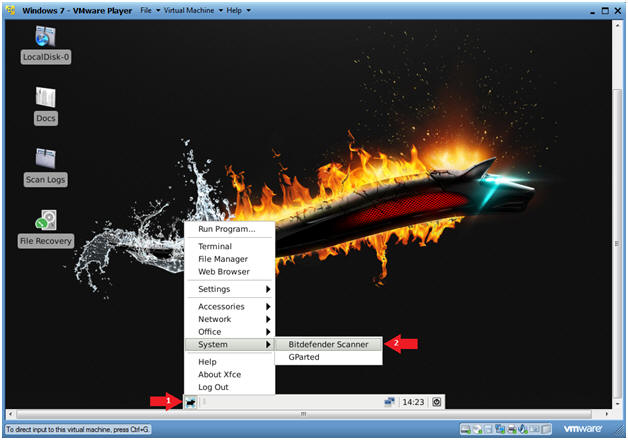
- Instructions
- Bitdenfender Rescue Mode - Welcome
- Instructions
- Click Continue
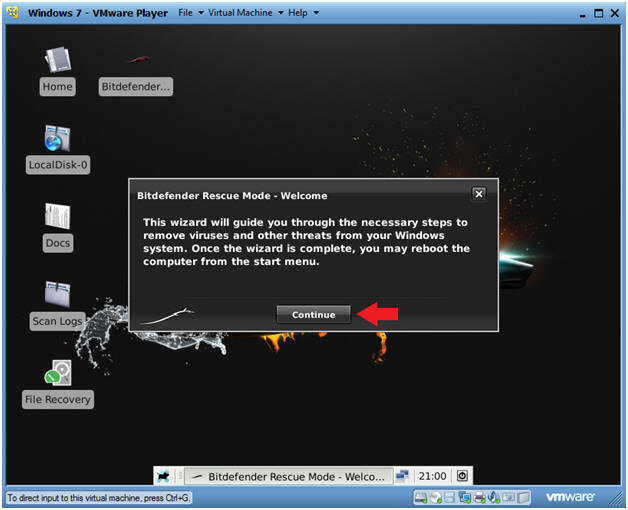
- Instructions
- Bitdenfender Update
- Notes (FYI):
- Bitdefender will now download the latest updates for their scanner.
- This will take around 15 minutes.
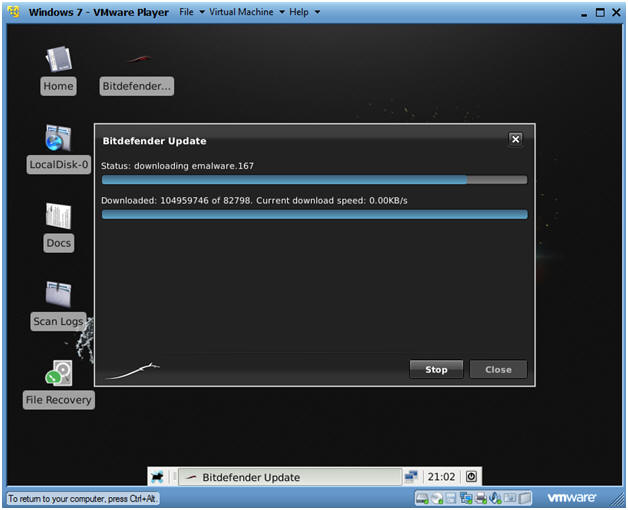
- Notes (FYI):
- Scan Now
- Instructions
- Click Scan Now
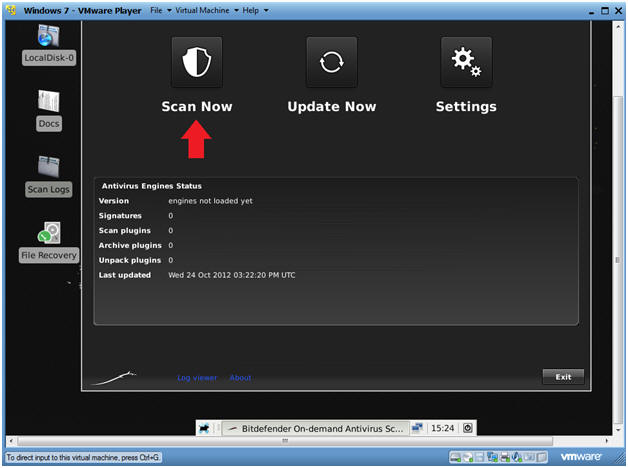
- Instructions
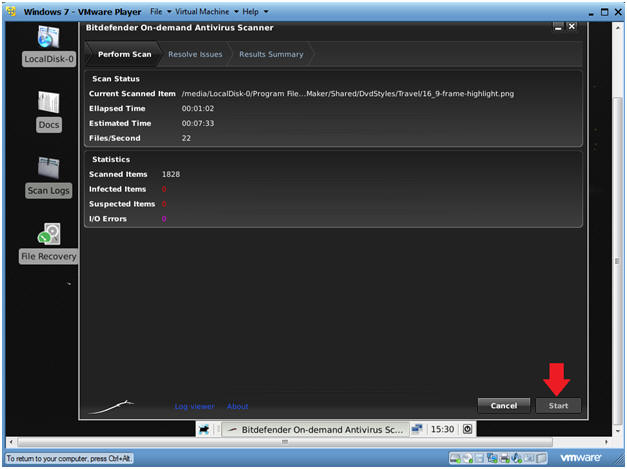
- Start Scan
- Instructions
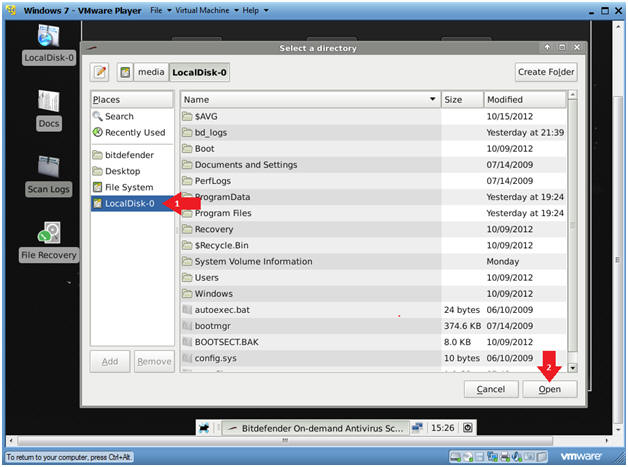
- Click on LocalDisk-0
- Click Open
- Instructions
- Bitdenfender Antivirus Scanner
- Notes (FYI):
- Bitdefender will show a loading screen before the scan begins.
- Instructions
- Click Scan
- Notes (FYI):
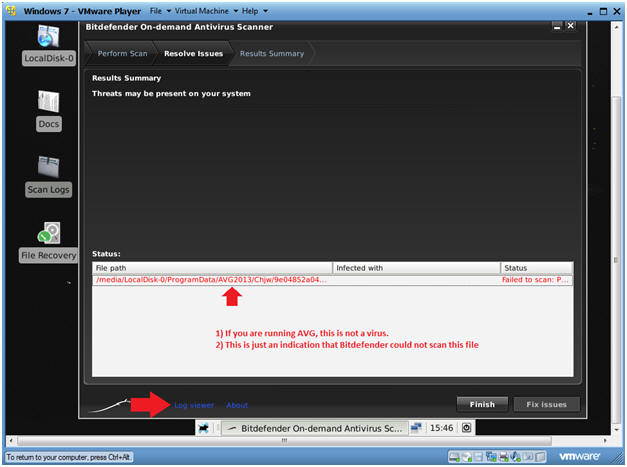
- Viewing Results
- Notes (FYI):
- The white status pain will list any found viruses.
- In my case, Bitdefender identicates that it could not run a scan on an AVG2013 dat file. (No Big Deal)
- Instructions
- Click on the Log viewer
- Continue to Proof of Lab Section (Do not close Log viewer)
- Notes (FYI):
| Section 4. Proof of Lab |
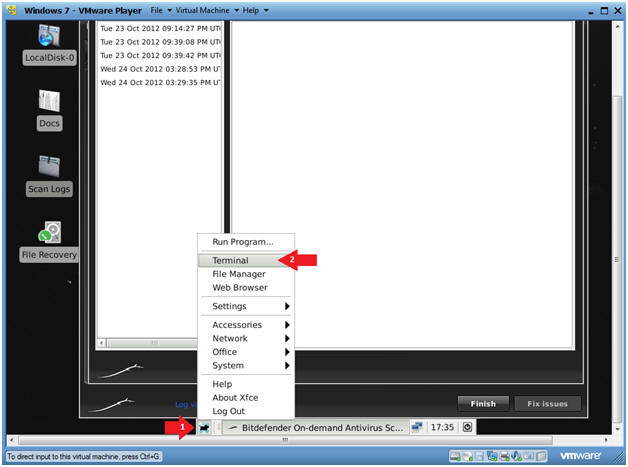
- Open a Terminal
- Notes (FYI):
- The white status pain will list any found viruses.
- In my case, Bitdefender identicates that it could not run a scan on an AVG2013 dat file. (No Big Deal)
- Instructions
- Click on the X on the GUI
- Click on Terminal
- Notes (FYI):
-
Proof of Lab Instructions
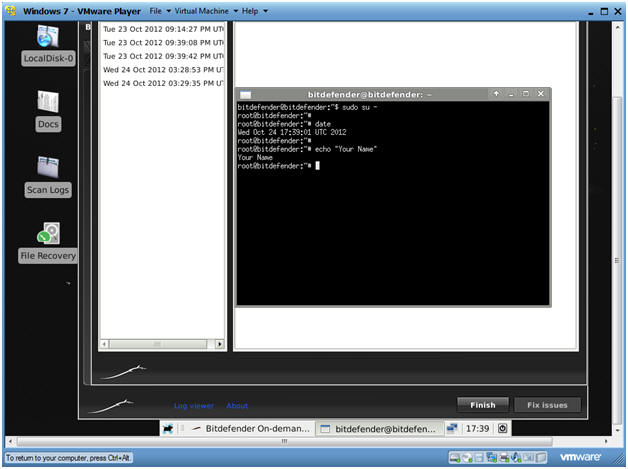
- Instructions:
- date
- Press <Enter>
- echo "Your Name"
- Replace the string "Your Name" with your actual name.
- e.g., echo "John Gray"
- Do a PrtScn
- Paste into a word document
- Upload to Moodle
- Instructions:
- Edit Virtual Machine Settings
- Instructions:
- From the VM Player Menu Bar do the following:
- Select Virtual Machine
- Select Virtual Machine Settings...
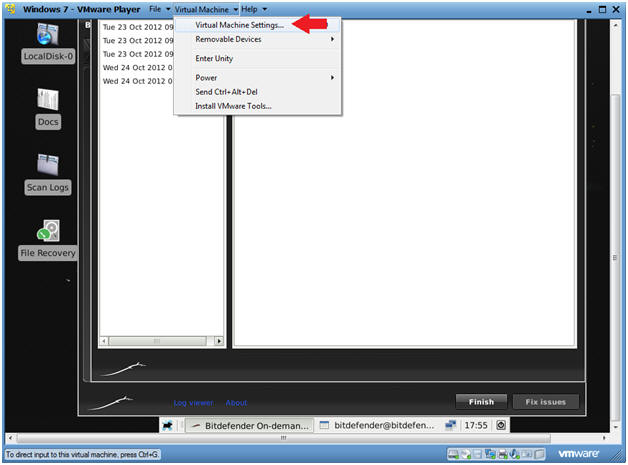
- Instructions:
- Edit CD/DVD (IDE)
- Instructions:
- Select CD/DVD (IDE)
- Select the Connection radio button: Use physical drive, with Auto detect selected.
- Click the OK Button
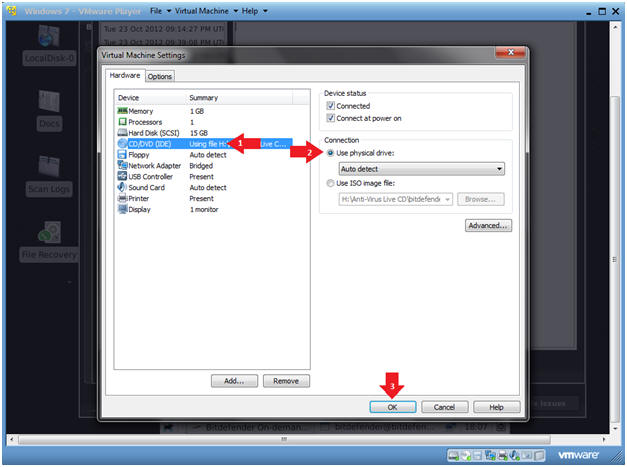
- Instructions:
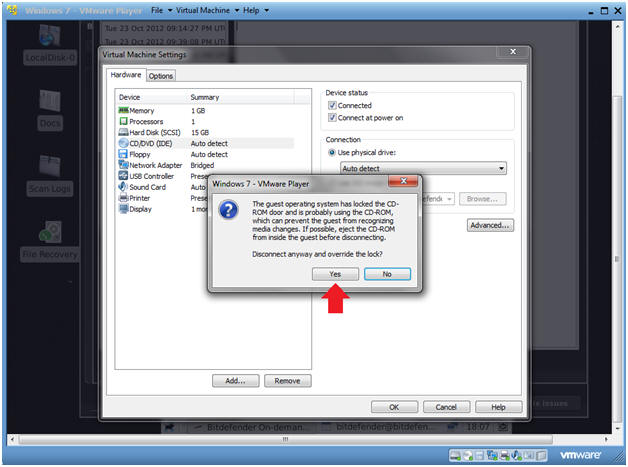
- Windows 7 - VMware Player CD-ROW Disconnect
Message
- Instructions:
- Select Yes
- Instructions:
- Shutdown Machine
- Instructions:
- Click the small Shutdown icon on the bottom GUI bar (See Below)
- Click the big Shutdown icon.
- Instructions:
