(Damn Vulnerable Windows XP: Lesson 1)
{ How to create a Damn Vulnerable Windows XP Machine }
| Section 0. Background Information |
- What is Damn Vulnerable Windows XP?
- This is a Windows XP Virtual Machine that provides a practice environment to conduct ethical penetration testing, vulnerability assessment, exploitation and forensics investigation.
- The Microsoft Software License Terms for the IE VMs are included in the release notes.
- By downloading and using this software, you agree to these license terms.
-
Lab Notes
- In this lab we will do the following:
- Download & Install Z-Zip
- Download a Windows VM (IE6)
- Disable Standard Security
- Create Weak Passwords
- Remove all XP3 and XP4 Patches
- In this lab we will do the following:
-
External Hardrive Recommendation
- It is only a recommendation to purchase an external hard-drive for the following reasons:
- Laptops do not always provide you with extra space that Virtual Machines Require
- Using an external drive allows you to easily play a Virtual Machine across multiple devices.
- In (Section 2, Step 2), I save the Virtual Machine to an External Hardive. Accordingly, you could save it locally if you have space on your system.
- Computer Security Student does receive a very small Amazon Affiliate commission from this purchase
- It is only a recommendation to purchase an external hard-drive for the following reasons:
- Legal Disclaimer
- As a condition of your use of this Web site, you warrant to computersecuritystudent.com that you will not use this Web site for any purpose that is unlawful or that is prohibited by these terms, conditions, and notices.
- In accordance with UCC § 2-316, this product is provided with "no warranties, either express or implied." The information contained is provided "as-is", with "no guarantee of merchantability."
- In addition, this is a teaching website that does not condone malicious behavior of any kind.
- You are on notice, that continuing and/or using this lab outside your "own" test environment is considered malicious and is against the law.
- © 2015 No content replication of any kind is allowed without express written permission.
| Section 1: Download 7-Zip (Pre-Requisite) |
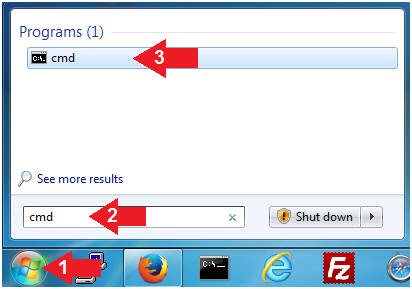
- Open a Command Prompt (Host
Computer)
- Instructions:
- Click the Start Button
- Type cmd in the search box
- Click the cmd icon
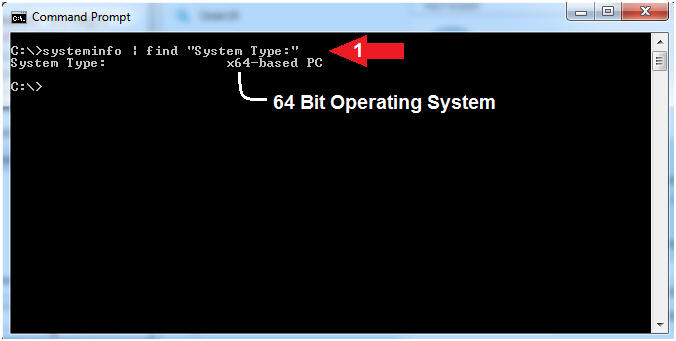
- Instructions:
- Determine System Type
- Instructions:
- systeminfo | find "System Type:"
- Note(FYI):
- x64 - 64 Bit Operating System
- x86 - 32 Bit Operating System
- Instructions:
- Open Firefox
- Instructions:
- Click the Start Button
- Type firefox in the search box
- Click the firefox icon
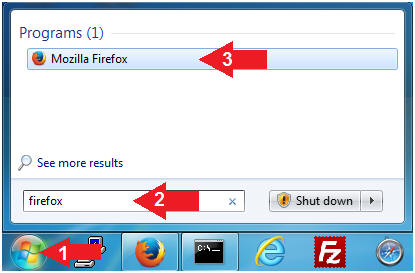
- Instructions:
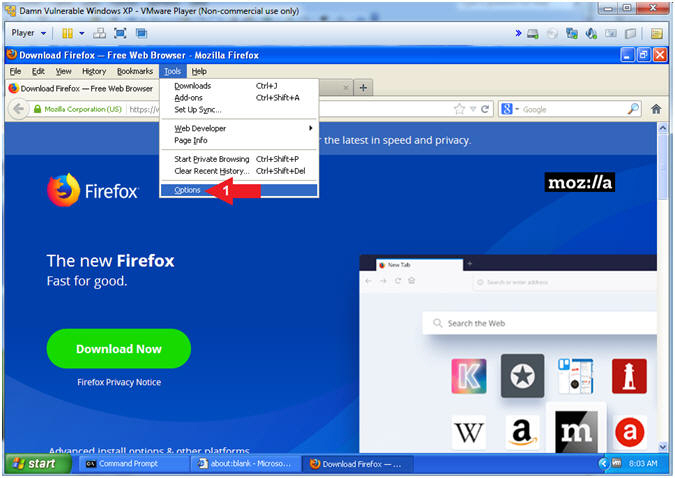
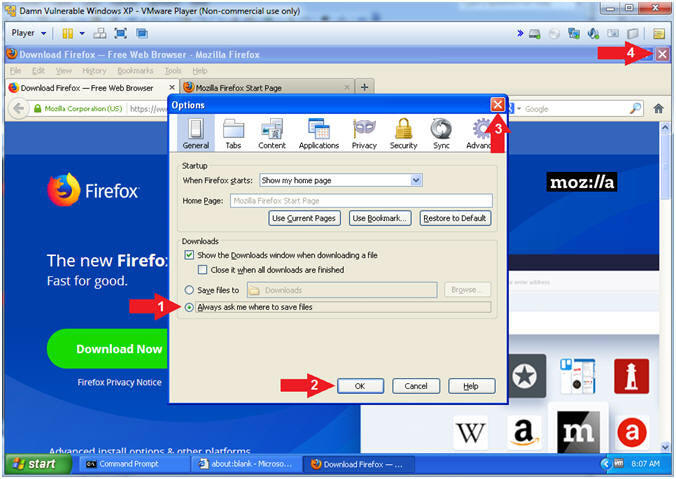
- Save Files Configuration Location
- Instructions:
- Tools --> Options
- Click the General Tab
- Click the radio button Always ask me where to save files
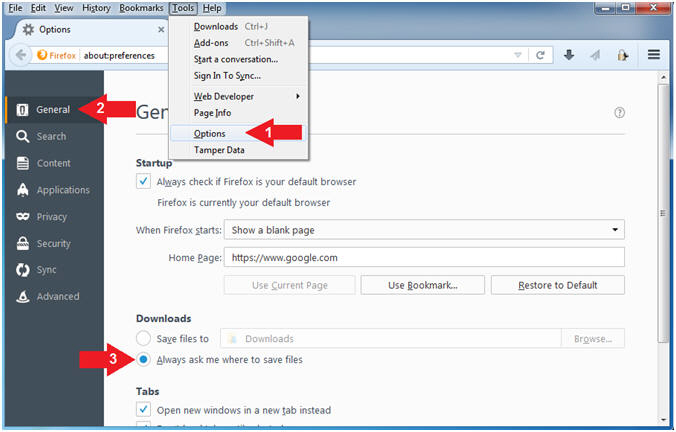
- Instructions:
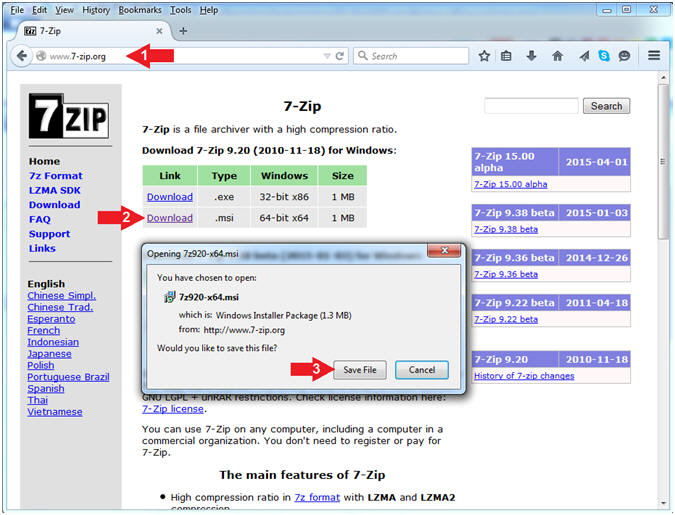
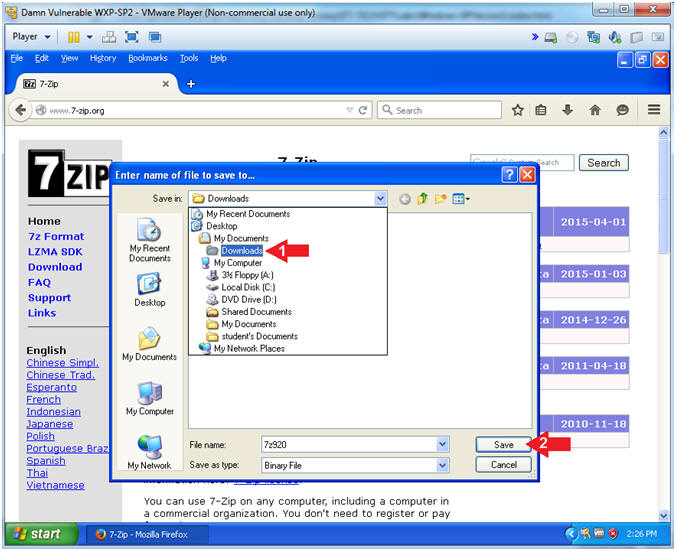
- Start 7-Zip Download
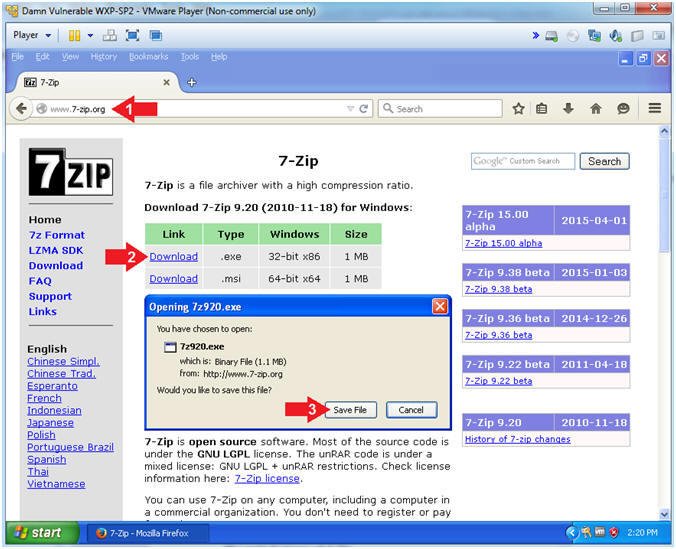
- Instructions:
- http://www.7-zip.org
- Click Download
- Click the Save File Button
- Note(FYI):
- If you already have 7-Zip installed on your host machine, then you can skip down to (Section 2, Step 1).
- Use Section 1, Step 2 to determine if you should download the 32-bit or 64-bit version.
- Instructions:
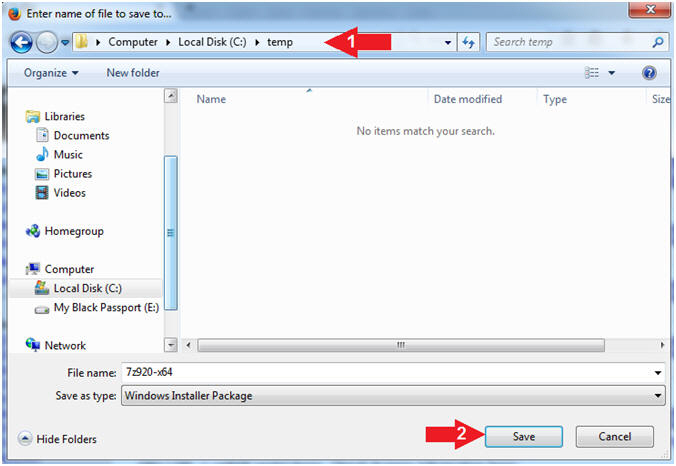
- Save 7-Zip
- Instructions:
- Navigate to C:\temp
- Click the Save Button
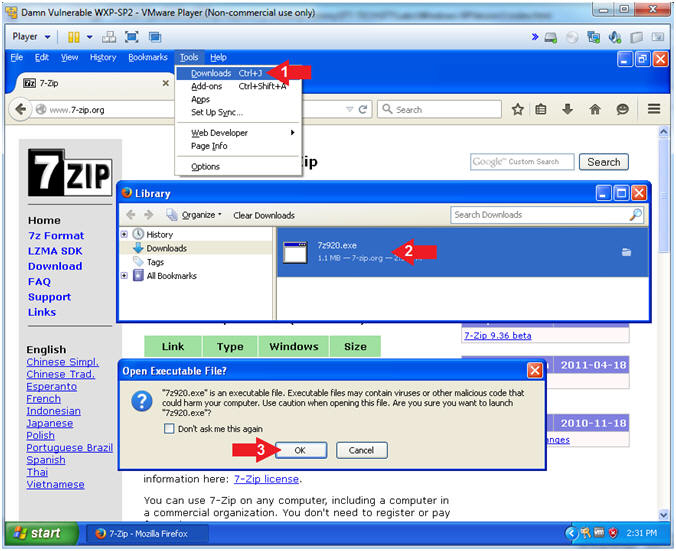
- Instructions:
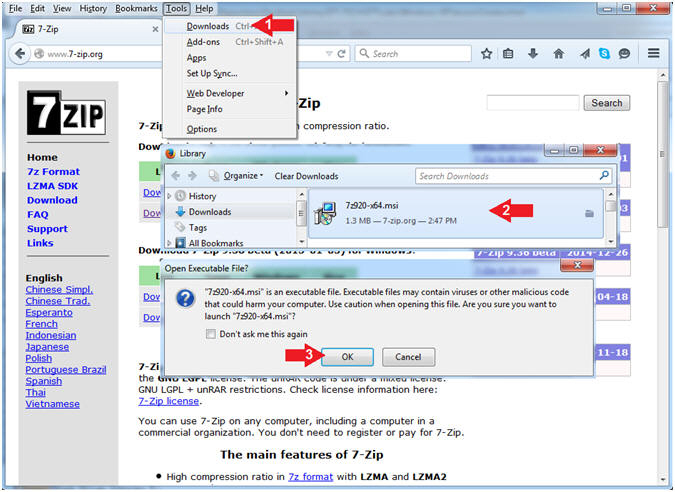
- Open Executable File
- Instructions:
- Tools --> Download
- Double Click on 7z*.msi file
- Click the OK Button
- Instructions:
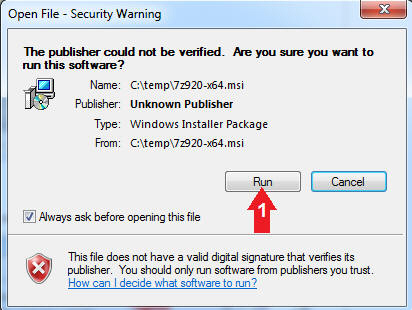
- Open Executable File
- Instructions:
- Click the Run Button
- Instructions:
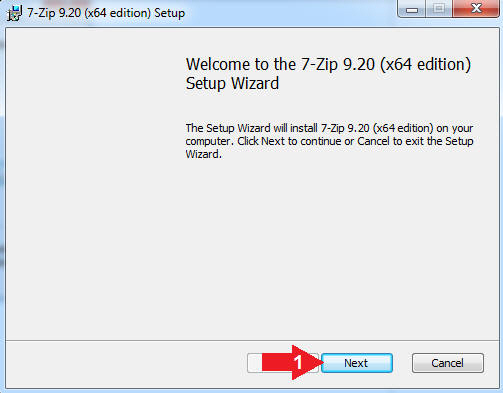
- 7-Zip Setup Wizard
- Instructions:
- Click the Next Button
- Instructions:
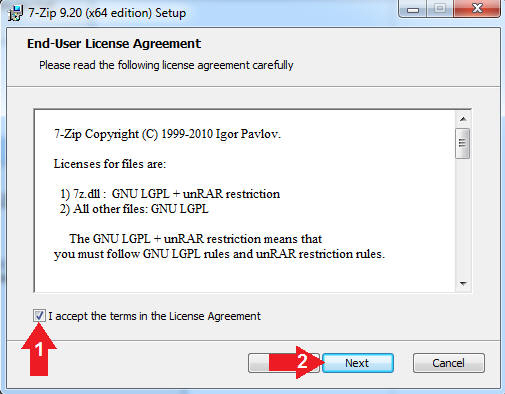
- 7-Zip EULA
- Instructions:
- Check I Accept...
- Click the Next Button
- Instructions:
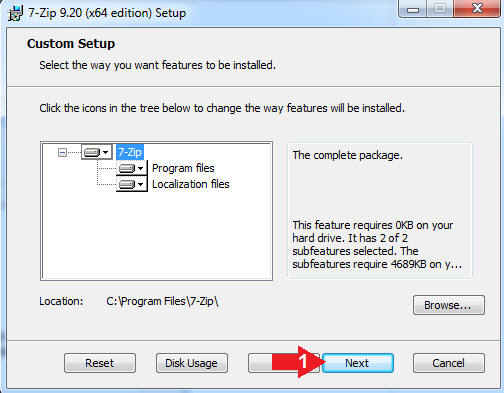
- 7-Zip Custom Setup
- Instructions:
- Click the Next Button
- Instructions:
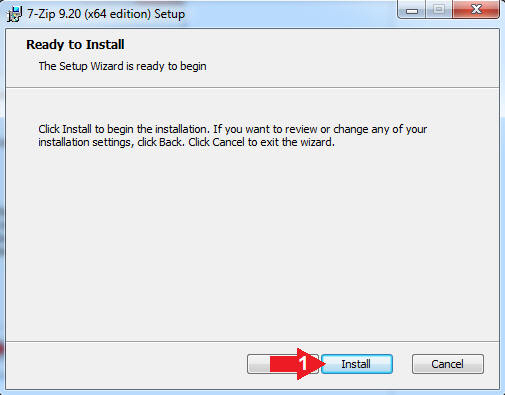
- 7-Zip Installation
- Instructions:
- Click the Install Button
- Instructions:
- 7-Zip Completion
- Instructions:
- Click the Finish Button
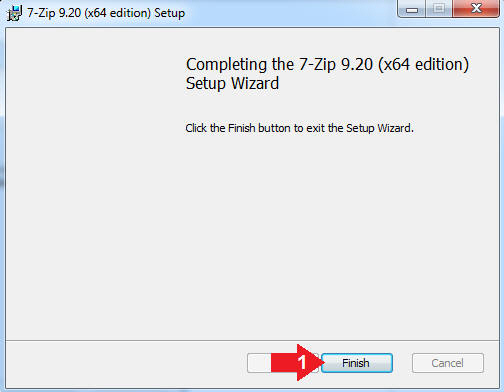
- Instructions:
| Section 2: Download Microsoft XP-IE6 VM |
- Download Windows XP-IE6
- Instructions:
- Navigate to one of the follow URLs
- VMware:
- https://drive.google.com/open?id=1ufSg6tG_QJX3Ssihn_eB35FEOFm4GQSq
- Virtual Box:
- https://drive.google.com/open?id=1BMonDTESIB9MMAeDKmtoNEAMq9hjOns7
- VMware:
- Click the Save File Radio button
- Click the OK Button
- Navigate to one of the follow URLs
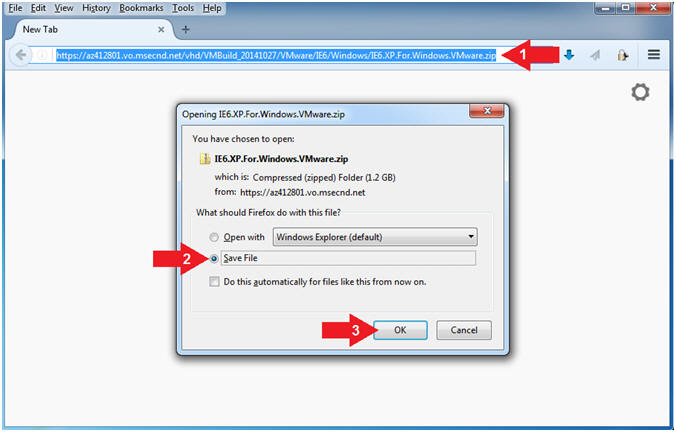
- Instructions:
- Download Location
- Instructions:
- Navigate to your preferred download
directory
- In my case, E:\VMs\Damn Vulnerable Windows XP
- Click the Save Button
- Navigate to your preferred download
directory
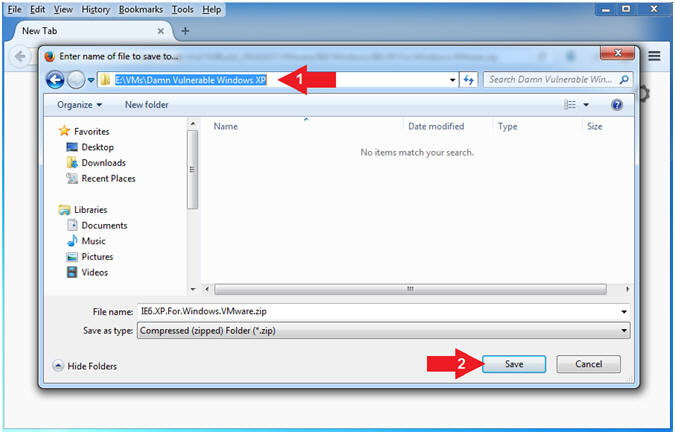
- Instructions:
- Go To Downloads Folder (Part 1)
- Instructions:
- Tools --> Downloads
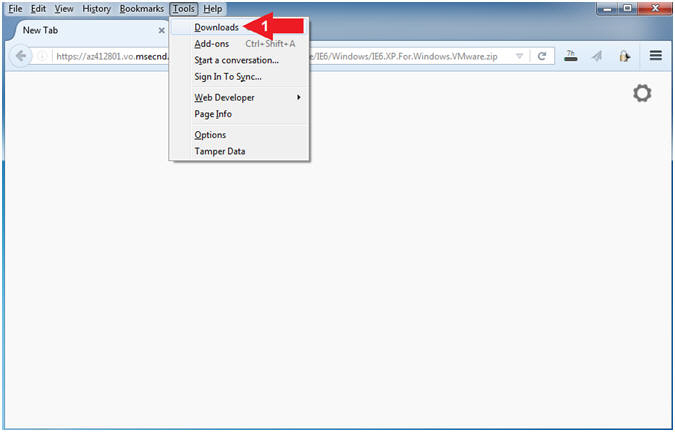
- Instructions:
- Go To Downloads Folder (Part 2)
- Instructions:
- Right Click on IE6.XP.For.Windows.VMware.zip
- Open Containing Folder
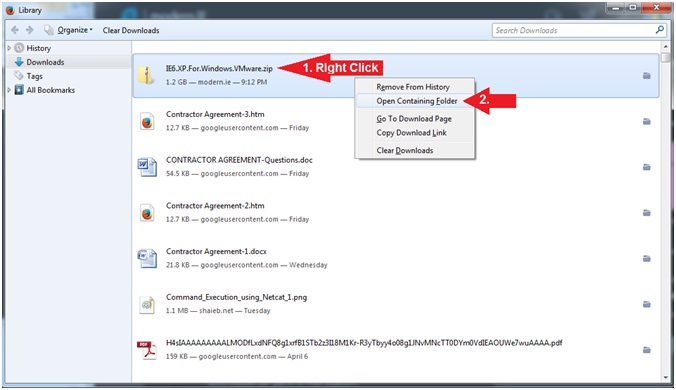
- Instructions:
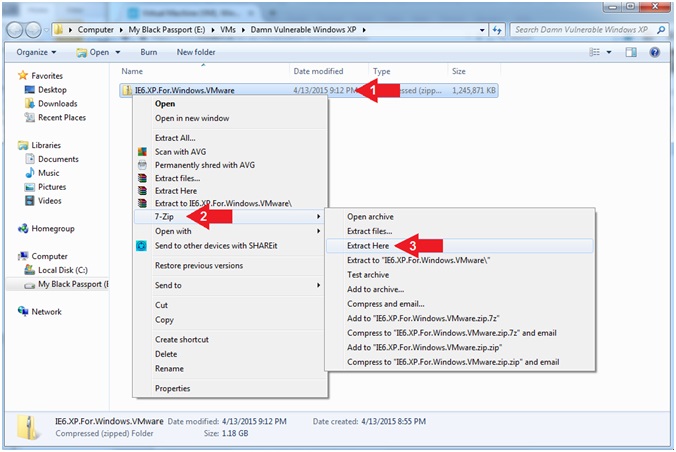
- Extract Files
- Instructions:
- Right Click on IE6.XP.For.Windows.VMware.zip
- Select 7-Zip
- Extract Here
- Instructions:
- Extract Process
- Note(FYI):
- The Extraction Process will take between 2 to 5 minutes.
- Continue to Next Step after the extraction completes.
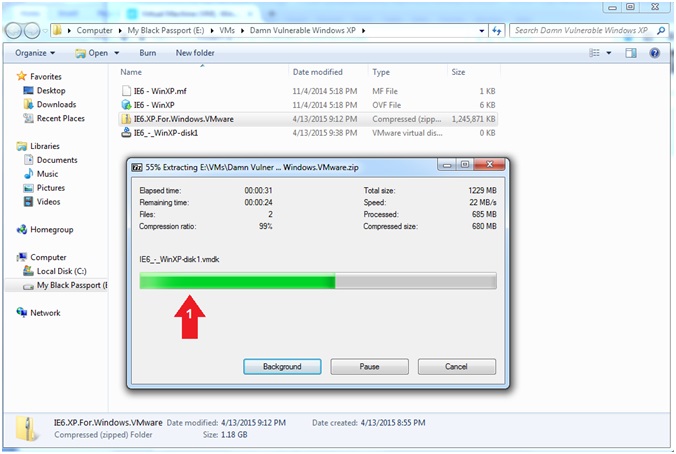
- Note(FYI):
| Section 3: Create a New Virtual Machine |
- Open VMware Player on your windows machine.
- Instructions:
- Click the Start Button
- Type "vmware player" in the search box
- Click on VMware Player
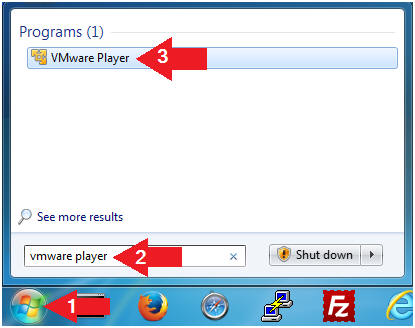
- Instructions:
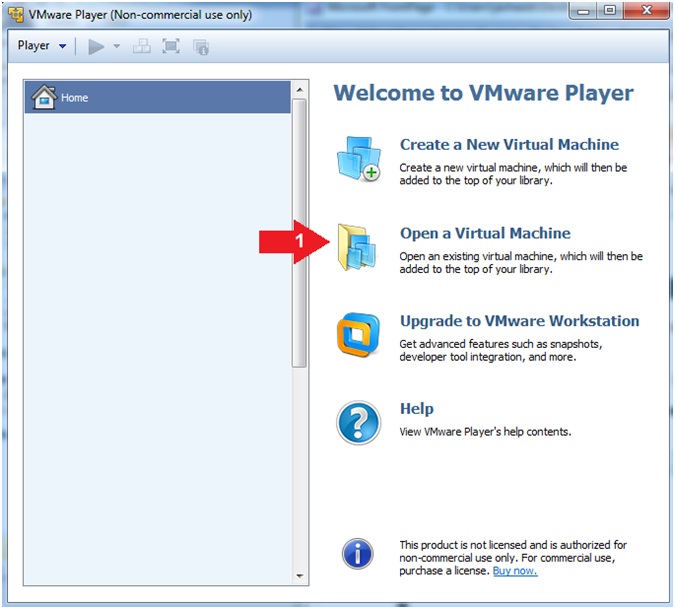
- Create a New Virtual Machine. (See Below)
- Instructions:
- Click on Open a Virtual Machine
- Instructions:
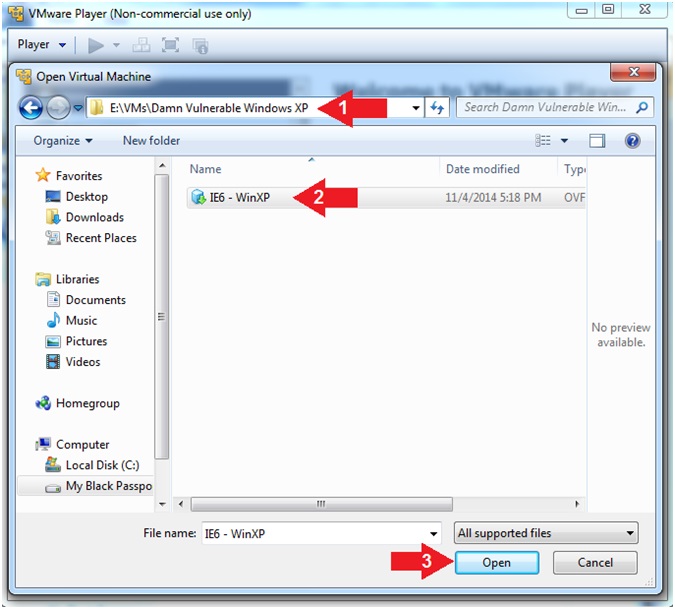
- Open Virtual Machine
- Instructions:
- Navigate To Extracted Virtual Machine
Location
- In my case, the directory was E:\VMs\Damn Vulnerable Windows XP
- Click IE6 - WinXP
- Click the Open Button
- Navigate To Extracted Virtual Machine
Location
- Instructions:
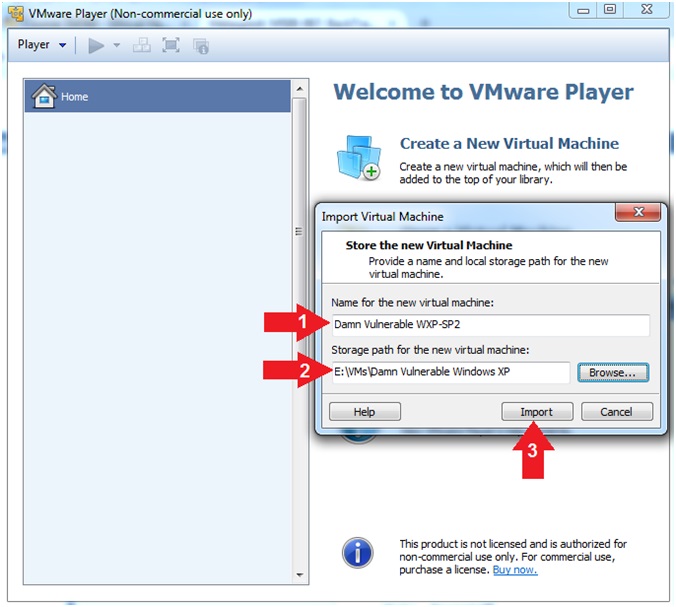
- Import Virtual Machine
- Instructions:
- Name: Damn Vulnerable WXP-SP2
- Storage Path: Browse to your desired
storage location
- In my case, the storage directory is E:\VMs\Damn Vulnerable Windows XP
- Click the Import Button
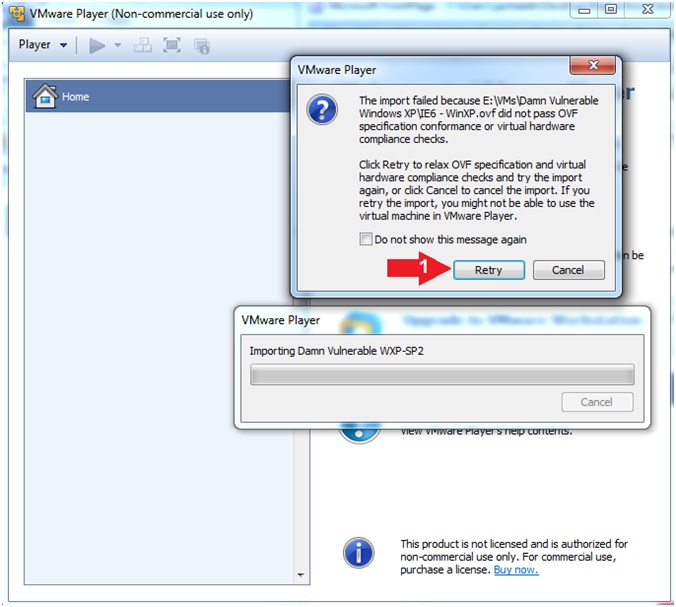
- Don't be alarmed, an error message will be displayed.
- Continue to the next step.
- Instructions:
- Virtual Machine OVF Failure
- Instructions:
- Click the Retry Button
- Note(FYI):
- The import will take between 10 and 15 minutes.
- Instructions:
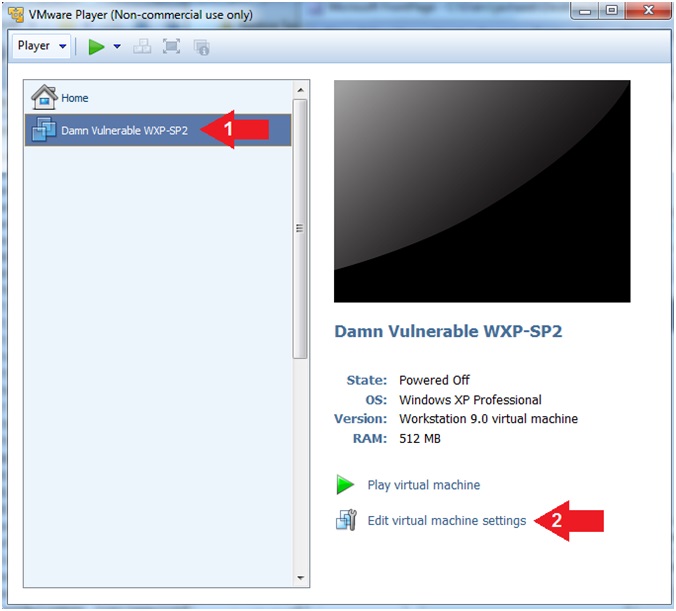
- Edit Virtual Machine
- Instructions:
- Click on Damn Vulnerable WXP-SP2
- Click on Edit virtual machine settings
- Instructions:
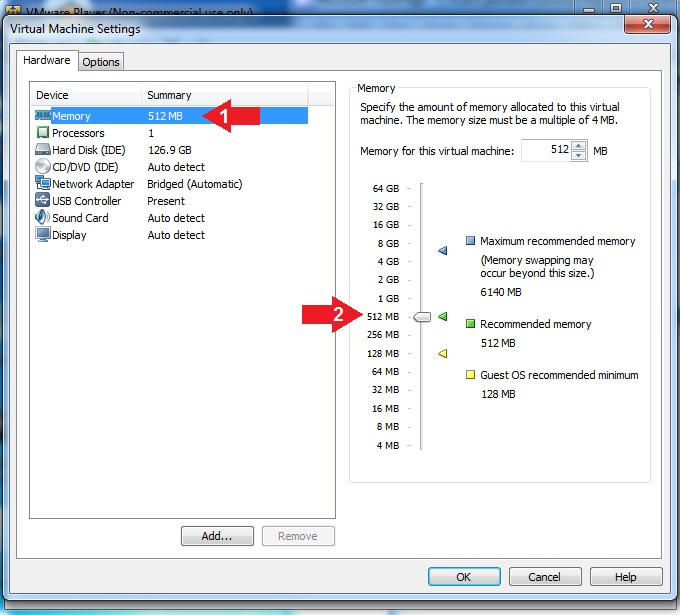
- Configure Memory Setting
- Instructions:
- Click on Memory
- Select 512 MB
- Note(FYI):
- Do NOT Click the OK Button, we still have more to configure.
- Instructions:
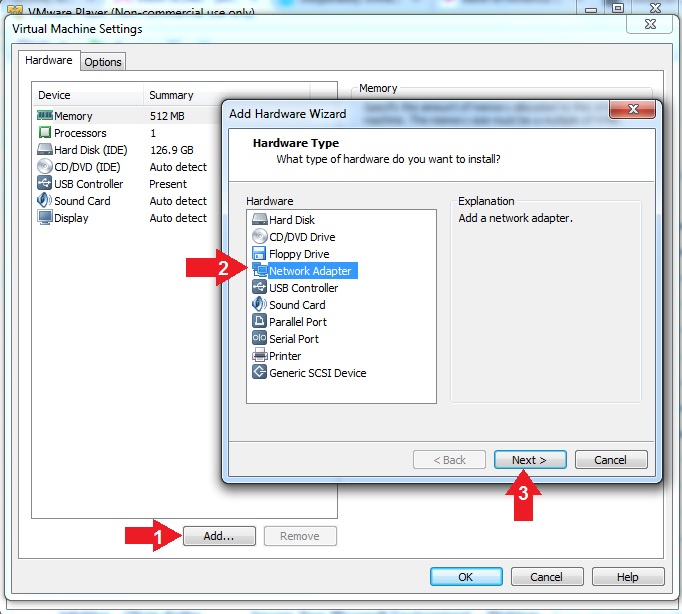
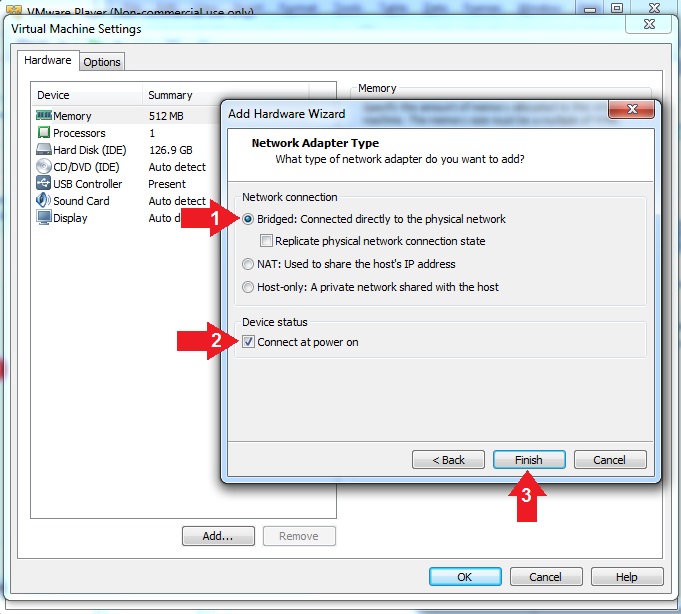
- Add Network Adapter
- Instructions:
- Click the Add... Button
- Click on Network Adapter
- Click the Next Button
- Instructions:
- Add Network Adapter
- Instructions:
- Network connection: Click on the Bridged radio button
- Device Status: Check Connect at power on
- Click the Finish Button
- Instructions:
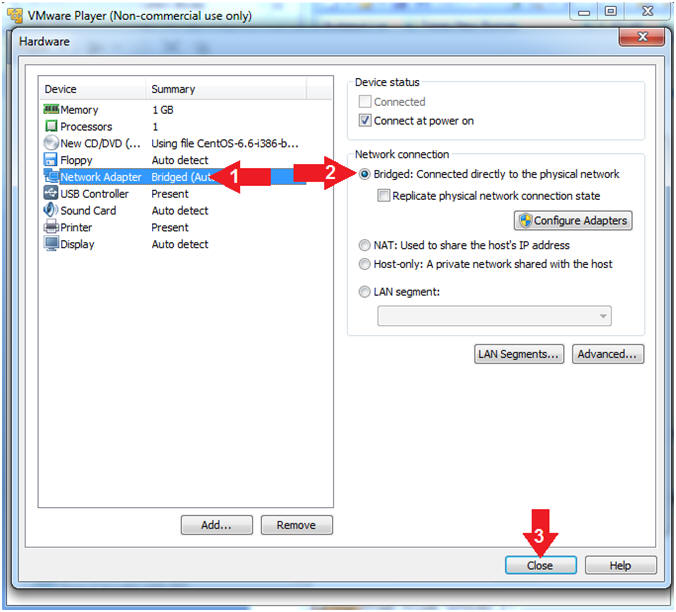
- Configure the Network Adapter
- Instructions:
- Click on Network Adapter
- Selected the Bridged radio button.
- Now, you can click the Close button.
- Note(FYI):
- If you are not behind your own personal home router or private network, select Host-only.
- Note: If you do choose Host-only, you will not be able to connect to the Internet on this Virtual Machine, Install Firefox and Complete this Lesson.
- Instructions:
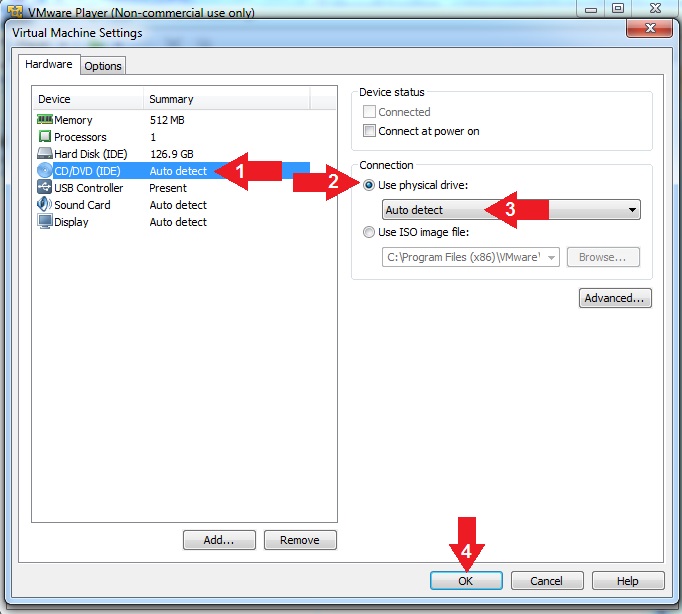
- Configure CD/DVD Settings
- Instructions:
- Click on CD/DVD(IDE)
- Click the Use physical drive radio button
- Select Auto detect
- Click the OK Button
- Instructions:
| Section 4: Play Damn Vulnerable WXP-SP2 |
- Start the Damn Vulnerable WXP-SP2
- Instructions:
- Click on Damn Vulnerable WXP-SP2
- Click on Play virtual machine
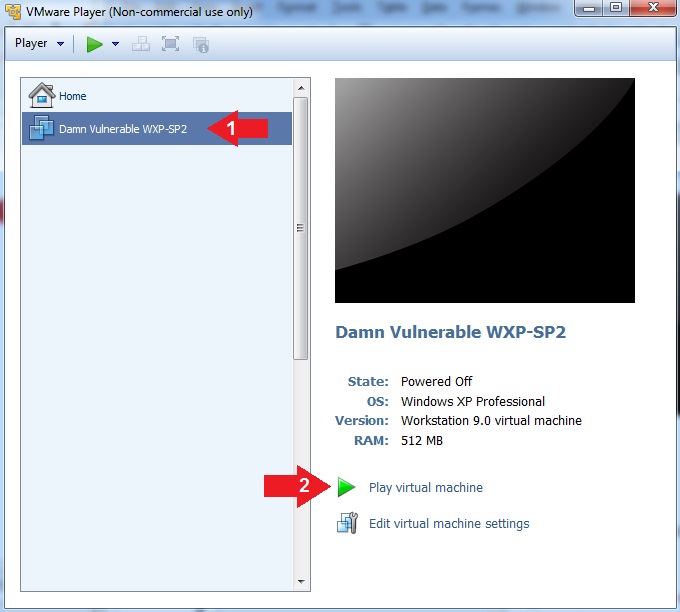
- Instructions:
| Section 5: Make Vulnerable |
- Open Control Panel
- Instructions:
- Click the Start Button
- Click on Control Panel

- Instructions:
- Open Windows Firewall
- Instructions:
- Double Click on Windows Firewall
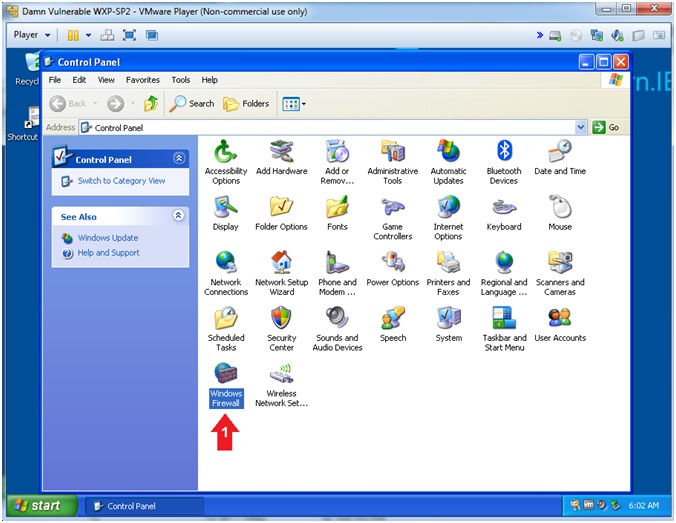
- Instructions:
- Turn Off Windows Firewall
- Instructions:
- Click the Off (not recommended) radio button
- Note(FYI):
- Obviously, it is never a good idea to turn off a host firewall. Accordingly, this VM will later be used to illustrate that point.
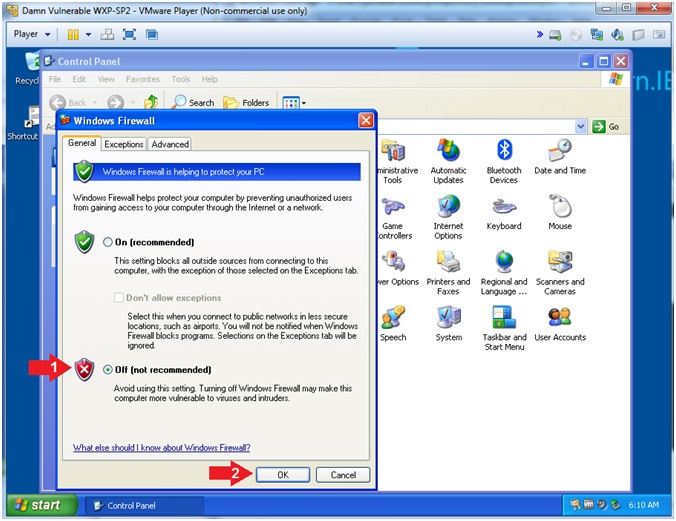
- Instructions:
- Open Automatic Updates
- Instructions:
- Double Click on Automatic Updates
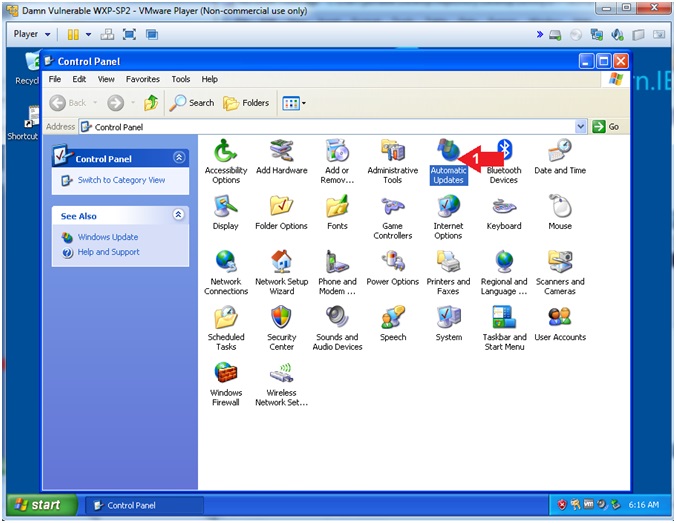
- Instructions:
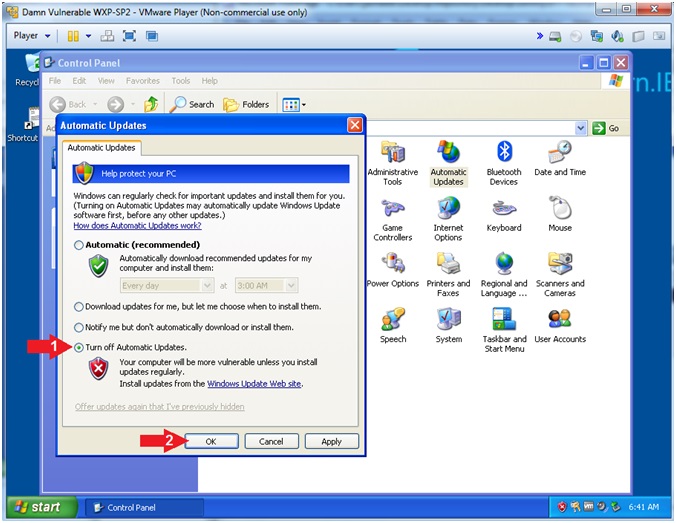
- Turn Automatic Updates Off
- Instructions:
- Click the Turn off Automatic Updates radio button
- Click the OK button
- Note(FYI):
- Obviously, it is never a good idea to turn off Automatic Updates. Accordingly, this VM will later be used to illustrate that point.
- Instructions:
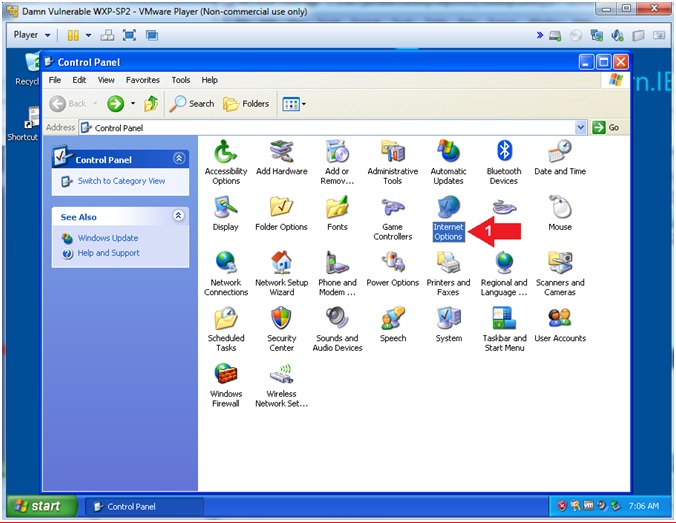
- Open Internet Options
- Instructions:
- Double Click on Internet Options
- Instructions:
- Default Home Page Configuration
- Instructions:
- Click the General Tab
- Click the Use Blank Button
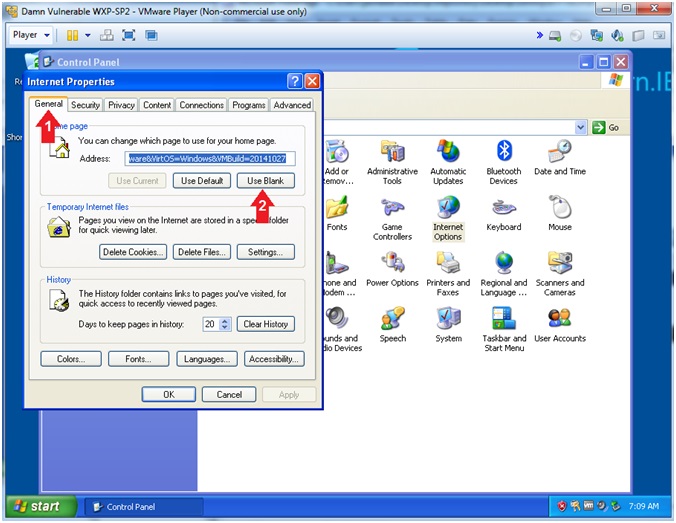
- Instructions:
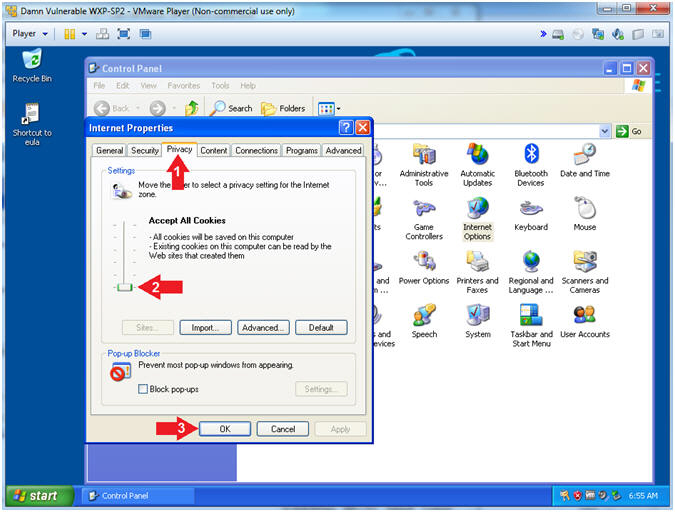
- Name the server
- Instructions:
- Click the Privacy Tab
- Select the lowest privacy level
- Click the OK Button.
- Instructions:
- Open Display
- Instructions:
- Double click on Display
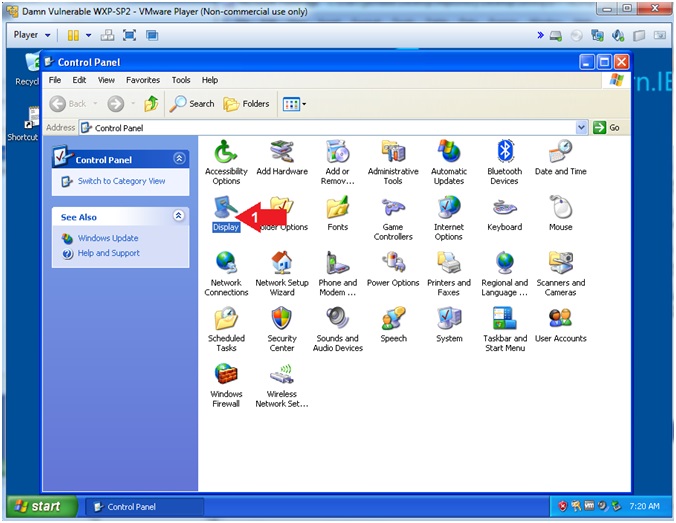
- Instructions:
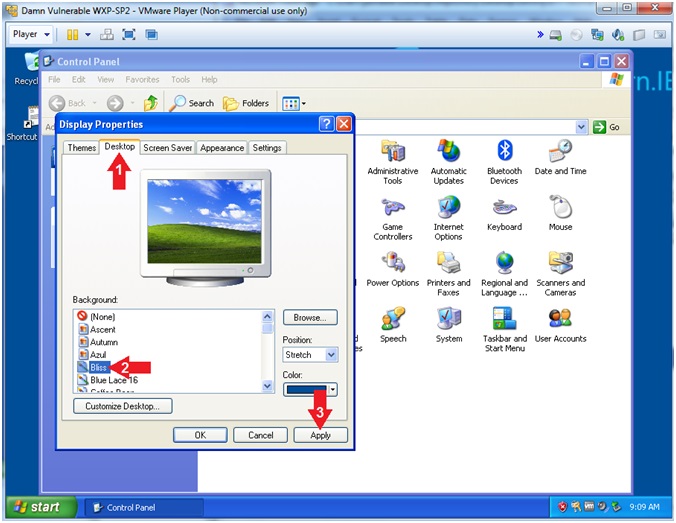
- Configure Desktop Background
- Instructions:
- Click on the Desktop Tab
- Background: Bliss
- Click the Apply Button
- Instructions:
- Configure Power Options Properties
- Instructions:
- Click on the Screen Saver Tab
- Click on the Power... Button
- Click on the Power Schemes Tab
- Power schemes: Home/Office Desk
- Click the OK Button (Power Options Properties Screen)
- Click the OK Button (Display Properties Screen)
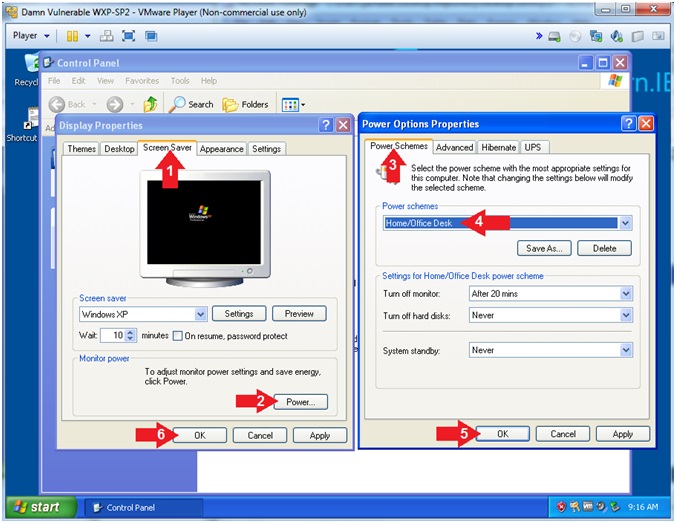
- Instructions:
- Open System Properties
- Instructions:
- Double click on System
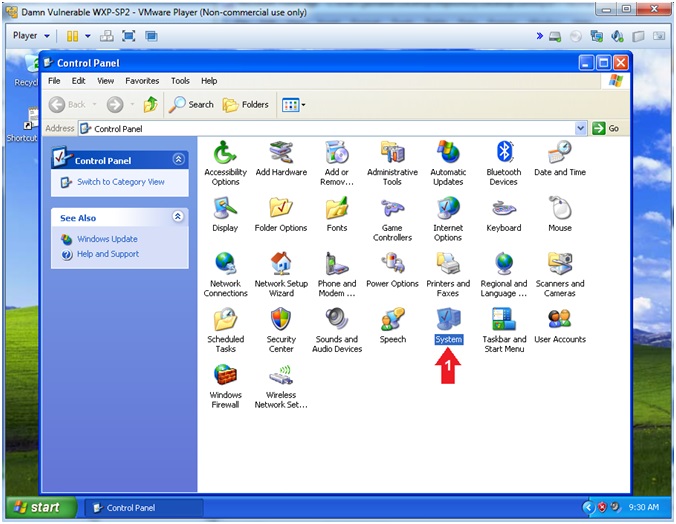
- Instructions:
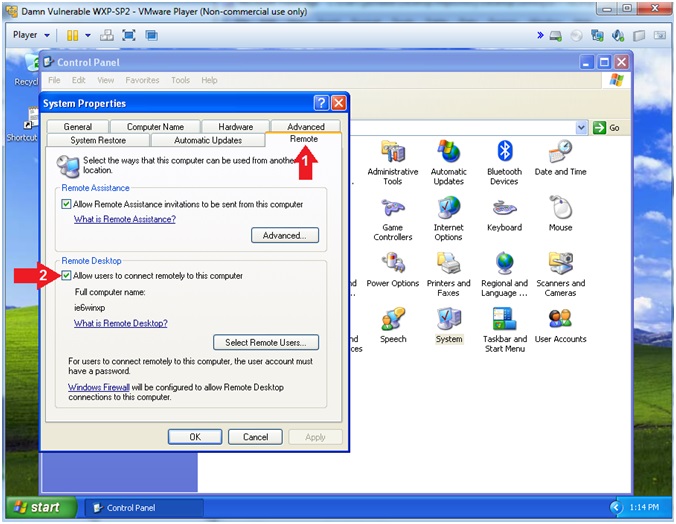
- Remote Desktop
- Instructions:
- Click on the Remote Tab
- Check the Allow users to connect remotely to this computer checkbox
- Instructions:
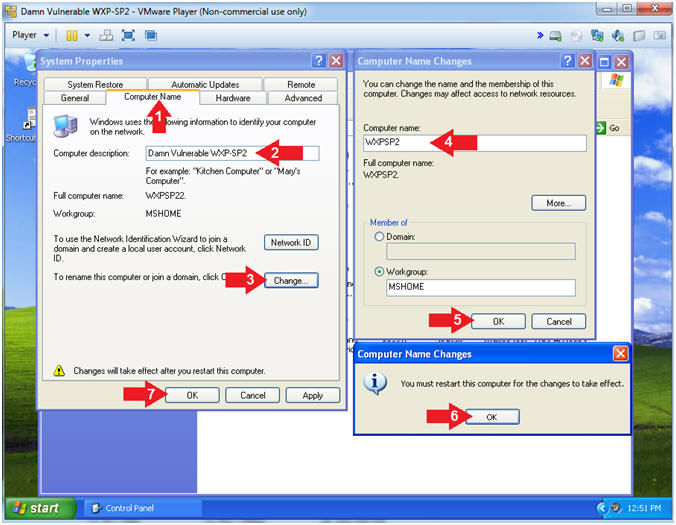
- Change Computer Name
- Instructions:
- Click on the Computer Name Tab
- Computer description: Damn Vulnerable WXP-SP2
- Click the Change Button
- Computer name: WXPSP2
- Click the OK Button
- Click the OK Button after the restart message appears.
- Instructions:
| Section 6: Set Weak Password |
- Open Control Panel
- Instructions:
- Click the Start Button
- Click on Control Panel
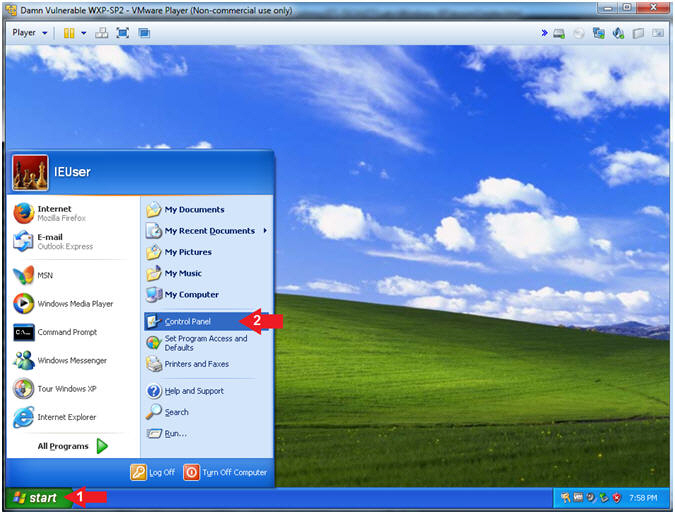
- Instructions:
- Open User Accounts
- Instructions:
- Double Click on User Accounts
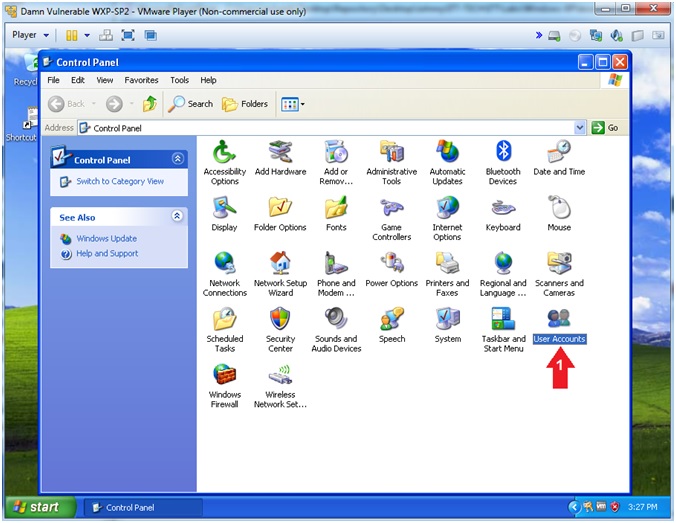
- Instructions:
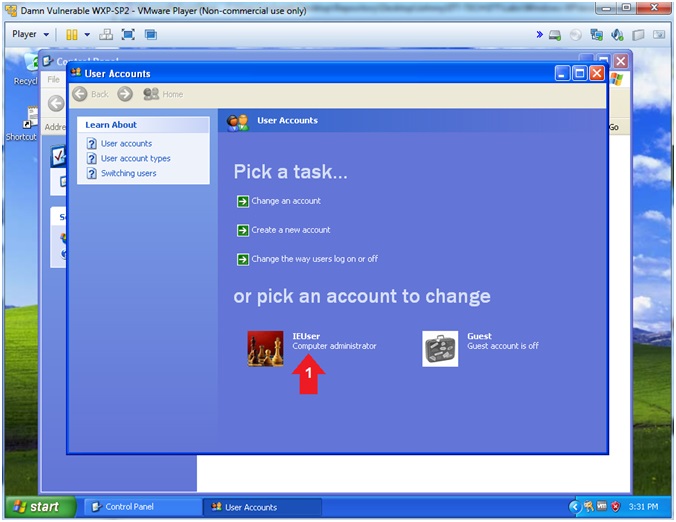
- Select Account
- Instructions:
- Double Click on the IEUser Account
-
- Instructions:
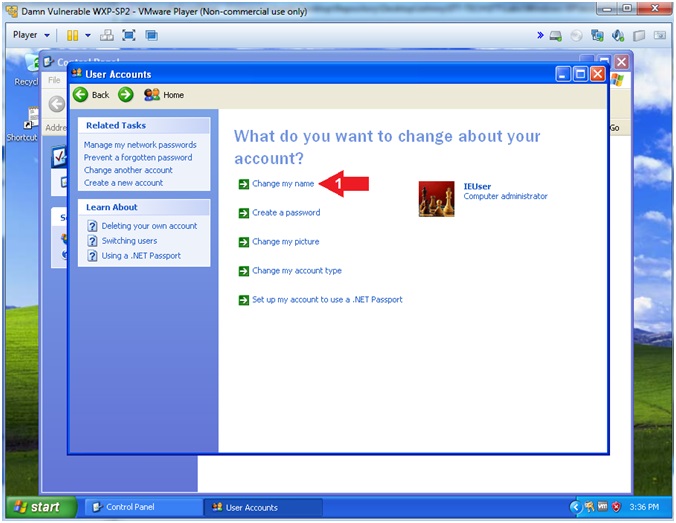
- Change my name (Part 1)
- Instructions:
- Click Change my name
- Instructions:
- Change Username (Part 2)
- Instructions:
- Replace IEUser with student
- Click the Change Name Button

- Instructions:
- Change Password (Part 1)
- Instructions:
- Click on Create a password
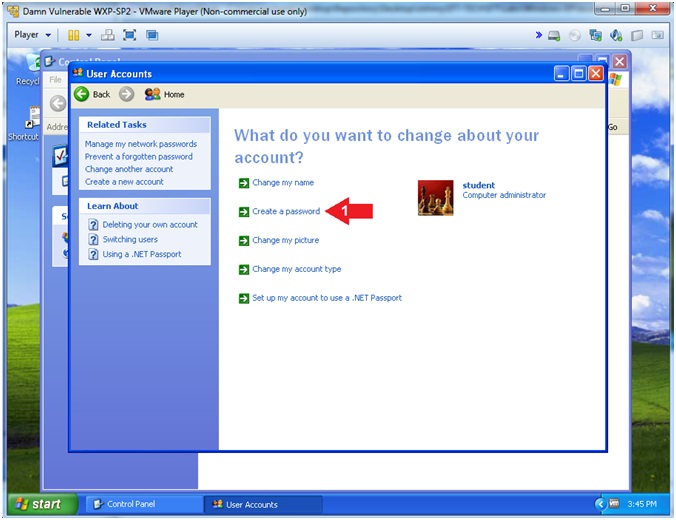
- Instructions:
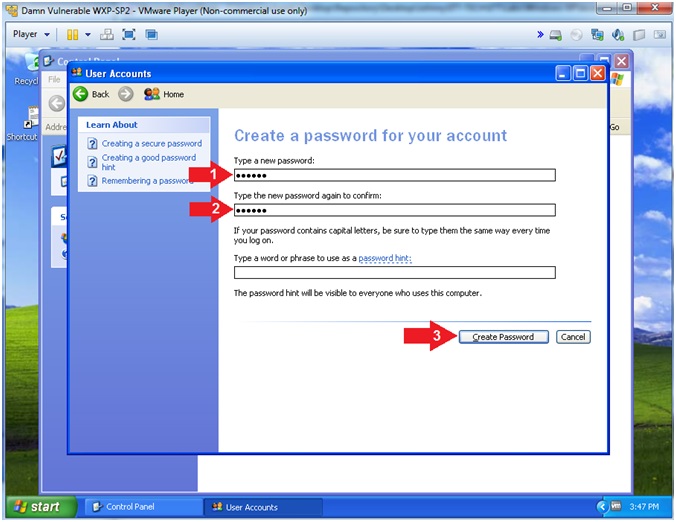
- Change Password (Part 2)
- Instructions:
- Type a new password: abc123
- Type the new password again to confirm: abc123
- Click the Create Password Button
- Note(FYI):
- Obviously, it is never a good idea to use an extremely weak password. Accordingly, this VM will later be used to illustrate that point.
- Instructions:
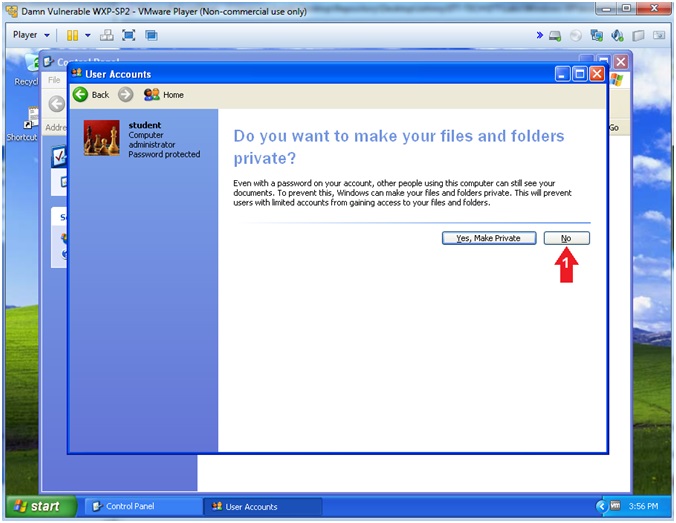
- Make Files Private
- Instructions:
- Click the No Button
- Note(FYI):
- Obviously, it is never a good idea to allow others to view your documents. Accordingly, this VM will later be used to illustrate that point.
- Instructions:
| Section 7: Enable Administrator Account |
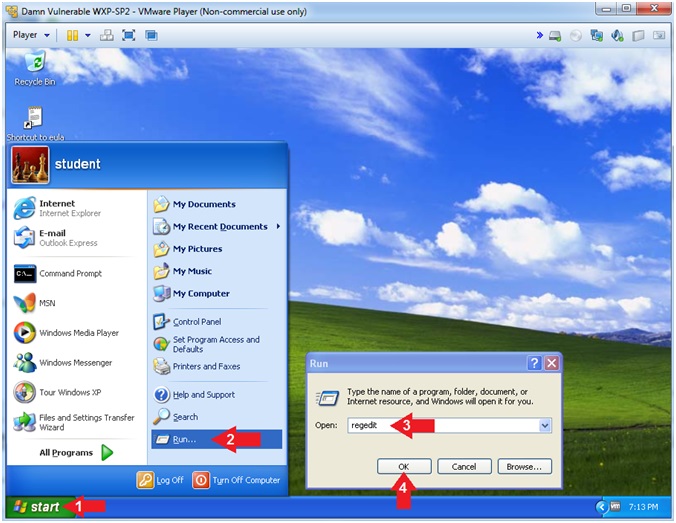
- Open Regedit
- Instructions:
- Click the Start Button
- Click Run
- Type regedit
- Click the OK Button
- Instructions:
- Registry Editor
- Instructions:
- Edit --> Find...
- Find what: UserList
- Click the Find Next Button
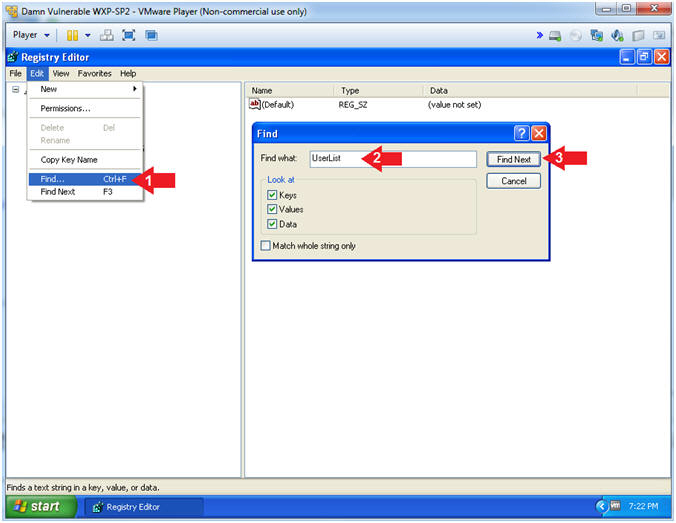
- Instructions:
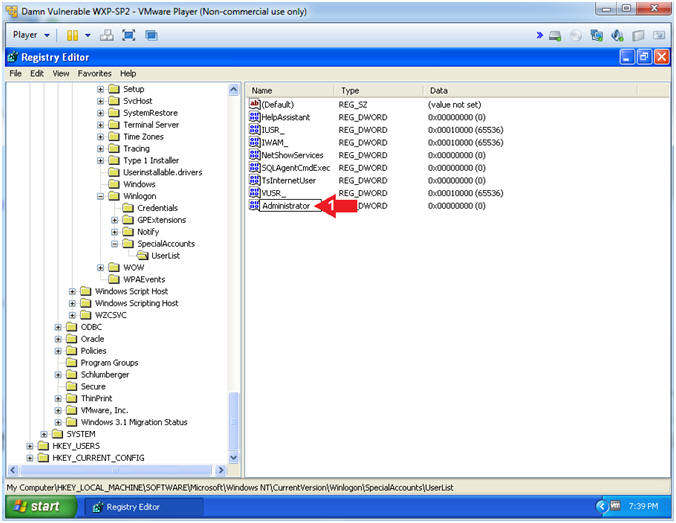
- Create Administrator DWORD (Part 1)
- Instructions:
- Click on UserList
- Edit --> New --> DWORD Value
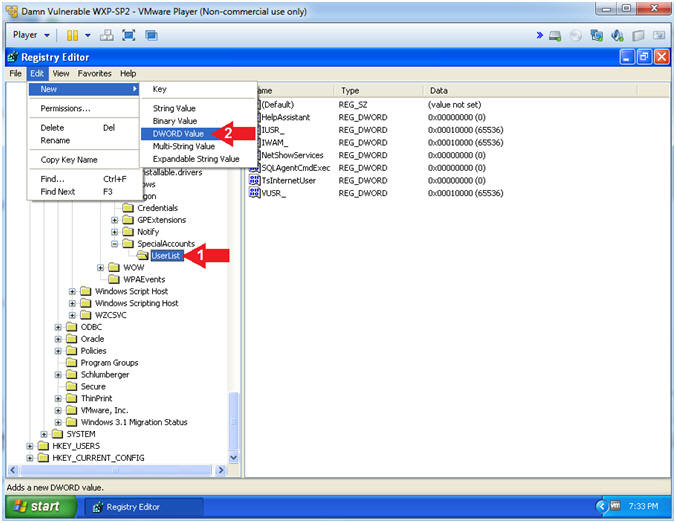
- Instructions:
- Create Administrator DWORD (Part 2)
- Instructions:
- Type Administrator
- Instructions:
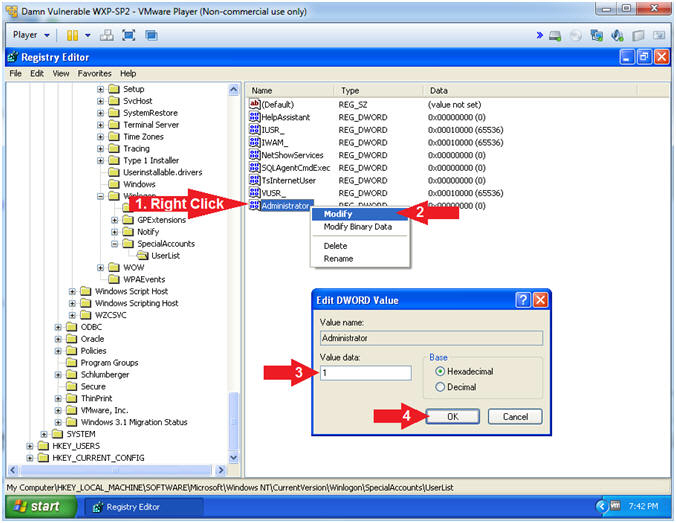
- Set Administrator DWORD Value
- Instructions:
- Right Click on Administrator
- Click Modify
- Value data: 1
- Click the OK Button
- Instructions:
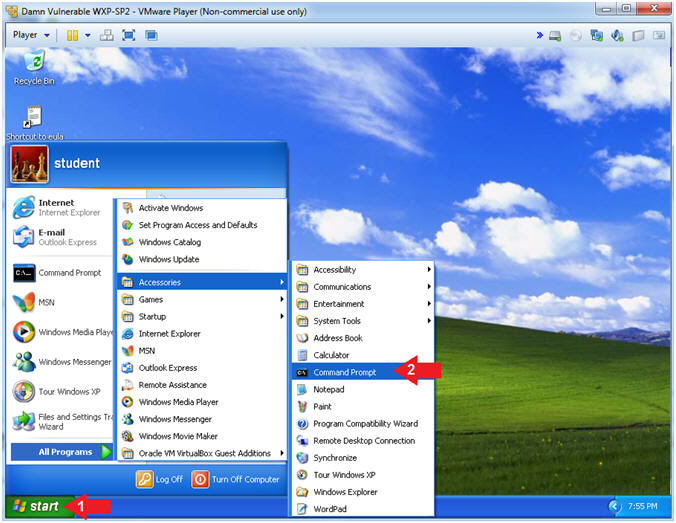
- Open the Command Prompt
- Instructions:
- Click the Start Button
- All Programs --> Accessories --> Command Prompt
- Instructions:
- Set Administrator Password
- Instructions:
- net user
- net user Administrator abc123
- Note(FYI):
- Show All Users
- Obviously, it is never a good idea to use an extremely weak password. Accordingly, this VM will later be used to illustrate that point.
- Instructions:

| Section 8: Remove All Windows XP Patches |
- Open Notepad
- Instructions:
- Click the Start Button
- All Programs --> Accessories --> Notepad
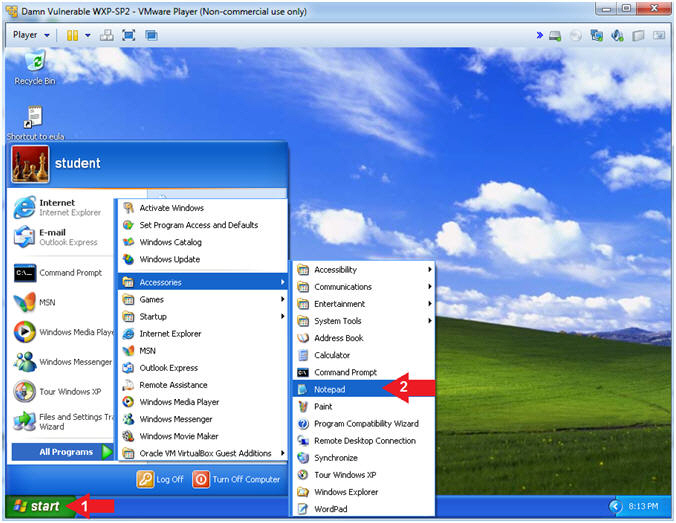
- Instructions:
- Copy and Paste Patch Removal Script
- Instructions:
- Copy the below text.
-
@ECHO OFF
Setlocal EnableDelayedExpansion
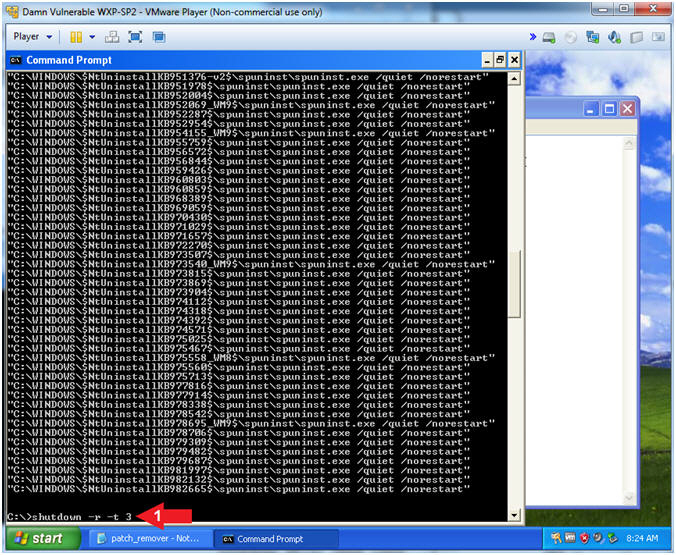
for /f "tokens=*" %%G in ('dir /b /s /a:d "C:\WINDOWS\$NTUninstallKB*"') do (
set MYVAR=%%G\spuninst\spuninst.exe
echo "!MYVAR! /quiet /norestart"
!MYVAR! /quiet /norestart
)
-
@ECHO OFF
- Paste Text in the Notepad Screen: Edit --> Paste
- Copy the below text.
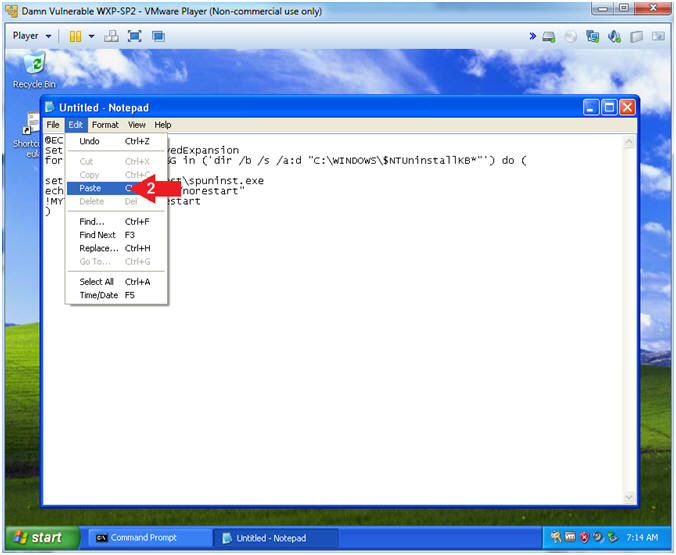
- Instructions:
- Save patch_remover.bat file
- Instructions:
- File --> Save As...
- Save in: Local Disk (C:)
- File name: patch_remover.bat
- Save as type: All Files
- Click the Save Button
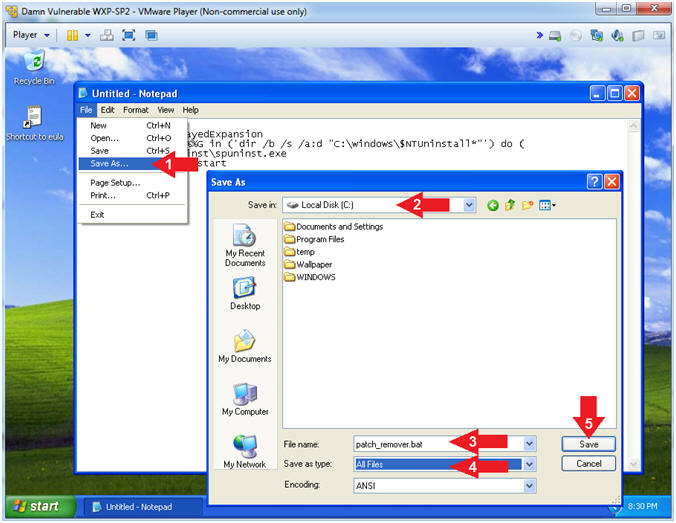
- Instructions:
- Open the Command Prompt
- Instructions:
- Click the Start Button
- All Programs --> Accessories --> Command Prompt
- Instructions:
- Remove Patches
- Instructions:
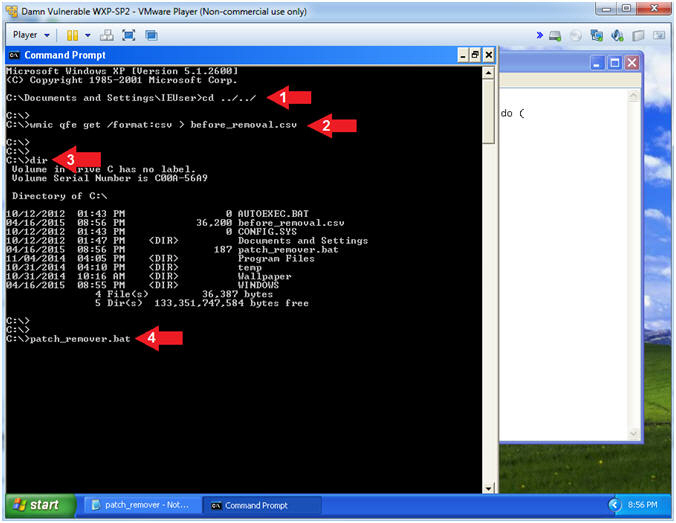
- cd ../../
- wmic qfe get /format:csv > before_removal.csv
- dir
- patch_remover.bat
- Note(FYI):
- Obviously, it is never a good idea to remove all the patches. Accordingly, this VM will later be used to illustrate various issues, such as MS08-067 and may others.
- The patch_remover.bat script will take around 5 minutes to execute.
- Instructions:
- Reboot Machine
- Instructions:
- shutdown -r -t 3
- Instructions:
- Login to Windows
- Instructions:
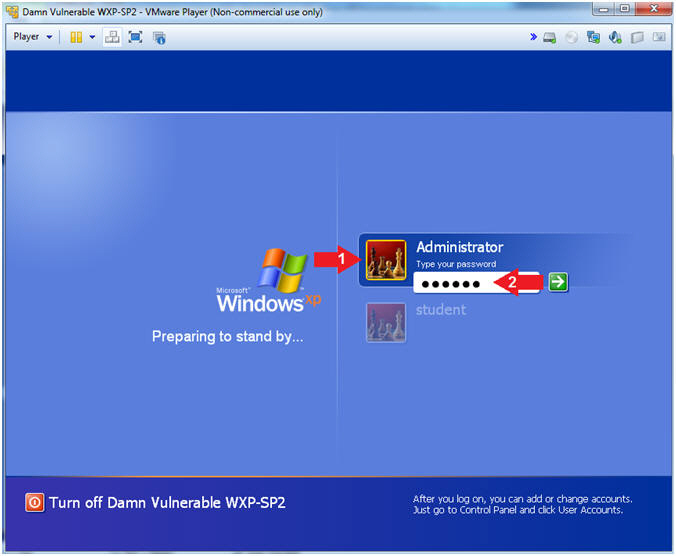
- Click on Administrator
- Type your password: abc123
- Instructions:
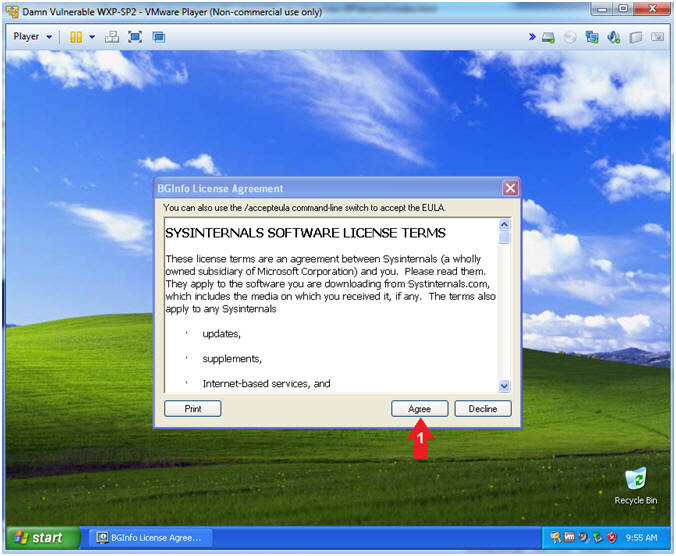
- EULA Agreement
- Instructions:
- Click the Agree button
- Instructions:
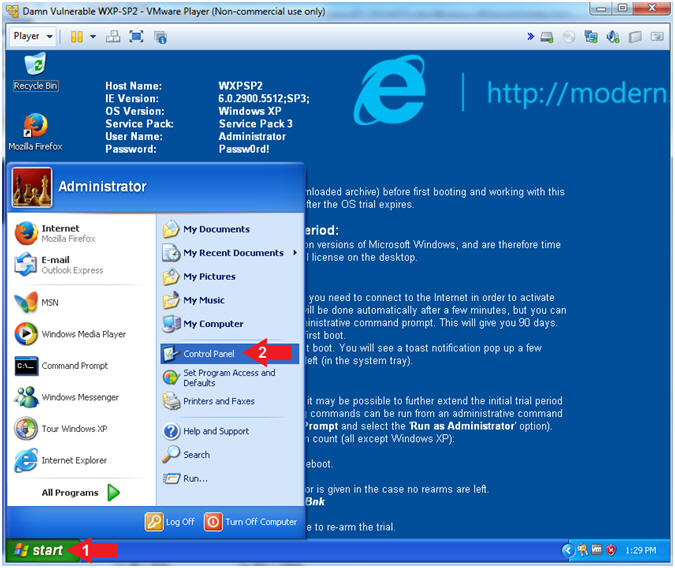
- Open Control Panel
- Instructions:
- Click the Start Button
- Click on Control Panel
- Instructions:
- Change Desktop
- Instructions:
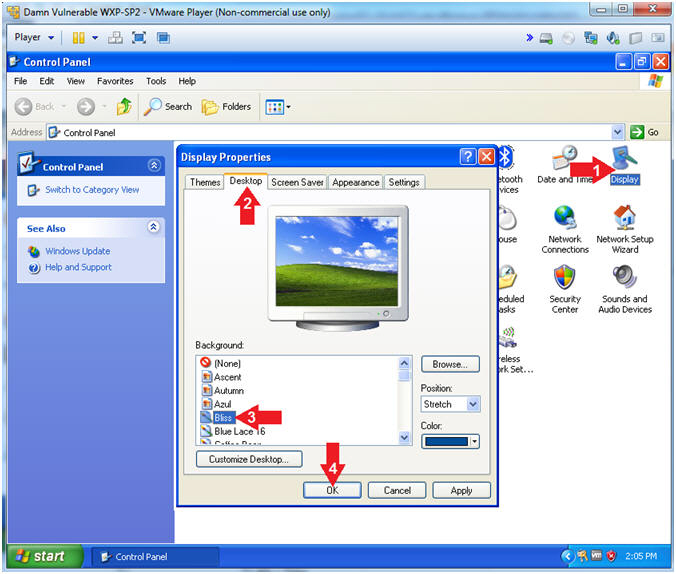
- Click the Display Icon
- Click on the Desktop Tab
- Click on the Bliss Background
- Click the OK Button
- Instructions:
- Open the Command Prompt
- Instructions:
- Click the Start Button
- All Programs --> Accessories --> Command Prompt
- Instructions:
- Remove Bginfo Background
- Instructions:
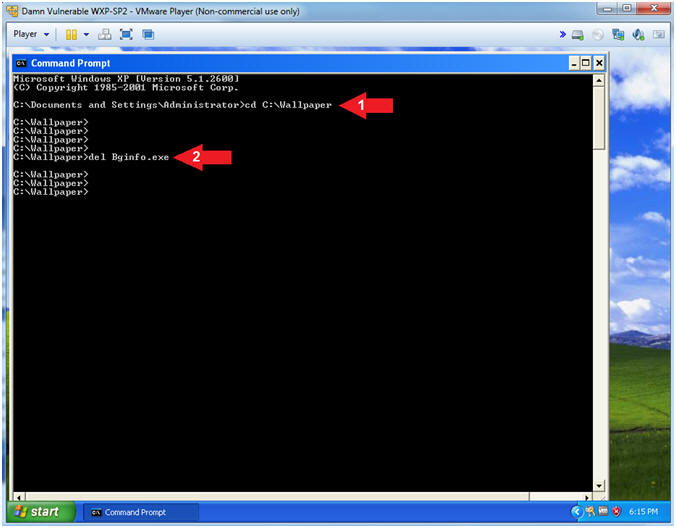
- cd C:\Wallpaper
- del Bginfo.exe
- Note(FYI):
- This is not necessary, unless you prefer the default background.
- Basically, it's up to you.
- Instructions:

| Section 9: Install Firefox |
- Open Internet Explorer
- Instructions:
- Click the Start Button
- All Programs --> Internet Explorer
- Instructions:
- Firefox Download URL
- Instructions:
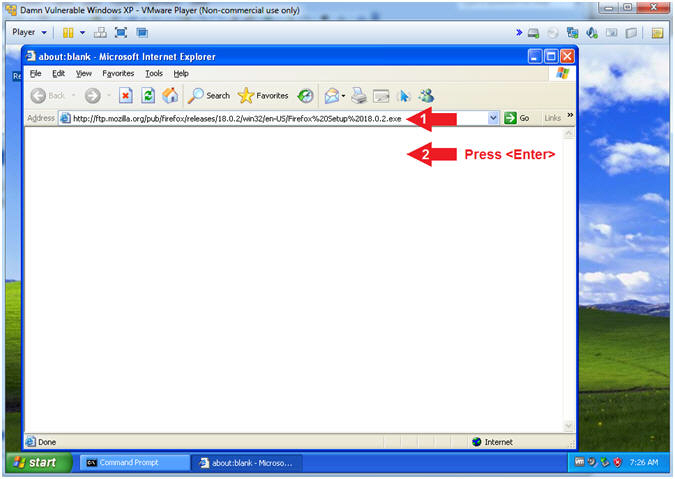
- Navigate to the following URL
- http://www.computersecuritystudent.com/WINDOWS/DVW/WXP_IE6/lesson1/Firefox_Setup_52.9.0esr.exe
- Press <Enter>
- Navigate to the following URL
- Note(FYI):
- Based on research, Version 18.0.2 is the most stable version of Firefox to Run on Windows XP.
- Instructions:
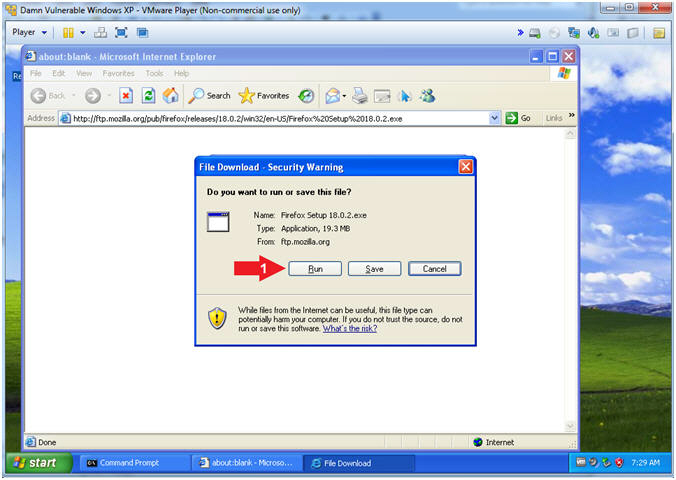
- File Download - Security Warning
- Instructions:
- Click the Run Button
- Instructions:
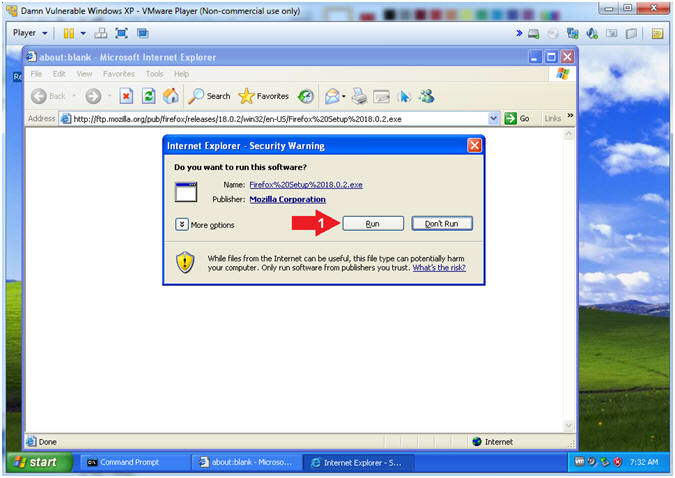
- Internet Explorer - Security Warning
- Instructions:
- Click the Run Button
- Instructions:
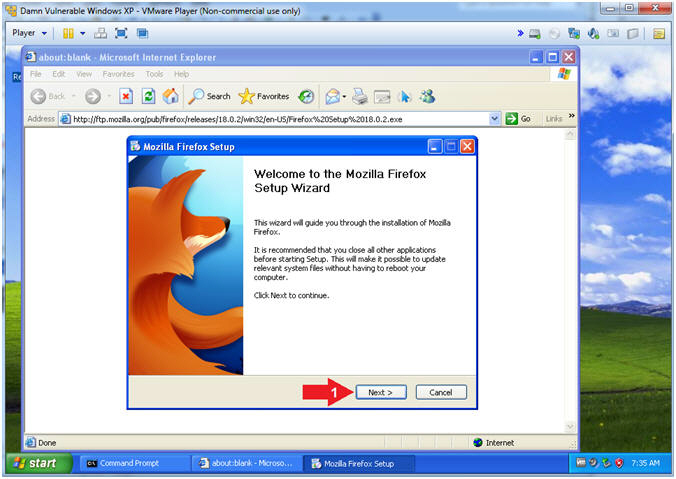
- FireFox Setup (Part 1)
- Instructions:
- Click the Next Button
- Instructions:
- FireFox Setup (Part 2)
- Instructions:
- Select the Standard Radio Button
- Click the Next Button
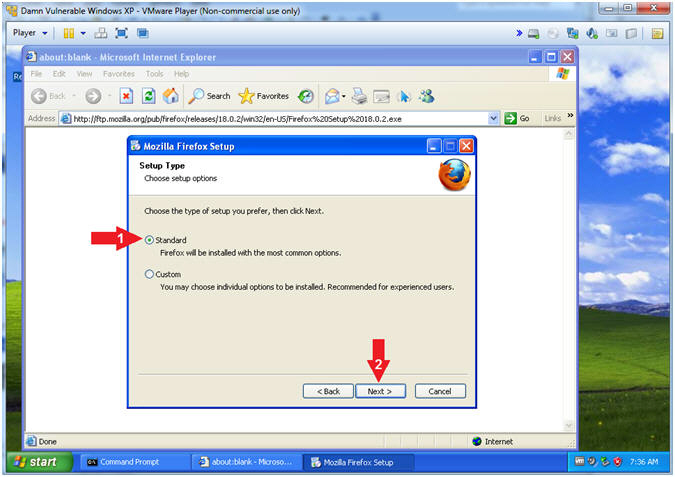
- Instructions:
- FireFox Setup (Part 3)
- Instructions:
- Check the Use Firefox as my default web browser Checkbox
- Click the Install Button
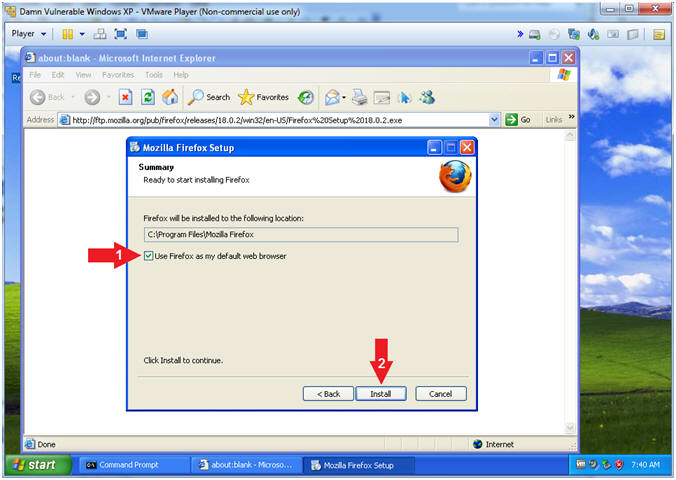
- Instructions:
- FireFox Setup (Part 4)
- Note(FYI):
- This process might take 1 minute

- Note(FYI):
- FireFox Setup (Part 5)
- Instructions:
- Check the Launch Firefox now Checkbox
- Click the Finish Button
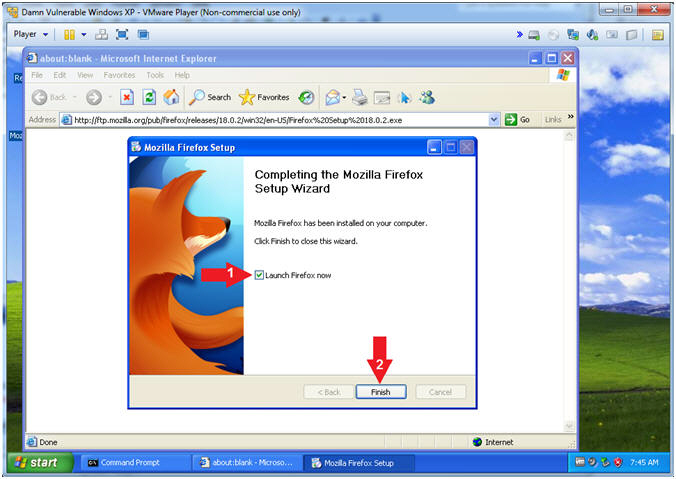
- Instructions:
- FireFox Setup (Part 6)
- Instructions:
- Click the Don't import anything Radio Button
- Click the Next Button
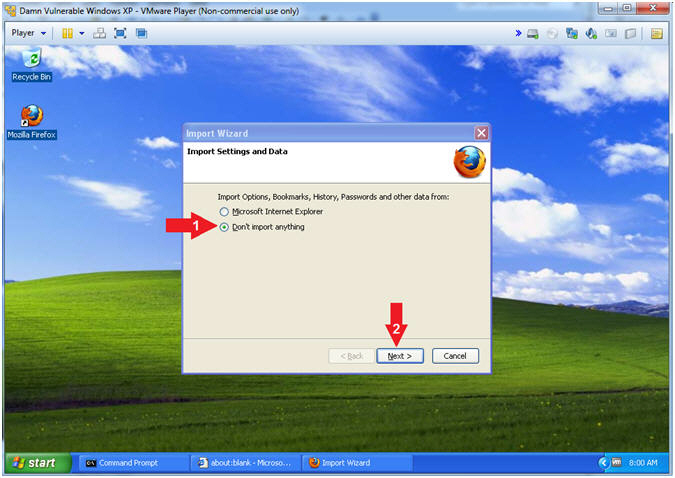
- Instructions:
- Firefox Options (Part 1)
- Instructions:
- Tools --> Options
- Instructions:
- Firefox Options (Part 2)
- Instructions:
- Click the General Tab
- Click the Always ask me where to save files radio button
- Click the X to close Options
- Click the X to close Firefox
- Instructions:
| Section 10: Install 7-zip |
- Open Firefox
- Instructions:
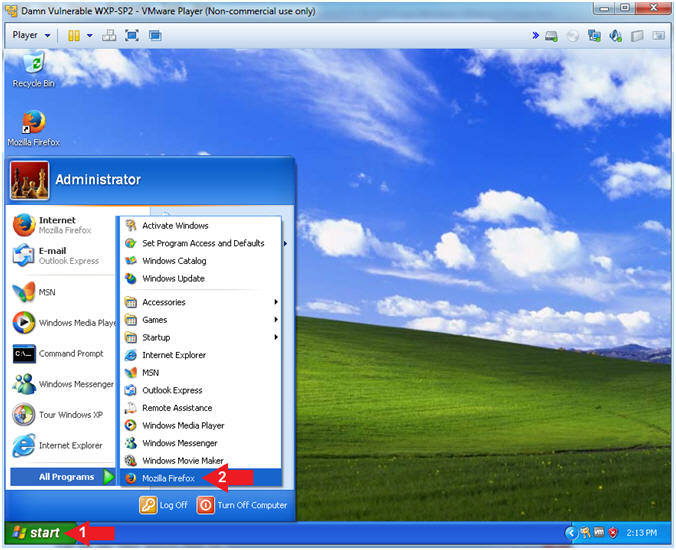
- Click the Start Button
- All Programs --> Mozilla Firefox
- Instructions:
- Start 7-Zip Download
- Instructions:
- http://www.7-zip.org
- Click Download
- Click the Save File Button
- Instructions:
- Save to Destination Folder
- Instructions:
- Navigate to Desktop --> My Documents --> Downloads
- Click the Save Button
- Instructions:
- Open Executable File
- Instructions:
- Tools --> Download
- Double Click on 7z*.msi file
- Click the OK Button
- Instructions:
- Open Executable File
- Instructions:
- Click the Run Button
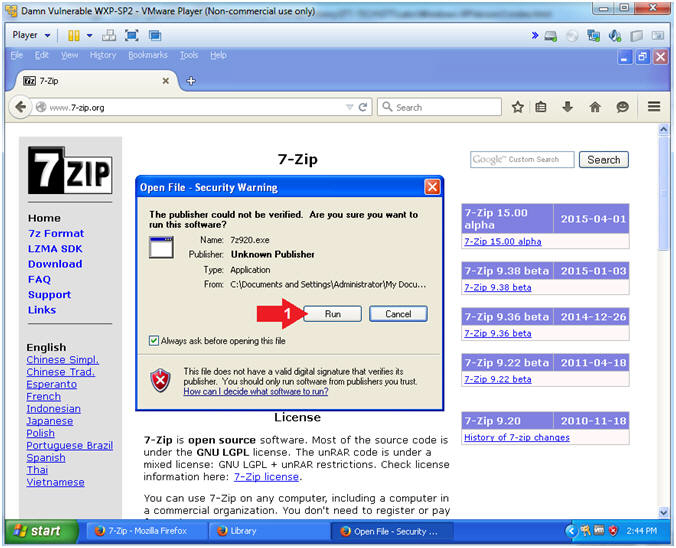
- Instructions:
- Install 7-Zip
- Instructions:
- Click the Install Button

- Instructions:
- 7-Zip Completion
- Instructions:
- Click the Finish Button
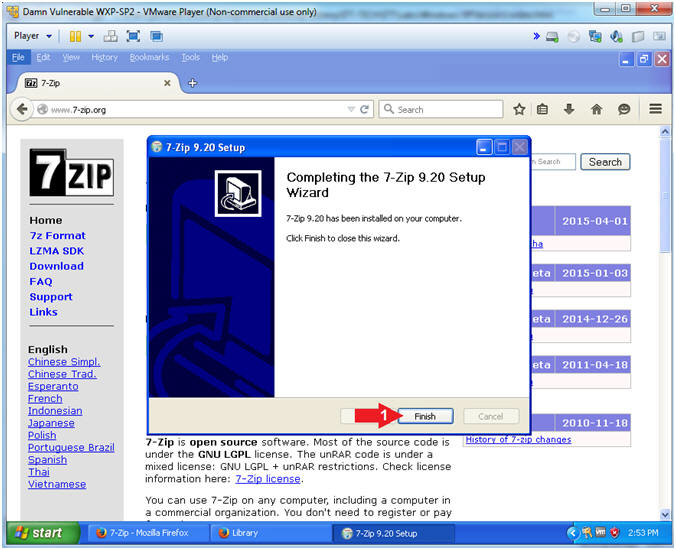
- Instructions:
- Start 7-Zip
- Instructions:
- Click the Start Button
- All Programs --> 7-Zip --> 7-Zip File Manager
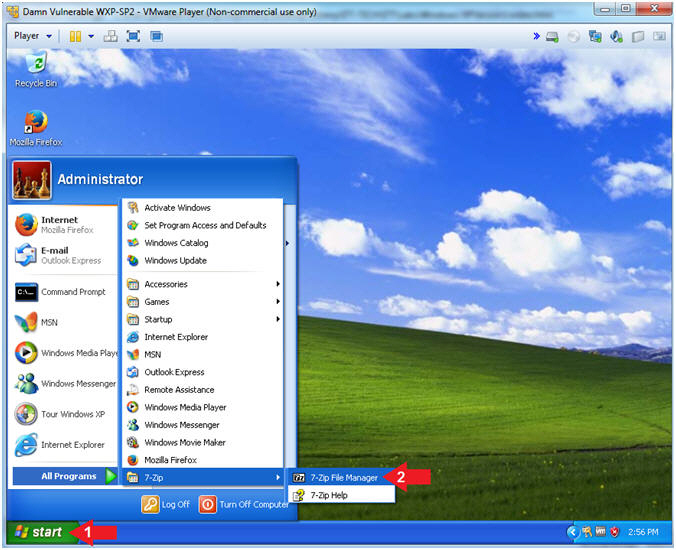
- Instructions:
- 7-Zip File Manager
- Note(FYI):
- The 7-Zip File Manager should have successfully started.
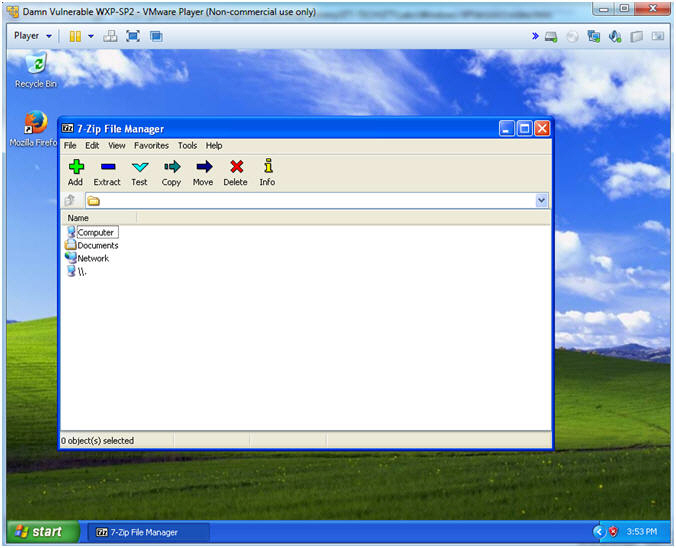
- Note(FYI):
| Section 11: Proof of Lab |
- Proof of Lab
- Instructions:
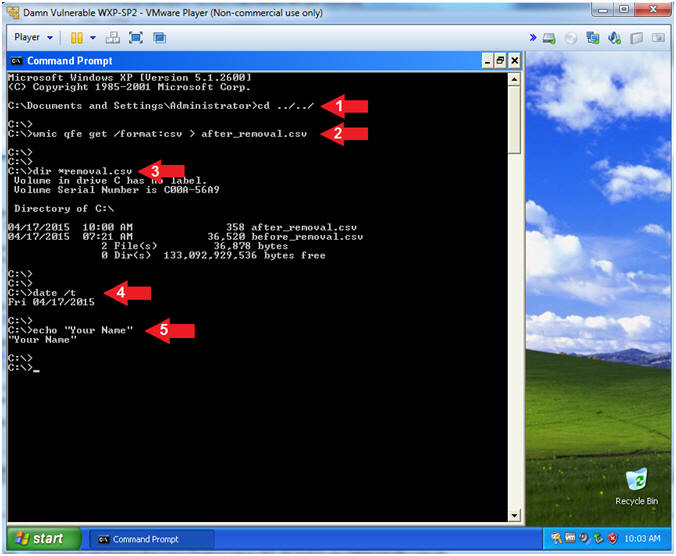
- cd ../../
- wmic qfe get /format:csv > after_removal.csv
- dir *removal.csv
- date /
- echo "Your Name"
- Put in your actual name in place of "Your Name"
- e.g., echo "John Gray"
-
Proof of Lab
Instructions
- Press the <Ctrl> and <Alt> key at the same time.
- Press the <PrtScn> key.
- Paste into a word document
- Upload to Moodle
- Instructions: