(Perl: Lesson 7)
{ Extracting with split, binding operator =~, & back references }
| Section 0. Background Information |
- What is Perl
- Perl is a high-level, general-purpose, interpreted, dynamic programming language. Perl was originally developed by Larry Wall in 1987 as a general-purpose Unix scripting language to make report processing easier. Since then, it has undergone many changes and revisions and become widely popular amongst programmers. Larry Wall continues to oversee development of the core language, and its upcoming version, Perl 6. Perl borrows features from other programming languages including C, shell scripting (sh), AWK, and sed. The language provides powerful text processing facilities without the arbitrary data length limits of many contemporary Unix tools, facilitating easy manipulation of text files. Perl gained widespread popularity in the late 1990s as a CGI scripting language, in part due to its parsing abilities.
- Getting Perl
- For the purposes of these perl lesson, I will be using a perl package that comes standard on Backtrack, Ubuntu and most flavors of Linux and Unix.
- However, if you are using Windows, instead
of a Linux, Unix or MAC operating system, you still have options.
- Pre-Requisite
-
Lab
Notes
- In this lab we will do the following:
- We will download a program that contains various extraction examples for the strings "PASS_MAX_DAYS 99999" and "PASS_MAX_DAYS=99999".
- The program will provide extraction examples using split, the binding operator =~, and using the special perl back reference variables $1 and $2.
- In this lab we will do the following:
- Legal Disclaimer
- As a condition of your use of this Web site, you warrant to computersecuritystudent.com that you will not use this Web site for any purpose that is unlawful or that is prohibited by these terms, conditions, and notices.
- In accordance with UCC § 2-316, this product is provided with "no warranties, either express or implied." The information contained is provided "as-is", with "no guarantee of merchantability."
- In addition, this is a teaching website that does not condone malicious behavior of any kind.
- Your are on notice, that continuing and/or using this lab outside your "own" test environment is considered malicious and is against the law.
- © 2013 No content replication of any kind is allowed without express written permission.
| Section 1. Login to BackTrack |
- Start Up VMWare Player
- Instructions:
- Click the Start Button
- Type Vmplayer in the search box
- Click on Vmplayer
-

- Instructions:
- Open a Virtual Machine
- Instructions:
- Click on Open a Virtual Machine
-

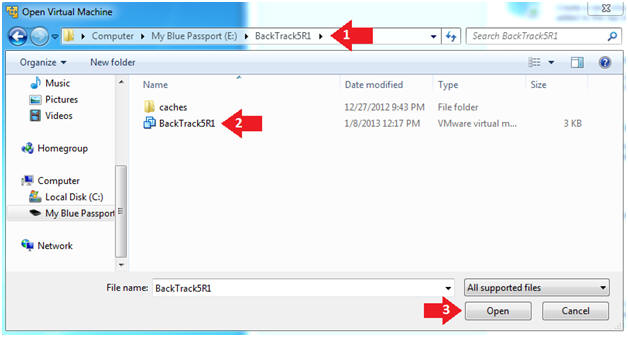
- Instructions:
- Open the BackTrack5R1 VM
- Instructions:
- Navigate to where the BackTrack5R1 VM is located
- Click on on the BackTrack5R1 VM
- Click on the Open Button
-
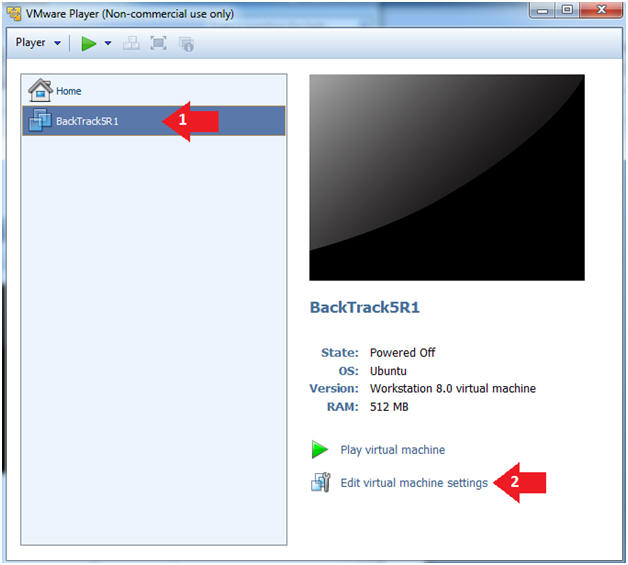
- Instructions:
- Edit the BackTrack5R1 VM
- Instructions:
- Select BackTrack5R1 VM
- Click Edit virtual machine settings
-
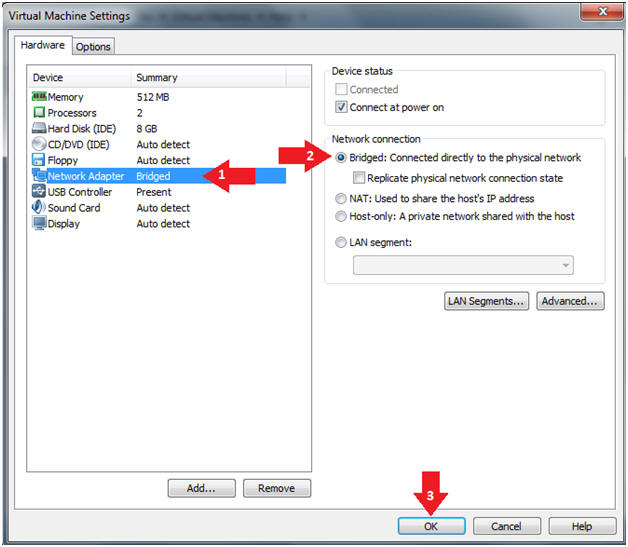
- Instructions:
- Edit Virtual Machine Settings
- Instructions:
- Click on Network Adapter
- Click on the Bridged Radio button
- Click on the OK Button
- Instructions:
- Play the BackTrack5R1 VM
- Instructions:
- Click on the BackTrack5R1 VM
- Click on Play virtual machine
-

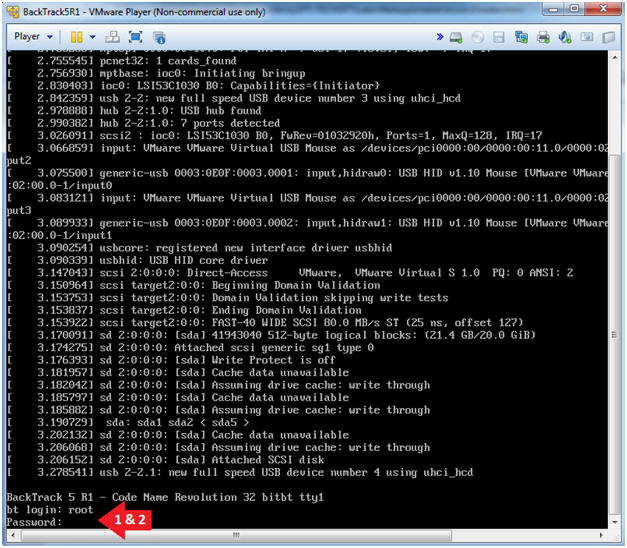
- Instructions:
- Login to BackTrack
- Instructions:
- Login: root
- Password: toor or <whatever you changed it to>.
-
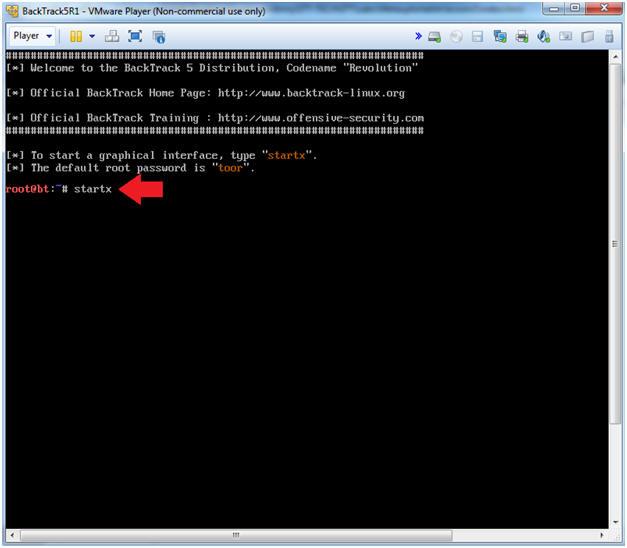
- Instructions:
- Bring up the GNOME
- Instructions:
- Type startx
-
- Instructions:
| Section 2. Bring up a console terminal |
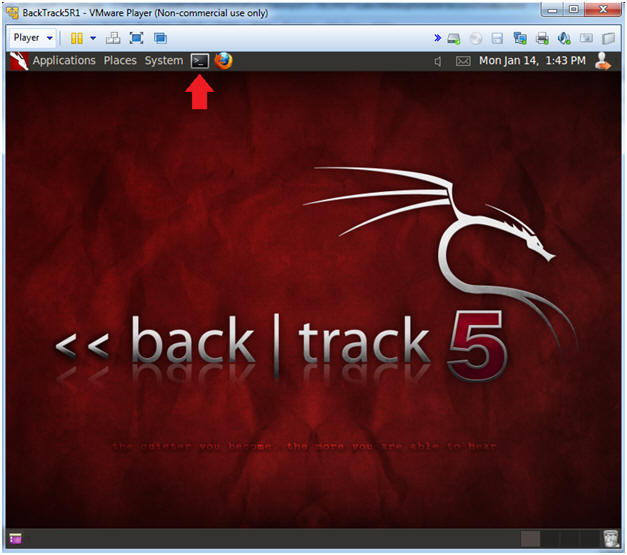
- Start up a terminal window
- Instructions:
- Click on the Terminal Window
- Instructions:
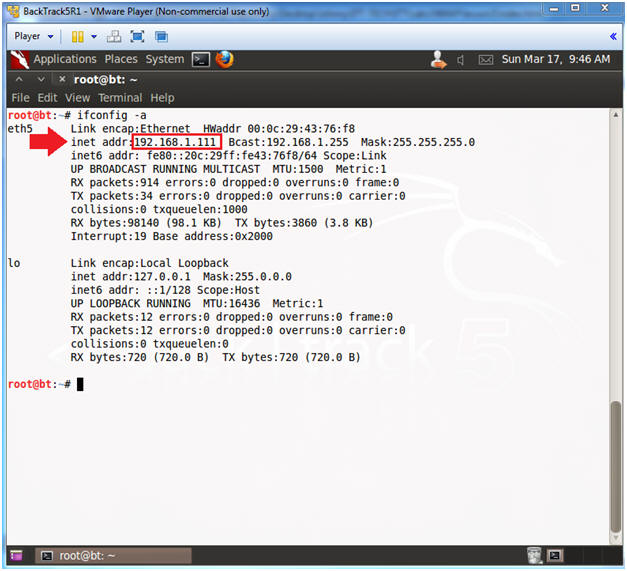
- Obtain the IP Address
- Instructions:
- ifconfig -a
- Note(FYI):
- My IP address 192.168.1.111.
- In your case, it will probably be different.
-
- Instructions:
| Section 3. Download lesson7a.pl |
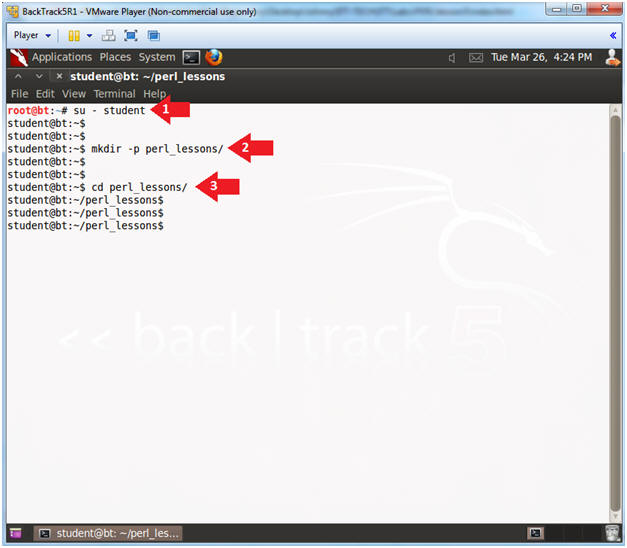
- Become the student user and make a directory
- Instructions:
- su - student
- mkdir -p perl_lessons
- cd perl_lessons
- Instructions:
- Download lesson7a.pl
- Instructions:
- wget http://www.computersecuritystudent.com/UNIX/PERL/lesson7/lesson7a.pl
- chmod 700 lesson7a.pl
- perl -c lesson7a.pl
- Instructions:
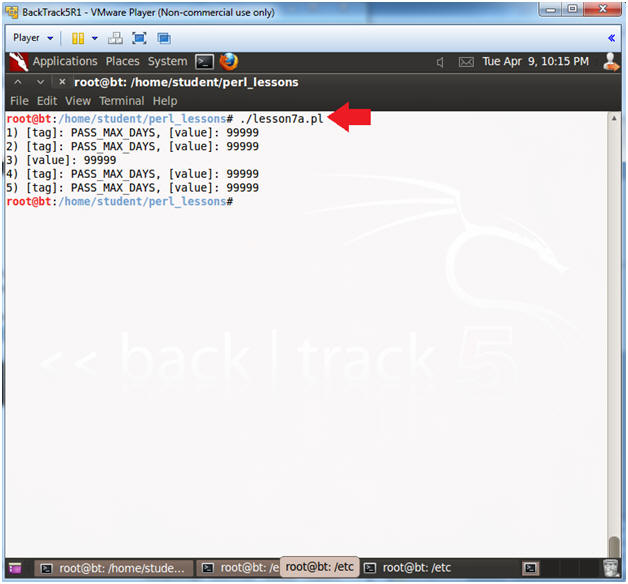
- Run lesson7a.pl
- Instructions:
- ./lesson7a.pl
- Note(FYI):
- Before continuing to the proof of lab section.
- Read each line of the code and examine how each subroutine executes.
- Then read the following "Analyze The Code" section.
- Instructions:

| Section 4. Analyze The Code |
- SheBang Directive
- Instructions:
- vi lesson7a.pl
- :set nu
- Press the <Enter> key
- Note(FYI):
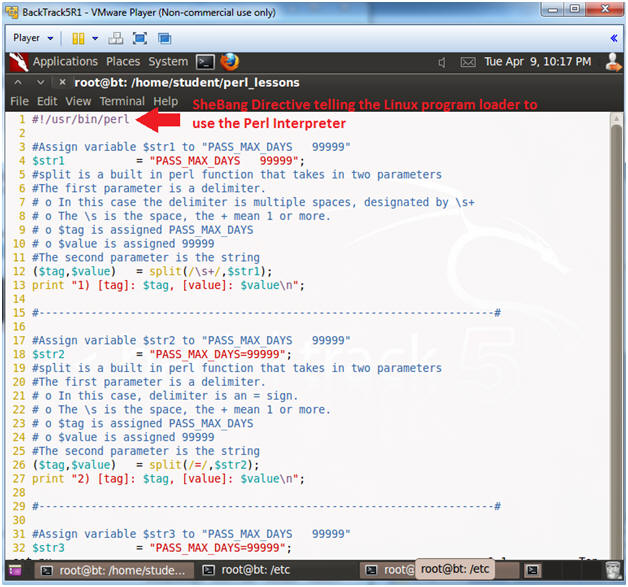
- Line 1: #!/usr/bin/perl
- #! - is called the SheBang Directive. SheBang is an interpreter directive that tells Linux to load the following program.
- /usr/bin/perl - is the Perl Interpreter. SheBang tells the program loader to run the Perl Interpreter.
- Line 1: #!/usr/bin/perl
- Instructions:
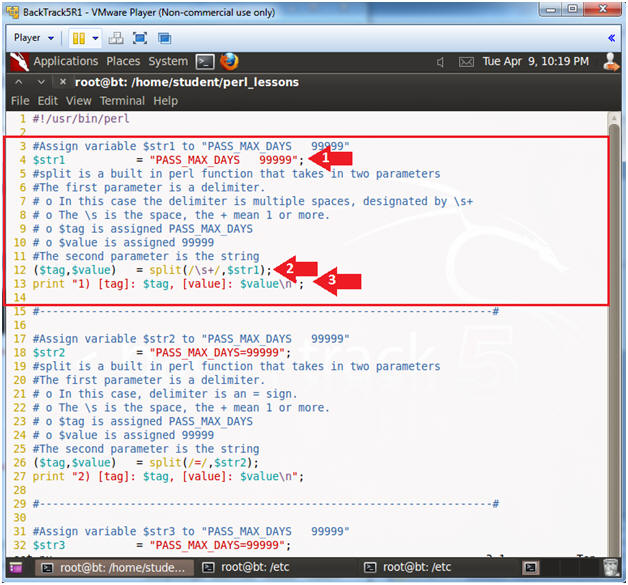
- Explaining Lines 3 through 14
- Instructions:
- Arrow down to line 4
- Note(FYI):
- Line 4: $str1 = "PASS_MAX_DAYS 99999";
- Assign the string "PASS_MAX_DAYS 99999" to variable $str1.
- Line 12: ($tag,$value) =
split(/\s+/,$str1);
- Use the split function to parse out the tag PASS_MAX_DAYS and its' value 99999 from the variable $str, using the delimiter "\s+".
- Line 13: print "1) [tag]: $tag,
[value]: $value\n";
- Print the extracted values for $tag and $value.
- Line 4: $str1 = "PASS_MAX_DAYS 99999";
- Instructions:
- Explaining Lines 15 through 28
- Instructions:
- Arrow down to line 18
- Note(FYI):
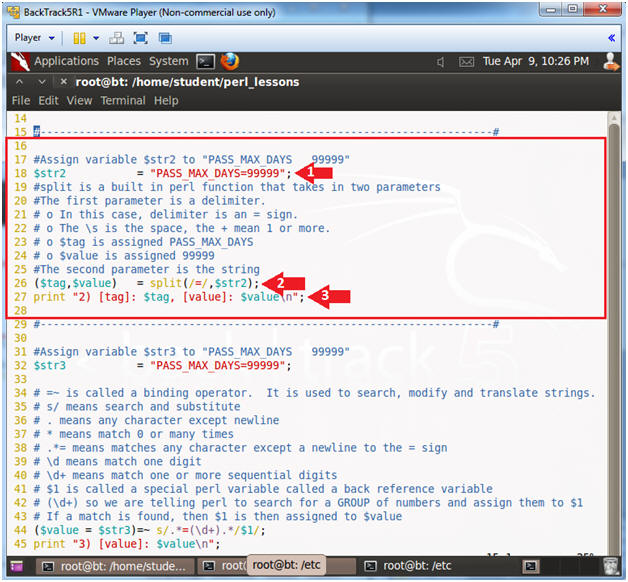
- Line 18: $str2 = "PASS_MAX_DAYS 99999";
- Assign the string "PASS_MAX_DAYS 99999" to variable $str2.
- Line 26: ($tag,$value) =
split(/=/,$str1);
- Use the split function to parse out the tag PASS_MAX_DAYS and its' value 99999 from the variable $str, using the delimiter "=".
- Line 27: print "2) [tag]: $tag,
[value]: $value\n";
- Print the extracted values for $tag and $value.
- Line 18: $str2 = "PASS_MAX_DAYS 99999";
- Instructions:
- Explaining Lines 30 through 46
- Instructions:
- Arrow down to line 32
- Note(FYI):
- Line 32: $str3 = "PASS_MAX_DAYS=99999";
- Assign the string "PASS_MAX_DAYS 99999" to variable $str2.
- Line 46: ($value = $str3)=~
s/.*=(\d+).*/$1/;
- # =~ is called a binding operator. It
is used to search, modify and translate strings.
# s/ means search and substitute
# . means any character except newline
# * means match 0 or many times
# .*= means matches any character except a newline to the = sign
# \d means match one digit
# \d+ means match one or more sequential digits
# $1 is called a special perl variable called a back reference variable
# (\d+) so we are telling perl to search for a GROUP of numbers and assign them to $1
# If a match is found, then $1 is then assigned to $value
- # =~ is called a binding operator. It
is used to search, modify and translate strings.
- Line 45: print "3) [value]: $value\n";
- Print the extracted number $value.
- Line 32: $str3 = "PASS_MAX_DAYS=99999";

- Instructions:
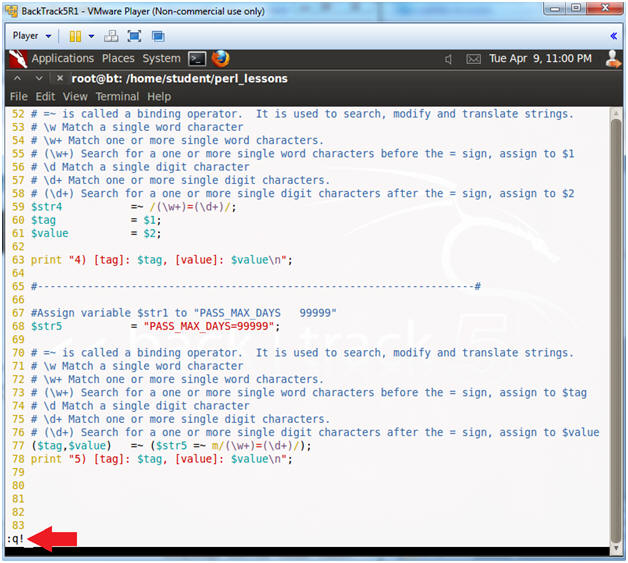
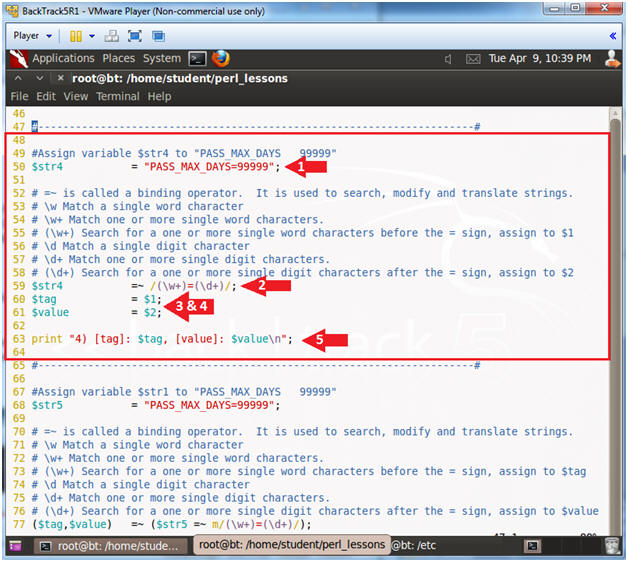
- Explaining Lines 48 through 64
- Instructions:
- Arrow down to line 50
- Note(FYI):
- Line 50: $str4 = "PASS_MAX_DAYS 99999";
- Assign the string "PASS_MAX_DAYS 99999" to variable $str2.
- Line 59: $str4 =~ /(\w+)=(\d+)/;
- # =~ is called a binding operator. It
is used to search, modify and translate strings.
# \w Match a single word character
# \w+ Match one or more single word characters.
# (\w+) Search for a one or more single word characters before the = sign, assign to $1
# \d Match a single digit character
# \d+ Match one or more single digit characters.
# (\d+) Search for a one or more single digit characters after the = sign, assign to $2
- # =~ is called a binding operator. It
is used to search, modify and translate strings.
- Line 60: $tag = $1;
- Assign $1, which is equivalent to the match (\w+), which is equivalent to PASS_MAX_DAYS
- Line 61: $value = $2;
- Assign $2, which is equivalent to the match (\d+), which is equivalent to the extracted value of 99999.
- Line 63: print "4) [tag]: $tag,
[value]: $value\n";
- Print the extracted values for $tag and $value.
- Line 50: $str4 = "PASS_MAX_DAYS 99999";
- Instructions:
- Explaining Lines 66 through 81
- Instructions:
- Arrow down to line 68
- Note(FYI):
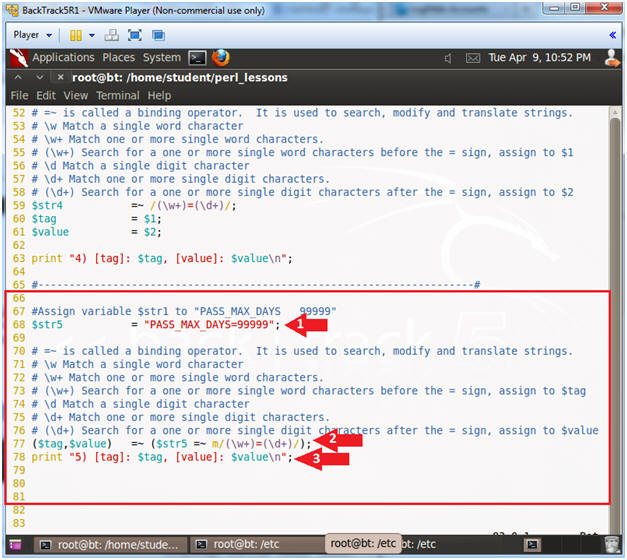
- Line 68: $str5 = "PASS_MAX_DAYS=99999";
- Assign the string "PASS_MAX_DAYS=99999" to variable $str5.
- Line 77: ($tag,$value) =~ ($str5 =~
m/(\w+)=(\d+)/);
- # =~ is called a binding operator. It
is used to search, modify and translate strings.
# \w Match a single word character
# \w+ Match one or more single word characters.
# (\w+) Search for a one or more single word characters before the = sign, assign to $tag
# \d Match a single digit character
# \d+ Match one or more single digit characters.
# (\d+) Search for a one or more single digit characters after the = sign, assign to $value
- # =~ is called a binding operator. It
is used to search, modify and translate strings.
- Line 78: print "5) [tag]: $tag,
[value]: $value\n";
- Print the extracted values for $tag and $value.
- Line 68: $str5 = "PASS_MAX_DAYS=99999";
- Instructions:
- Save and Quit
- Instructions:
- Press the <Esc> key
- :q!
- Press the <Enter> key
- Instructions:
| Section 5. Proof of Lab |
- Project
- Instructions:
- You will be creating two seperate programs: lesson7b.pl and lesson7c.pl.
- vi lesson7b.pl
- Define the SheBang Perl Directive
- e.g., #!/usr/bin/perl
- The program should ask for today's
date.
- e.g., print "Enter today\'s date in the following format (YYYY-MM-DD): ";
- The program should assign variable
$date to standard input
- e.g., chomp(my $date = <stdin>);
- The program should split $date into the
variables $year, $month and $day.
- e.g., ($year,$month,$day) = split(/-/,$date);
- The program should display the date in
a different format.
- e.g., print "Today\'s date: $day/$month/$year\n";
- Define the SheBang Perl Directive
- vi lesson7c.pl
- Define the SheBang Perl Directive
- e.g., #!/usr/bin/perl
- The program should ask for today's
date.
- e.g., print "Enter today\'s date in the following format (YYYY-MM-DD): ";
- The program should assign variable
$date to standard input
- e.g., chomp(my $date = <stdin>);
- The program should split $date into the
variables $year, $month and $day.
- e.g., ($year,$month,$day) = ($date =~ m/(\d+)-(\d+)-(\d+)/);
- The program should display the date in
a different format.
- e.g., print "Today\'s date: $day/$month/$year\n";
- Define the SheBang Perl Directive
- Instructions:
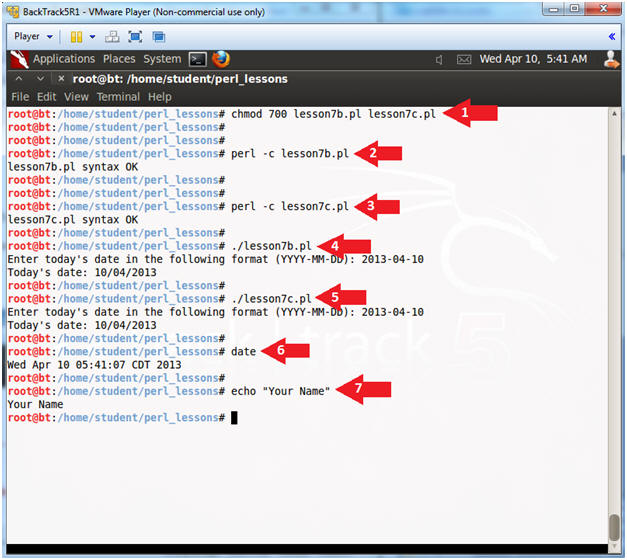
- Proof of Lab
- Instructions
- chmod 700 lesson7b.pl lesson7c.pl
- perl -c lesson7b.pl
- perl -c lesson7c.pl
- ./lesson7b.pl
- Enter Today's Date: 2013-04-10
- ./lesson7c.pl
- Enter Today's Date: 2013-04-10
- date
- echo "Your Name"
- Put in your actual name in place of "Your Name"
- e.g., echo "John Gray"
- Do a PrtScn, Paste into a word document, and upload to Moodle.
-
Proof Of Lab
Instructions:
- Press the PrtScn key
- Paste into a word document
- Upload to Moodle
- Instructions