(Forensics: WinAudit Lesson 1)
{ System Inventory }
| Section 0: Background Information |
- Background
- WinAudit is a great free tool, that will give you a comprehensive view of the components that make up your system, including hardware, software and BIOS.
-
Lab
Notes
- In this lab we will do the following:
- Download WinAudit.
- Install WinAudit.
- Create Audit Report
- Interrogate Audit Report Sections.
- In this lab we will do the following:
- Legal Disclaimer
- As a condition of your use of this Web site, you warrant to computersecuritystudent.com that you will not use this Web site for any purpose that is unlawful or that is prohibited by these terms, conditions, and notices.
- In accordance with UCC § 2-316, this product is provided with "no warranties, either express or implied." The information contained is provided "as-is", with "no guarantee of merchantability."
- In addition, this is a teaching website that does not condone malicious behavior of any kind.
- You are on notice, that continuing and/or using this lab outside your "own" test environment is considered malicious and is against the law.
- © 2012 No content replication of any kind is allowed without express written permission.
| Section 1: Power On Damn Vulnerable WXP-SP2 |
- Start VMware Player
- Instructions
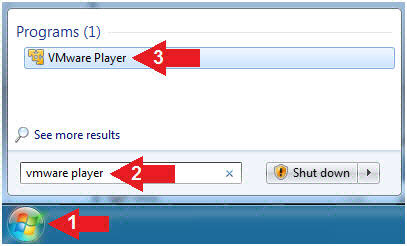
- For Windows 7
- Click Start Button
- Search for "vmware player"
- Click VMware Player
- For Windows XP
- Starts --> Programs --> VMware Player
- For Windows 7

- Instructions
- Start Up Damn Vulnerable WXP-SP2.
- Instructions:
- Click on Damn Vulnerable WXP-SP2
- Click on Edit virtual machine Settings
- Note(FYI):
- For those of you not part of my class, this is a Windows XP machine running SP2.
- Instructions:
- Edit Virtual Machine Settings
- Instructions:
- Click on Network Adapter
- Click on the Bridged Radio button
- Click on the OK Button

- Instructions:
- Play Virtual Machine
- Instructions:
- Click on Damn Vulnerable WXP-SP2
- Click on Play virtual machine

- Instructions:
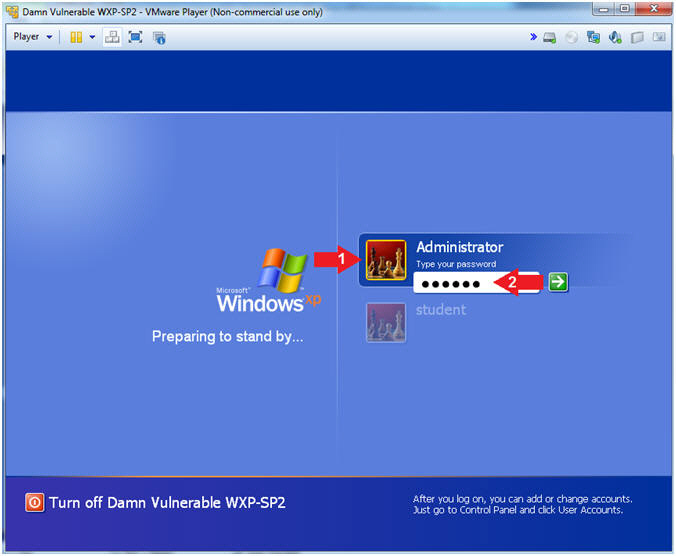
- Login to Windows
- Instructions:
- Click on Administrator
- Type your password: <Supply Password>
- Instructions:
- Open a Command Prompt
- Instructions:
- Start --> All Programs --> Accessories --> Command Prompt
- Instructions:
- Obtain Damn Vulnerable WXP-SP2's IP Address
- Instructions:
- ipconfig
- Note(FYI):
- In my case, Damn Vulnerable WXP-SP2's IP Address 192.168.1.116.
- In your case, Damn Vulnerable WXP-SP2's IP Address might be different.

- Instructions:
| Section 2: Download and Install WinAudit |
- Open Firefox
- Instructions:
- Start --> All Programs --> Mozilla Firefox

- Instructions:
- Download WinAudit
- Instructions:
- Navigate to the below URL.
- http://www.computersecuritystudent.com/FORENSICS/Windows/Miscellaneous/lesson1/WinAudit.zip
- Click Save File Radio Button
- Click the OK Button
- Navigate to the below URL.

- Instructions:
- Save WinAudit
- Instructions:
- Navigate to Desktop --> My Documents --> Downloads
- File name: WinAudit
- Click the Save Button.

- Instructions:
- Download complete
- Instructions:
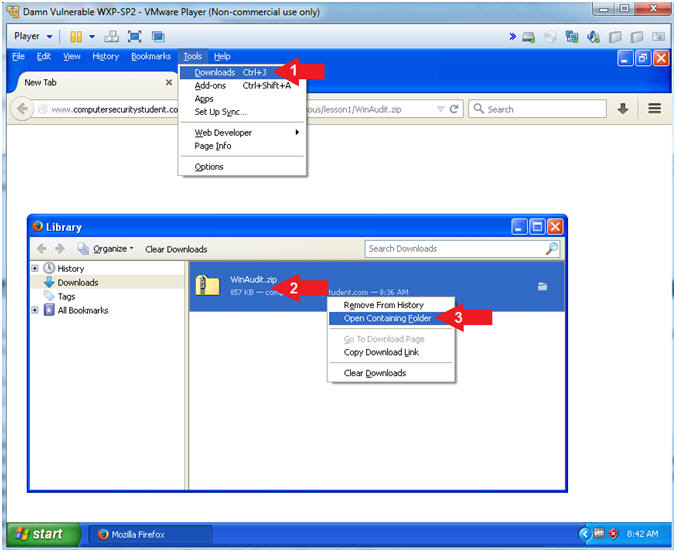
- Click Tools --> Downloads
- Right Click on WinAudit.zip
- Open Containing Folder

- Instructions:
- Extract All...
- Instructions:
- Right Click on WinAudit.zip
- Click on Extract All...

- Instructions:
- Extraction Wizard
- Instructions:
- Click the Next Button

- Instructions:
- Select Folder
- Instructions:
- Click the Next Button

- Instructions:
- Successfully Installed
- Instructions:
- Click the Finish Button

- Instructions:
| Section 3: Download and Install WinAudit |
- Install Winaudit
- Instructions:
- Navigate to C:\tools\winaudit
- Right Click on WinAudit.exe
- Click on Open

- Instructions:
- Open File - Security Warning
- Instructions:
- Click the Run Button
- Instructions:
| Section 4: Audit Your Computer |
- Audit Your Computer
- Instructions:
- Click on Here (See Below).

- Instructions:
| Section 5: System Overview |
- System Overview
- Instructions:
- Click on System Overview.

- Instructions:
| Section 6: Installed Software |
- Click on Installed Programs
- Instructions:
- Go To: Installed Software --> Active Setup
- Note(FYI):
- Notice you will see a list of programs.
- There will be a matrix for each program that will contain: Name, Vendor, Version, etc.

- Instructions:
| Section 4: Security Settings |
- Internet Software
- Instructions:
- Go To: Security --> Internet Software
- Note(FYI):
- Notice that this computer has an outdated Internet Explo[d]er browser running at version 6. (Below are some possible exploits.)
- Metasploit windows/browser/ms10_002_aurora: How To Crash Internet Exploder 6
- Metasploit: windows/browser/ms10_002_aurora: exploit, migrate, keylogrecorder, scraper, metsvc
- Instructions:
- Open Ports
- Instructions:
- Go To: Security --> Open Ports
- Note(FYI):
- For each open port listed below, a table of information will display the following data: Protocol, Address, Name, Connection State, Process Name, Manufacture, etc.

- Instructions:
- Security Settings
- Instructions:
- Go To: Security --> Security Settings
- Note(FYI):
- Below you can see various basic security settings: Screen Saver, Password Length, Password Age, Internet Explorer, etc.
- Notice the following issues: (1) the screen saver password is not set, (2) automatic updates are turned off, (3) minimum password length can be set to nothing, (4) lockout attempts are disabled, (5) ActiveX is allowed, etc.
- Instructions:
- Shared Permissions
- Instructions:
- Go To: Security --> Shared Permissions
- Note(FYI):
- Below there are three folders that are shared: (1) ADMIN$, C$, and IPC$.
- The entire Hard drive is shared out to everyone.

- Instructions:
- Windows Firewall
- Instructions:
- Go To: Security --> Windows Firewall
- Note(FYI):
- Notice that the Firewall is not enabled. In addition, both Remote Assistance and Remote Desktop are enabled.
- Instructions:
| Section 5: Running Programs |
- Running Programs
- Instructions:
- Go To: Running Programs
- Note(FYI):
- This section produces a list of running programs.
- Notice that both telnet and vnc are running. Telnet is susceptible to sniffer attacks. VNC could be a problem if authentication is not set.
- Instructions:
| Section 6: Hardware Devices |
- Hardware Devices
- Instructions:
- Go To: Hardware Devices
- Note(FYI):
- Notice under the Hardware device tree their is a list of devices and peripherals.
- For a Forensics investigation, you will need take physical pictures of all peripheral devices attached to the computer. Then you will need to collect a software inventory, like below, where you record the device type, description, manufacture, driver version, etc.

- Instructions:
| Section 7: Save the WinAudit Report |
- Save WinAudit Report
- Instructions:
- Go To: File --> Save

- Instructions:
- Saving
- Instructions:
- Navigate to Desktop --> My Documents
- Filename: WXPSP2-20121219
- Remember to change your date, where the format is YYYYMMDD. (YYYY = year, MM = month, DD = day).
- Save as type: CSV
- I chose CSV (Comma Separated Value) because this format can easily be parsed into stuffed into a database in a hurry.
- Click the Save Button

- Instructions:
| Section 8: Proof of Lab |
- Open a Command Prompt
- Instructions:
- Start --> All Programs --> Accessories --> Command Prompt
- Instructions:
- Proof of Lab
- Instructions:
- cd "My Documents"
- dir WXPSP2-20121219.csv
- Remember that your filename will probably be different.
- date /t
- echo "Your Name"
- Replace the string "Your Name" with your actual name.
- e.g., echo "John Gray"
-
Proof of Lab Instructions
- Press both the <Ctrl> and <Alt> keys at the same time.
- Do a <PrtScn>
- Paste into a word document
- Upload to Moodle

- Instructions:


