(Volatility 2.2: Lesson 3)
{ Analyzing the Memory Dump of a MS10-061 Attack }
| Section 0. Background Information |
- What is the scenario?
- In the pre-requisite lesson we learned how a malicious perpetrator was able to connected to a shared printer and later gain Administrator privilege to that machine. During the attack we were able to use Helix to remotely copy its' memory to our Kali Forensics machine. Now we are (1) going to use Volatility to analyze its' memory, (2) objdump to analyze the backdoor executable created by ms10_061_spoolss, and (3) BitDefender to scan the backdoor executable.
- What is the Microsoft Print Spooler Service
Impersonation Vulnerability?
- The ms10_061_spoolss module exploits the
RPC service impersonation vulnerability detailed in Microsoft Bulletin
MS10-061. By making a specific DCE RPC request to the StartDocPrinter
procedure, an attacker can impersonate the Printer Spooler service to
create a file. The
working directory at the time is %SystemRoot%\system32. An attacker
can specify any file name, including directory traversal or full
paths. By sending WritePrinter requests, an attacker can fully
control the content of the created file. In order to gain code
execution, this module writes to a directory used by Windows
Management Instrumentation (WMI) to deploy applications. This
directory (Wbem\Mof) is periodically scanned and any new .mof files
are processed automatically. This is the same technique employed by
the Stuxnet code found in the wild.
- The ms10_061_spoolss module exploits the
RPC service impersonation vulnerability detailed in Microsoft Bulletin
MS10-061. By making a specific DCE RPC request to the StartDocPrinter
procedure, an attacker can impersonate the Printer Spooler service to
create a file. The
- What is Volatility 2.2?
- Volatility now supports Linux memory dumps in raw or LiME format and includes 35+ plugins for analyzing 32-bit and 64-bit Linux kernels from 2.6.11 - 3.5.x and distributions such as Debian, Ubuntu, OpenSuSE, Fedora, CentOS, and Mandrake. Official OSX and Android support are coming!
- Volatility supports memory dumps from all major 32-bit and 64-bit Windows versions and service packs including XP, 2003 Server, Vista, Server 2008, Server 2008R2, and 7.
- Whether your memory dump is in raw format, a Microsoft crash dump, hibernation file, or virtual machine snapshot, Volatility is able to work with it.
- Reference: http://code.google.com/p/volatility/
-
What is objdump?
- objdump is a program that is used for displaying various information about object files. It can be used as a disassembler to view executable in assembly form.
- What is BitDefender (bdscan)?
- Bitdefender (bdscan) is an anti-virus scanner for both the Unix and Linux environments with the capabilities to detect and remove Trojans, rootkits, rogues, aggressive adware, spam and much more.
- Pre-Requisite
- Metasploit: MS10-061: Kali 1.0: Detect NetBIOS Printer Shares, Gain Access, and Obtain Forensic Files
- Kali: Lesson 4: Install BitDefender
- References
-
Lab Notes
- In this lab we will do the following:
- Determine Volatility Profile
- Examine Network Connections
- Associate Suspicious Network Connections to Process IDs
- Associate Filenames to Process IDs
- Associate DLLs to Backdoor Executable
- Scan Backdoor Executable
- In this lab we will do the following:
- Legal Disclaimer
- As a condition of your use of this Web site, you warrant to computersecuritystudent.com that you will not use this Web site for any purpose that is unlawful or that is prohibited by these terms, conditions, and notices.
- In accordance with UCC § 2-316, this product is provided with "no warranties, either express or implied." The information contained is provided "as-is", with "no guarantee of merchantability."
- In addition, this is a teaching website that does not condone malicious behavior of any kind.
- You are on notice, that continuing and/or using this lab outside your "own" test environment is considered malicious and is against the law.
- © 2016 No content replication of any kind is allowed without express written permission.
| Section 1: Login to BackTrack |
- Open VMware Player on your windows machine.
- Instructions:
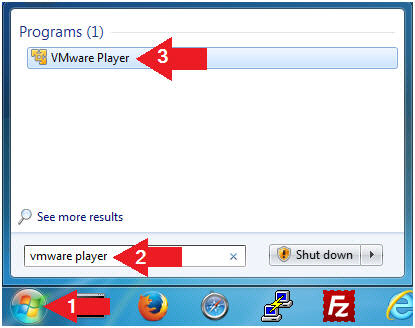
- Click the Start Button
- Type "vmware player" in the search box
- Click on VMware Player
- Instructions:
- Edit Virtual Machine Settings
- Instructions:
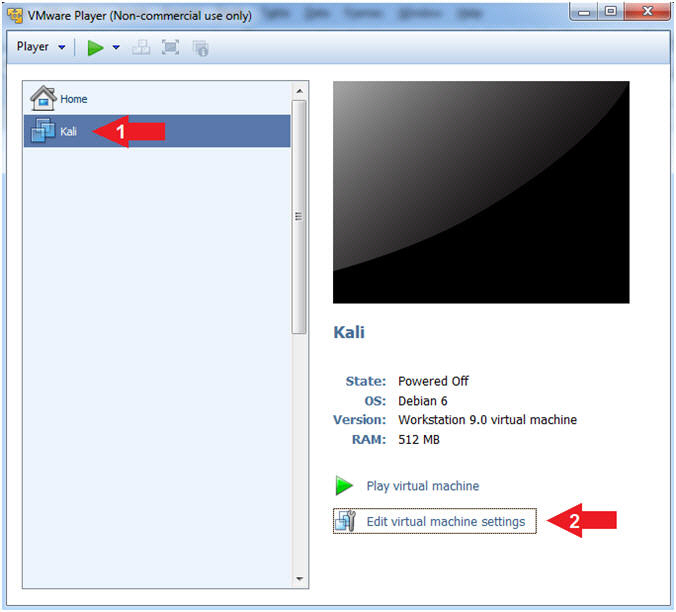
- Click on Kali
- Edit Virtual Machine Settings
- Note:
- Before beginning a lesson it is necessary to check the following VM settings.
- Instructions:
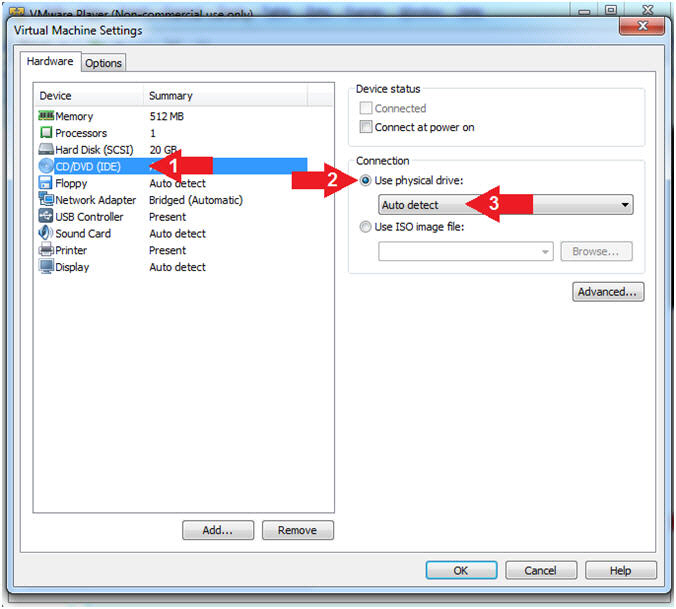
- Configure CD/DVD
- Instructions:
- Click on CD/DVD (IDE)
- Click on the radio button "Use physical drive:"
- Select Auto detect
- Instructions:
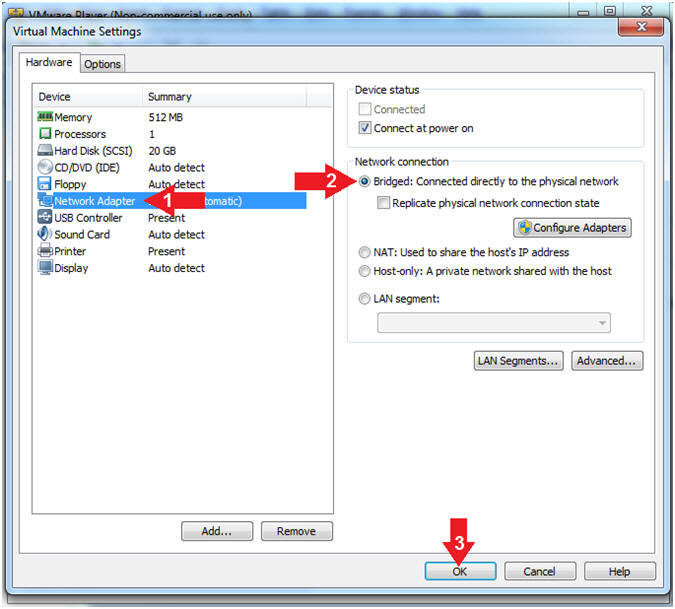
- Set Network Adapter
- Instructions:
- Click on Network Adapter
- Click on the radio button "Bridged: Connected directly to the physical network".
- Click the OK Button
- Instructions:
| Section 2: Play and Login to Kali |
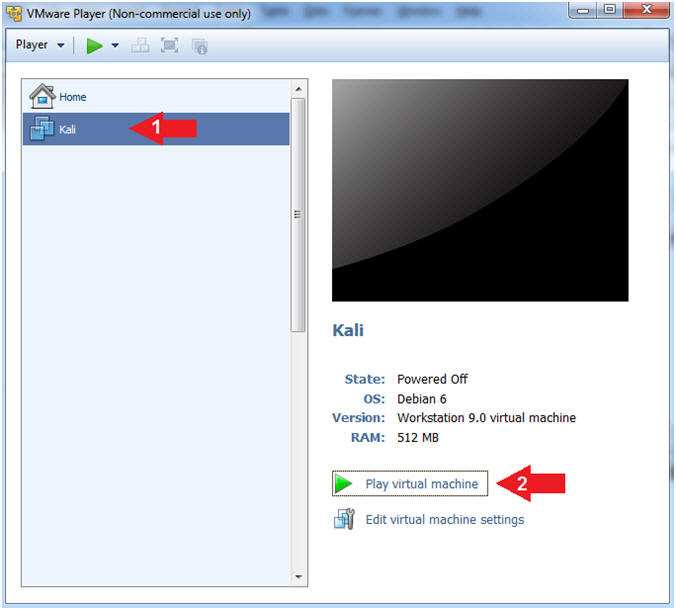
- Start Up Kali
- Instructions:
- Click on Kali
- Play virtual machine
- Instructions:
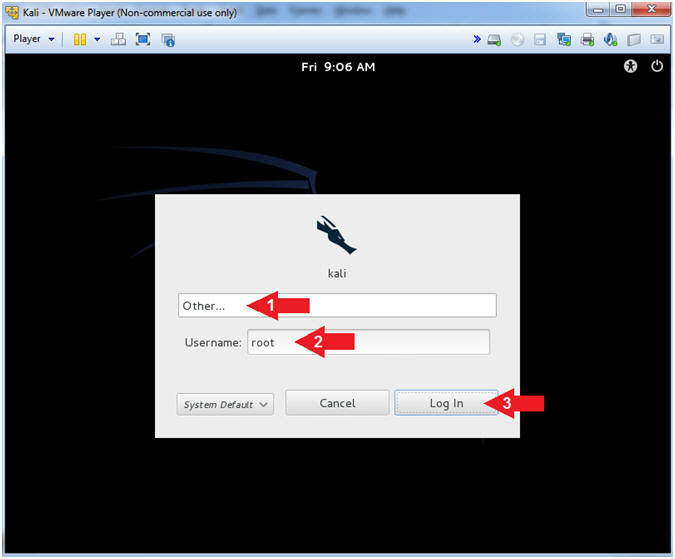
- Supply Username
- Instructions:
- Click Other...
- Username: root
- Click the Log In Button
- Instructions:
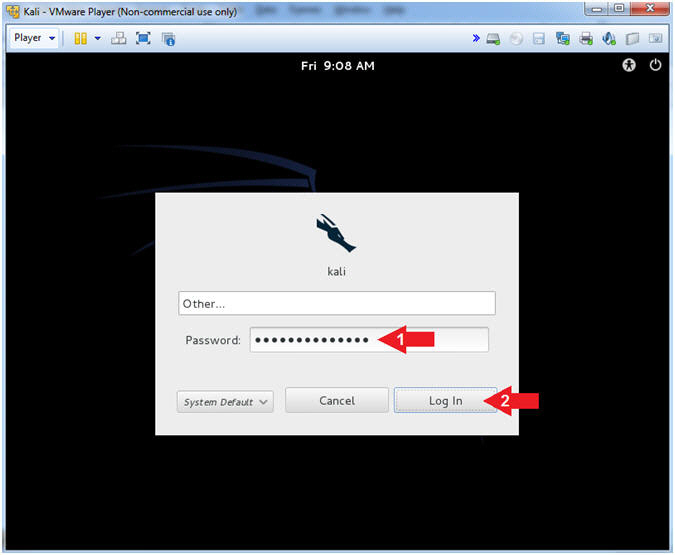
- Supply Password
- Instructions:
- Password: <Provide you Kali root password>
- Click the Log In Button
- Instructions:
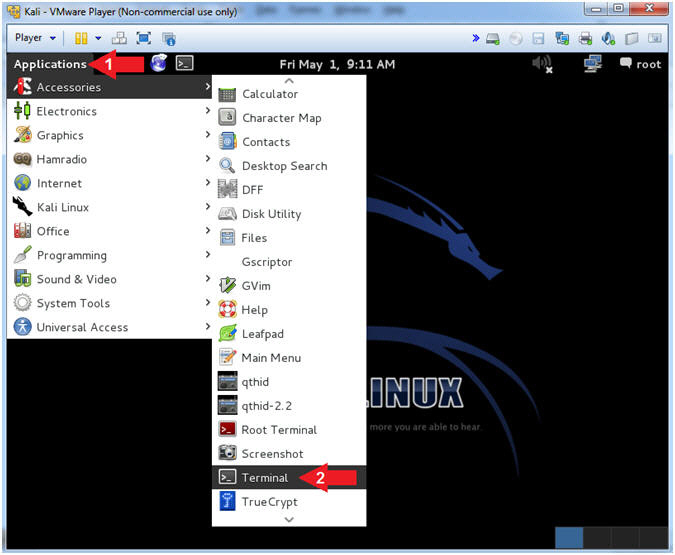
- Open a Terminal Window
- Instructions:
- Click on Applications
- Accessories --> Terminal
- Instructions:
- Obtain Kali's IP Address
- Instructions:
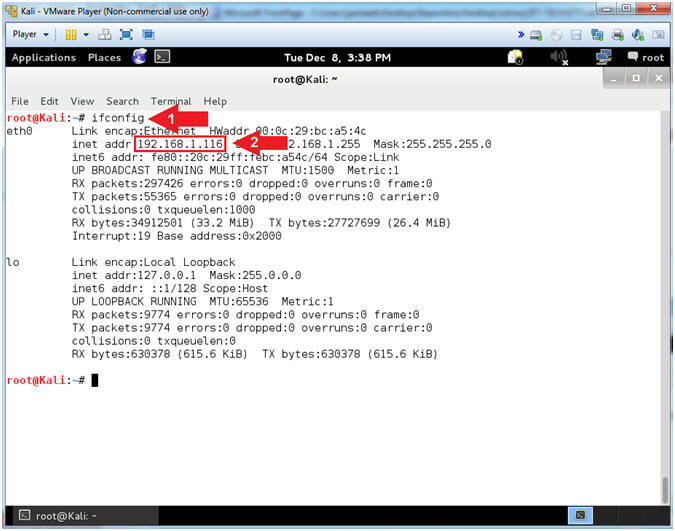
- ifconfig
- Record your IP Address
- Note(FYI):
- Command #1, ifconfig is used to display Kali's IP Address.
- Command #2, Record Your IP Address.
- Mine is 192.168.1.116.
- Yours will probably be different.
- Instructions:
| Section 3: Set Volatility Execute Permissions |
- Setting Volatility File Permissions
- Instructions:
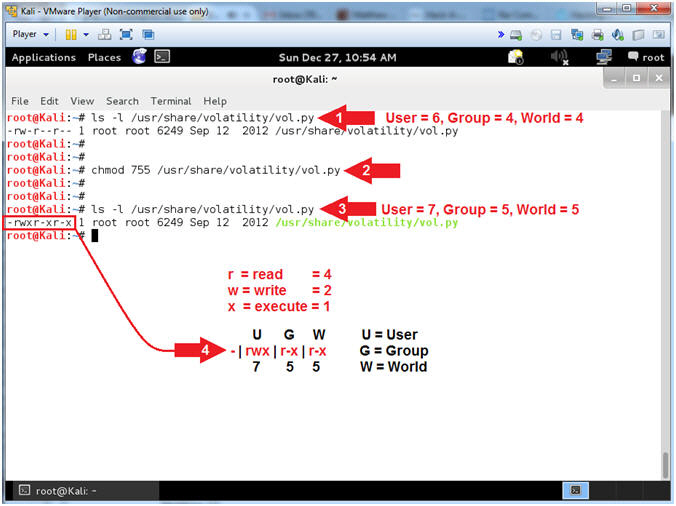
- ls -l /usr/share/volatility/vol.py
- chmod 755 /usr/share/volatility/vol.py
- ls -l /usr/share/volatility/vol.py
- Notice the permission are set to 755 (See Picture)
- Note(FYI):
- Command #1, Use (ls -l) to list the file details of vol.py. Notice permission are set to 644, and the the execute (x) bit is not set.
- Command #2, Use (chmod) to give the User, Group and World execute permissions.
- Command #3-4, Use (ls -l) to display the vol.py file permissions. Notice, that User, Group and World all have the execute (x) bit set.
- Instructions:
| Section 4: Set Volatility Environmental PATH Variable. |
- Setting Volatility Environmental PATH
- Instructions:
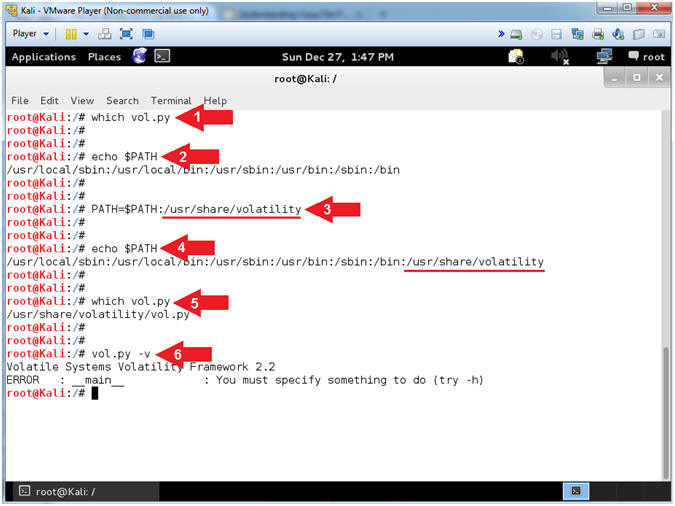
- which vol.py
- echo $PATH
- PATH=$PATH:/usr/share/volatility
- echo $PATH
- which vol.py
- vol.py -v
- Note(FYI):
- Command #1, Use (which) to view the full file path location of vol.py. Nothing is returned, which means the operating system does not know where vol.py is located.
- Command #2, The PATH variable is an environment variable that contains a colon-delimited list of system directories. The directories are where commands are located, so that when you type a command, those directories are where the system searches for it.
- Command #3, vol.py is located in (/usr/share/volatility). Therefore, we add (/usr/share/volatility) to the PATH variable so the operating system knows where vol.py is located.
- Command #4, Notice the (which) now returns the full path name of where vol.py is located.
- Command #5, Just to make sure, we issue the command (vol.py -v) to make sure Volatility can run. The (-v) flag tells Volatility to display its' version number.
- Instructions:
| Section 5: Determine Volatility Profile |
- View Forensic Files
- Instructions
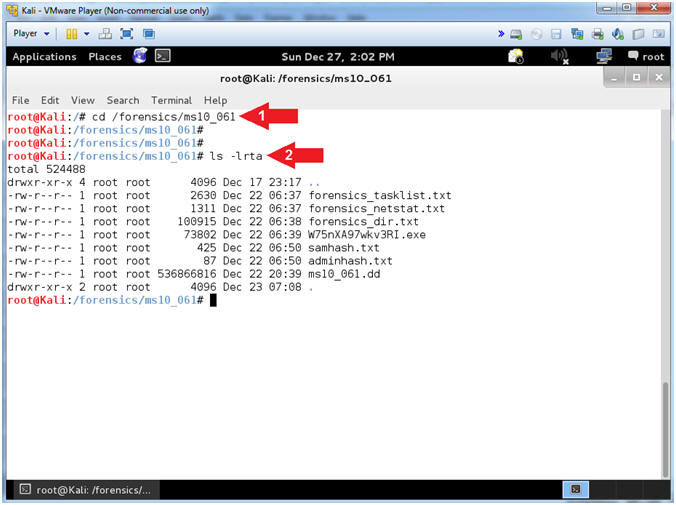
- cd /forensics/ms10_061
- ls -lrta
- Note(FYI):
- If your (/forensics/ms10_061) directory does not contain all the below files, then you will need to complete the following lesson before continuing this lesson. Note: Your executable will be named differently than mine (W75nXA97wkv3RI.exe).
- Metasploit: MS10-061: Kali 1.0: Detect NetBIOS Printer Shares, Gain Access, and Obtain Forensic Files
- Determine Which Profile to Use
- Instructions
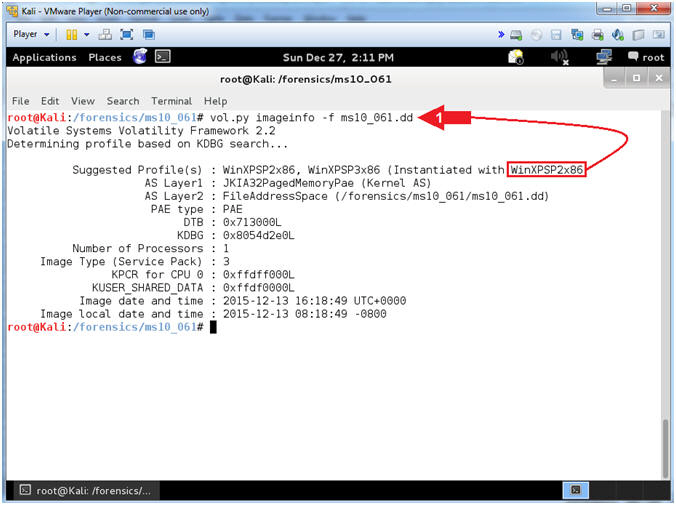
- vol.py imageinfo -f ms10_061.dd
- Note(FYI):
- Command #1, ask Volatility to identify the Operating System Version of the image (ms10_061.dd).
| Section 5: Associate Network Connections to Processes |
- Display Network Connections
- Instructions
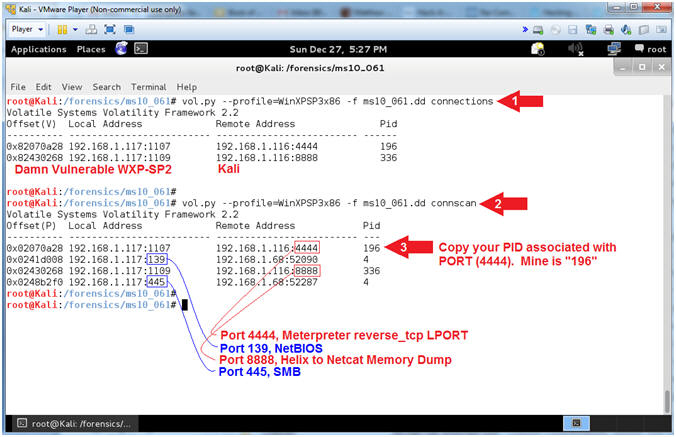
- vol.py --profile=WinXPSP3x86 -f ms10_061.dd connections
- vol.py --profile=WinXPSP3x86 -f ms10_061.dd connscan
- Copy your PID associated with PORT
(4444).
- Mine is 196.
- Note(FYI):
- Command #1, Use (connections)
to view the active connections.
- In my case, the local address (192.168.1.117) belongs to Damn Vulnerable WXP-SP2 and the remote address (192.168.1.116) belongs to Kali.
- Command #2, Use (connscan)
to view both active and terminated connections.
- Port 4444, belongs to the reverse_tcp LPORT Meterpreter sessions running on Kali.
- Port 139, belongs to NetBIOS running on Damn Vulnerable WXP-SP2. NetBIOS is used by attackers to probe for file, folder, device and printer shares.
- Port 8888, belongs to the netcat session on Kali that received Helix's memory dump.
- Port 445, belongs to SMB running on Damn Vulnerable WXP-SP2. The SMB (Server Message Block) protocol is used among other things for file sharing in Windows NT/2K/XP.
- Viewing Processes with
pslist
- Note(FYI):
- Below replace PID(196) with your PID associated with Port(4444) in the previous step.
- Instructions
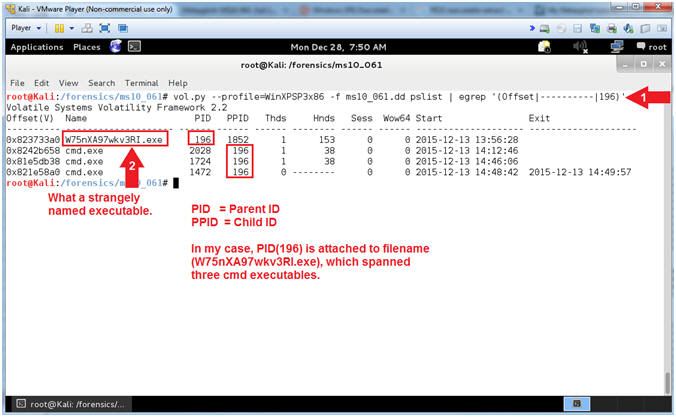
- vol.py --profile=WinXPSP3x86 -f ms10_061.dd pslist | egrep '(Offset|----------|196)'
- Notice the strangely named executable (W75nXA97wkv3RI.exe) associated with PID(196).
- Note(FYI):
- Command #1, Use (pslist) to list the processes of a system. Note, the (-p PID) flag only returns one line, which is the reason I use egrep. E.g., vol.py --profile=WinXPSP3x86 -f ms10_061.dd pslist -p 196
- Step #2, Typically processes do not listen on Port(4444). Another red flag is that it is strangely named. In addition, strangely named executables to now spawn off three Command Prompts (cmd.exe).
- Viewing Processes with
pstree
- Note(FYI):
- Below replace PID(196) with your PID associated with Port(4444) in the previous step.
- Instructions
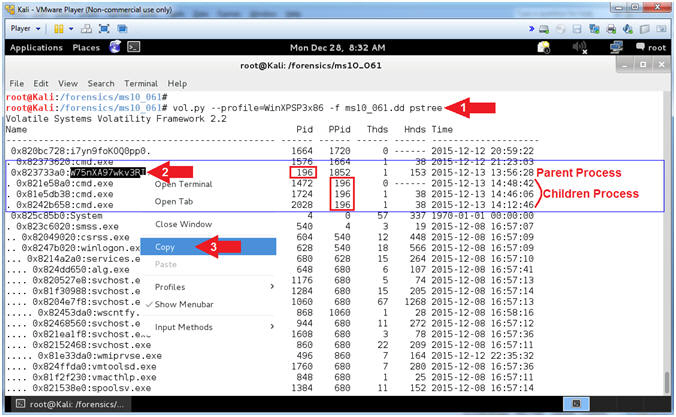
- vol.py --profile=WinXPSP3x86 -f ms10_061.dd pstree
- Locate, Highlight, and Right Click the strangely name executable. In my case, it is name (W75nXA97wkv3RI).
- Select Copy
- Note(FYI):
- Command #1, Use (pstree) to view the process list in tree form. Child process are indicated using indention and periods.
- Viewing Processes with
dlllist
- Note(FYI):
- Below replace (W75nXA97wkv3RI) with your strangely named executable that you copied in the previous step.
- Instructions
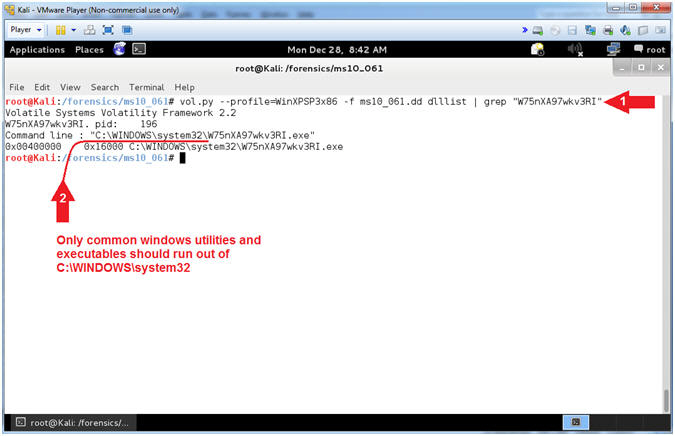
- vol.py --profile=WinXPSP3x86 -f ms10_061.dd dlllist | grep "W75nXA97wkv3RI"
- Notice that the strangely named executable is running out of C:\WINDOWS\system32
- Note(FYI):
- Command #1, Use (dlllist) to display a process's loaded DLLs.
- Step #2, Just to recap, we know there is a strangely named executable (W75nXA97wkv3RI) that is attached PID(196) that is connected to a remote IP address (Kali[192.168.1.116]) on Port(4444). On top of that, a glaring red flag is that the strangely named executable is running out of C:\WINDOWS\system32. This directory (C:\WINDOWS\system32) should only contain Microsoft specific utilities (Executables) and Libraries (DLLs).
- To get a comprehensive list of allowed utilities and libraries, see the following link.
| Section 6: Associate File to DLLs |
- Viewing DLLs with
objdump
- Note(FYI):
- Replace (W75nXA97wkv3RI.exe) with your strangely named executable.
- Instructions
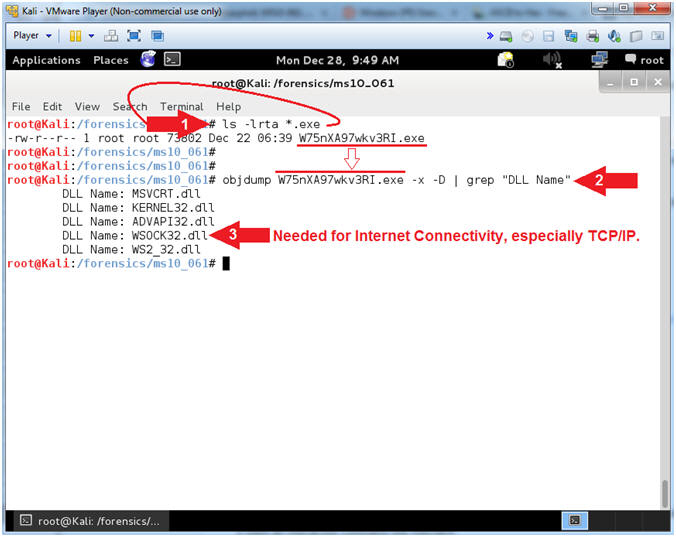
- ls -lrta *.exe
- objdump W75nXA97wkv3RI.exe -x -D | grep "DLL Name"
- WSOCK32.dll is a Windows Library that is used for Internet Connectivity, especially for TCP/IP.
- Note(FYI):
- Command #1, Use (ls -lrta *.exe) to only list executables in the forensics directory (/forensics/ms10_061).
- Command #2, Among other things, command (objdump) is used view which object files and libraries (DLLs) are used by a program. In this case, I am asking objdump to show me all the DLLs that are accessed by (W75nXA97wkv3RI.exe).
- Step #3, I bring extra attention to WSOCK32.dll because this DLL is required for Internet Connectivity.
| Section 7: Searching for Hidden Malware in Memory |
- Analyze Process IDs with malfind
- Instructions
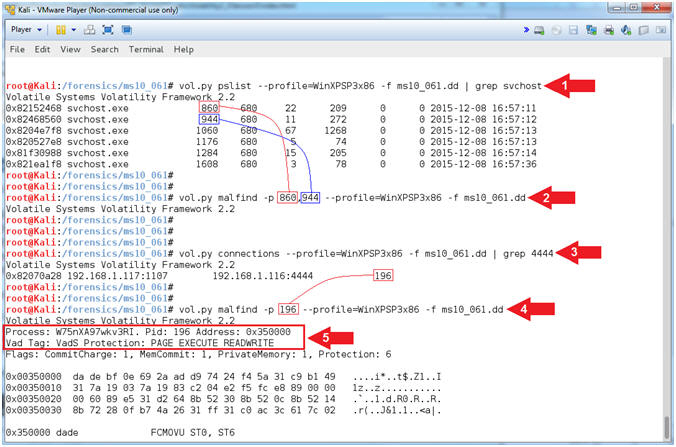
- vol.py pslist --profile=WinXPSP3x86 -f ms10_061.dd | grep svchost
- vol.py
malfind -p 860,944
--profile=WinXPSP3x86 -f ms10_061.dd
- Replace (860) with your first svchost.exe PID. (See Picture)
- Replace (944) with your second svchost.exe PID. (See Picture)
- vol.py connections --profile=WinXPSP3x86 -f ms10_061.dd | grep 4444
- vol.py
malfind -p (196)
--profile=WinXPSP3x86 -f ms10_061.dd
- Replace (196) with your PID associated with Port 4444. (See Picture)
- Notice that malfind found suspicious memory that has the ability to read, write and execute.
- Note(FYI):
- Command #1, We use (pslist) and (grep) to search for only svchost processes. svchost.exe (Service Host, or SvcHost) is a system process that hosts multiple Windows services.
- Command #2, We use (malfind) to search for hidden or injected code/DLLs in user mode memory, based on characteristics such as VAD tag and page permissions. Notice no results were found, because malfind did not detect any malware hidden in memory.
- Command #3, We use (connections) and (grep) to search for only network connections that contain the string (4444) to represent port/4444.
- Command #4-5, This time (malfind) displays a lot of results. Notice the PID(196) is associated with (W75nXA97wkv3RI.exe) and its' VAD Tag Character has the ability to read, write and execute instruction from its' particular memory location. VAD refers to the Virtual Address Descriptor for the Windows Memory Tree Structure.
| Section 8: Scan Executable with BitDefender |
- Scan Executable with
BitDefender
- Note(FYI):
- Replace (W75nXA97wkv3RI.exe) with your strangely named executable.
- Instructions
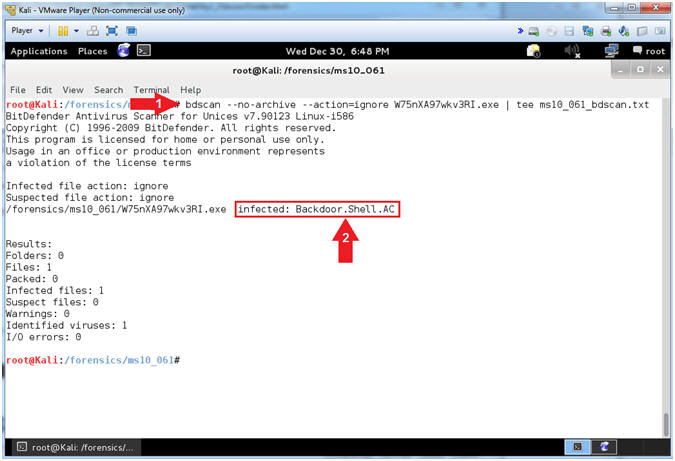
- bdscan --no-archive --action=ignore W75nXA97wkv3RI.exe | tee ms10_061_bdscan.txt
- Notice that BitDefender flags (W75nXA97wkv3RI.exe) as an infected Backdoor.Shell.AC.
- Note(FYI):
- Command #1, bdscan is BitDefender's command line Antivirus Scanner for Unices. The flag (--no-archive) specifies that bdscan should not scan inside archives. The flag (--action=ignore) specifies even if an infected object is found, BitDefender will just report them and no action will be performed. Finally, we pipe (|) the output to tee to (1) display the results to the screen and (2) and to log those results to a file (ms10_061_bdscan.txt).
| Section 9: Extract Administrator Password from Registry |
- Retrieved Encrypted Passwords with
hivelist and hashdump
- Note(FYI):
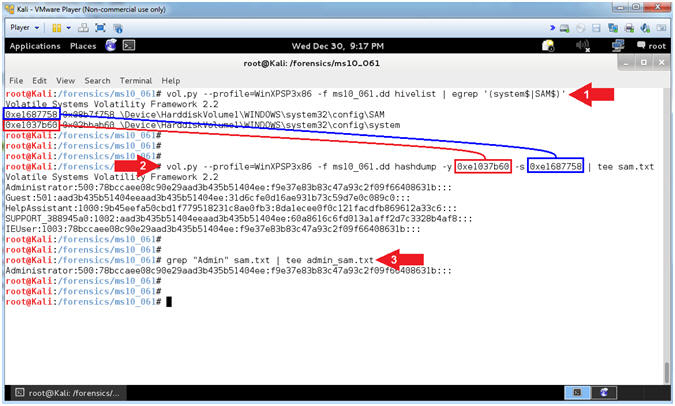
- Replace the below virtual address (0xe1037b60) of the system registry key with your virtual address. (See Picture)
- Replace the below virtual address (0xe1687758) of the SAM registry key with your virtual address. (See Picture)
- Instructions
- vol.py --profile=WinXPSP3x86 -f ms10_061.dd hivelist | egrep '(system$|SAM$)'
- vol.py --profile=WinXPSP3x86 -f ms10_061.dd hashdump -y 0xe1037b60 -s 0xe1687758 | tee sam.txt
- grep "Admin" sam.txt | tee admin_sam.txt
- Note(FYI):
- Command #1, Use (hivelist) to locate the virtual addresses of registry hives in memory, and the full paths to the corresponding hive on disk.
- Command #2, Use (hashdump) to extract and decrypt cached domain credentials stored in the registry.
- Command #3, Use (grep) to search the file (sam.txt) and display the results.
- Command #2-3, Use (tee) to display the results of the above commands and write those results into their output files (sam.txt and admin_sam.txt)
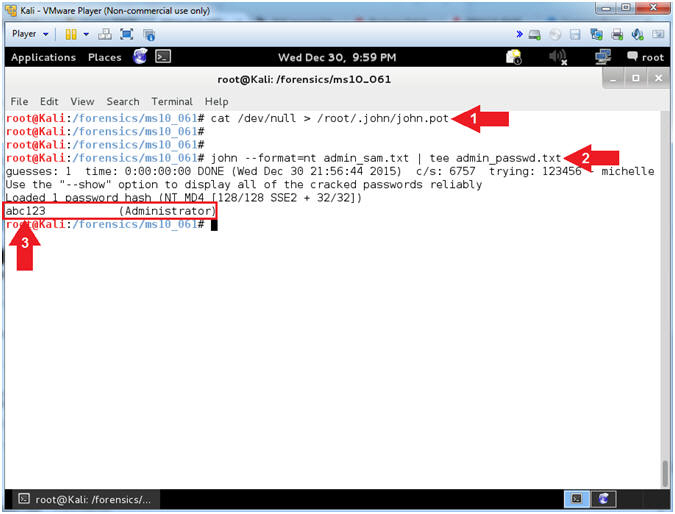
- Crack Admin Password with John The Ripper
- Instructions
- cat /dev/null > /root/.john/john.pot
- john --format=nt admin_sam.txt | tee admin_passwd.txt
- Notice that John The Ripper easily crack the Administrator password (abc123).
- Note(FYI):
- Command #1, Use cat and the null device (/dev/null) to clear out the (john.pot) file by redirecting (>) null output into it. The (john.pot) file contains previously guessed passwords. If the password has already been correctly guessed, then the password will not be displayed, unless you use the (--show) flag.
- Command #2, use (john) to attempt to crack the Administrator password. Use the flag (--format=nt) to tell (john) that the password is using a Windows(nt) cipher.
| Section 10: Proof of Lab |
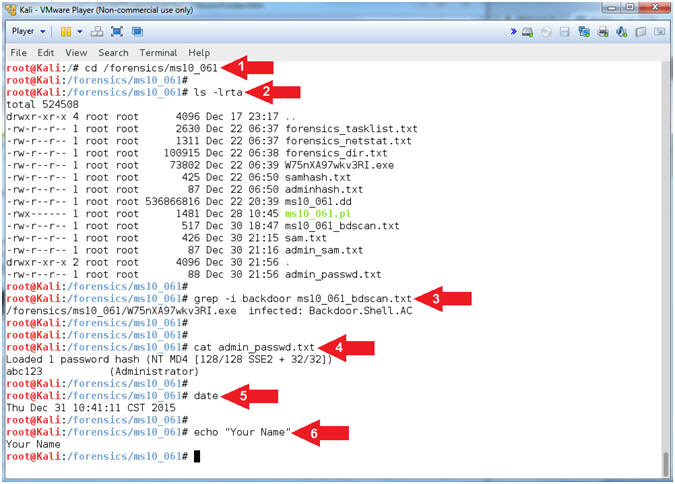
- Proof of Lab
- Instructions
- cd /forensics/ms10_061
- ls -lrta
- grep -i backdoor ms10_061_bdscan.txt
- cat admin_passwd.txt
- date
- echo "Your Name"
- Put in your actual name in place of "Your Name"
- e.g., echo "John Gray"
-
Proof Of Lab Instructions:
- Do a PrtScn of the below commands
- Paste into a word document
- Upload to Moodle
- Instructions